一、在实际的开发当中,弹窗是少不了的,默认系统的弹窗样式太丑,难以满足项目的实际需求,所以需要自己定义弹窗组件,把弹窗组价定义为全局的,这样减少每次使用的时候引入麻烦,节省开发时间。本文将分享如何定义一个全局的弹窗组件。下边开始上代码。
二、实际代码如下:
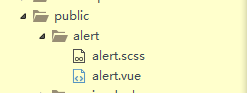
1.在components目录下的public目录新建一个文件夹alert,然后新建两个文件alert.vue和alert.scss。组件的样式代码我喜欢跟组件放到一起,这样按模块去划分管理。公共的样式就放到公共的样式文件里就行了。
2.alert.vue代码如下
<template>
  <div class="alertModal" ref="alert">
    <!--social post弹框-->
      <transition name="fade">
          <div v-if="modelFlag==1" class="alertbox">
            <div class="alert-dialog">
              <div class="alert-content">
                <div class="alert-header">
                    <span  class="alertclose" @click="close">×</span>
                    <span class="alert-title">
                       {{modelTitle}}
                    </span>
                </div>
                <div class="alert-body">
                    {{modelContent}}
                </div>
                <div class="alert-footer">
                    <button class="alertbtn"  @click="close">{{modelClose}}</button>
                    <button class="alertbtn alert-info" @click="submit">{{modelSave}}</button>
                </div>
              </div>
            </div>
        </div>
      </transition>
      <div v-if="modelFlag==1" class="modal-backdrop"></div>
  </div>
</template>

<script>

export default {
    data(){
        return{
            modelFlag:0,//0为消失,1为显示
            modelTitle:'Alert',//弹窗标题
            modelClose:'取消',//取消按钮文字
            modelContent:'',//弹窗内容
            modelSave:'确定',//确定按钮文字
            callBack:null,//是否需要回调函数
        }
    },
    methods:{
        //回调函数
        doCallBack(){
            if(typeof this.callBack == 'function'){
                this.callBack()
                this.callBack=null;
            }
        },
        //关闭弹窗,数据重置
        close(){
           this.modelFlag=0;
           this.modelTitle='Alert';
           this.modelClose='取消';
           this.modelContent='';
           this.modelSave='确定';
           this.callBack=null;
        },
        //点击确定按钮弹窗消失
        submit(){
            this.doCallBack()
            this.close()
        },
        //显示弹窗,记性复制
        show(options){
            if(this.modelFlag==1){return};
            this.modelTitle=options.modelTitle||this.modelTitle;
            this.modelContent=options.modelContent;
            this.modelFlag=1;
            this.modelSave=options.modelSave||this.modelSave;
            this.modelClose=options.modelClose||this.modelClose;
            if(options.callBack){
                this.callBack=options.callBack;
            }
        },
    },
    watch:{

    }
}
</script>

<!-- Add "scoped" attribute to limit CSS to this component only -->
<style lang="sass" scoped>
@import 'alert.scss'
</style>
3.在App.vue中引入组件并注册,
import alert from 'components/public/alert/alert.vue'
mounted(){
        Vue.prototype.$alert=this.$refs.alert;
    },
  components:{
      alert
  }
<alert ref='alert'></alert>
在外层div下加上组件。
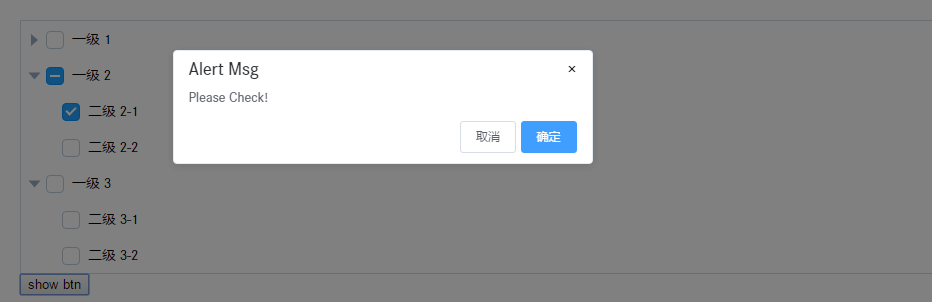
4.使用弹窗
比如我在一个页面那里点击一个button然后调用显示这弹窗,则:
<button @click="showalert">show alert</button>
methods:{
        showalert(){
               this.$alert.show({modelTitle:"Alert Msg",
                          modelContent:'Please Check!'})
        }
    },
this.$alert.show({modelTitle:"Alert Msg",modelContent:'Please Check!'}),show方法里边传一个对象,里边是相应的配置。
这样就可以使用啦!
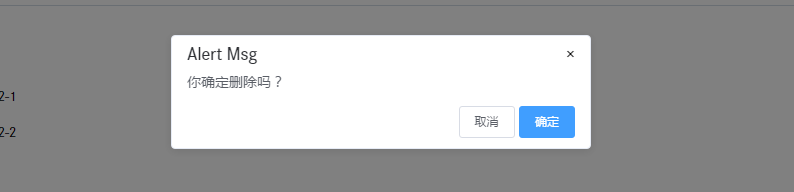
5.使用confirm功能,在对象里加入callBack回调函数:
showalert(){
               this.$alert.show({modelTitle:"Alert Msg",modelContent:'你确定删除吗?',callBack:()=>{
                   alert(1)
               }})
        }
结果如下:
6.最后附上样式代码
.modal.fade .alert-dialog {
  -webkit-transition: -webkit-transform .3s ease-out;
       -o-transition:      -o-transform .3s ease-out;
          transition:         transform .3s ease-out;
  -webkit-transform: translate(0, -25%);
      -ms-transform: translate(0, -25%);
       -o-transform: translate(0, -25%);
          transform: translate(0, -25%);
}
.modal.in .alert-dialog {
  -webkit-transform: translate(0, 0);
      -ms-transform: translate(0, 0);
       -o-transform: translate(0, 0);
          transform: translate(0, 0);
}
.alertbox{
    position: fixed;
    top: 0;
    bottom: 0;
    left: 0;
    right: 0;
    text-align: center;
    z-index: 99999;
}
.alert-dialog{
    display: inline-block;
    width: 420px;
    padding-bottom: 10px;
    vertical-align: middle;
    background-color: #fff;
    border-radius: 4px;
    border: 1px solid #e6ebf5;
    font-size: 18px;
    box-shadow: 0 2px 12px 0 rgba(0,0,0,.1);
    text-align: left;
    overflow: hidden;
    backface-visibility: hidden;
    position: relative;
    top: 140px;
    padding: 10px 15px;
}
.modal-backdrop.fade {
  filter: alpha(opacity=0);
  opacity: 0;
}
.modal-backdrop.in {
  filter: alpha(opacity=50);
  opacity: .5;
}
.alert-footer{
    float: right;
    margin-top: 5px;
}
.alert-scrollbar-measure {
  position: absolute;
  top: -9999px;
  width: 50px;
  height: 50px;
  overflow: scroll;
}


.fade-enter-active, .fade-leave-active {
  transition: opacity .5s
}
.fade-enter, .fade-leave-to /* .fade-leave-active in <2.1.8 */ {
  opacity: 0
}
.modal-backdrop {
    position: fixed;
    top: 0;
    right: 0;
    bottom: 0;
    left: 0;
    z-index: 1040;
    background-color: #000;
    opacity: 0.5;
}

.el-icon-date{
    cursor: pointer;
}
.alert-header{

}
.alert-title{
    font-size: 18px;
    line-height: 1;
    color: #2d2f33;
}
.alert-body{
    padding: 10px 0px;
    color: #5a5e66;
    font-size: 14px;
    line-height: 17px;
}
.alertbtn{
    text-align: center;
    font-weight: 500;
    cursor: pointer;
    padding: 9px 15px;
    font-size: 12px;
    border-radius: 3px;
    line-height: 1;
    background: #fff;
    border: 1px solid #d8dce5;
    border-color: #d8dce5;
    color: #5a5e66;
}
.alert-info{
    color: #fff;
    background-color: #409eff;
    border-color: #409eff;
}
.alertclose{
    float: right;
    cursor: pointer;
}
希望对大家有用。