Nginx优化-配置参数优化上
https://coding.net/u/aminglinux/p/nginx/git/blob/master/optimize/nginx_opt.md

Nginx作为高性能web服务器,即使不特意调整配置参数也可以处理大量的并发请求。
以下的配置参数是借鉴网上的一些调优参数,仅作为参考,不见得适于你的线上业务。
worker进程
worker_processes
该参数表示启动几个工作进程,建议和本机CPU核数保持一致,每一核CPU处理一个进程。
worker_rlimit_nofile
它表示Nginx最大可用的文件描述符个数,需要配合系统的最大描述符,建议设置为102400。
还需要在系统里执行ulimit -n 102400才可以。
也可以直接修改配置文件/etc/security/limits.conf修改
增加:
#* soft nofile 655350 (去掉前面的#)
#* hard nofile 655350 (去掉前面的#)
worker_connections
该参数用来配置每个Nginx worker进程最大处理的连接数,这个参数也决定了该Nginx服务器最多能处理多少客户端请求
(worker_processes * worker_connections),建议把该参数设置为10240,不建议太大。
http和tcp连接
use epoll
使用epoll模式的事件驱动模型,该模型为Linux系统下最优方式。
multi_accept on
使每个worker进程可以同时处理多个客户端请求。
sendfile on
使用内核的FD文件传输功能,可以减少user mode和kernel mode的切换,从而提升服务器性能。
tcp_nopush on
当tcp_nopush设置为on时,会调用tcp_cork方法进行数据传输。
使用该方法会产生这样的效果:当应用程序产生数据时,内核不会立马封装包,而是当数据量积累到一定量时才会封装,然后传输。
tcp_nodelay on
不缓存data-sends(关闭 Nagle 算法),这个能够提高高频发送小数据报文的实时性。
(关于Nagle算法)
【假如需要频繁的发送一些小包数据,比如说1个字节,以IPv4为例的话,则每个包都要附带40字节的头,
也就是说,总计41个字节的数据里,其中只有1个字节是我们需要的数据。
为了解决这个问题,出现了Nagle算法。
它规定:如果包的大小满足MSS,那么可以立即发送,否则数据会被放到缓冲区,等到已经发送的包被确认了之后才能继续发送。
通过这样的规定,可以降低网络里小包的数量,从而提升网络性能。】
keepalive_timeout
定义长连接的超时时间,建议30s,太短或者太长都不一定合适,当然,最好是根据业务自身的情况来动态地调整该参数。
keepalive_requests
定义当客户端和服务端处于长连接的情况下,每个客户端最多可以请求多少次,可以设置很大,比如50000.
reset_timeout_connection on
设置为on的话,当客户端不再向服务端发送请求时,允许服务端关闭该连接。
client_body_timeout
客户端如果在该指定时间内没有加载完body数据,则断开连接,单位是秒,默认60,可以设置为10。
send_timeout
这个超时时间是发送响应的超时时间,即Nginx服务器向客户端发送了数据包,但客户端一直没有去接收这个数据包。
如果某个连接超过send_timeout定义的超时时间,那么Nginx将会关闭这个连接。单位是秒,可以设置为3。
buffer和cache(以下配置都是针对单个请求)
client_body_buffer_size
当客户端以POST方法提交一些数据到服务端时,会先写入到client_body_buffer中,如果buffer写满会写到临时文件里,建议调整为128k。
client_max_body_size
浏览器在发送含有较大HTTP body的请求时,其头部会有一个Content-Length字段,client_max_body_size是用来限制Content-Length所示值的大小的。
这个限制body的配置不用等Nginx接收完所有的HTTP包体,就可以告诉用户请求过大不被接受。会返回413状态码。
例如,用户试图上传一个1GB的文件,Nginx在收完包头后,发现Content-Length超过client_max_body_size定义的值,
就直接发送413(Request Entity Too Large)响应给客户端。
将该数值设置为0,则禁用限制,建议设置为10m。
client_header_buffer_size
设置客户端header的buffer大小,建议4k。
large_client_header_buffers
对于比较大的header(超过client_header_buffer_size)将会使用该部分buffer,两个数值,第一个是个数,第二个是每个buffer的大小。
建议设置为4 8k
open_file_cache
该参数会对以下信息进行缓存:
打开文件描述符的文件大小和修改时间信息;
存在的目录信息;
搜索文件的错误信息(文件不存在无权限读取等信息)。
格式:open_file_cache max=size inactive=time;
max设定缓存文件的数量,inactive设定经过多长时间文件没被请求后删除缓存。
建议设置 open_file_cache max=102400 inactive=20s;
open_file_cache_valid
指多长时间检查一次缓存的有效信息。建议设置为30s。
open_file_cache_min_uses
open_file_cache指令中的inactive参数时间内文件的最少使用次数,
如,将该参数设置为1,则表示,如果文件在inactive时间内一次都没被使用,它将被移除。
建议设置为2。
压缩
对于纯文本的内容,Nginx是可以使用gzip压缩的。使用压缩技术可以减少对带宽的消耗。
由ngx_http_gzip_module模块支持

配置如下:
gzip on; //开启gzip功能
gzip_min_length 1024; //设置请求资源超过该数值才进行压缩,单位字节
gzip_buffers 16 8k; //设置压缩使用的buffer大小,第一个数字为数量,第二个为每个buffer的大小
gzip_comp_level 6; //设置压缩级别,范围1-9,9压缩级别最高,也最耗费CPU资源
gzip_types text/plain application/x-javascript text/css application/xml image/jpeg image/gif image/png; //指定哪些类型的文件需要压缩
gzip_disable "MSIE 6."; //IE6浏览器不启用压缩

测试:
curl -I -H "Accept-Encoding: gzip, deflate" http://www.aminglinux.com/1.css
日志
- 错误日志级别调高,比如crit级别,尽量少记录无关紧要的日志。
- 对于访问日志,如果不要求记录日志,可以关闭,
- 静态资源的访问日志关闭
静态文件过期
对于静态文件,需要设置一个过期时间,这样可以让这些资源缓存到客户端浏览器,
在缓存未失效前,客户端不再向服务期请求相同的资源,从而节省带宽和资源消耗。

配置示例如下:
location ~* ^.+.(gif|jpg|png|css|js)$
{
    expires 1d; //1d表示1天,也可以用24h表示一天。
}
作为代理服务器
Nginx绝大多数情况下都是作为代理或者负载均衡的角色。
因为前面章节已经介绍过以下参数的含义,在这里只提供对应的配置参数:
http
{
    proxy_cache_path /data/nginx_cache/ levels=1:2 keys_zone=my_zone:10m inactive=300s max_size=5g;
    ...;
    server
    {
	proxy_buffering on;
	proxy_buffer_size 4k;
	proxy_buffers 2 4k;
	proxy_busy_buffers_size 4k;
	proxy_temp_path /tmp/nginx_proxy_tmp 1 2;
	proxy_max_temp_file_size 20M;
	proxy_temp_file_write_size 8k;

	location /
	{
	    proxy_cache my_zone;
	    ...;
	}
    }
}
SSL优化
- 适当减少worker_processes数量,因为ssl功能需要使用CPU的计算。
- 使用长连接,因为每次建立ssl会话,都会耗费一定的资源(加密、解密)
- 开启ssl缓存,简化服务端和客户端的“握手”过程。
ssl_session_cache   shared:SSL:10m; //缓存为10M
ssl_session_timeout 10m; //会话超时时间为10分钟
1. nginx分为两个进程一个master进程一个worker进程,master是主进程,worker是工作进程,客户端连接的是worker进程(一般配置worker_processes和cup核数相等就可以了)
2.查看系统描述符大小默认是1024
[root@centos-03 logrotate.d]# ulimit -n
1024
[root@centos-03 logrotate.d]#
3.nginx建议调到102400,首先需要将系统的调大
4.为什么要将描述符调大呢,因为客户端与服务端(nginx)通信的时候需要建立一个websockite,建立连接的时候就在系统中生成了一个文件描述符
5.查看文件描述符
[root@centos-03 logrotate.d]# lsof -c nginx |grep -i ipv4
nginx   29709   root    9u     IPv4              81901      0t0       TCP *:http (LISTEN)
nginx   29709   root   10u     IPv4              81902      0t0       TCP *:webcache (LISTEN)
nginx   29709   root   21u     IPv4              84964      0t0       TCP *:irdmi (LISTEN)
nginx   30143 nobody    9u     IPv4              81901      0t0       TCP *:http (LISTEN)
nginx   30143 nobody   10u     IPv4              81902      0t0       TCP *:webcache (LISTEN)
nginx   30143 nobody   21u     IPv4              84964      0t0       TCP *:irdmi (LISTEN)
[root@centos-03 logrotate.d]#
6.调高系统描述符(临时)
[root@centos-03 logrotate.d]# ulimit -n 102400
[root@centos-03 logrotate.d]#
7.永久调高系统描述符添加配置
[root@centos-03 logrotate.d]# vi /etc/security/limits.conf
# End of file
* soft nofile 655350
* hard nofile 655350
压缩
1.将gzip配置放到http部分(重启nginx可以用killall nginx)
[root@centos-03 logrotate.d]# vim /usr/local/nginx/conf/nginx.conf
    gzip  on;
    gzip_min_length 1024; (最小压缩值,达不到这个值不压缩,看不出效果)
    gzip_buffers 16 8k;
    gzip_comp_level 6;
    gzip_types text/plain application/x-javascript text/css application/xml image/jpeg image/gif image/png;
    gzip_disable "MSIE 6.";
[root@centos-03 logrotate.d]# /usr/local/nginx/sbin/nginx -s reload
[root@centos-03 logrotate.d]#
root@centos-03 logrotate.d]# cd /data/wwwroot/www.1.com
[root@centos-03 www.1.com]# vim 1.css
fdklsaaaaaaaaaaaaaaaaaaaaaaaaajsjfdlksajfkjdsklfklsajfl
djfsjfdjslkfffffffffffffffffffffffff
djsafkljdaaaaaaaaassssssssssssssssssssss
fjsajfkkkkkkkkkkkkkksjfiodjsafkkkkkkkkkkkkkkkkkkkkkk
fjdlksajfkkkkkkkkkkkkkkkkkkkkkkkkkkkkkkkkk
fdklsaaaaaaaaaaaaaaaaaaaaaaaaajsjfdlksajfkjdsklfklsajfl
djfsjfdjslkfffffffffffffffffffffffff
djsafkljdaaaaaaaaassssssssssssssssssssss
[root@centos-03 www.1.com]# curl www.123.com/1.css
[root@centos-03 www.1.com]# curl -I !$
curl -I www.123.com/1.css
HTTP/1.1 200 OK
Server: nginx/1.14.0
Date: Sat, 28 Jul 2018 20:53:44 GMT
Content-Type: text/css
Content-Length: 6643
Connection: keep-alive
Last-Modified: Sat, 28 Jul 2018 20:51:19 GMT
ETag: "5b5cd747-19f3"
Accept-Ranges: bytes

[root@centos-03 www.1.com]# curl -I -H "Accept-Encoding: gzip, deflate" www.123.com/1.css
HTTP/1.1 200 OK
Server: nginx/1.14.0
Date: Sat, 28 Jul 2018 20:54:52 GMT
Content-Type: text/css
Connection: keep-alive
Last-Modified: Sat, 28 Jul 2018 20:51:19 GMT
ETag: W/"5b5cd747-19f3"
Content-Encoding: gzip

[root@centos-03 www.1.com]#
静态文件缓存时间配置
[root@centos-03 vhost]# vim 1.conf
server {
        listen 8080;
        server_name www.123.com;
        index index.html;
        root /data/wwwroot/www.1.com;
        rewrite_log on;
        location /
        {
                rewrite /123.html /1.html redirect;
                error_log /data/logs/123.com.err.log debug;
        }
        location ~* '(css|js|png|jpg|gif|rar|mp4)$'
        {
                access_log off;
                expires 1d;
        }
        access_log /data/logs/123.com.acc.log main;
}
[root@centos-03 vhost]# /usr/local/nginx/sbin/nginx -t
nginx: the configuration file /usr/local/nginx/conf/nginx.conf syntax is ok
nginx: configuration file /usr/local/nginx/conf/nginx.conf test is successful
[root@centos-03 vhost]# /usr/local/nginx/sbin/nginx -s reload
[root@centos-03 vhost]# curl -x127.0.0.1:8080 -I -H "Accept-Encoding:gzip,deflate" www.123.com/1.css
HTTP/1.1 200 OK
Server: nginx/1.14.0
Date: Sun, 29 Jul 2018 19:42:13 GMT
Content-Type: text/css
Last-Modified: Sat, 28 Jul 2018 20:51:19 GMT
Connection: keep-alive
ETag: W/"5b5cd747-19f3"
Expires: Mon, 30 Jul 2018 19:42:13 GMT
Cache-Control: max-age=86400
Content-Encoding: gzip

[root@centos-03 vhost]#
Nginx优化-内核参数调整
调整Linux内核参数
作为高性能WEB服务器,只调整Nginx本身的参数是不行的,因为Nginx服务依赖于高性能的操作系统。
以下为常见的几个Linux内核参数优化方法。
1 net.ipv4.tcp_max_tw_buckets
对于tcp连接,服务端和客户端通信完后状态变为timewait,假如某台服务器非常忙,连接数特别多的话,那么这个timewait数量就会越来越大。
毕竟它也是会占用一定的资源,所以应该有一个最大值,当超过这个值,系统就会删除最早的连接,这样始终保持在一个数量级。
这个数值就是由net.ipv4.tcp_max_tw_buckets这个参数来决定的。
CentOS7系统,你可以使用sysctl -a |grep tw_buckets来查看它的值,默认为32768,
你可以适当把它调低,比如调整到8000,毕竟这个状态的连接太多也是会消耗资源的。
但你不要把它调到几十、几百这样,因为这种状态的tcp连接也是有用的,
如果同样的客户端再次和服务端通信,就不用再次建立新的连接了,用这个旧的通道,省时省力。
2 net.ipv4.tcp_tw_recycle = 1
该参数的作用是快速回收timewait状态的连接。上面虽然提到系统会自动删除掉timewait状态的连接,但如果把这样的连接重新利用起来岂不是更好。
所以该参数设置为1就可以让timewait状态的连接快速回收,它需要和下面的参数配合一起使用。
3 net.ipv4.tcp_tw_reuse = 1
该参数设置为1,将timewait状态的连接重新用于新的TCP连接,要结合上面的参数一起使用。
4 net.ipv4.tcp_syncookies = 1
tcp三次握手中,客户端向服务端发起syn请求,服务端收到后,也会向客户端发起syn请求同时连带ack确认,
假如客户端发送请求后直接断开和服务端的连接,不接收服务端发起的这个请求,服务端会重试多次,
这个重试的过程会持续一段时间(通常高于30s),当这种状态的连接数量非常大时,服务器会消耗很大的资源,从而造成瘫痪,
正常的连接进不来,这种恶意的半连接行为其实叫做syn flood攻击。
设置为1,是开启SYN Cookies,开启后可以避免发生上述的syn flood攻击。
开启该参数后,服务端接收客户端的ack后,再向客户端发送ack+syn之前会要求client在短时间内回应一个序号,
如果客户端不能提供序号或者提供的序号不对则认为该客户端不合法,于是不会发ack+syn给客户端,更涉及不到重试。
5 net.ipv4.tcp_max_syn_backlog
该参数定义系统能接受的最大半连接状态的tcp连接数。客户端向服务端发送了syn包,服务端收到后,会记录一下,
该参数决定最多能记录几个这样的连接。在CentOS7,默认是256,当有syn flood攻击时,这个数值太小则很容易导致服务器瘫痪,
实际上此时服务器并没有消耗太多资源(cpu、内存等),所以可以适当调大它,比如调整到30000。
6 net.ipv4.tcp_syn_retries
该参数适用于客户端,它定义发起syn的最大重试次数,默认为6,建议改为2。
7 net.ipv4.tcp_synack_retries
该参数适用于服务端,它定义发起syn+ack的最大重试次数,默认为5,建议改为2,可以适当预防syn flood攻击。
8 net.ipv4.ip_local_port_range
该参数定义端口范围,系统默认保留端口为1024及以下,以上部分为自定义端口。这个参数适用于客户端,
当客户端和服务端建立连接时,比如说访问服务端的80端口,客户端随机开启了一个端口和服务端发起连接,
这个参数定义随机端口的范围。默认为32768    61000,建议调整为1025 61000。
9 net.ipv4.tcp_fin_timeout
tcp连接的状态中,客户端上有一个是FIN-WAIT-2状态,它是状态变迁为timewait前一个状态。
该参数定义不属于任何进程的该连接状态的超时时间,默认值为60,建议调整为6。
10 net.ipv4.tcp_keepalive_time
tcp连接状态里,有一个是established状态,只有在这个状态下,客户端和服务端才能通信。正常情况下,当通信完毕,
客户端或服务端会告诉对方要关闭连接,此时状态就会变为timewait,如果客户端没有告诉服务端,
并且服务端也没有告诉客户端关闭的话(例如,客户端那边断网了),此时需要该参数来判定。
比如客户端已经断网了,但服务端上本次连接的状态依然是established,服务端为了确认客户端是否断网,
就需要每隔一段时间去发一个探测包去确认一下看看对方是否在线。这个时间就由该参数决定。它的默认值为7200秒,建议设置为30秒。
11 net.ipv4.tcp_keepalive_intvl
该参数和上面的参数是一起的,服务端在规定时间内发起了探测,查看客户端是否在线,如果客户端并没有确认,
此时服务端还不能认定为对方不在线,而是要尝试多次。该参数定义重新发送探测的时间,即第一次发现对方有问题后,过多久再次发起探测。
默认值为75秒,可以改为3秒。
12 net.ipv4.tcp_keepalive_probes
第10和第11个参数规定了何时发起探测和探测失败后再过多久再发起探测,但并没有定义一共探测几次才算结束。
该参数定义发起探测的包的数量。默认为9,建议设置2。
设置和范例
在Linux下调整内核参数,可以直接编辑配置文件/etc/sysctl.conf,然后执行sysctl -p命令生效

结合以上分析的各内核参数,范例如下
net.ipv4.tcp_fin_timeout = 6
net.ipv4.tcp_keepalive_time = 30
net.ipv4.tcp_max_tw_buckets = 8000
net.ipv4.tcp_tw_reuse = 1
net.ipv4.tcp_tw_recycle = 1
net.ipv4.tcp_syncookies = 1
net.ipv4.tcp_max_syn_backlog = 30000
net.ipv4.tcp_syn_retries = 2
net.ipv4.tcp_synack_retries = 2
net.ipv4.ip_local_port_range = 1025 61000
net.ipv4.tcp_keepalive_intvl = 3
net.ipv4.tcp_keepalive_probes = 2
[root@centos-03 vhost]# sysctl -a |grep tw_buckets
net.ipv4.tcp_max_tw_buckets = 4096
[root@centos-03 vhost]#
1.查看time-wait数量
[root@centos-03 vhost]# ss -an
监控Nginx
https://coding.net/u/aminglinux/p/nginx/git/blob/master/mon/stat.md
配置Nginx状态
Nginx有内置一个状态页,需要在编译的时候指定参数--with-http_stub_status_module参数方可打开。
也就是说,该功能是由http_stub_status_module模块提供,默认没有加载。
Nginx配置文件示例
server{
	listen 80;
	server_name www.aminglinux.com;

	location /status/ {
	    stub_status on;
	    access_log off;
	    allow 127.0.0.1;
	    allow 192.168.10.0/24;
	    deny all;
	}
}
配置说明
location /status/这样当访问/status/时即可访问到状态页内容。
stub_status on即打开了状态页。
access_log off不记录日志
allow和deny只允许指定IP和IP段访问,因为这个页面需要保护起来,并不公开,当然也可以做用户认证。
测试和结果说明
测试命令:curl -x127.0.0.1:80 www.aminglinux.com/status/

结果如下:
Active connections: 1
server accepts handled requests
 11 11 11
Reading: 0 Writing: 1 Waiting: 0

说明:
active connections – 活跃的连接数量
server accepts handled requests — 总共处理的连接数、成功创建的握手次数、总共处理的请求次数
需要注意,一个连接可以有多次请求。
reading — 读取客户端的连接数.
writing — 响应数据到客户端的数量
waiting — 开启 keep-alive 的情况下,这个值等于 active – (reading+writing), 意思就是 Nginx 已经处理完正在等候下一次请求指令的驻留连接.
1.top命令(输入>号,可以往下翻)
2.ps aux|grep nginx
3.netstat
[root@centos-03 vhost]# netstat -lntp |grep nginx
tcp        0      0 0.0.0.0:8080            0.0.0.0:*               LISTEN      29709/nginx: master
tcp        0      0 0.0.0.0:80              0.0.0.0:*               LISTEN      29709/nginx: master
tcp        0      0 0.0.0.0:8000            0.0.0.0:*               LISTEN      29709/nginx: master
[root@centos-03 vhost]#
4.ss -an 查看网络链接数
5.查看nginx进程的所有文件描述符
[root@centos-03 vhost]# lsof -c nginx
6.抓包(tcpdump -nn -i 指定网卡抓包)
[root@centos-03 vhost]# tcpdump -nn
tcpdump: packet printing is not supported for link type NFLOG: use -w
[root@centos-03 vhost]#
7.配置nginx状态信息
[root@centos-03 vhost]# cd /usr/local/src/nginx-1.14.0
[root@centos-03 nginx-1.14.0]# /usr/local/nginx/sbin/nginx -V
nginx version: nginx/1.14.0
built by gcc 4.8.5 20150623 (Red Hat 4.8.5-28) (GCC)
built with OpenSSL 1.0.2k-fips  26 Jan 2017
TLS SNI support enabled
configure arguments: --with-http_ssl_module --prefix=/usr/local/nginx
[root@centos-03 nginx-1.14.0]# ./configure --with-http_stub_status_module --with-http_ssl_module --prefix=/usr/local/nginx
[root@centos-03 nginx-1.14.0]# make
[root@centos-03 nginx-1.14.0]# make install
[root@centos-03 nginx-1.14.0]# /usr/local/nginx/sbin/nginx -V
nginx version: nginx/1.14.0
built by gcc 4.8.5 20150623 (Red Hat 4.8.5-28) (GCC)
built with OpenSSL 1.0.2k-fips  26 Jan 2017
TLS SNI support enabled
configure arguments: --with-http_stub_status_module --with-http_ssl_module --prefix=/usr/local/nginx
[root@centos-03 nginx-1.14.0]#
测试
[root@centos-03 nginx-1.14.0]# vim /usr/local/nginx/conf/vhost/1.conf
server {
        listen 8080;
        server_name www.123.com;
        index index.html;
        root /data/wwwroot/www.1.com;
        rewrite_log on;
        location /
        {
                rewrite /123.html /1.html redirect;
                error_log /data/logs/123.com.err.log debug;
        }
        location ~* '(css|js|png|jpg|gif|rar|mp4)$'
        {
                access_log off;
                expires 1d;
        }

        location /status/ {
            stub_status on;
            access_log off;
            allow 127.0.0.1;
            allow 192.168.10.0/24;
            deny all;
        }
        access_log /data/logs/123.com.acc.log main;
}
[root@centos-03 nginx-1.14.0]# /usr/local/nginx/sbin/nginx -t
nginx: the configuration file /usr/local/nginx/conf/nginx.conf syntax is ok
nginx: configuration file /usr/local/nginx/conf/nginx.conf test is successful
[root@centos-03 nginx-1.14.0]# /usr/local/nginx/sbin/nginx -s reload
[root@centos-03 nginx-1.14.0]# killall nginx
[root@centos-03 nginx-1.14.0]# /usr/local/nginx/sbin/nginx
[root@centos-03 nginx-1.14.0]# curl -x127.0.0.1:8080 www.123.com/status/
Active connections: 1
server accepts handled requests
 1 1 1
Reading: 0 Writing: 1 Waiting: 0
[root@centos-03 nginx-1.14.0]# curl -x127.0.0.1:8080 www.123.com/status/
Active connections: 1
server accepts handled requests
 2 2 2
Reading: 0 Writing: 1 Waiting: 0
[root@centos-03 nginx-1.14.0]# curl -x127.0.0.1:8080 www.123.com/status/
Active connections: 1
server accepts handled requests
 3 3 3
Reading: 0 Writing: 1 Waiting: 0
[root@centos-03 nginx-1.14.0]#
Nginx架构-LNMP
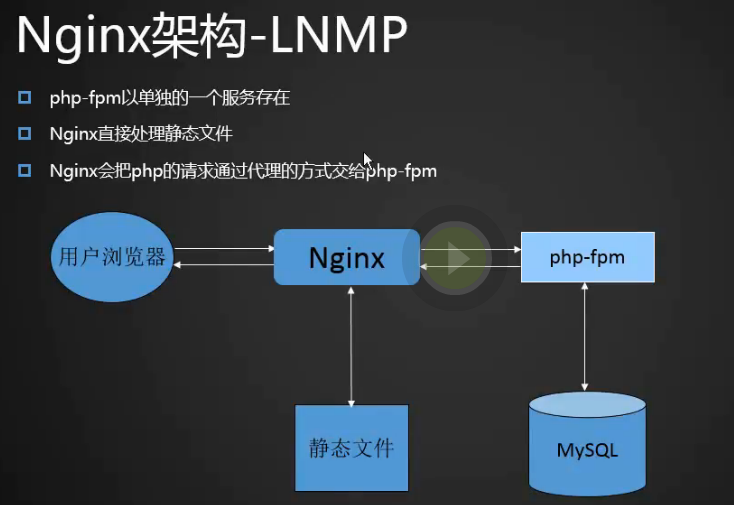
1.php-fpm是一个单独的服务,其实就是php,php的请求交给php-fpm去做,nginx只处理静态的文件,nginx会把php的请求通过代理的方式交给php-fpm。

配置Nginx和php
配置如下(在server部分添加):
    location ~ .php$ {
        include fastcgi_params;
        fastcgi_pass unix:/tmp/php-fcgi.sock;
        fastcgi_index index.php;
        fastcgi_param SCRIPT_FILENAME $document_root$fastcgi_script_name;
    }

配置说明:
1 fastcgi_params文件在/usr/local/nginx/conf/下面,其内容为fastcgi相关的变量
2 fastcgi_pass后面跟的是php-fpm服务监听地址,可以是IP:PORT,也可以是unix socket地址,也支持upstream的地址
3 fastcgi_index定义索引页,如果在server内其他部分有定义index参数,该配置可以忽略
4 fastcgi_param这行其实可以在fastcgi_params文件里面定义SCRIPT_FILENAME变量,这个变量如果不定义,php的请求是没办法访问的。
Nginx架构-tomcat

https://coding.net/u/aminglinux/p/nginx/git/blob/master/java/nginx_tomcat.md
Nginx+Tomcat架构
配置文件示例
server
{
    listen 80;
    server_name www.aminglinux.com;

    location ~* ".(jpg|png|jepg|js|css|xml|bmp|swf|gif|html)$"
    {
        root /data/wwwroot/aminglinux/;
        access_log off;
        expire 7d;
    }

    location /
    {
        proxy_pass http://127.0.0.1:8080/;
        proxy_set_header Host $host;
        proxy_set_header X-Real-IP      $remote_addr;
        proxy_set_header X-Forwarded-For $proxy_add_x_forwarded_for;
    }
}

说明:
1 首先,把各种静态文件的请求分离出来,单独由nginx处理。
2 其他请求直接代理8080端口,即tomcat服务。
Nginx架构-nginx+keepalived

Nginx运维规范

1.安装路径放到usr/local/nginx下
1.日志路径放到data/logs下