原文地址:https://mylinuxramblings.wordpress.com/2010/12/05/linux-mint-debian-edition-lmde-first-impressions/
Whilst WINE is a great Linux API for Microsoft OS based applications. However, it is not quite the same as running the real thing if you need 100% compatibility. Even under Windows 7, support for older programs based on MS-DOS is rather limited requiring the use of programs like DOSBOX or using XP Compatibility Mode.
I tend not to throw out formerly useful software, you never know when it may become useful again! Therefore, I still have software from my MS-DOS days, including genuine MS-DOS 6.21 boot disks as well as a complete set of Softlanding Linux System "Linux SLS Distribution v0.99p9" http://tinyurl.com/5cgrx dating from late 1992. SLS eventually became Slackware and the rest is Linux history!
This tutorial will explain how to create a bootable MS-DOS 6 based VirtualBox VM with CD-ROM support.
For those of you who are not lucky enough to have original MS-DOS disks, I plan to do a further article but this time using FreeDOS, an 100% compatible open source MS-DOS 6.22 replacement (with bells!).
Turning your Floppy Disks into .img files
Note: Your PC will need a floppy disk drive!
Because VirtualBox does not work with physical floppy disks (at least as far as I can tell) but with disk images, the first thing you need to do is turn the physical MS-DOS disks into disk images.
Luckily, in Linux this is really easy:
Open Terminal
Navigate to where you want the images saved, which is normally the hidden .VirtualBox directory in your home folder.
Insert the first floppy MS-DOS disk in the drive and enter in Terminal:
Kdesudo cat /dev/fd0 > imagefilename.img
Example: sudo cat /dev/fd0 > MSDOS6.21-1.img
Repeat for all the remaining two MS-DOS disks, remember to give each file name a slightly different name to identify it!
Creating your VirtualBox VM
Launch VirtualBox and click New, then click Next.
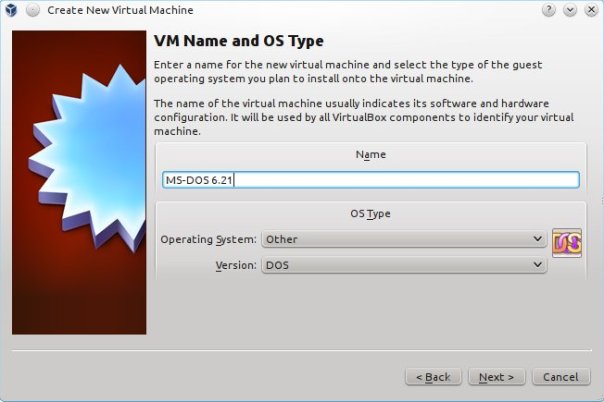
Change Operating System to Other, this defaults the version to DOS.
Give the VM a name e.g. MS-DOS 6.21
Click Next
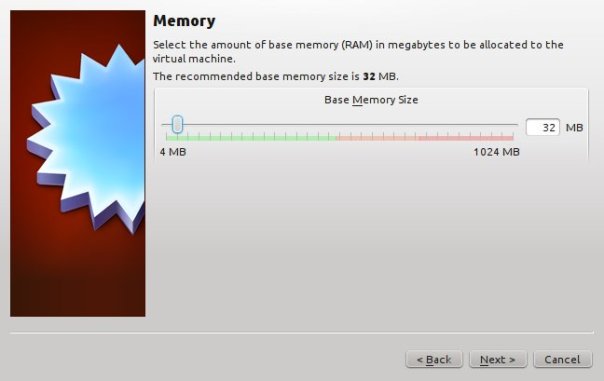
As this VM will only run MS-DOS applications, I’m going to leave the amount of RAM at the default size of 32Mb. This can be changed later.
Click Next

We are now going to create a new virtual hard disk and make it bootable, so the default settings are okay.
Click Next

The New Virtual Disk Wizard will be displayed.
Click Next

Again accept the defaults.
Click Next

For Virtual Disk Location and Size, 512Mb should be more than enough so accept the defaults.
Click Next

You are now given a summary of your Virtual Hard Disk settings.
Click Finish

You are now given the Summary information for the VM you have just configured.
Click Finish
Making floppy disk .img files available to VirtualBox and your VM
From the VirtualBox menu bar, select File > Virtual Media Manager
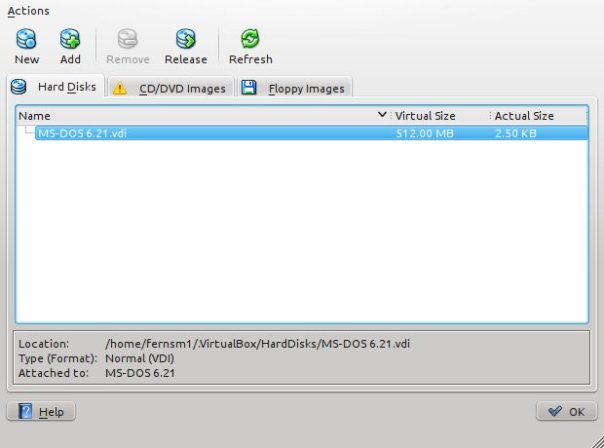
Click the Floppy Images tab.
Click Add and select the images you wish to add. Then click Open.

If done correctly, your Floppy Images folder should look similar to the above.
Clock OK.
We are now going to configure our MS-DOS VM for Floppy Disks, so with the VM selected from the main window, select Settings from the toolbar.
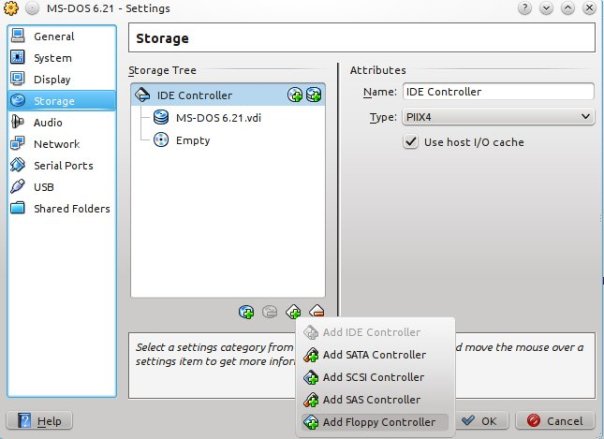
Select the Storage menu down the left hand side of the window and then select Add Controller > Add Floppy Controller from the icon at the bottom of the controller window.
To the right of the Floppy Controller, click the icon Add Floppy Device. An ‘Empty’ floppy drive will be added.
We now need to insert our first MS-DOS floppy disk so when we boot the VM, it will boot off the disk and start the install.
With the floppy drive selected, the far right window pane will change.
To the right of the label Floppy Device, click on the drop-down currently showing as Empty and select the first MS-DOS disk image listed.
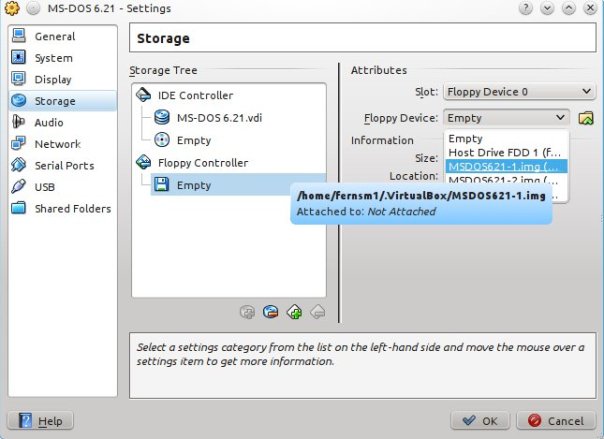
Click OK, you will be returned to the main VirtualBox menu.
Installing MS-DOS in your VM
With the MS-DOS VM selected, click Start from the toolbar.
Your VM should boot and load the MS-DOS installation program like in the screen-shot below

Follow the on screen instructions to install MS-DOS.
As this is a new Virtual hard disk you will be asked to configure unformatted disk space. Select this option.
You will be asked to mount the first floppy disk. This is already mounted so press Enter.
One of two things may now happen:
a. Your disk formats successfully and MS-DOS starts to install itself.
or
b. The disk formatting remains at 0%. If this should happen, go to the VM menu bar and select Machine > Reset.
When the Starting MS-DOS…. message appears on the screen press F8. You will be prompted as in the screen-shot below.
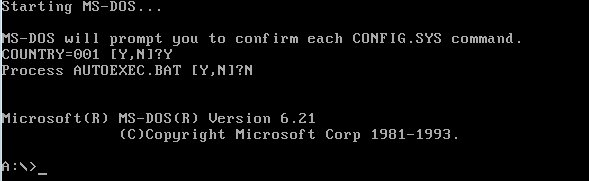
Reply N to Process AUTOEXEC.BAT, and the command prompt will appear as above. We are now going to manually format the C: drive. Enter the command format c:.
Once the drive has been formatted, enter the command setup, the installation process will now continue.
After a short while (remember floppy disks normally held 1.44Mb!) you will be asked to insert the next floppy disk.
At the bottom of the VirtualBox VM window, right click on the floppy disk icon and select the second MS-DOS installation disk image.

Then continue with the installation by pressing Enter.
Once the installation has been completed, you will be asked to remove all floppies from the floppy drive and then reboot the VM. As before right click on the Floppy icon and this time un-tick the currently mounted floppy disk.
Now press Enter to reboot.
When the VM first reboots, it does not correctly display the command prompt.

To resolve go to the VM menu bar and select Machine > Reset. The VM will reboot and the command prompt will be correctly displayed.
Managing Performance!
MS-DOS is not a demanding OS, however running in a VM can cause problems for the host computer. To avoid the CPU on the host being fully loaded, we will use a program called DOSIDLE, this is a TSR (Terminate and Stay Resident) program. I’ve included DOSIDLE on the floppy disk image file called cdrom.img which can be downloaded from here.
Just download this file from the link above, add it to your .VirtualBox where you MS-DOS image disks reside, and then add to VirtualBox in the same way.
Mount your cdrom.img disk into the VirtualBox floppy drive. Now type a: to change to the ‘a’ drive, followed by dir to display the contents. If all goes to plan you should see the following
Copy the contents of the drive ‘a’ to a folder called CDROM on c: by entering
mkdir c:cdrom
xcopy *.* c:cdrom /s
copy c:cdromdosidledosidle.exe c:
Dismount the virtual floppy disk.
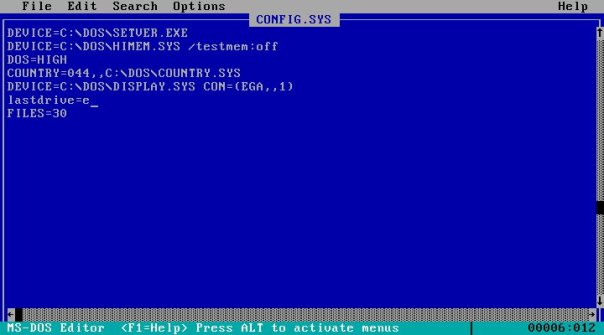
Now edit config.sys by entering edit c:config.sys
and change the contents so they look like the following
Save the file and now edit autoexec.bat by entering edit c:autoexec.bat.
and change the contents so they look like the following

Save the file and reboot the VM.
On reboot you should get the following displayed
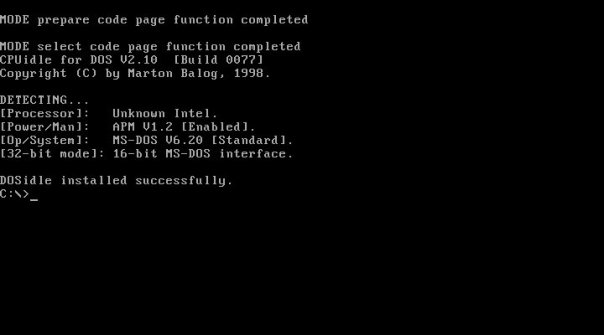
Your MS-DOS VM will now only consume the CPU it needs.
Adding Support for CD-ROMs
By default MS-DOS does not come with CD-ROM support. However, this can be easily changed.
In the cdrom directory (which contains the contents of the cdrom.img file copied earlier) is a device driver for the CD ROM drive for VirtualBox. Copy this to the root of C: by entering
copy c:cdromoakcdrom.sys c:
Now edit config.sys so that it looks like the following screen-shot

Save the file and now edit autoexec.bat so that it looks like the following screen-shot
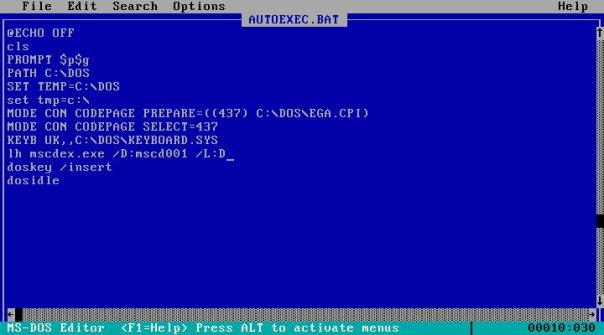
Here we have added the 3rd line from the bottom, the /L:D tells DOS to assign the drive letter D: to the CD ROM drive.
Save the file and reboot the VM.
On reboot you should get the following displayed

The 4th line down tells you that the MSCDEX has been loaded and the line below that tells you that the CD-ROM drive has been successfully assigned the letter D.
I would have liked to have added network support to MS-DOS using Microsoft Lanman so files could be shared between the guest VM and the host. However, whilst driver support exists for the network cards used in VirtualBox it has turned out to be far too complicated to set-up in VirtualBox. FreeDOS unlike MS-DOS offers network support as standard and I’ll endeavour to build a VirtualBox image with this version of DOS at a later date.
In the meantime, those of you desperate to use MS-DOS with networking should consider using VMWare as this provides better network card support for MS-DOS and there are a number of articles available on the internet on how to configure.
=-=-=-=-=
Powered by Blogilo