Python 系统标准模块(shutil、logging、shelve、configparser、subprocess、xml、yaml、自定义模块)
目录:
- shutil
- logging模块
- shelve
- configparser
- subprocess
- xml处理
- yaml处理
- 自定义模块
一,系统标准模块:
1、shutil:是一种高层次的文件操作工具,类似于高级API,而且主要强大之处在于其对文件的复制与删除操作更是比较支持好,是高级的文件、文件夹、压缩包处理模块,而且是系统的标准自带模块;
copyfile(src, dst, *, follow_symlinks=True):拷贝文件,如果目标存在同名的文件会进行覆盖:
import shutil
file = "test.py"
shutil.copyfile(file,"/tmp/2.sh")
copyfileobj(fsrc, fdst, length=16*1024):将一个文件的文件内容拷贝到另一个文件中,可以指定拷贝部分内容:
import shutil
a = open('test.py','rb')
b = open('new.py','wb')
shutil.copyfileobj(a,b)
a.close()
b.close()
shutil.copymode(src, dst):仅拷贝权限。内容、组、用户均不变
import subprocess
subprocess.Popen("ls -l",shell=True) #执行带参数的命令,查看当前目录的文件权限
-rw-r--r--   1 root         root          24 Nov 16 17:12 1
-rw-r--r--   1 root         root   184516354 Nov 26 10:58 10.16.57.102
-rw-r--r--   1 root         root      556763 Nov 26 12:05 all.sq #源文件权限
-rw-------.  1 root         root        2441 Aug 11  2015 anaconda-ks.cfg #目标操作文件现在的权限是600、

import shutil #导入模块
shutil.copymode("all.sq","anaconda-ks.cfg") #将all.sq的权限赋值给anaconda-ks.cfg,每个文件的内容都保持不变
subprocess.Popen("ls -l",shell=True)
-rw-r--r--   1 root         root          24 Nov 16 17:12 1
-rw-r--r--   1 root         root   184516354 Nov 26 10:58 10.16.57.102
-rw-r--r--   1 root         root      556763 Nov 26 12:05 all.sq
-rw-r--r--.  1 root         root        2441 Aug 11  2015 anaconda-ks.cfg #文件权限已经更改成和all.sq的一样
shutil.copystat(src, dst):拷贝状态的信息,包括:mode bits, atime, mtime, flags
subprocess.Popen("ls -l",shell=True)
-rw-r--r--   1 root         root          24 Nov 16 17:12 1
-rw-r--r--   1 root         root   184516354 Nov 26 10:58 10.16.57.102
-rw-r--r--   1 root         root      556763 Nov 26 12:05 all.sq #源文件时间戳
-rw-r--r--.  1 root         root        2441 Aug 11  2015 anaconda-ks.cfg #目标文件时间戳

shutil.copystat('all.sq','anaconda-ks.cfg')
subprocess.Popen("ls -l",shell=True)
-rw-r--r--   1 root         root          24 Nov 16 17:12 1
-rw-r--r--   1 root         root   184516354 Nov 26 10:58 10.16.57.102
-rw-r--r--   1 root         root      556763 Nov 26 12:05 all.sq
-rw-r--r--.  1 root         root        2441 Nov 26 12:05 anaconda-ks.cfg #时间信息已经个all.sq保持一致了
shutil.copy(src, dst):拷贝文件和权限,即保留文件的源权限
subprocess.Popen(["touch","mytest.py"]) #创建一个文件
shutil.copy('mytest.py','mytest.py.bak') #从刚才创建的文件复制一个文件
subprocess.Popen("ls -l",shell=True)
-rw-r--r--   1 root         root           0 Mar  4 16:35 mytest.py #复制前的文件
-rw-r--r--   1 root         root           0 Mar  4 16:39 mytest.py.bak #复制后的文件
shutil.copy2(src, dst):拷贝文件和状态信息:
shutil.copy2('mytest.py','mytest2.py.bak')
subprocess.Popen("ls -l",shell=True)
-rw-r--r--   1 root         root           0 Mar  4 16:35 mytest2.py.bak #shutil.copy2保留了源文件的权限和状态信息
-rw-r--r--   1 root         root           0 Mar  4 16:35 mytest.py
-rw-r--r--   1 root         root           0 Mar  4 16:39 mytest.py.bak #shutil.copy 保留了源文件的权限但是没有保留状态信息
shutil.copytree(src, dst, symlinks=False, ignore=None):递归的去拷贝文件中的所有目录和文件,如copytree(source, destination, ignore=ignore_patterns('*.pyc', 'tmp*') #可以设置忽略不拷贝的文件名后缀
shutil.copytree("1","1_new") #递归copy1到1_new
subprocess.Popen("tree",shell=True)
 1.doc
 1.exe
 1.log
 1.txt
 2
     3
         4
1_new
 1.doc
 1.exe
 1.log
 1.txt
 2
     3
         4
shutil.rmtree(path[, ignore_errors[, onerror]]):递归删除文件和目录
shutil.rmtree("1_new")
shutil.move(src, dst):递归的去移动文件和目录:
shutil.move("1","new_1")
mysql.sock
new_1
    1.doc
    1.exe
    1.log
    1.txt
    2
        3
            4
shutil.make_archive(base_name, format,...):
创建压缩包并返回文件路径,例如:"zip", "tar", "bztar","gztar"
base_name: 压缩包的文件名,也可以是压缩包的路径。只是文件名时,则保存至当前目录,否则保存至指定路径,
    如:www                        =>保存至当前路径
    如:/Users/wupeiqi/tom =>保存至/Users/tom/
format: 压缩包种类,“zip”, “tar”, “bztar”,“gztar”
root_dir: 要压缩的文件夹路径(默认当前目录)
owner: 用户,默认当前用户
group: 组,默认当前组
logger: 用于记录日志,通常是logging.Logger对象
shutil.make_archive("etc_back",format="zip",root_dir="/etc/") #完全备份/etc/里面的所有文件和目录,是递归备份

subprocess.Popen("ls -l /tmp/etc_back.zip",shell=True)
<subprocess.Popen at 0x7f555aef8850>

 -rw-r--r-- 1 root root 21316881 Mar  4 17:25 /tmp/etc_back.zip
shutil 对压缩包的处理是调用 ZipFile 和 TarFile 两个模块来进行的,如下:
zipfile:
import zipfile
压缩过程:
zipfile = zipfile.ZipFile("myzip.zip","w") #创建一个实例,并制定新建的压缩文件名和w模式
zipfile.write("my.cnf")
zipfile.write("host.conf")
zipfile.write("fstab")
zipfile.close() #在为关闭之前系统是存在myzip.zip,但是无法解压

subprocess.Popen("ls -l /tmp/myzip.zip",shell=True)
<subprocess.Popen at 0x7f555bedfc90>
 -rw-r--r-- 1 root root 5982 Mar  4 17:34 /tmp/myzip.zip

解压过程:
z = zipfile.ZipFile("/tmp/myzip.zip","r")
z.extractall()
z.close()
TarFile:
# 压缩
mytar = tarfile.open("/tmp/test/my_file.tar","w")
mytar.add("/tmp/1.txt")
mytar.add("/tmp/1.tar") #1.txt和1.tar需要事先存在
mytar.close()

# 解压
tar = tarfile.open("/tmp/test/my_file.tar","r")
tar.extractall("/tmp/") #解压到/tmp里面
tar.close() #关闭会话
2、logging模块:用于自定义日志安全级别日志并写入文件的模块:
import  logging
#类的实例,全局的级别,日志实例
logger =  logging.getLogger('TEST-LOG')
logger.setLevel(logging.DEBUG)

#输出在屏幕的设定的信息级别
ch = logging.StreamHandler()
ch.setLevel(logging.DEBUG)

#写入在文件设定的信息级别
fh = logging.FileHandler("access.log") #定义操作的日志写入文件
fh.setLevel(logging.INFO)

#创建日志格式
formatter = logging.Formatter('%(asctime)s-%(name)s-%(levelname)s-%(message)s')

#添加格式到屏幕和文件的方法
ch.setFormatter(formatter)
fh.setFormatter(formatter)

#将文件设置和屏幕设置添加到logger,即和将信息进行输出和写入到文件
logger.addHandler(ch)
logger.addHandler(fh)

#应用
logger.debug("debug message")
logger.info("debug message")
logger.warn("debug message")
logger.error("debug message")
logger.critical("debug message")
CRITICAL = 50
FATAL = CRITICAL
ERROR = 40
WARNING = 30
WARN = WARNING
INFO = 20
DEBUG = 10
NOTSET = 0

只有大于当前日志等级的操作才会被记录,即10大于20,那么DEBUG会记录INFO的日志,而INFO不会记录DEBUG的日志
import logging

def log_models(logname,infos):
    logger = logging.getLogger(logname) #定义username
    logger.setLevel(logging.DEBUG) #定义全局日志级别

    ch = logging.StreamHandler() #定义屏幕日志
    ch.setLevel(logging.DEBUG) #定义屏幕日志级别

    fh = logging.FileHandler('log.txt') #定义日志保存文件
    fh.setLevel(logging.DEBUG) #定义文件日志保存级别

    formatter = logging.Formatter("%(asctime)s - %(name)s - %(levelname)s - %(message)s")

    ch.setFormatter(formatter) #屏幕输出格式套用自定义的日志格式
    fh.setFormatter(formatter) #日志输出格式套用自定义的日志格式

    logger.addHandler(ch) #把屏幕输出日志交给logger接口执行
    logger.addHandler(fh)#把文件输出日志交给logger接口执行

    logger.debug(infos) #调用日志模块

log_models("jack","debug")

执行结果:
会生成一个log.txt文件,并调用一次就记录一次登录日志:
2016-03-07 11:48:44,800 - jack - DEBUG - debug
3、shelve 模块:shelve模块是一个简单的k,v将内存数据通过文件持久化的模块,可以持久化任何pickle可支持的python数据格式
import shelve
my_shalve = shelve.open("shelve_test") #打开一个文件
class Test(object):
    def __init__(self,name):
        self.n = name

dd = Test("Zhang San")
cc = Test("21")
list1 = ["jack","tom","jhon"]
my_shalve["test"] = list1 #将列表实例化
my_shalve["class1"] = dd #将类dd实例化
my_shalve["class2"] = cc
my_shalve.close()

读取数据:
for i in my_shalve: #取类似于key的数据
    print(i)
test = my_shalve["test"] #根据key取数据
print(test,"test")
4.configparser:用于对特定的配置进行操作,当前模块的名称在 python 3.x 版本中变更为 configparser:
import   configparser
config = configparser.ConfigParser()
config['DEFAULTS'] = {'ServerAliveInterval':'45',
                    'Compression':'yes',
                    'CompressionLevel':'9'}

config['jack.com'] = {}
config['jack.com']['user'] = 'Jack'
config['jack.com']['password'] = '123456'

config['tom.com'] = {}
topsecret = config['tom.com'] #实例化config对象,和上面的功能是一样的
topsecret['HostPort'] = '51200'
topsecret['ForwardX11'] = 'no'
config['DEFAULTS']['ForwardX11'] = 'yes'


with open('example.ini', 'w') as configfile:
   config.write(configfile)
读取文件:
import  configparser
config = configparser.ConfigParser()
for i in config:
    print(i,"--->")
print('jack.com' in config) #判断一个主机区域是否在配置文件内部

print(config.sections()) #列表的内容
print(config.read('example.ini'))  #读取到文件名
print(config.sections()) #文件中的主机块内容
print(config['jack.com']['user'])  #读取指定数据
import   configparser
config = configparser.ConfigParser()
config.read("example.ini")

####读取文件内容
print(config.read('example.ini'),"#读取到文件名")

abc = config.read('example.ini')
print(config.sections(),"#读取文件中的主机块的标题名称,会包含的DEFAULTS")
a = config['jack.com']['user'] #读取主机下面的指定的数据内容,如这次读取到的user值是Jack
print(a,"获取到的user的信息")

item_list = config.items('jack.com') #将一个主机的内部的配置以列表的方式读出来,里面的值包含在元组
print(item_list)

hosts = config.options('jack.com') #实例化,通过options获取jack.com的key信息
print(hosts,"通过options获取jack.com的key信息")

#####通过key获取指定的key的value
item_list = config.items('tom.com')
print(item_list,"以列表里包含元组的形式显示配置信息")
print(config.getint("tom.com","hostport"),"直接指定主机组里面的每个key取得相应的整数值")
print(config.get("tom.com","forwardx11"),"直接指定主机组里面的每个key取得相应的字符串的值")

###删除
config.remove_section('tom.com') #删除指定的组
config.write(open('example.ini', "w")) #保存到文件

###增加
config.has_section('jhon.com') #先判断一个组名在不在
config.add_section('jhon.com') #不存在就添加
config.write(open('example.ini', "w")) #保存到文件

##修改
config.set('jack.com','password','654321') #将指定key的内容改为654321
config.write(open('example.ini', "w")) #将修改保存到文件

高级用法之增删改查
5.subprocess:从Python 2.4开始,Python引入subprocess模块来管理子进程,以取代一些旧模块的方法:如 os.system、os.spawn*、os.popen*、popen2.*、commands.*不但可以调用外部的命令作为子进程,而且可以连接到子进程的input/output/error管道,获取相关的返回信息,subprocess的目的就是启动一个新的进程并且与之通信:
通过python执行shell命令:
import  subprocess
print(subprocess.call("ls -l /etc",shell=True),"执行原生shell命令")
print(subprocess.call(["ls", "-l", "/etc"],shell=False),"通过python解释器执行shell命令,要讲命令放在一个列表并各自用引号引起来")

正确执行如果:
lrwxr-xr-x@ 1 root wheel 11 Oct 18 09:26 /etc -> private/etc
0 通过python解释器执行shell命令,要讲命令放在一个列表并各自用引号引起来
check_call:执行命令,如果执行状态码是 0 ,则返回0,否则抛异常:
import  subprocess
print(subprocess.call(["ls", "-l", "/etc/cc"],shell=False),"通过python解释器执行shell命令,要讲命令放在一个列表并各自用引号引起来")

执行结果:
ls: /etc/cc: No such file or directory
Traceback (most recent call last):
File "/Users/zhangshijie/PycharmProjects/S12-Python3/day6/test/Subprocess_test.py", line 10, in <module>
print(subprocess.check_call(["ls", "-l", "/etc/cc"],shell=False),"通过python解释器执行shell命令,要讲命令放在一个列表并各自用引号引起来")
File "/Library/Frameworks/Python.framework/Versions/3.5/lib/python3.5/subprocess.py", line 584, in check_call
raise CalledProcessError(retcode, cmd)
subprocess.CalledProcessError: Command '['ls', '-l', '/etc/cc']' returned non-zero exit status 1
check_output:执行命令,如果状态码是 0 ,则返回执行结果,否则抛异常:
import  subprocess
print(subprocess.check_output(["ls", "-l", "/etc"],shell=False))
print(subprocess.check_output(["ls", "-l", "/etc/xx"],shell=False))

执行结果:
b'lrwxr-xr-x@ 1 root  wheel  11 Oct 18 09:26 /etc -> private/etc
'
ls: /etc/xx: No such file or directory
Traceback (most recent call last):
  File "/Users/zhangshijie/PycharmProjects/S12-Python3/day6/test/Subprocess_test.py", line 11, in <module>
    print(subprocess.check_output(["ls", "-l", "/etc/xx"],shell=False))
  File "/Library/Frameworks/Python.framework/Versions/3.5/lib/python3.5/subprocess.py", line 629, in check_output
    **kwargs).stdout
  File "/Library/Frameworks/Python.framework/Versions/3.5/lib/python3.5/subprocess.py", line 711, in run
    output=stdout, stderr=stderr)
subprocess.CalledProcessError: Command '['ls', '-l', '/etc/xx']' returned non-zero exit status 1
subprocess.Popen(...) :用于执行复杂的系统命令,可以获取命令执行的结果并复制给变量进行调用:
'''
参数:
args:shell命令,可以是字符串或者序列类型(如:list,元组)
bufsize:指定缓冲。0 无缓冲,1 行缓冲,其他 缓冲区大小,负值 系统缓冲
stdin, stdout, stderr:分别表示程序的标准输入、输出、错误句柄
preexec_fn:只在Unix平台下有效,用于指定一个可执行对象(callable object),它将在子进程运行之前被调用
close_sfs:在windows平台下,如果close_fds被设置为True,则新创建的子进程将不会继承父进程的输入、输出、错误管道。
所以不能将close_fds设置为True同时重定向子进程的标准输入、输出与错误(stdin, stdout, stderr)。
shell:同上
cwd:用于设置子进程的当前目录
env:用于指定子进程的环境变量。如果env = None,子进程的环境变量将从父进程中继承。
universal_newlines:不同系统的换行符不同,True -> 同意使用

startupinfo与createionflags只在windows下有效
将被传递给底层的CreateProcess()函数,用于设置子进程的一些属性,如:主窗口的外观,进程的优先级等等
'''
通过管道获取输出结果:call只能显示运行结果,但是不能讲结果保存变量,要获取到结果就要使用Popen,popen是python3的功能:
python 3.x但是sunbprocess.run()
call不能获取到结果,想获取到结果就要使用popen,popen是启用了两个进程,进程通讯要使用管道PIPE处理
shell:申明不使用python转义,直接使用shell原生命令
import subprocess
obj = subprocess.Popen(("df  -h"),shell=True, stdout=subprocess.PIPE)
print(obj.stdout.read()) #读取正确的的输出
>>> import subprocess
 >>> obj = subprocess.Popen(["python"], stdin=subprocess.PIPE, stdout=subprocess.PIPE, stderr=subprocess.PIPE) #通过python解释器与管道交互执行命令,会启动新的子进程
>>> obj.stdin.write('print("hello")
 ')
>>> obj.stdin.write('print("hello1")
 ')
>>> out_error_list = obj.communicate()
>>> print out_error_list
('', '  File "<stdin>", line 2
    print("hello1")
其他操作:
child.poll()           # 检查子进程状态
child.kill()           # 终止子进程
child.send_signal()    # 向子进程发送信号
child.terminate()      # 终止子进程

总结:
subprocess.call #执行执行命令并返回,不能讲结果取出
subprocess.check_call() #执行命令,如果执行结果是0则返回0,否则抛出异常
subprocess.check_output() #如果命令执行结果是0则执行,否则不执行并抛出异常
subprocess.Popen() #执行命令并将结果取出
subprocess.PIPE #管道
Popen.wait()  #等待子进程执行完毕
Popen.communicate() #提交执行的命令
6.xml:对xml格式的稳定进行操作的系统模块:


import xml.etree.ElementTree as ET

tree = ET.parse("test.xml")
root = tree.getroot()
print(root)
#遍历xml文档
for child in root:
    print(child.tag,"-->名称",child.attrib,"-->属性")
    for i in child:
        print(i.tag, i.text)

#只遍历year 节点
for node in root.iter("year"):
    print(node.tag,node.text)

#修改和删除xml文档内容
import xml.etree.ElementTree as ET

tree = ET.parse("test.xml")
root = tree.getroot()

for node in root.iter('year'):
    new_year = int(node.text) + 1
    node.text = str(new_year)
    node.set("updated","yes")
tree.write("test1.xml")

#删除node
for country in root.findall('country'):
   rank = int(country.find('rank').text)
   if rank > 50:
     root.remove(country)

tree.write('output.xml')
import xml.etree.ElementTree as ET

tree = ET.parse("test.xml")
root = tree.getroot()
print(root)
#遍历xml文档
for child in root:
    print(child.tag,"-->名称",child.attrib,"-->属性")
    for i in child:
        print(i.tag, i.text)

#只遍历year 节点
for node in root.iter("year"):
    print(node.tag,node.text)

#修改和删除xml文档内容
import xml.etree.ElementTree as ET

tree = ET.parse("test.xml")
root = tree.getroot()

for node in root.iter('year'):
    new_year = int(node.text) + 1
    node.text = str(new_year)
    node.set("updated","yes")
tree.write("test1.xml")

#删除node
for country in root.findall('country'):
   rank = int(country.find('rank').text)
   if rank > 50:
     root.remove(country)

tree.write('output.xml')
test.xml
<jack>
    <country name="Liechtenstein">
        <rank updated="yes">2</rank>
        <year updated="yes">2009</year>
        <gdppc>141100</gdppc>
        <neighbor direction="E" name="Austria" />
        <neighbor direction="W" name="Switzerland" />
    </country>
    <country name="Singapore">
        <rank updated="yes">5</rank>
        <year updated="yes">2012</year>
        <gdppc>59900</gdppc>
        <neighbor direction="N" name="Malaysia" />
    </country>
    <country name="Panama">
        <rank updated="yes">69</rank>
        <year updated="yes">2012</year>
        <gdppc>13600</gdppc>
        <neighbor direction="W" name="Costa Rica" />
        <neighbor direction="E" name="Colombia" />
    </country>
</jack>
7.yaml:Python也可以很容易的处理ymal文档格式(ansible等格式),只不过需要安装一个模块,
参考文档:http://pyyaml.org/wiki/PyYAMLDocumentation
二:自定义模块:
1、导入自己编写的模块:
自定义模块一般都是自己写的可以是独立的一个.py文件,但是也可以是文件夹,不过文件夹想要是一个模块必须有__int__的目录才是模块,如:
例如:写一个logic模块,当其他模块调用的时候使用模块名+方法(函数名),如使用logic里面的模块的方法:
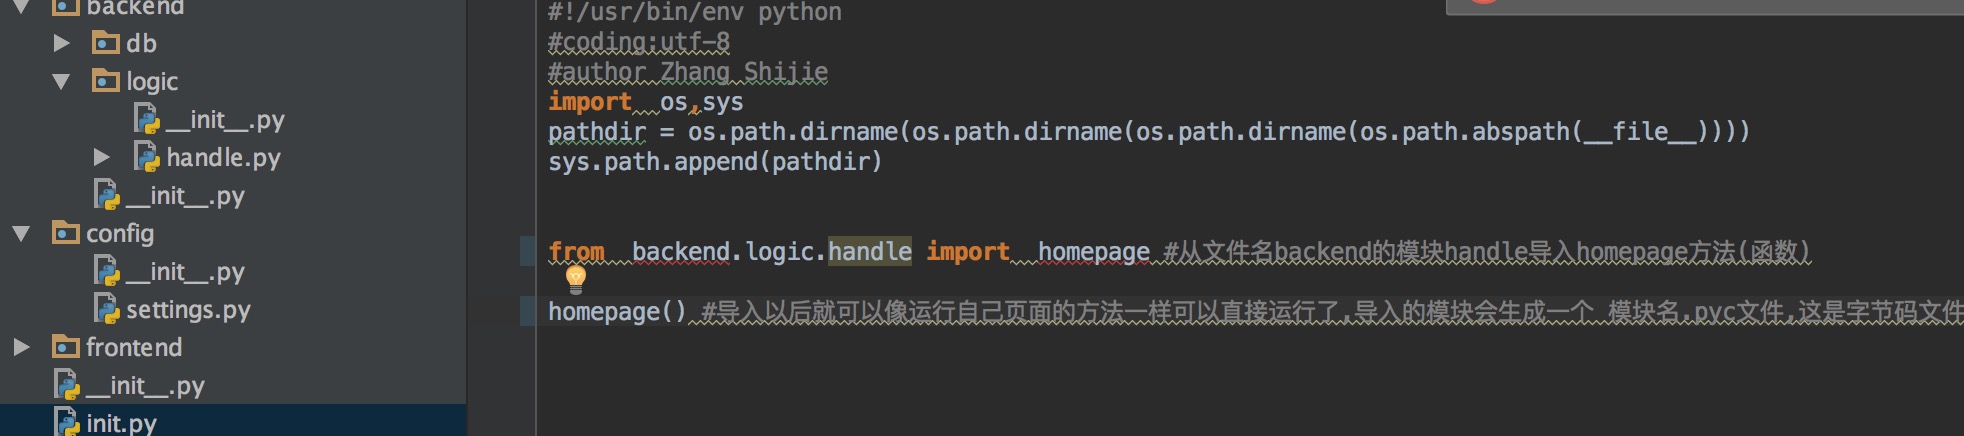
import os,sys
pathdir = os.path.dirname(os.path.dirname(os.path.dirname(os.path.abspath(__file__))))
sys.path.append(pathdir)
from backend.logic.handle import homepage

homepage()
2.安装及使用开源模块:如
可以通过yum、pip 、apt-get方式安装,具体取决于系统的支持
另外还可以通过源码安装,安装过程为:
在使用源码安装时,要先解决依赖环境,如gcc编译和python开发环境
yum install gcc
yum install python-devel
或
apt-get python-dev

通过源码安装python模块:
下载源码
解压源码
进入目录
编译源码    python setup.py build
安装源码    python setup.py install

安装完成后直接导入就行
注:如果是多版本并存,需要使用合适的python安装,如使用python3,就需要使用
python3 setup.py build
python3 setup.py install
3.安装paramiko模块:
Centos Or RHEL :
yum -y install pip
pip install paramiko
Windwos 系统安装:
1、下载pip
https://pypi.python.org/pypi/pip#downloads
2、解压pip包然后安装
python setup.py install
3、添加环境变量
C:Python34Scripts;(根据自己的python路径定)
4、安装paramiko
pip install paramiko
import paramiko

ssh = paramiko.SSHClient()
ssh.set_missing_host_key_policy(paramiko.AutoAddPolicy())
ssh.connect('10.16.59.103', 22, 'root', '123456')
stdin, stdout, stderr = ssh.exec_command('ifconfig')
a = stdout.read()
print(a)
ssh.close()
import os,sys
import paramiko

t = paramiko.Transport(('182.92.219.86',22))
t.connect(username='shuaige',password='123')
sftp = paramiko.SFTPClient.from_transport(t)
sftp.put('/tmp/test.py','/tmp/test.py')
t.close()

import os,sys
import paramiko

t = paramiko.Transport(('182.92.219.86',22))
t.connect(username='shuaige',password='123')
sftp = paramiko.SFTPClient.from_transport(t)
sftp.get('/tmp/test.py','/tmp/test2.py')
t.close()
import paramiko

pravie_key_path = '/home/auto/.ssh/id_rsa'
key = paramiko.RSAKey.from_private_key_file(pravie_key_path)

t = paramiko.Transport(('182.92.219.86',22))
t.connect(username='shuaige',pkey=key)

sftp = paramiko.SFTPClient.from_transport(t)
sftp.put('/tmp/test3.py','/tmp/test3.py')

t.close()

import paramiko

pravie_key_path = '/home/auto/.ssh/id_rsa'
key = paramiko.RSAKey.from_private_key_file(pravie_key_path)

t = paramiko.Transport(('182.92.219.86',22))
t.connect(username='shuaige',pkey=key)

sftp = paramiko.SFTPClient.from_transport(t)
sftp.get('/tmp/test3.py','/tmp/test4.py')

t.close()