I recently implemented a Custom Security provider that is used in a production environment. I had a few enquiries surrounding the implementation and thought it would be good to share an example implementation. Attached is a derived version of the provider I created but with a SQL Server Implementation.
The code ('SQLSecManager.rar') for this blog post can be downloaded fromhttp://www.k2underground.com/groups/k2_blackpearl_custom_security_provider/media/p/31587.aspx. Please ensure you login the Underground before accessing the link. Please also note the accompanying readme.txt
- Unzip the example files to a favorite temp location on a K2 BP VPC with all the standard K2 development and runtime artifacts installed
- Crack open SQL Server Management Studio and create a new empty database. Call it “EmpSec”. Execute the “SecSQLScript.txt” located in the Security Provider Implementation Folder. Make sure all the Tables, Test Data and Sprocs deploy.
3.a Sign and Compile the Security Implementation Project and copy the outputArnIT.K2SecurityProviderLibrary.Implementations.dll Assembly to the “C:\Program Files\K2 blackpearl\Host Server\Bin\securityproviders” folder after you stopped K2 Host Server.


3b. We need the Public Key token of the Compiled Security Assembly. Launch the VS Command Prompt and execute the ‘sn –T’ command to extract the value


3c. With K2 Host Server still stopped, execute the following SQL Command against the HostServer database. Ensure your public key token is used in the script’s 3rd parameter

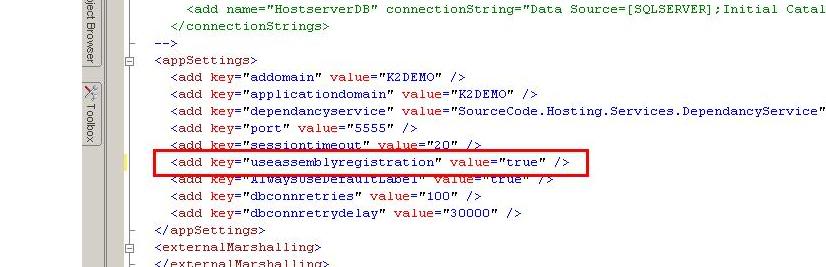
3d. Open the K2HostServer.config file and set the ‘useassemblyregistration’s value attribute to ‘true’
4.Start K2 Host Server and crack open another Query Window in SQL Man Studio.
(At this point you might be wondering why all this stopping and starting of K2 Host Server. The answer is twofold. Firstly, I take advantage of the 'auto creation' of the entry into the 'SecurityProviders' table K2 HostServer makes at startup and secondly, to enable my SQL script below to work! Note, there are NO errors in the script below. If you followed the steps correctly, this script execution will result in successful provider registration)
Run the following Script. Make sure K2 Host Server starts up before running the script!:
use [HostServer]
declare @id uniqueidentifier, @a_newid uniqueidentifier;
set @a_newid = newid()
select @id = SecurityProviderID from SecurityProviders where ProviderClassName = 'ArnIT.K2SecurityProviderLibrary.Implementations.SqlMembershipProviderProxy'
insert into SecurityLabels values (@a_newid, 'ArnIT Security', @id, null, @id, null, '0')
5. Stop K2 Host Server again and open up the “K2HostServer.config” located in “C:\Program Files\K2 blackpearl\Host Server\Bin”. Delete the < connectionStrings> node and its contents after learning the replacement settings. An example of the unencrypted settings is in the section above the connectionStrings node. By commenting that back, K2 Host Server will consume and encrypt it again upon startup, hence we can safely delete the original encrypted version. The idea is to register the SQL Connectionstring the Security Provider uses.
Deleting the Encrypted connectionStrings:

Recreating the connectionStrings section:
Add the connectionstring below and start K2 Host Server after saving the file.
<add name="ArnITEmpSecurityProvider.Connectionstring" connectionString="Data Source=BLACKPEARL;Database=EmpSec; Integrated Security=True" />

As mentioned, K2 Host Server will consume your settings and encrypt it. The “green” section should be deleted for production environments.
Encrypted connectionStrings section:

6. Restart K2 Host Server. Your provider will be registered after 4. above and you should be good to test it. The easiest way to verify registration completed successfully is to do a user lookup in workspace in any of the permissions sections


The next section will test the Security Provider Implementation. An example Expense Claim K2 Process is included in the zip file and needs to be exported to your environment.
7. You need to create the following Roles in workspace. These are used as destinations for the Claims Process:
Add the following DYNAMIC K2 Roles
1. “ArnIT EmpSys Administrator “ (Group "ArnIT Security:Administrator") [Claim Approval Activity Destination]
2. “ArnIT EmpSys Clerk” (Group "ArnIT Security:Worker") [Claim Processing Activity Destination]
It should look like the below:


8. Export the process and assign Start Permissions to all the “ArnIT” Groups. Ensure you save the permissions.

You should be good to test the process. I included a test application that basically starts a new instance of the claims process and approves it by actioning the worklist items. You should be able to plug any front end into this and point your UI Security Provider to your Custom Security Provider datastore.
9. Start the process and inspect the Worklist and Process Instance
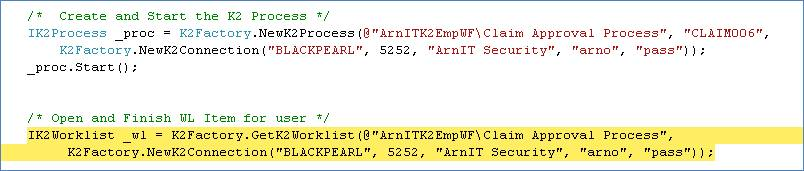


10. Finish the Worklist items for the “Claim Approval” Activity and inspect the Worklist and Process Instance


11. Finish off the “Claim Processing” tasks by adding a “WL Item” finish code section for Paul.
This example is tested and works on K2 blackpearl 0807. Dynamic Roles also works fine. The Filter Criteria for the Search is not implemented, but this should not be a too big a job to implement. The password sections should also be encrypted as per normal security patterns.
Feel free to have a look at the ASP.NET provider located athttp://www.k2underground.com/blogs/pitchblack/archive/2009/06/17/how-to-implement-a-asp-net-security-provider-for-k2-blackpearl.aspx