全文搜索
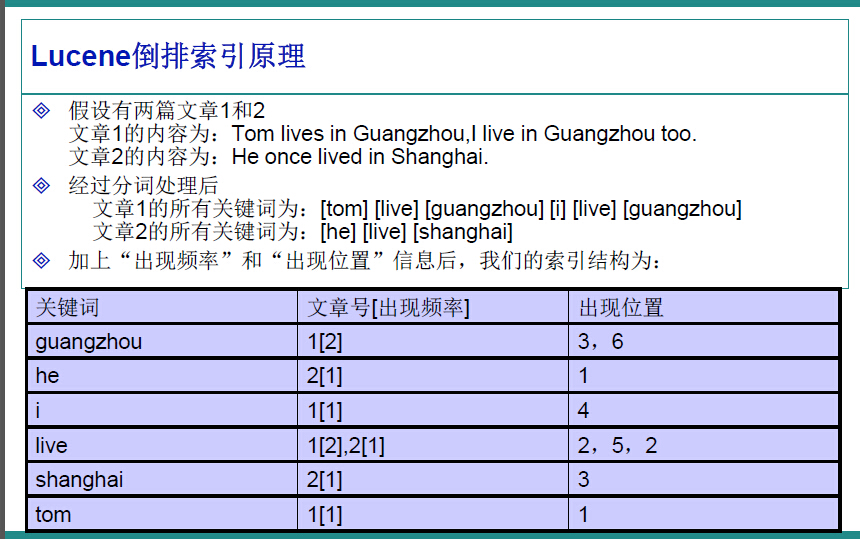
比如,我们一个文件夹中,或者一个磁盘中有很多的文件,记事本、world、Excel、pdf,我们想根据其中的关键词搜索包含的文件。例如,我们输入Lucene,所有内容含有Lucene的文件就会被检查出来。这就是所谓的全文检索。因此,很容易的我们想到,应该建立一个关键字与文件的相关映射,盗用ppt中的一张图,很明白的解释了这种映射如何实现。

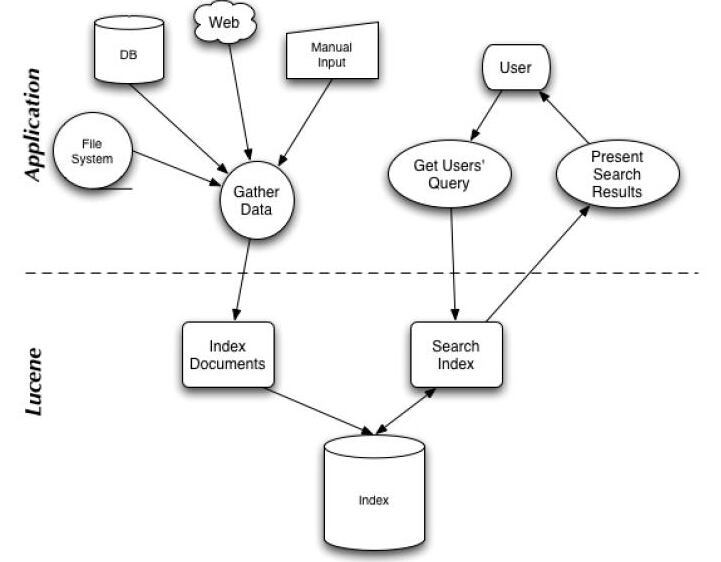
在Lucene中,就是使用这种“倒排索引”的技术,来实现相关映射。 有了这种映射关系,我们就来看看Lucene的架构设计。下面是Lucene的资料必出现的一张图,但也是其精髓的概括。

我们可以看到,Lucene的使用主要体现在两个步骤:
1 创建索引,通过IndexWriter对不同的文件进行索引的创建,并将其保存在索引相关文件存储的位置中。
2 通过索引查寻关键字相关文档。
 1     Analyzer analyzer = new StandardAnalyzer(Version.LUCENE_CURRENT);
 2
 3     // Store the index in memory:
 4     Directory directory = new RAMDirectory();
 5     // To store an index on disk, use this instead:
 6     //Directory directory = FSDirectory.open("/tmp/testindex");
 7     IndexWriterConfig config = new IndexWriterConfig(Version.LUCENE_CURRENT, analyzer);
 8     IndexWriter iwriter = new IndexWriter(directory, config);
 9     Document doc = new Document();
10     String text = "This is the text to be indexed.";
11     doc.add(new Field("fieldname", text, TextField.TYPE_STORED));
12     iwriter.addDocument(doc);
13     iwriter.close();
14
15     // Now search the index:
16     DirectoryReader ireader = DirectoryReader.open(directory);
17     IndexSearcher isearcher = new IndexSearcher(ireader);
18     // Parse a simple query that searches for "text":
19     QueryParser parser = new QueryParser(Version.LUCENE_CURRENT, "fieldname", analyzer);
20     Query query = parser.parse("text");
21     ScoreDoc[] hits = isearcher.search(query, null, 1000).scoreDocs;
22     assertEquals(1, hits.length);
23     // Iterate through the results:
24     for (int i = 0; i < hits.length; i++) {
25       Document hitDoc = isearcher.doc(hits[i].doc);
26       assertEquals("This is the text to be indexed.", hitDoc.get("fieldname"));
27     }
28     ireader.close();
29     directory.close();
索引的创建
首先,我们需要定义一个词法分析器。
比如一句话,“我爱我们的中国!”,如何对他拆分,扣掉停顿词“的”,提取关键字“我”“我们”“中国”等等。这就要借助的词法分析器Analyzer来实现,这里面使用的是标准的词法分析器,如果专门针对汉语,还可以搭配paoding,进行使用。
1 Analyzer analyzer = new StandardAnalyzer(Version.LUCENE_CURRENT);
参数中的Version.LUCENE_CURRENT,代表使用当前的Lucene版本,本文环境中也可以写成Version.LUCENE_40。
第二步,确定索引文件存储的位置,Lucene提供给我们两种方式:
1 本地文件存储
1 Directory directory = FSDirectory.open("/tmp/testindex");
2 内存存储
1 Directory directory = new RAMDirectory();
可以根据自己的需要进行设定。
第三步,创建IndexWriter,进行索引文件的写入。
1 IndexWriterConfig config = new IndexWriterConfig(Version.LUCENE_CURRENT, analyzer);
2 IndexWriter iwriter = new IndexWriter(directory, config);
这里的IndexWriterConfig,据官方文档介绍,是对indexWriter的配置,其中包含了两个参数,第一个是目前的版本,第二个是词法分析器Analyzer。
第四步,内容提取,进行索引的存储
1 Document doc = new Document();
2 String text = "This is the text to be indexed.";
3 doc.add(new Field("fieldname", text, TextField.TYPE_STORED));
4 iwriter.addDocument(doc);
5 iwriter.close();
第一行,申请了一个document对象,这个类似于数据库中的表中的一行。
第二行,是我们即将索引的字符串。
第三行,把字符串存储起来(因为设置了TextField.TYPE_STORED,如果不想存储,可以使用其他参数,详情参考官方文档),并存储“表明”为"fieldname".
第四行,把doc对象加入到索引创建中。
第五行,关闭IndexWriter,提交创建内容。
这就是索引创建的过程。
关键字查询:
第一步,打开存储位置
1 DirectoryReader ireader = DirectoryReader.open(directory);
第二步,创建搜索器
1 IndexSearcher isearcher = new IndexSearcher(ireader);
第三步,类似SQL,进行关键字查询
1 QueryParser parser = new QueryParser(Version.LUCENE_CURRENT, "fieldname", analyzer);
2 Query query = parser.parse("text");
3 ScoreDoc[] hits = isearcher.search(query, null, 1000).scoreDocs;
4 assertEquals(1, hits.length);
5 for (int i = 0; i < hits.length; i++) {
6     Document hitDoc = isearcher.doc(hits[i].doc);
7     assertEquals("This is the text to be indexed.",hitDoc.get("fieldname"));
8 }
这里,我们创建了一个查询器,并设置其词法分析器,以及查询的“表名“为”fieldname“。查询结果会返回一个集合,类似SQL的ResultSet,我们可以提取其中存储的内容。
关于各种不同的查询方式,可以参考官方手册,或者推荐的PPT
第四步,关闭查询器等。
1 ireader.close();
2 directory.close();