https://blog.csdn.net/jymn_chen/article/details/10023081
2013年08月17日 15:02:28 Jymn_Chen 阅读数:12258
先上一张图:
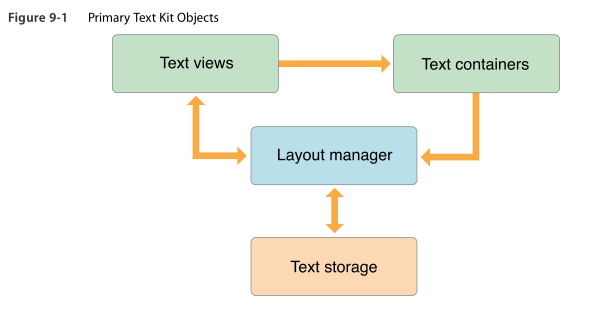
这是使用UITextView时用到的iOS7新增加的类:NSTextContainer、NSLayoutManager、NSTextStorage及其相互关系:
这三个新出的类还没有在官方出独立的class reference,但是在新出的UIKit_Framework上已经有这些类的相关说明及使用方法,当然官方还会更新。
以下是摘自文档的部分语句:
首先是NSTextContainer:
The NSTextContainer class defines a region in which text is laid out.
An NSTextContainer object defines rectangular regions, and you can define exclusion paths inside the textcontainer'sboundingrectanglesothattextflowsaroundtheexclusionpathasitislaidout.
接着是NSLayoutManager:
An NSLayoutManager object coordinates the layout and display of characters held in an NSTextStorage object. It maps Unicode character codes to glyphs, sets the glyphs in a series of NSTextContainer objects, and displays them in a series of text view objects.
最后是NSTextStorage:
NSTextStorage is a semiconcrete subclass of NSMutableAttributedString that manages a set of client NSLayoutManagerobjects,notifyingthemofanychangestoitscharactersorattributessothattheycanrelay and redisplay the text as needed.
按照个人理解:
NSTextStorage保存并管理UITextView要展示的文字内容,该类是NSMutableAttributedString的子类,由于可以灵活地往文字添加或修改属性,所以非常适用于保存并修改文字属性。
NSLayoutManager用于管理NSTextStorage其中的文字内容的排版布局。
NSTextContainer则定义了一个矩形区域用于存放已经进行了排版并设置好属性的文字。
以上三者是相互包含相互作用的层次关系。
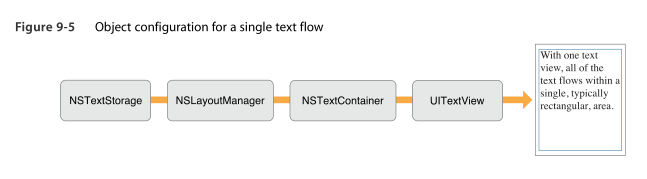
接下来是三种类的使用:
CGRect textViewRect = CGRectInset(self.view.bounds, 10.0, 20.0);
// NSTextContainer
NSTextContainer *container = [[NSTextContainer alloc] initWithSize:CGSizeMake(textViewRect.size.width, CGFLOAT_MAX)]; // new in iOS 7.0
container.widthTracksTextView = YES; // Controls whether the receiveradjusts the width of its bounding rectangle when its text view is resized
// NSLayoutManager
NSLayoutManager *layoutManager = [[NSLayoutManager alloc] init]; // new in iOS 7.0
[layoutManager addTextContainer:container];
// NSTextStorage subclass
self.textStorage = [[TextStorage alloc] init]; // new in iOS 7.0
[self.textStorage addLayoutManager:layoutManager];
首先是初始化类对象,然后通过add方法来建立三者之间的关系。
最后必须注意要在UITextView中通过initWithFrame:textContainer:方法来添加相应的NSTextContainer从而设置好对应的文字。
// UITextView
UITextView *newTextView = [[UITextView alloc] initWithFrame:textViewRect textContainer:container];
newTextView.autoresizingMask = UIViewAutoresizingFlexibleHeight | UIViewAutoresizingFlexibleWidth;
newTextView.scrollEnabled = YES;
newTextView.keyboardDismissMode = UIScrollViewKeyboardDismissModeOnDrag;
// newTextView.editable = NO;
newTextView.font = [UIFont fontWithName:self.textStorage.fontName size:18.0];
newTextView.dataDetectorTypes = UIDataDetectorTypeAll;
self.textView = newTextView;
[self.view addSubview:self.textView];
如果要使用NSTextStorage类来改变文字的属性,分别使用
[_textStorage beginEditing];
[_textStorage endEditing];
来向UITextStorage类或其子类发送开始或完成文字编辑的消息。在两条语句之间进行相应的文字编辑,例如为文字添加letterpress style:
[_textStorage beginEditing];
NSDictionary *attrsDic = @{NSTextEffectAttributeName: NSTextEffectLetterpressStyle};
UIKIT_EXTERN NSString *const NSTextEffectAttributeName NS_AVAILABLE_IOS(7_0); // NSString, default nil: no text effect
NSMutableAttributedString *mutableAttrString = [[NSMutableAttributedString alloc] initWithString:@"Letterpress" attributes:attrsDic];
NSAttributedString *appendAttrString = [[NSAttributedString alloc] initWithString:@" Append:Letterpress"];
[mutableAttrString appendAttributedString:appendAttrString];
[_textStorage setAttributedString:mutableAttrString];
[_textStorage endEditing];
可以看到通过attribute来改变文字的属性是非常简单的。
又如通过NSTextStorage类为文字添加颜色属性:
[_textStorage beginEditing];
/* Dynamic Coloring Text */
self.textStorage.bookItem = [[BookItem alloc] initWithBookName:@"Dynamic Coloring.rtf"];
self.textStorage.tokens = @{@"Alice": @{NSForegroundColorAttributeName: [UIColor redColor]},
@"Rabbit": @{NSForegroundColorAttributeName: [UIColor greenColor]},
DefaultTokenName: @{NSForegroundColorAttributeName: [UIColor blackColor]}
};
[_textStorage setAttributedString:_textStorage.bookItem.content];
[_textStorage endEditing];
其处理过程要看看重写的NSTextStorage子类:
接口部分:
NSString *const DefaultTokenName;
@interface TextStorage : NSTextStorage
@property (nonatomic, strong) NSString *fontName;
@property (nonatomic, copy) NSDictionary *tokens; // a dictionary, keyed by text snippets(小片段), with attributes we want to add
@property (nonatomic, strong) BookItem *bookItem;
@end
以及.m中的匿名类别:
#import "TextStorage.h"
NSString *const DefaultTokenName = @"DefaultTokenName";
@interface TextStorage ()
{
NSMutableAttributedString *_storingText; // 存储的文字
BOOL _dynamicTextNeedsUpdate; // 文字是否需要更新
}
@end
然后是基本的初始化方法:
// get fontName Snell RoundHand
-(NSString *)fontName
{
NSArray *fontFamily = [UIFont familyNames];
NSString *str = fontFamily[2];
// NSLog(@"%@", str);
return str;
}
// initial
-(id)init
{
self = [super init];
if (self) {
_storingText = [[NSMutableAttributedString alloc] init];
}
return self;
}
重点来了,重写NSTextStorage类的子类必须重载以下四个方法:
// Must override NSAttributedString primitive method
-(NSString *)string // 返回保存的文字
-(NSDictionary *)attributesAtIndex:(NSUInteger)location effectiveRange:(NSRangePointer)range // 获取指定范围内的文字属性
// Must override NSMutableAttributedString primitive method
-(void)setAttributes:(NSDictionary *)attrs range:(NSRange)range // 设置指定范围内的文字属性
-(void)replaceCharactersInRange:(NSRange)range withString:(NSString *)str // 修改指定范围内的文字
具体实现如下:
// Must override NSAttributedString primitive method
// 返回保存的文字
-(NSString *)string
{
return [_storingText string];
}
// 获取指定范围内的文字属性
-(NSDictionary *)attributesAtIndex:(NSUInteger)location effectiveRange:(NSRangePointer)range
{
return [_storingText attributesAtIndex:location effectiveRange:range];
}
_storingText保存了NSTextStorage中的文字,string方法直接返回该变量的string值。
要获取文字属性时也可以直接从_storingText入手。
// Must override NSMutableAttributedString primitive method
// 设置指定范围内的文字属性
-(void)setAttributes:(NSDictionary *)attrs range:(NSRange)range
{
[self beginEditing];
[_storingText setAttributes:attrs range:range];
[self edited:NSTextStorageEditedAttributes range:range changeInLength:0]; // Notifies and records a recent change. If there are no outstanding -beginEditing calls, this method calls -processEditing to trigger post-editing processes. This method has to be called by the primitives after changes are made if subclassed and overridden. editedRange is the range in the original string (before the edit).
[self endEditing];
}
// 修改指定范围内的文字
-(void)replaceCharactersInRange:(NSRange)range withString:(NSString *)str
{
[self beginEditing];
[_storingText replaceCharactersInRange:range withString:str];
[self edited:NSTextStorageEditedAttributes | NSTextStorageEditedCharacters range:range changeInLength:str.length - range.length];
_dynamicTextNeedsUpdate = YES;
[self endEditing];
}
可以看到在设置或要改变文字的属性时必须分别调用beginEditing和endEditing方法,在两者之间进行相应的动作。
如果NSTextStorge类收到endEditing的通知,则调用processEditing方法进行处理。
// Sends out -textStorage:willProcessEditing, fixes the attributes, sends out -textStorage:didProcessEditing, and notifies the layout managers of change with the -processEditingForTextStorage:edited:range:changeInLength:invalidatedRange: method. Invoked from -edited:range:changeInLength: or -endEditing.
-(void)processEditing
{
if (_dynamicTextNeedsUpdate) {
_dynamicTextNeedsUpdate = NO;
[self performReplacementsForCharacterChangeInRange:[self editedRange]];
}
[super processEditing];
}
这是iOS7新增的用于设置文字属性和进行排版的三个主要的类,本文主要说了NSTextStorage类。另外两个类我会继续跟进学习。
对比起iOS6及以前,处理文字的排版布局和重置属性变得更加简便。
Demo已经上传了,可以下载看看。
Snell Roundhand是一种我觉得非常华丽的字体,非常喜欢。最后上张程序运行结果的图:
原文:https://blog.csdn.net/jymn_chen/article/details/10023081