pymsql
pymsql是Python中操作MySQL的模块,其使用方法和MySQLdb几乎相同。
下载安装
1 pip3 install pymysql
使用操作
1、执行SQL
 1 #!/usr/bin/env python
 2 # -*- coding:utf-8 -*-
 3 import pymysql
 4
 5 # 创建连接
 6 conn = pymysql.connect(host='127.0.0.1', port=3306, user='root', passwd='123', db='t1')
 7 # 创建游标
 8 cursor = conn.cursor()
 9
10 # 执行SQL,并返回收影响行数
11 effect_row = cursor.execute("update hosts set host = '1.1.1.2'")
12
13 # 执行SQL,并返回受影响行数
14 #effect_row = cursor.execute("update hosts set host = '1.1.1.2' where nid > %s", (1,))
15
16 # 执行SQL,并返回受影响行数
17 #effect_row = cursor.executemany("insert into hosts(host,color_id)values(%s,%s)", [("1.1.1.11",1),("1.1.1.11",2)])
18
19
20 # 提交,不然无法保存新建或者修改的数据
21 conn.commit()
22
23 # 关闭游标
24 cursor.close()
25 # 关闭连接
26 conn.close()
示例:
 1 import pymysql
 2
 3
 4 conn = pymysql.connect(host="10.37.129.3",port=3306,user="egon",passwd="123456",db="homework",charset="utf8")
 5
 6 cursor = conn.cursor()
 7
 8
 9 #方式一:
10
11 sql = "select * from course where cid=1"
12 effect_row = cursor.execute(sql)
13
14
15 # 方式二:
16 sql = "select * from course where cid='%s'" %(1,)
17 effect_row = cursor.execute(sql)
18
19
20 # 方式三  普通  列表
21 sql = "select * from course where cid='%s'"
22
23 effect_row = cursor.execute(sql,1)
24 effect_row = cursor.execute(sql,[1])
25
26
27 # 方式四  字典格式
28
29 sql = "select * from course where cid='%(u)s'"
30 effect_row = cursor.execute(sql,{"u":1})
31
32
33 row_1 = cursor.fetchone()
34
35 cursor.close()
36 conn.close()
37
38 print(row_1)
2、获取新创建数据自增ID
 1 #!/usr/bin/env python
 2 # -*- coding:utf-8 -*-
 3 import pymysql
 4
 5 conn = pymysql.connect(host='127.0.0.1', port=3306, user='root', passwd='123', db='t1')
 6 cursor = conn.cursor()
 7 cursor.executemany("insert into hosts(host,color_id)values(%s,%s)", [("1.1.1.11",1),("1.1.1.11",2)])
 8 conn.commit()
 9 cursor.close()
10 conn.close()
11
12 # 获取最新自增ID
13 new_id = cursor.lastrowid
3、获取查询数据
 1 #!/usr/bin/env python
 2 # -*- coding:utf-8 -*-
 3 import pymysql
 4
 5 conn = pymysql.connect(host='127.0.0.1', port=3306, user='root', passwd='123', db='t1')
 6 cursor = conn.cursor()
 7 cursor.execute("select * from hosts")
 8
 9 # 获取第一行数据
10 row_1 = cursor.fetchone()
11
12 # 获取前n行数据
13 # row_2 = cursor.fetchmany(3)
14 # 获取所有数据
15 # row_3 = cursor.fetchall()
16
17 conn.commit()
18 cursor.close()
19 conn.close()
注:在fetch数据时按照顺序进行,可以使用cursor.scroll(num,mode)来移动游标位置,如:
- cursor.scroll(1,mode='relative') # 相对当前位置移动
- cursor.scroll(2,mode='absolute') # 相对绝对位置移动
4、fetch数据类型
关于默认获取的数据是元祖类型,如果想要或者字典类型的数据,即:
 1 #!/usr/bin/env python
 2 # -*- coding:utf-8 -*-
 3 import pymysql
 4
 5 conn = pymysql.connect(host='127.0.0.1', port=3306, user='root', passwd='123', db='t1')
 6
 7 # 游标设置为字典类型
 8 cursor = conn.cursor(cursor=pymysql.cursors.DictCursor)
 9 r = cursor.execute("call p1()")
10
11 result = cursor.fetchone()
12
13 conn.commit()
14 cursor.close()
15 conn.close()
5、插入演示
 1 import pymysql
 2
 3
 4 conn = pymysql.connect(host="10.37.129.3",port=3306,user="egon",passwd="123456",db="student_info",charset="utf8")
 5
 6 cursor = conn.cursor(cursor=pymysql.cursors.DictCursor)
 7
 8
 9 #插入一行
10 # sql = "insert into student_info(sname,gender,class_id) VALUES('alex1','女',2)"
11
12 #插入多行
13 sql = "insert into student_info(sname,gender,class_id) VALUES('alex1','女',2),('alex2','女',2),('alex3','女',2)"
14
15 r = cursor.execute(sql)
16
17 #或
18
19 sql = "insert into userinfo(username,password) values(%s,%s)"
20 # 受影响的行数
21 r = cursor.executemany(sql,[('egon','sb'),('laoyao','BS')])
22
23
24
25
26 conn.commit()
27 cursor.close()
28 conn.close()
29
30 print(r)
6、补充
 1 # sql 注入
 2 import pymysql
 3
 4 user = input("username:")
 5 pwd = input("password:")
 6
 7 conn = pymysql.connect(host="localhost",user='root',password='',database="db3")   #建立与客户端的链接
 8 cursor = conn.cursor()
 9 sql = "select * from userinfo where username='%s' and pwd='%s'" %(user,pwd,) #不要自己定义放置占位符user和pwd,防数据库被泄露
10 # select * from userinfo where username='uu' or 1=1 -- ' and password='%s'
11 #上面部分会理解成,第一部分:select * from userinfo where username='uu',第二部分:or 1=1,第三部分:-- 注释,
12 # 第四部分:' and password='%s',第四部分会当成注释内容。所以执行该程序会显示登录成功。
13 cursor.execute(sql)         #执行sql语句
14 result = cursor.fetchone()  #返回第一行内容
15 #关闭连接
16 cursor.close()
17 conn.close()
18
19 if result:
20     print('登录成功')
21 else:
22     print('登录失败')
 1 import pymysql
 2 user = input("username:")
 3 pwd = input("password:")
 4
 5 conn = pymysql.connect(host="localhost",user='root',password='',database="db3")
 6 cursor = conn.cursor()
 7 sql = "select * from userinfo where username=%s and pwd=%s"
 8 # cursor.execute(sql,(user,pwd))
 9 cursor.execute(sql,[user,pwd])    #cursor.execute(sql,user,pwd)也可写成cursor.execute(sql,[user,pwd]),效果一样
10 # cursor.execute(sql,{'u':user,'p':pwd})    #sql中加入key值,打印结果就会变成字典的格式而不是元组格式
11 result = cursor.fetchone()                  #取一行
12 cursor.close()
13 conn.close()
14 if result:
15     print('登录成功')
16 else:
17     print('登录失败')
18
19 print(result)
20
 1 import pymysql
 2
 3 # 增加,删,该
 4 #增
 5 # conn = pymysql.connect(host="localhost",user='root',password='',database="db3")
 6 # cursor = conn.cursor()
 7 # sql = "insert into userinfo(username,pwd) values('root','123123')"
 8 # 受影响的行数
 9 # r = cursor.execute(sql)
10 # #  ******
11 # conn.commit()     #对数据库有改变均要执行conn.commit()命令,提交给数据库。所以增删改均需有这条命令,查不需要。
12 # cursor.close()
13 # conn.close()
14
15 # conn = pymysql.connect(host="localhost",user='root',password='',database="db3")
16 # cursor = conn.cursor()
17 # # sql = "insert into userinfo(username,pwd) values(%s,%s)"
18 # # cursor.execute(sql,(user,pwd,))
19 #
20 # sql = "insert into userinfo(username,password) values(%s,%s)"
21 # # 受影响的行数
22 # r = cursor.executemany(sql,[('egon','sb'),('laoyao','BS')])
23 # #  ******
24 # conn.commit()
25 # cursor.close()
26 # conn.close()
27
28
29
30
31 # 查
32 # conn = pymysql.connect(host="localhost",user='root',password='',database="db666")
33 # cursor = conn.cursor(cursor=pymysql.cursors.DictCursor)
34 # sql = "select * from userinfo"
35 # cursor.execute(sql)
36
37 # cursor.scroll(1,mode='relative')  # 相对当前位置移动
38 # cursor.scroll(2,mode='absolute') # 相对绝对位置移动
39 # result = cursor.fetchone()
40 # print(result)
41 # result = cursor.fetchone()
42 # print(result)
43 # result = cursor.fetchone()
44 # print(result)
45 # result = cursor.fetchall()
46 # print(result)
47
48
49 # result = cursor.fetchmany(4)
50 # print(result)
51 # cursor.close()
52 # conn.close()
53
54
55
56
57 # 新插入数据的自增ID: cursor.lastrowid
58 # import pymysql
59 #
60 # conn = pymysql.connect(host="localhost",user='root',password='',database="db3")
61 # cursor = conn.cursor()
62 # sql = "insert into userinfo(username,pwd) values('asdfasdf','123123')"
63 # cursor.execute(sql)
64 # conn.commit()
65 # print(cursor.lastrowid)       #lastrowid最后一个自增id
66 # cursor.close()
67 # conn.close()
SQLAchemy
SQLAlchemy是Python编程语言下的一款ORM框架,该框架建立在数据库API之上,使用关系对象映射进行数据库操作,简言之便是:将对象转换成SQL,然后使用数据API执行SQL并获取执行结果。
安装:
1 pip3 install SQLAlchemy
SQLAlchemy本身无法操作数据库,其必须以来pymsql等第三方插件,Dialect用于和数据API进行交流,根据配置文件的不同调用不同的数据库API,
从而实现对数据库的操作,如:
 1 MySQL-Python
 2     mysql+mysqldb://<user>:<password>@<host>[:<port>]/<dbname>
 3
 4 pymysql
 5     mysql+pymysql://<username>:<password>@<host>/<dbname>[?<options>]
 6
 7 MySQL-Connector
 8     mysql+mysqlconnector://<user>:<password>@<host>[:<port>]/<dbname>
 9
10 cx_Oracle
11     oracle+cx_oracle://user:pass@host:port/dbname[?key=value&key=value...]
12
13 更多详见:http://docs.sqlalchemy.org/en/latest/dialects/index.html
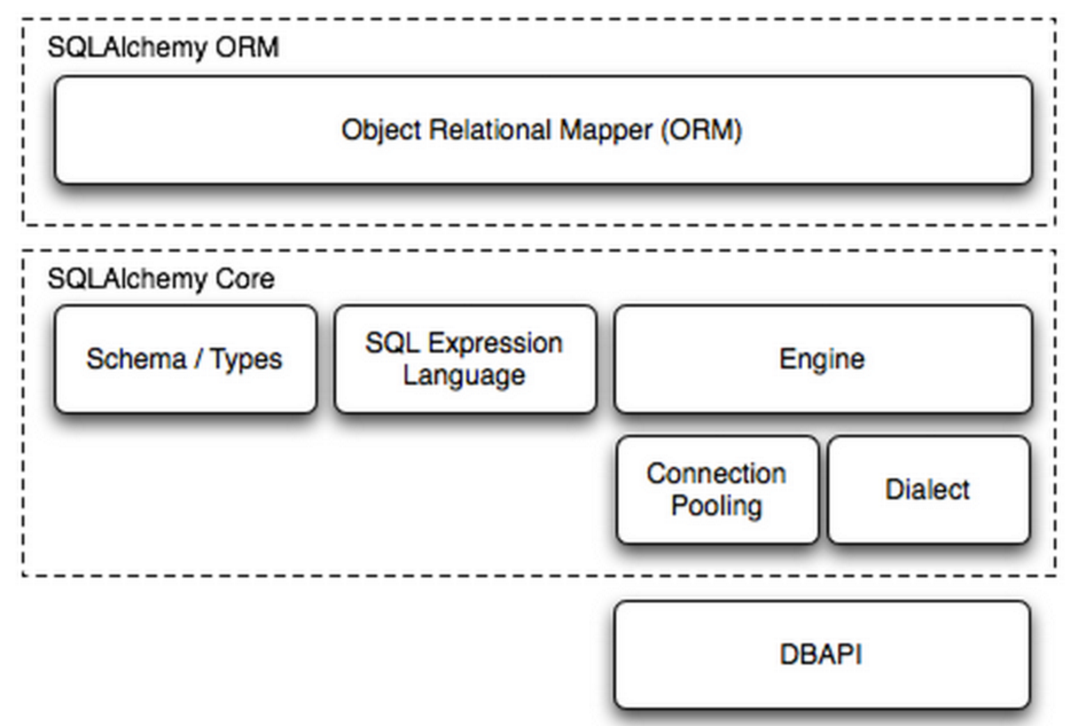
一、内部处理
使用 Engine/ConnectionPooling/Dialect 进行数据库操作,Engine使用ConnectionPooling连接数据库,然后再通过Dialect执行SQL语句。
 1 #!/usr/bin/env python
 2 # -*- coding:utf-8 -*-
 3 from sqlalchemy import create_engine
 4
 5
 6 engine = create_engine("mysql+pymysql://root:123@127.0.0.1:3306/t1", max_overflow=5)
 7
 8 # 执行SQL
 9 # cur = engine.execute(
10 #     "INSERT INTO hosts (host, color_id) VALUES ('1.1.1.22', 3)"
11 # )
12
13 # 新插入行自增ID
14 # cur.lastrowid
15
16 # 执行SQL
17 # cur = engine.execute(
18 #     "INSERT INTO hosts (host, color_id) VALUES(%s, %s)",[('1.1.1.22', 3),('1.1.1.221', 3),]
19 # )
20
21
22 # 执行SQL
23 # cur = engine.execute(
24 #     "INSERT INTO hosts (host, color_id) VALUES (%(host)s, %(color_id)s)",
25 #     host='1.1.1.99', color_id=3
26 # )
27
28 # 执行SQL
29 # cur = engine.execute('select * from hosts')
30 # 获取第一行数据
31 # cur.fetchone()
32 # 获取第n行数据
33 # cur.fetchmany(3)
34 # 获取所有数据
35 # cur.fetchall()
二、ORM功能使用
使用 ORM/Schema Type/SQL Expression Language/Engine/ConnectionPooling/Dialect 所有组件对数据进行操作。根据类创建对象,对象转换成SQL,执行SQL。
1、创建表
 1 #!/usr/bin/env python
 2 # -*- coding:utf-8 -*-
 3 from sqlalchemy.ext.declarative import declarative_base
 4 from sqlalchemy import Column, Integer, String, ForeignKey, UniqueConstraint, Index
 5 from sqlalchemy.orm import sessionmaker, relationship
 6 from sqlalchemy import create_engine
 7
 8 engine = create_engine("mysql+pymysql://root:123@127.0.0.1:3306/t1", max_overflow=5)
 9
10 Base = declarative_base()
11
12 # 创建单表
13 class Users(Base):
14     __tablename__ = 'users'
15     id = Column(Integer, primary_key=True)
16     name = Column(String(32))
17     extra = Column(String(16))
18
19     __table_args__ = (
20     UniqueConstraint('id', 'name', name='uix_id_name'),
21         Index('ix_id_name', 'name', 'extra'),
22     )
23
24
25 # 一对多
26 class Favor(Base):
27     __tablename__ = 'favor'
28     nid = Column(Integer, primary_key=True)
29     caption = Column(String(50), default='red', unique=True)
30
31
32 class Person(Base):
33     __tablename__ = 'person'
34     nid = Column(Integer, primary_key=True)
35     name = Column(String(32), index=True, nullable=True)
36     favor_id = Column(Integer, ForeignKey("favor.nid"))
37
38
39 # 多对多
40 class Group(Base):
41     __tablename__ = 'group'
42     id = Column(Integer, primary_key=True)
43     name = Column(String(64), unique=True, nullable=False)
44     port = Column(Integer, default=22)
45
46
47 class Server(Base):
48     __tablename__ = 'server'
49
50     id = Column(Integer, primary_key=True, autoincrement=True)
51     hostname = Column(String(64), unique=True, nullable=False)
52
53
54 class ServerToGroup(Base):
55     __tablename__ = 'servertogroup'
56     nid = Column(Integer, primary_key=True, autoincrement=True)
57     server_id = Column(Integer, ForeignKey('server.id'))
58     group_id = Column(Integer, ForeignKey('group.id'))
59
60
61 def init_db():
62     Base.metadata.create_all(engine)
63
64
65 def drop_db():
66     Base.metadata.drop_all(engine)
注:设置外检的另一种方式 ForeignKeyConstraint(['other_id'], ['othertable.other_id'])
2、操作表


 1 #!/usr/bin/env python
 2 # -*- coding:utf-8 -*-
 3 from sqlalchemy.ext.declarative import declarative_base
 4 from sqlalchemy import Column, Integer, String, ForeignKey, UniqueConstraint, Index
 5 from sqlalchemy.orm import sessionmaker, relationship
 6 from sqlalchemy import create_engine
 7
 8 engine = create_engine("mysql+pymysql://root:123@127.0.0.1:3306/t1", max_overflow=5)
 9
10 Base = declarative_base()
11
12 # 创建单表
13 class Users(Base):
14     __tablename__ = 'users'
15     id = Column(Integer, primary_key=True)
16     name = Column(String(32))
17     extra = Column(String(16))
18
19     __table_args__ = (
20     UniqueConstraint('id', 'name', name='uix_id_name'),
21         Index('ix_id_name', 'name', 'extra'),
22     )
23
24     def __repr__(self):
25         return "%s-%s" %(self.id, self.name)
26
27 # 一对多
28 class Favor(Base):
29     __tablename__ = 'favor'
30     nid = Column(Integer, primary_key=True)
31     caption = Column(String(50), default='red', unique=True)
32
33     def __repr__(self):
34         return "%s-%s" %(self.nid, self.caption)
35
36 class Person(Base):
37     __tablename__ = 'person'
38     nid = Column(Integer, primary_key=True)
39     name = Column(String(32), index=True, nullable=True)
40     favor_id = Column(Integer, ForeignKey("favor.nid"))
41     # 与生成表结构无关,仅用于查询方便
42     favor = relationship("Favor", backref='pers')
43
44 # 多对多
45 class ServerToGroup(Base):
46     __tablename__ = 'servertogroup'
47     nid = Column(Integer, primary_key=True, autoincrement=True)
48     server_id = Column(Integer, ForeignKey('server.id'))
49     group_id = Column(Integer, ForeignKey('group.id'))
50     group = relationship("Group", backref='s2g')
51     server = relationship("Server", backref='s2g')
52
53 class Group(Base):
54     __tablename__ = 'group'
55     id = Column(Integer, primary_key=True)
56     name = Column(String(64), unique=True, nullable=False)
57     port = Column(Integer, default=22)
58     # group = relationship('Group',secondary=ServerToGroup,backref='host_list')
59
60
61 class Server(Base):
62     __tablename__ = 'server'
63
64     id = Column(Integer, primary_key=True, autoincrement=True)
65     hostname = Column(String(64), unique=True, nullable=False)
66
67
68
69
70 def init_db():
71     Base.metadata.create_all(engine)
72
73
74 def drop_db():
75     Base.metadata.drop_all(engine)
76
77
78 Session = sessionmaker(bind=engine)
79 session = Session()
80
81 表结构 + 数据库连接
增
1 obj = Users(name="alex0", extra='sb')
2 session.add(obj)
3 session.add_all([
4     Users(name="alex1", extra='sb'),
5     Users(name="alex2", extra='sb'),
6 ])
7 session.commit()
删
1 session.query(Users).filter(Users.id > 2).delete()
2 session.commit()
改
1 session.query(Users).filter(Users.id > 2).update({"name" : "099"})
2 session.query(Users).filter(Users.id > 2).update({Users.name: Users.name + "099"}, synchronize_session=False)
3 session.query(Users).filter(Users.id > 2).update({"num": Users.num + 1}, synchronize_session="evaluate")
4 session.commit()
查
1 ret = session.query(Users).all()
2 ret = session.query(Users.name, Users.extra).all()
3 ret = session.query(Users).filter_by(name='alex').all()
4 ret = session.query(Users).filter_by(name='alex').first()
5
6 ret = session.query(Users).filter(text("id<:value and name=:name")).params(value=224, name='fred').order_by(User.id).all()
7
8 ret = session.query(Users).from_statement(text("SELECT * FROM users where name=:name")).params(name='ed').all()
补充
 1 # 条件
 2 ret = session.query(Users).filter_by(name='alex').all()
 3 ret = session.query(Users).filter(Users.id > 1, Users.name == 'eric').all()
 4 ret = session.query(Users).filter(Users.id.between(1, 3), Users.name == 'eric').all()
 5 ret = session.query(Users).filter(Users.id.in_([1,3,4])).all()
 6 ret = session.query(Users).filter(~Users.id.in_([1,3,4])).all()
 7 ret = session.query(Users).filter(Users.id.in_(session.query(Users.id).filter_by(name='eric'))).all()
 8 from sqlalchemy import and_, or_
 9 ret = session.query(Users).filter(and_(Users.id > 3, Users.name == 'eric')).all()
10 ret = session.query(Users).filter(or_(Users.id < 2, Users.name == 'eric')).all()
11 ret = session.query(Users).filter(
12     or_(
13         Users.id < 2,
14         and_(Users.name == 'eric', Users.id > 3),
15         Users.extra != ""
16     )).all()
17
18
19 # 通配符
20 ret = session.query(Users).filter(Users.name.like('e%')).all()
21 ret = session.query(Users).filter(~Users.name.like('e%')).all()
22
23 # 限制
24 ret = session.query(Users)[1:2]
25
26 # 排序
27 ret = session.query(Users).order_by(Users.name.desc()).all()
28 ret = session.query(Users).order_by(Users.name.desc(), Users.id.asc()).all()
29
30 # 分组
31 from sqlalchemy.sql import func
32
33 ret = session.query(Users).group_by(Users.extra).all()
34 ret = session.query(
35     func.max(Users.id),
36     func.sum(Users.id),
37     func.min(Users.id)).group_by(Users.name).all()
38
39 ret = session.query(
40     func.max(Users.id),
41     func.sum(Users.id),
42     func.min(Users.id)).group_by(Users.name).having(func.min(Users.id) >2).all()
43
44 # 连表
45
46 ret = session.query(Users, Favor).filter(Users.id == Favor.nid).all()
47
48 ret = session.query(Person).join(Favor).all()
49
50 ret = session.query(Person).join(Favor, isouter=True).all()
51
52
53 # 组合
54 q1 = session.query(Users.name).filter(Users.id > 2)
55 q2 = session.query(Favor.caption).filter(Favor.nid < 2)
56 ret = q1.union(q2).all()
57
58 q1 = session.query(Users.name).filter(Users.id > 2)
59 q2 = session.query(Favor.caption).filter(Favor.nid < 2)
60 ret = q1.union_all(q2).all()
更多功能参见文档,猛击这里下载PDF。