为什么用redis
解决服务器CPU内存压力
方案一、存在Cookie中
此种方案需要将Session数据以Cookie的形式存在客户端,不安全,网络负担效率低
方案二、存在文件服务器或者是数据库里
此种方案会导致大量的IO操作,效率低.
方案三、Session复制
此种方案会导致每个服务器之间必须将Session广播到集群内的每个节点,Session数据会冗余,节点越多浪费越大,存在广播风暴问题.
方案四、存在Redis中
-
目前来看,此种方案是最好的。将Session数据存在内存中,每台服务器都从内存中读取数据,速度快,结构还相对简单
-
将活跃的数据缓存到Redis中,客户端的请求先打到缓存中来获取对应的数据,如果能获取到,直接返回,不需要从MySQL中读取。如果缓存中没有,再从MySQL数据库中读取数据,将读取的数据返回并存一份到Redis中,方便下次读取
-
适用于对数据高并发的读写、海量数据的读写、对数据高可扩展性的
redis简介及安装
简介
Redis是一个开源的key-value存储系统。和Memcached类似,它支持存储的value类型相对更多,包括string(字符串)、list(链表)、set(集合)、zset(sorted set --有序集合)和hash(哈希类型)。这些数据类型都支持push/pop、add/remove及取交集并集和差集及更丰富的操作,而且这些操作都是原子性的。在此基础上,Redis支持各种不同方式的排序。
安装
https://www.cnblogs.com/marvinn/p/11081106.html
redis的五大数据类型
基本操作

key
-
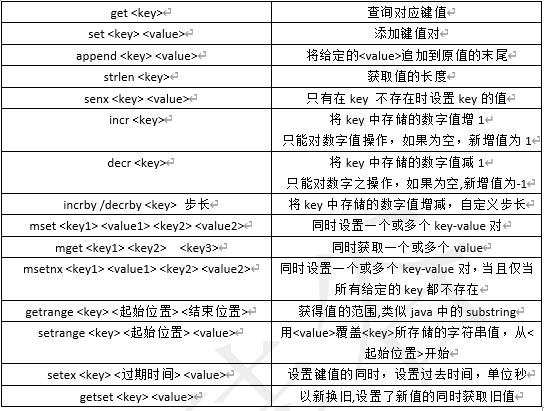
String是Redis最基本的类型,你可以理解成与Memcached一模一样的类型,一个key对应一个value
-
String类型是二进制安全的。意味着Redis的string可以包含任何数据。比如jpg图片或者序列化的对象 。
-
String类型是Redis最基本的数据类型,一个Redis中字符串value最多可以是512M
常用操作
list
-
单键多值
-
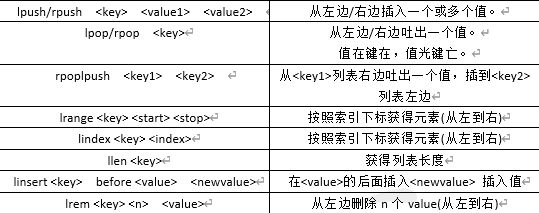
Redis 列表是简单的字符串列表,按照插入顺序排序。你可以添加一个元素导列表的头部(左边)或者尾部(右边)。
-
它的底层实际是个双向链表,对两端的操作性能很高,通过索引下标的操作中间的节点性能会较差

Set
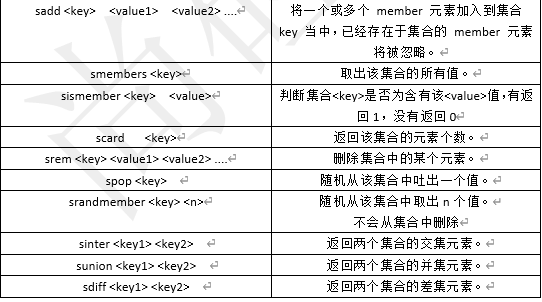
- Redis set对外提供的功能与list类似是一个列表的功能,特殊之处在于set是可以自动排重的,当你需要存储一个列表数据,又不希望出现重复数据时,set是一个很好的选择,并且set提供了判断某个成员是否在一个set集合内的重要接口,这个也是list所不能提供的
- Redis的Set是string类型的无序集合。它底层其实是一个value为null的hash表,所以添加,删除,查找的复杂度都是O(1)
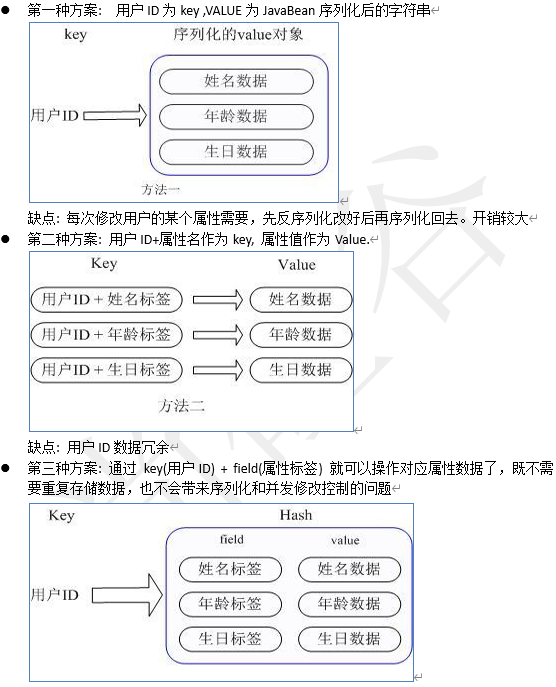
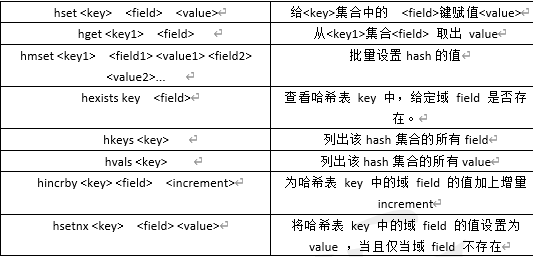
Hash
现有一个JavaBean对象,在Redis中如何存?
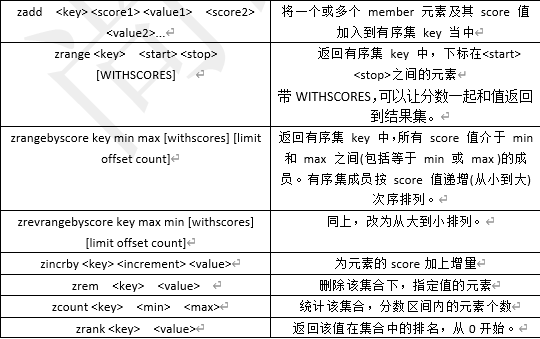
Zset
-
Redis有序集合zset与普通集合set非常相似,是一个没有重复元素的字符串集合。不同之处是有序集合的每个成员都关联了一个评分(score) ,这个评分(score)被用来按照从最低分到最高分的方式排序集合中的成员。集合的成员是唯一的,但是评分可以是重复了
-
因为元素是有序的, 所以你也可以很快的根据评分(score)或者次序(position)来获取一个范围的元素。访问有序集合的中间元素也是非常快的,因此你能够使用有序集合作为一个没有重复成员的智能列表。
redis的相关配置
https://blog.csdn.net/P_ning/article/details/106241421
redis的Java客户端
-
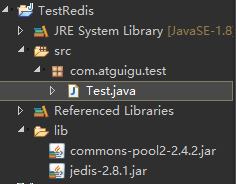
导入jar包
Commons-pool-1.6.jar
Jedis-2.1.0.jar -
注意事项
-
禁用Linux的防火墙:Linux(CentOS7)里执行命令 : systemctl stop firewalld.service
-
redis.conf中注释掉bind 127.0.0.1 ,然后 protect-mode no
- 测试是否联通
package com.atguigu.test;


import redis.clients.jedis.Jedis;


public class Test {


     public static void main(String[] args) {


          Jedis jedis = new Jedis("192.168.16.128",6379);

          String result = jedis.ping();

          System.out.println(result);

          jedis.set("a", "a");

          String a = jedis.get("a");

          System.out.println(a);

          jedis.close();

     }

}
- 完成一个手机验证码功能
-
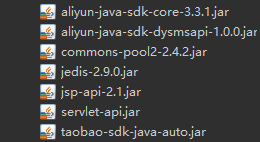
导入jar包
-
index.jsp
1、index.jsp中
插入一些文件
<script  src="/Verify_code/static/jquery/jquery-3.1.0.js"
></script>

<link href="/Verify_code/static/bs/css/bootstrap.min.css"
rel="stylesheet" />

<script  src="/Verify_code/static/bs/js/bootstrap.min.js"
></script>

主体中
<div class="container">//1、boostrap中的样式,可以用来控制是否在12个格子中

          <div class="row">//2、与container配合减少一些空白

              <div id="alertdiv" class="col-md-12">//一行12个

                    <form class="navbar-form navbar-left"><u>role</u>="search" id="codeform">

                     <div class="form-group">

                       <input type="text" class="form-control" <u>placeholder</u>="填写手机号" name="phone_no">//加入form-control会使用boostrap自带的input框

                       <button type="button" class="btn btn-default" id="sendCode">发送验证码</button>//name可重复、value不可重复

                     <br><font id="countdown" color="red" ></font> <br>

                     <input type="text" class="form-control" <u>placeholder</u>="填写验证码" name="verify_code">

                     <button type="button" class="btn btn-default" id="verifyCode">确定</button>

                     <font id="result" color="green" ></font><font id="error" color="red" ></font>

                     </div>

                   </form>

    </div>

   </div>

  </div>


1、https://blog.csdn.net/weixin_42097173/article/details/80381896</u>

2、https://www.cnblogs.com/olivertian/p/11119784.html</u>

3、https://blog.csdn.net/wem603947175/article/details/83004364</u>

javascript中

var t=120;//设定倒计时的时间
var interval;

function refer(){
    $("#countdown").text("请于"+t+"秒内填写验证码 "); // 显示倒计时
    t--; // 计数器递减
    if(t<=0){
    	clearInterval(interval);
    	$("#countdown").text("验证码已失效,请重新发送! ");
    }
}

$(function(){//整个页面加载完成后
	$("#sendCode").click( function () {//绑定发送验证码按钮
		   $.post("/Verify_code/CodeSenderServlet",$("#codeform").serialize(),function(data){//1、-跳转访问路径、-form表单中信息序列化信息、反应(传回来的信息)
	    	 	if(data=="true"){//2、定时器倒计时
	    		 	t=120;
	    		 	clearInterval(interval);
	    		 	interval= setInterval("refer()",1000);//启动1秒定时
	   		 }else if (data=="limit"){
	   			clearInterval(interval);
	   			$("#countdown").text("单日发送超过次数! ")
	   		 }
		  });
    });

	$("#verifyCode").click( function () {//绑定验证确定按钮
		   $.post("/Verify_code/CodeVerifyServlet",$("#codeform").serialize(),function(data){
	    	 	if(data=="true"){
	    		 	$("#result").attr("color","green");//3、设置或返回备选元素的属性或值
	    		 	$("#result").text("验证成功");
	    		 	clearInterval(interval);
	    		 	$("#countdown").text("");
	   		}else{
	    		 	$("#result").attr("color","red");
	    		 	$("#result").text("验证失败");
	   		}
		  });
    });


});

1、<u>https://www.cnblogs.com/webapi/p/10550185.html</u>

2、<u>https://blog.csdn.net/YDesire/article/details/81124331</u>

3、<u>https://www.cnblogs.com/blmlove/p/12701722.html</u>

2、CodeSenderServlet

@WebServlet("/CodeSenderServlet")

public class CodeSenderServlet extends HttpServlet {

      private static final long serialVersionUID = 1L;


    /**

     * @see HttpServlet#HttpServlet()

     */

      public CodeSenderServlet() {

        super();

        // TODO Auto-generated constructor stub

      }

      private String getCode(int length) {

          String code = "";

          Random random = new Random();

          for(int i = 0; i < length; i++) {

              int rand = random.nextInt(10);//1、生成随机数字

              code += rand;

          }

          return code;
      }

     /**

      * @see HttpServlet#doPost(HttpServletRequest request, HttpServletResponse response)

      */

     protected void doPost(HttpServletRequest request, HttpServletResponse response) throws ServletException, IOException {
            //获取手机号
            String phone_no = request.getParameter("phone_no");
            //获取验证码
             String code = getCode(6);
             //拼接key
             String codeKey = "Verify_code:" + phone_no + ":code";//Verify_code:12345:code
            String countKey = "Verify_code:" + phone_no + ":count";
             Jedis jedis = new Jedis("192.168.16.128", 6379);
            //判断发送验证码的次数
            String count = jedis.get(countKey);
            if(count == null) {
            //代表第一次
            jedis.setex(countKey, 24*60*60, "1");

          }else if(Integer.parseInt(count) <= 2) {

              jedis.incr(countKey);

          }else if(Integer.parseInt(count) > 2) {

              response.getWriter().print("limit");

              jedis.close();

              return ;

          }


          //向<u>redis</u>中进行存储,以手机号为键,以验证码为值

          jedis.setex(codeKey, 120, code);

          jedis.close();

          response.getWriter().print(true);


     }

}


1、https://www.cnblogs.com/hm1990hpu/p/8875928.html</u>


3、CodeVerifyServlet

@WebServlet("/CodeVerifyServlet")

public class CodeVerifyServlet extends HttpServlet {

     private static final long serialVersionUID = 1L;


    /**

     * @see HttpServlet#HttpServlet()

     */

    public CodeVerifyServlet() {

        super();

        // TODO Auto-generated constructor stub

    }

     /**

      * @see HttpServlet#doPost(HttpServletRequest request, HttpServletResponse response)

      */
       protected void doPost(HttpServletRequest request, HttpServletResponse response) throws ServletException, IOException {

          //获取验证码和手机号

          String phone_no = request.getParameter("phone_no");

          String verify_code = request.getParameter("verify_code");

          //拼接key

          String codeKey = "Verify_code:" + phone_no + ":code";

          //从<u>redis</u>中获取手机号所对应的验证码

          Jedis jedis = new Jedis("192.168.16.128", 6379);

          String code = jedis.get(codeKey);

          if(code.equals(verify_code)) {

              response.getWriter().print(true);

          }

          jedis.close();


     }

}