采用前端录音,基于Node搭建Websocket服务器,音频对象Blob使用Websocket传给后端服务器后写入本地音频文件,然后调用百度AI语音识别本地音频文件,最后将识别结果传给前端显示。
查看文档知道了我想要的信息,如果想要实现实时语音识别、长时间段的语音、唤醒词功能、语义解析功能,需要使用Android、IOS SDK或者Linux C++ SDK版本,而我使用的Nodejs SDK是不支持的。
- 语音时长上线为60s,超出讲返回错误
- 原始录音文件为pcm(不压缩)、wav(不压缩)、pcm编码或者amr(压缩)格式,不区分大小写,推荐使用`pcm`
- 录音采样率为16000,声道为单通道
- 支持普通话、英文、粤语、四川话
调用百度AI平台语音识别的Nodejs SDK,查看文档快速入门,可以查看如何调用。
首先将nodejs-sdk下载下来,下载后将目录里的speech文件夹拷贝到你的项目文件夹中,其中assets是存放录音音频的地方,然后进入node文件夹下的位置进行安装依赖包:
npm install
我的项目文件夹目录如下:
audio_asr_baidu
├─ package-lock.json
└─ speech
       ├─ .gitignore
       ├─ assets
       │    ├─ 16k_test.pcm
       │    └─ recorder.wav
       ├─ cpp
       │    ├─ .gitignore
       │    ├─ README.md
       │    ├─ build.sh
       │    └─ main.cpp
       └─ node
              ├─ .gitignore
              ├─ README.md
              ├─ RecordRTC.js
              ├─ index.html
              ├─ main.js
              ├─ node_modules
              ├─ package-lock.json
              ├─ package.json
              └─ style.css
然后在node文件夹里的index.html是我的客户端文件,main.js是我的服务端文件。
在main.js文件里搭建websocket服务器,首先安装相关依赖模块:
npm i ws -S
然后搭建:
let Server = require('ws').Server;
const wss = new Server({
    port: 9001
})
// 连接服务器
wss.on('connection', ws => {
    console.log('server connected');

    })
    ws.on('error', error => {
        console.log('Error:' + error);

    })
    ws.on('close', () => {
        console.log('Websocket is closed');
    })
})
// 断开连接
wss.on('disconnection', ws => {
    ws.on('message', msg => {
        console.log('server recived msg:' + msg);
    })
})
然后在index.html中:
let ws = new WebSocket('ws://localhost:9001');
ws.onopen = e => {
    console.log('Connection to server opened');
}
启动服务:
node main.js
就可以在控制台看见这样的打印信息:
// 客户端的打印信息:
Connection to server opened

// 服务端的打印信息:
server connected
客户端录音传给服务端,然后写入本地.wav文件的操作有个了雏形,但是还需要再修改一下,所以这里只是大概将百度AI提供的录音文件语音识别之后传给前端显示演示出来。
index.html:
<div>
  <p>You said: </p>
  <p id="txt"></p>
 </div>
我使用的是RecordRTC录音:
<script src="./RecordRTC.js"></script>
    <script>
        let audio = document.querySelector('audio');
        let audioTxt = document.getElementById('txt');
        let ws = new WebSocket('ws://localhost:9001');
        ws.onopen = e => {
           console.log('Connection to server opened');
       }
            /**
             * @name: captureMicrophone
             * @description: 获取麦克风权限
             * @param {type} callback
             * @return: none
             */
        function captureMicrophone(callback) {
            navigator.mediaDevices.getUserMedia({
                audio: true
            }).then(callback).catch(function(error) {
                alert('Unable to access your microphone.');
                console.error(error);
            });
        }
        /**
         * @name: stopRecordingCallback
         * @description: 停止说话 发送blob给服务端
         * @param {type} none
         * @return: none
         */
        function stopRecordingCallback() {
            audio.srcObject = null;
            let blob = recorder.getBlob();
            console.log(blob);
           // 录音回放
            audio.src = URL.createObjectURL(blob);
           // 麦克风停止使用
            recorder.microphone.stop();
            // 传输blob
            ws.send(blob)
        }
        // 将识别结果传送给前端显示
        ws.onmessage = e => {
            console.log(e.data);
            let data = JSON.parse(e.data);
            audioTxt.innerHTML = data.result;
        }
        ws.onclose = e => {
            console.log('Connection to server closed');

        }

        let recorder; // globally accessible
        /**
         * @name:
         * @description: 开始说话
         * @param {type} none
         * @return:
         */
        document.getElementById('btn-start-recording').onclick = function() {
            // this.disabled = true;
            captureMicrophone(function(microphone) {
                audio.srcObject = microphone;


                recorder = RecordRTC(microphone, {
                    type: 'audio',
                    recorderType: StereoAudioRecorder,
                    desiredSampRate: 16000
                });

                recorder.startRecording();

                // 点击停止说话,释放麦克风
                recorder.microphone = microphone;
                document.getElementById('btn-stop-recording').disabled = false;
            });
        };
        /**
         * @name:
         * @description: 停止说话
         * @param {type} none
         * @return:
         */
        document.getElementById('btn-stop-recording').onclick = function() {
            // this.disabled = true;
            recorder.stopRecording(stopRecordingCallback);

        };
    </script>
服务端将音频对象blob写入本地.wav文件,然后进行语音识别:
let AipSpeech = require("baidu-aip-sdk").speech;
let fs = require('fs');
let Server = require('ws').Server;

const wss = new Server({
    port: 9001
})
let resTxt;// 语音识别结果

wss.on('connection', ws => {
    console.log('server connected');

    ws.on('message', data => {
        console.log('server recived audio blob');
   // 务必替换百度云控制台中新建百度语音应用的 Api Key 和 Secret Key
        let client = new AipSpeech(0, 'Api Key', 'Secret Key');

        let voice = fs.readFileSync('../assets/16k_test.pcm');

        let voiceBase64 = new Buffer(voice);

        // 识别本地语音文件
        client.recognize(voiceBase64, 'pcm', 16000).then(function(result) {
            console.log('语音识别本地音频文件结果: ' + JSON.stringify(result));
            resTxt = JSON.stringify(result)

        }, function(err) {
            console.log(err);
        });
    })
    // 服务端发送给客户端
    ws.send(resTxt);

    ws.on('error', error => {
        console.log('Error:' + error);

    })
    ws.on('close', () => {
        console.log('Websocket is closed');
    })
})
wss.on('disconnection', ws => {
    ws.on('message', msg => {
        console.log('server recived msg:' + msg);
    })
})
然后启动服务器:
node main.js
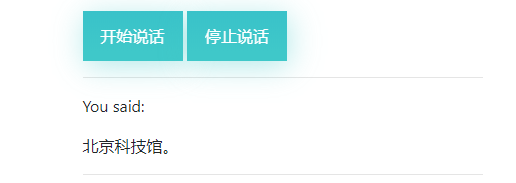
再打开index.html在浏览器上,就可以看到连接服务器了,然后语音识别的结果是这样:
语音识别本地音频文件结果: {"corpus_no":"6728179649062189023","err_msg":"success.","err_no":0,"result":["北京科技馆。"],"sn":"727133992011566526398"}
这是前端显示的结果: