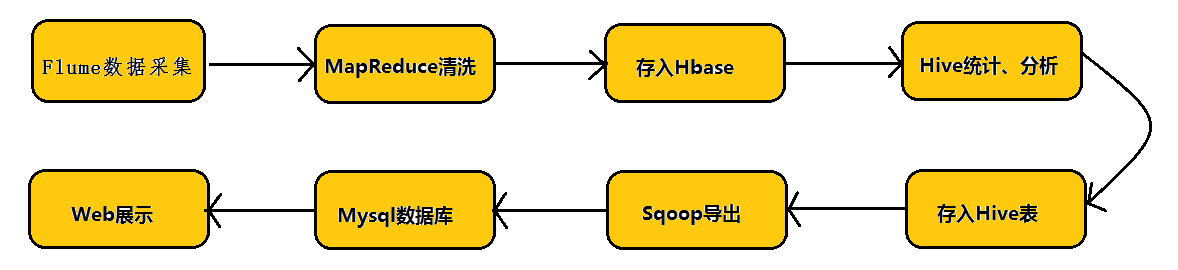
flume架构介绍
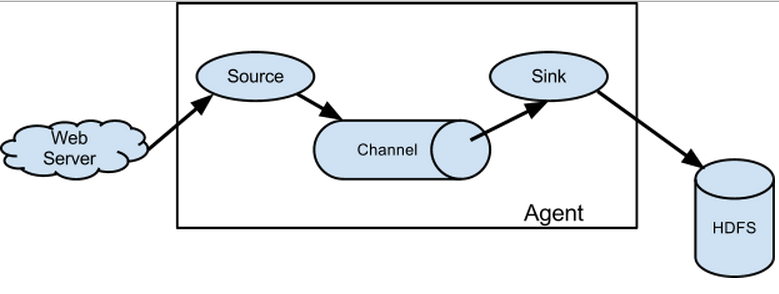
flume之所以这么神奇,是源于它自身的一个设计,这个设计就是agent,agent本身是一个Java进程,运行在日志收集节点—所谓日志收集节点就是服务器节点。
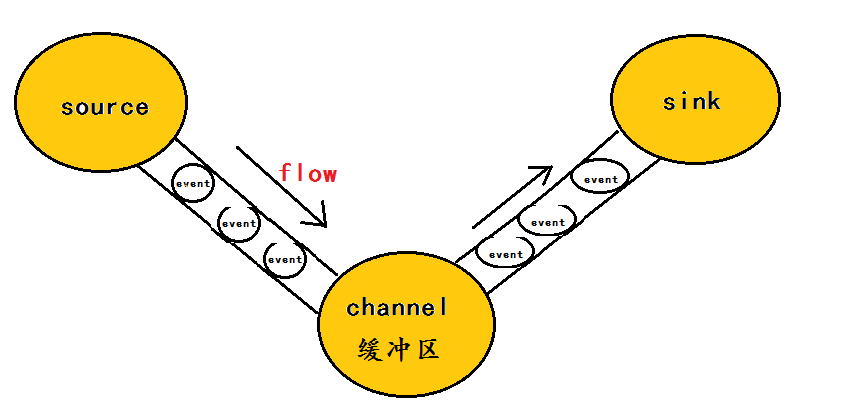
agent里面包含3个核心的组件:source—->channel—–>sink,类似生产者、仓库、消费者的架构。
source:source组件是专门用来收集数据的,可以处理各种类型、各种格式的日志数据,包括avro、thrift、exec、jms、spooling directory、netcat、sequence generator、syslog、http、legacy、自定义。
channel:source组件把数据收集来以后,临时存放在channel中,即channel组件在agent中是专门用来存放临时数据的——对采集到的数据进行简单的缓存,可以存放在memory、jdbc、file等等。
sink:sink组件是用于把数据发送到目的地的组件,目的地包括hdfs、logger、avro、thrift、ipc、file、null、Hbase、solr、自定义。
Agent文件的说明
定义Agent和组件的名字。
# a1: 自定义agent的名字
# 分别给 sources,channels,sinks取名
a1.sources = r1
a1.channels = c1
a1.sinks = k1
定义组件的配置信息
# r1获取的数据类型
a1.sources.r1.type = netcat
# r1的IP地址
a1.sources.r1.bind = localhost
# r1的端口
a1.sources.r1.port = 44444

# c1暂存数据的位置为内存里面
a1.channels.c1.type = memory
# 设置暂存空间的容量
a1.channels.c1.capacity = 1000
a1.channels.c1.transactionCapacity = 100

# k1输出的数据类型
a1.sinks.k1.type = logger
Agent通过组件的名字,将三个组件连接起来。
# sources 连接 channels
a1.sources.r1.channels = c1
# sinks 连接 channel(注意没有s)
a1.sinks.k1.channel = c1
NetCat Source:监听指定网络端口
只要应用程序向这个端口里面写数据,这个source组件就可以获取到信息。
logger Channel:memory
# 写创建Agent的脚本
gedit /opt/flume/flume1.8.0/conf/netcat.cof
a1.sources = r1
a1.sinks = k1
a1.channels = c1


a1.sources.r1.type = netcat
a1.sources.r1.bind = 192.168.37.130
a1.sources.r1.port = 44444

a1.channels.c1.type = memory
a1.channels.c1.capacity = 1000
a1.channels.c1.transactionCapacity = 100

a1.sinks.k1.type = logger


a1.sources.r1.channels = c1
a1.sinks.k1.channel = c1
cd /opt/flume/flume1.8.0/bin
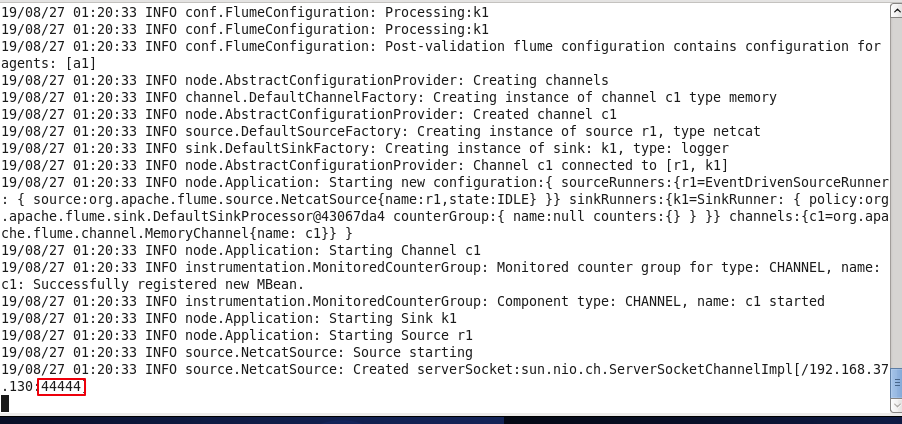
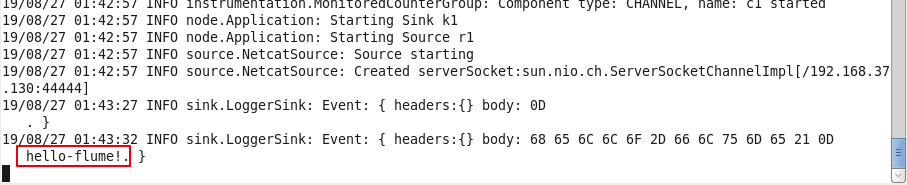
# 启动flume输出控制台,打印获取到的数据。
/opt/flume/flume1.8.0/bin/flume-ng agent -n a1 /opt/flume/flume1.8.0/conf/ -f /opt/flume/flume1.8.0/conf/netcat.cof -Dflume.root.logger=DEBUG,console
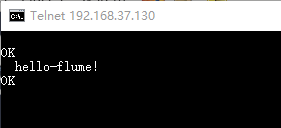
使用Windows的Telnet工具向端口发送数据(Windows10 Telnet的开启方法
# 打开CMD
telnet 192.168.37.130 44444
输入需要发送的数据...
Sink:hdfs Channel:file
# 创建保存临时数据的文件夹
mkdir /opt/flume/data
mkdir /opt/flume/checkpoint

# 创建Agent
gedit /opt/flume/flume1.8.0/conf/netcat.cof
# Name the components on this agent
a1.sources = r1
a1.sinks = k1
a1.channels = c1

# Describe/configure the source
a1.sources.r1.type = netcat
a1.sources.r1.bind = 192.168.37.130
a1.sources.r1.port = 44444

# Describe the sink
a1.sinks.k1.type = hdfs
# 保存在hdfs上的路径
a1.sinks.k1.hdfs.path = hdfs://slave2:9000/dataoutput
a1.sinks.k1.hdfs.writeFormat = Text
a1.sinks.k1.hdfs.fileType = DataStream
# 写入一个文件的间隔
a1.sinks.k1.hdfs.rollInterval = 10
a1.sinks.k1.hdfs.rollSize = 0
a1.sinks.k1.hdfs.rollCount = 0
# 生成的文件名前缀
a1.sinks.k1.hdfs.filePrefix = %Y-%m-%d-%H-%M-%S
a1.sinks.k1.hdfs.useLocalTimeStamp = true

# Use a channel which buffers events in file
a1.channels.c1.type = file
a1.channels.c1.checkpointDir = /opt/flume/checkpoint
a1.channels.c1.dataDirs = /opt/flume/data

# Bind the source and sink to the channel
a1.sources.r1.channels = c1
a1.sinks.k1.channel = c1
# 启动Hadoop
start-all.sh

# 开启flume Agent
/opt/flume/flume1.8.0/bin/flume-ng agent -n a1 /opt/flume/flume1.8.0/conf/ -f /opt/flume/flume1.8.0/conf/netcat.cof -Dflume.root.logger=DEBUG,console
# 打开CMD
telnet 192.168.37.130 44444
输入需要发送的数据...
数据保存在hdfs上的 /dataoutput
Spooling Directory Source:监听指定目录
只要应用程序向这个指定的目录中添加新的文件,source组件就可以获取到该信息,并解析该文件的内容,然后写入到channle。写入完成后,标记该文件已完成或者删除该文件。
注意事项:1. 拷贝到spool目录下的文件不可以再打开编辑 。2. 不能将具有相同文件名字的文件拷贝到这个目录下
logger Channel:memory
# 创建监听的文件夹
mkdir /opt/flume/FlumeInputdata/

# 编辑Agent文件
gedit /opt/flume/flume1.8.0/conf/netcat.cof
# Name the components on this agent
a1.sources = r1
a1.sinks = k1
a1.channels = c1

# Describe/configure the source
a1.sources.r1.type = spooldir
a1.sources.r1.spoolDir = /opt/flume/FlumeInputdata
a1.sources.r1.fileHeader = true
a1.sources.r1.interceptors = i1
a1.sources.r1.interceptors.i1.type = timestamp
# 是否删除已经标记的文件never(从不),immediate(立即)
a1.sources.r1.deletePolicy = never

# Describe the sink
a1.sinks.k1.type = logger

# Use a channel which buffers events in memory
a1.channels.c1.type = memory
a1.channels.c1.capacity = 1000
a1.channels.c1.transactionCapacity = 100

# Bind the source and sink to the channel
a1.sources.r1.channels = c1
a1.sinks.k1.channel = c1
# 开启flume Agent
/opt/flume/flume1.8.0/bin/flume-ng agent -n a1 /opt/flume/flume1.8.0/conf/ -f /opt/flume/flume1.8.0/conf/netcat.cof -Dflume.root.logger=DEBUG,console
发送数到监听的文件夹
vim /data1.txt
cp /data1.txt /opt/flume/flumeInputdata/
在控制台查看输出的结果。
hdfs Channel:file
# 编辑Agent文件
gedit /opt/flume/flume1.8.0/conf/netcat.cof
# Name the components on this agent
a1.sources = r1
a1.sinks = k1
a1.channels = c1

# Describe/configure the source
a1.sources.r1.type = spooldir
a1.sources.r1.spoolDir = /opt/flume/FlumeInputdata
a1.sources.r1.fileHeader = true
a1.sources.r1.interceptors = i1
a1.sources.r1.interceptors.i1.type = timestamp

# Describe the sink
# Describe the sink
a1.sinks.k1.type = hdfs
a1.sinks.k1.hdfs.path = hdfs://slave2:9000/dataoutput
a1.sinks.k1.hdfs.writeFormat = Text
a1.sinks.k1.hdfs.fileType = DataStream
a1.sinks.k1.hdfs.rollInterval = 10
a1.sinks.k1.hdfs.rollSize = 0
a1.sinks.k1.hdfs.rollCount = 0
a1.sinks.k1.hdfs.filePrefix = %Y-%m-%d-%H-%M-%S
a1.sinks.k1.hdfs.useLocalTimeStamp = true

# Use a channel which buffers events in file
a1.channels.c1.type = file
a1.channels.c1.checkpointDir = /opt/flume/checkpoint
a1.channels.c1.dataDirs = /opt/flume/data

# Bind the source and sink to the channel
a1.sources.r1.channels = c1
a1.sinks.k1.channel = c1
# 开启flume Agent
/opt/flume/flume1.8.0/bin/flume-ng agent -n a1 /opt/flume/flume1.8.0/conf/ -f /opt/flume/flume1.8.0/conf/netcat.cof -Dflume.root.logger=DEBUG,console
# 发生数据文件
cp /data1.txt /opt/flume/flumeInputdata/
数据保存在hdfs上的 /dataoutput
Exec Source:监听指定的命令的结果
获取一条命令的结果作为它的数据源
# 创建监视的文件
touch /words.txt

# 编辑Agent文件
gedit /opt/flume/flume1.8.0/conf/netcat.cof
a1.sources = r1
a1.sinks = k1
a1.channels = c1

# Describe/configure the source
a1.sources.r1.type = exec
# 使用tail -F 命令来监视文件的内容
a1.sources.r1.command = tail -F /words.txt

# Describe the sink
a1.sinks.k1.type = hdfs
a1.sinks.k1.hdfs.path = hdfs://salve2:9000/dataoutput
a1.sinks.k1.hdfs.writeFormat = Text
a1.sinks.k1.hdfs.fileType = DataStream
a1.sinks.k1.hdfs.rollInterval = 10
a1.sinks.k1.hdfs.rollSize = 0
a1.sinks.k1.hdfs.rollCount = 0
a1.sinks.k1.hdfs.filePrefix = %Y-%m-%d-%H-%M-%S
a1.sinks.k1.hdfs.useLocalTimeStamp = true

# Use a channel which buffers events in file
a1.channels.c1.type = file
a1.channels.c1.checkpointDir = /opt/flume/checkpoint
a1.channels.c1.dataDirs = /opt/flume/data

# Bind the source and sink to the channel
a1.sources.r1.channels = c1
a1.sinks.k1.channel = c1
# 开启flume Agent
/opt/flume/flume1.8.0/bin/flume-ng agent -n a1 /opt/flume/flume1.8.0/conf/ -f /opt/flume/flume1.8.0/conf/netcat.cof -Dflume.root.logger=DEBUG,console
echo 'file word!' >> /words.txt
数据保存在hdfs上的 /dataoutput
Avro Source:监听指定的Avro 端口
通过Avro 端口可以获取到Avro client发送过来的文件 。即只要应用程序通过Avro 端口发送文件,source组件就可以获取到该文件中的内容。
# 编辑Agent文件
gedit /opt/flume/flume1.8.0/conf/netcat.cof
# Name the components on this agent
a1.sources = r1
a1.sinks = k1
a1.channels = c1

# Describe/configure the source
a1.sources.r1.type = avro
a1.sources.r1.bind = 192.168.37.130
a1.sources.r1.port = 4141

# Describe the sink
a1.sinks.k1.type = hdfs
a1.sinks.k1.hdfs.path = hdfs://slave2:9000/dataoutput
a1.sinks.k1.hdfs.writeFormat = Text
a1.sinks.k1.hdfs.fileType = DataStream
a1.sinks.k1.hdfs.rollInterval = 10
a1.sinks.k1.hdfs.rollSize = 0
a1.sinks.k1.hdfs.rollCount = 0
a1.sinks.k1.hdfs.filePrefix = %Y-%m-%d-%H-%M-%S
a1.sinks.k1.hdfs.useLocalTimeStamp = true

# Use a channel which buffers events in file
a1.channels.c1.type = file
a1.channels.c1.checkpointDir = /opt/flume/checkpoint
a1.channels.c1.dataDirs = /opt/flume/data

# Bind the source and sink to the channel
a1.sources.r1.channels = c1
a1.sinks.k1.channel = c1
# 开启flume Agent
/opt/flume/flume1.8.0/bin/flume-ng agent -n a1 /opt/flume/flume1.8.0/conf/ -f /opt/flume/flume1.8.0/conf/netcat.cof -Dflume.root.logger=DEBUG,console
# 发送文件到端口
/opt/flume/flume1.8.0/bin/flume-ng avro-client -c /opt/flume/flume1.8.0/conf/ -H 192.168.37.130 -p 4141 -F /words.txt
数据保存在hdfs上的 /dataoutput
参考链接:https://blog.csdn.net/qq_33366098/article/details/81565618