WEB服务-Nginx之6-四层负载均衡
Nginx四层负载均衡概述
什么是四层负载均衡?
四层负载均衡是基于传输层协议包来封装的(如:TCP/IP),那我们前面使用到的七层是指的应用层,他的组装在四层的基础之上,无论四层还是七层都是指的OSI网络模型。
四层负载均衡应用场景
1、四层+七层来做负载均衡,四层可以保证七层的负载均衡的高可用性;如:nginx就无法保证自己的服务高可用,需要依赖LVS或者keepalive。
2、如:tcp协议的负载均衡,有些请求是TCP协议的(mysql、ssh),或者说这些请求只需要使用四层进行端口的转发就可以了,所以使用四层负载均衡。
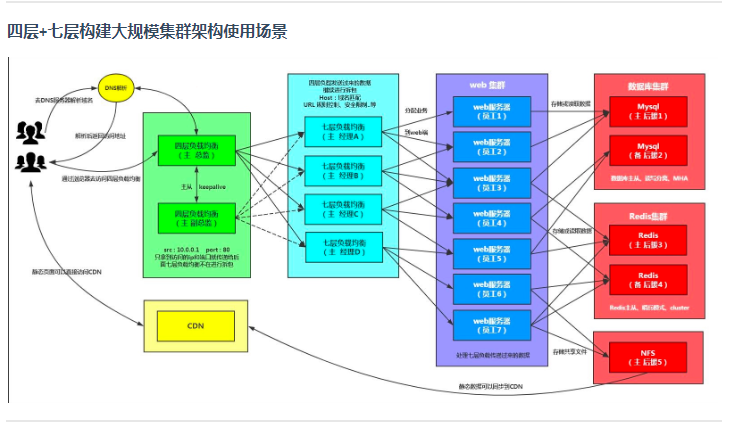
四层+七层构建大规模集群架构使用场景
四层负载均衡总结
1、四层负载均衡仅能转发TCP/IP协议、UDP协议、通常用来转发端口,如:tcp/22、udp/53;
2、四层负载均衡可以用来解决七层负载均衡端口限制问题;(七层负载均衡最大使用65535个端口号)
3、四层负载均衡可以解决七层负载均衡高可用问题;(多台后端七层负载均衡能同时的使用)
4、四层的转发效率比七层的高得多,但仅支持tcp/ip协议,不支持http和https协议;
5、通常大并发场景通常会选择使用在七层负载前面增加四层负载均衡。
6.四层负载的优点:解决后端冗余备份,提高后端并发,其中一台坏了,四层会给其中一台转发IP地址;
7.四层负载(主)出现单点故障,再加一台四层负载(备份)。
Nginx四层负载均衡示例
首先水平扩展lb,新建一台和lb01配置一样的lb02
- lb02安装nginx
[root@lb02 ~]# cat >/etc/yum.repos.d/nginx.repo <<EOF
[nginx-stable]
name=nginx stable repo
baseurl=http://nginx.org/packages/centos/7/$basearch/
gpgcheck=0
enabled=1
gpgkey=https://nginx.org/keys/nginx_signing.key
EOF
[root@lb02 ~]# yum -y install nginx

#启动nginx
[root@lb02 conf.d]# nginx -t
nginx: the configuration file /etc/nginx/nginx.conf syntax is ok
nginx: configuration file /etc/nginx/nginx.conf test is successful

Created symlink from /etc/systemd/system/multi-user.target.wants/nginx.service to /usr/lib/systemd/system/nginx.service.
[root@lb02 conf.d]# nginx
- lb02拉取lb01所有nginx相关配置
[root@lb02 ~]# scp -r root@172.16.1.5:/etc/nginx /etc/
- lb02启动nginx并加入开机自启
[root@lb02 ~]# systemctl start nginx
[root@lb02 ~]# systemctl enable nginx
lb配置四层负载均衡
- 创建存放四层负载均衡配置文件的目录,并加入主配置文件
/etc/nginx/nginx.conf
[root@lb10.0.0.4 ~]# mkdir /etc/nginx/conf.c
- 配置四层负载均衡,并重载
[root@lb10.0.0.4 ~]# cat > /etc/nginx/conf.c/lb_domain.conf <<EOF
stream {
    upstream lb {
        server 172.16.1.5:80 weight=5 max_fails=3 fail_timeout=30s;
        server 172.16.1.6:80 weight=5 max_fails=3 fail_timeout=30s;
    }

    server {
        listen 80;
        proxy_connect_timeout 3s;
        proxy_timeout 3s;
        proxy_pass lb;
    }
}
EOF

[root@lb10.0.0.4 ~]# systemctl reload nginx
加载不成功的原因,七层与四层都用了80端口删除七层的80端口,四层就可用。
- windows配置:
在C:WindowsSystem32driversetchosts文件中修改为10.0.0.4 php.oldboy.com blog.oldboy.com
使用浏览器访问页面测试成功!
- 配置四层负载均衡开启日志
四层负载均衡默认是没有access的日志的,因为在nginx.conf的配置中,access的日志格式是配置在http下的,而四层复杂均衡配置实在http以外的;
如果需要日志则需要在stream下面配置:
[root@lb10.0.0.4 ~]# cat > /etc/nginx/conf.c/lb_domain.conf <<EOF
stream {
    log_format  proxy '$remote_addr $remote_port - [$time_local] $status $protocol '
                  '"$upstream_addr" "$upstream_bytes_sent" "$upstream_connect_time"' ;
    access_log /var/log/nginx/proxy.log proxy;
    upstream lb {
            server 172.16.1.5:80 weight=5 max_fails=3 fail_timeout=30s;
            server 172.16.1.6:80 weight=5 max_fails=3 fail_timeout=30s;
    }

    server {
            listen 80;
            proxy_connect_timeout 3s;
            proxy_timeout 3s;
            proxy_pass lb;
    }
}
EOF
- 使用
proxy protocol获取真实客户端IP
使用架构四层负载均衡-->七层负载均衡-->web服务器,web服务器访问日志记录的客户端IP$remote_addr是七层负载均衡的,转发的客户端IP$http_x_forwarded_for是四层负载均衡的
[root@web01 ~]# tail -1 /var/log/nginx/access.log
172.16.1.6 - - [22/Sep/2020:13:38:58 +0800] "GET /wp-content/themes/2.8/images/tum.jpg HTTP/1.1" 200 204631 "http://blog.oldboy.com/" "Mozilla/5.0 (Windows NT 10.0; Win64; x64) AppleWebKit/537.36 (KHTML, like Gecko) Chrome/85.0.4183.102 Safari/537.36" "172.16.1.4"
proxy protocol是HAProxy的作者Willy Tarreau于2010年开发和设计的一个Internet协议,通过为tcp添加一个很小的头信息,来方便的传递客户端信息(协议栈、源IP、目的IP、源端口、目的端口等),在网络情况复杂又需要获取用户真实IP时非常有用。其本质是在三次握手结束后由代理在连接中插入了一个携带了原始连接四元组信息的数据包。
注意:proxy protocol的接收端必须在接收到完整有效的 proxy protocol 头部后才能开始处理连接数据。因此对于服务器的同一个监听端口,不存在兼容带proxy protocol包的连接和不带proxy protocol包的连接。如果服务器接收到的第一个数据包不符合proxy protocol的格式,那么服务器会直接终止连接。
lb配置:
[root@lb10.0.0.4 ~]# cat > /etc/nginx/conf.c/lb_domain.conf <<EOF
stream {
    log_format  proxy '$remote_addr:$remote_port - [$time_local] $status $protocol '
                  '"$upstream_addr" "$upstream_bytes_sent" "$upstream_connect_time"' ;
    access_log /var/log/nginx/proxy.log proxy;
    upstream lb {
        server 172.16.1.5:80 weight=5 max_fails=3 fail_timeout=30s;
        server 172.16.1.6:80 weight=5 max_fails=3 fail_timeout=30s;
    }

    server {
        listen 80;
        proxy_connect_timeout 3s;
        proxy_timeout 3s;
        proxy_pass lb;
        proxy_protocol on;
    }
}
EOF
lb01和lb02配置相同:
[root@lb01 ~]#   vim  /etc/nginx/conf.d/proxy_web.conf
log_format proxy '$remote_addr - $remote_user [$time_local] "$request" '
                 '$status $body_bytes_sent "$http_referer" '
                 '"$http_user_agent" "$http_x_forwarded_for" "$proxy_protocol_addr"';
proxy_headers_hash_max_size 5120;
proxy_headers_hash_bucket_size 640;
upstream web {
    server 172.16.1.7:80;
    server 172.16.1.8:80;
}
server {
    listen 80 proxy_protocol;
    server_name blog.oldboy.com;

    set_real_ip_from 172.16.1.0/24;
    real_ip_header proxy_protocol;

    location / {
        proxy_pass http://web;
        include proxy_params;
        proxy_next_upstream error timeout http_500 http_502 http_503 http_504;
        #proxy_set_header X-Forwarded-For $proxy_protocol_addr;
    }
    access_log /var/log/nginx/access.log proxy;
}
EOF
注意:X-Forwarded-For会自动附加
$remote_addr变量,这里设置proxy_set_header X-Forwarded-For $proxy_protocol_addr;会使web服务器收到的$http_x_forwarded_for的值变为$proxy_protocol_addr,$remote_addr
重载nginx服务:
[root@lb10.0.0.4 ~]# systemctl reload nginx
[root@lb01 ~]# systemctl reload nginx
[root@lb02 ~]# systemctl reload nginx
浏览器访问http://blog.oldboy.com/测试:
[root@lb10.0.0.4 ~]# tail -1 /var/log/nginx/proxy.log
10.0.0.1:1762 - [22/Sep/2020:15:06:13 +0800] 200 TCP "172.16.1.5:80" "2197" "0.001"
[root@lb01 ~]# tail -20 /var/log/nginx/access.log | grep thumbnail.png
10.0.0.1 - - [22/Sep/2020:15:06:10 +0800] 200 52141 "http://blog.oldboy.com/" "Mozilla/5.0 (Windows NT 10.0; Win64; x64) AppleWebKit/537.36 (KHTML, like Gecko) Chrome/85.0.4183.102 Safari/537.36" "-" "10.0.0.1"
[root@web01 ~]# tail -20 /var/log/nginx/access.log | grep thumbnail.png
172.16.1.5 - - [22/Sep/2020:15:06:10 +0800] "GET /wp-content/themes/2.8/images/thumbnail.png HTTP/1.1" 200 52141 "http://blog.oldboy.com/" "Mozilla/5.0 (Windows NT 10.0; Win64; x64) AppleWebKit/537.36 (KHTML, like Gecko) Chrome/85.0.4183.102 Safari/537.36" "10.0.0.1"
Nginx四层负载均衡端口转发
要求:
-
通过访问负载均衡的5555端口,实际是后端的web01的22端口提供服务;
10.0.0.4:5555 ---> 172.16.1.7:22;
-
通过访问负载均衡的6666端口,实际是后端的mysql的3306端口提供服务。
10.0.0.4:6666 ---> 172.16.1.51:3306;
实现配置:
[root@lb10.0.0.4 ~]#cat > /etc/nginx/conf.c/lb_domain.conf <<EOF
stream {
    log_format  proxy '$remote_addr $remote_port - [$time_local] $status $protocol '
                      '"$upstream_addr" "$upstream_bytes_sent" "$upstream_connect_time"' ;
    access_log /var/log/nginx/proxy.log proxy;

    upstream ssh_7 {
            server 10.0.0.7:22;
    }

    upstream mysql_51 {
            server 10.0.0.51:3306;
    }
    server {
            listen 5555;
            proxy_connect_timeout 3s;
            proxy_timeout 300s;
            proxy_pass ssh_7;
    }

    server {
            listen 6666;
            proxy_connect_timeout 3s;
            proxy_timeout 3s;
            proxy_pass mysql_51;
    }
}
EOF
测试:
使用Xshell连接10.0.0.4:5555实际是连接172.16.1.7:22
使用SQLyog连接10.0.0.4:6666实际是连接172.16.1.51:3306