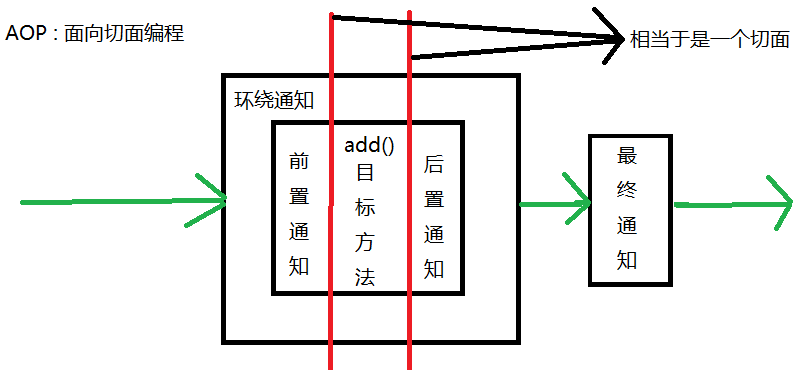
通知:
前置通知:运行目标方法前时,运行的通知;
后置通知:运行目标方法后时,运行的通知;
异常通知:运行目标方法发生异常时,运行的通知;
环绕通知:在环绕通知中可以定义,前置通知、后置通知、异常通知和最终通知,比较全面;
最终通知:运行方法后,都会运行的通知;
让我们用一张图来更加好的理解这几个通知:
一、通过接口实现通知
前置通知:继承MethodBeforeAdvice接口,并重写before()方法;
后置通知:继承AfterReturningAdvice接口,并重写afterReturning()方法;
异常通知:继承ThrowsAdvice接口,无重写方法;
环绕通知:继承MethodInterceptor接口,并重写invoke()方法;
最终通知;
如何来写一个通知?
a. 需要的jar包;
aopaliance.jar aspectjweaver.jar
b. 编写业务方法和需要的通知;
在下面的这个代码中,我们使用的业务方法是 addStudent(), 我们使用的通知是 前置通知;
c. 在applicationContext.xml中配置相关内容;
举例:
     <bean id="studentDao" class="org.kay.dao.StudentDaoImpl"></bean>  <!-- 将studentDao加入到SpringIoc容器中 -->

	<bean id="studentService" class="org.kay.service.Impl.StudentServiceImpl"> <!-- 将studentService加入到SpringIoc容器中 -->
		<property name="stuDao" ref="studentDao"></property>
	</bean>

	<bean id="myBeforeAdvice" class="org.kay.advice.MyBeforeAdvice"></bean>  <!-- 将通知加入到SpringIoc容器中 -->
	<aop:config>
           <!-- 配置切入点(在哪里执行通知) -->
		<aop:pointcut expression="execution(* org.kay.service.Impl.StudentServiceImpl.*(..))" id="myPointcut1"/>
          <!-- 配置切入点和切面的连接线 -->
		<aop:advisor advice-ref="myBeforeAdvice" pointcut-ref="myPointcut1"/>
	</aop:config>
目前在applicationContext.xml中的关于通知的相关配置大概就是这样,现在还不理解没事,目前只是举一个栗子;
我们来使用继承接口来实现一个前置通知:
a.jar包导一下;
b.编写业务类和前置通知类;
业务类:
Student类:
public class Student {
	private String stuName;
	private int stuAge;
	private String stuClass;
	private Course course;

	public Student() {}

	public String getStuName() {
		return stuName;
	}

	public void setStuName(String stuName) {
		this.stuName = stuName;
	}

	public int getStuAge() {
		return stuAge;
	}

	public void setStuAge(int stuAge) {
		this.stuAge = stuAge;
	}

	public String getStuClass() {
		return stuClass;
	}

	public void setStuClass(String stuClass) {
		this.stuClass = stuClass;
	}


	public Course getCourse() {
		return course;
	}

	public void setCourse(Course course) {
		this.course = course;
	}

	@Override
	public String toString() {
		return "Student [stuName=" + stuName + ", stuAge=" + stuAge + ", stuClass=" + stuClass + ", course=" + course
				+ "]";
	}
}
StudentDao类:
import org.kay.entity.Student;

public interface StudentDao {
	public void removeStudent(Student stu);
	public void deleteStudent();
}
StudentDaoImpl类:
import org.kay.entity.Student;

public class StudentDaoImpl implements StudentDao{
	public void addStudent(Student student) {
		System.out.println("增加学生...");
	}

	@Override
	public void deleteStudent() {
		// TODO Auto-generated method stub
		System.out.println("删除学生...");
	}

	@Override
	public void removeStudent(Student stu) {
		System.out.println("移动学生...");
	}
}
StudentService类:
import org.kay.entity.Student;

public interface StudentService {
	public void removeStudent(Student stu);
}
StudentServiceImpl类:
import org.kay.dao.StudentDao;
import org.kay.entity.Student;
import org.kay.service.StudentService;

public class StudentServiceImpl implements StudentService{

	StudentDao stuDao;

	public void setStuDao(StudentDao stuDao) {
		this.stuDao = stuDao;
	}

	@Override
	public void removeStudent(Student stu) {
		// TODO Auto-generated method stub
		//stuDao = null;  // 进行异常通知的测试代码。空指针异常。
		stuDao.removeStudent(stu);
	}
}
前置通知类:
import java.lang.reflect.Method;
import org.springframework.aop.MethodBeforeAdvice;

public class MyBeforeAdvice implements MethodBeforeAdvice{

	@Override
	public void before(Method arg0, Object[] arg1, Object arg2) throws Throwable {
		System.out.println("这是一个前置通知!");
		System.out.println("Method:"+arg0+", Object[]:"+arg1+", Object:"+arg2);
	}
}
编写好了相关的类,我们现在只要将他们配置一下就行了;
c.在applicationContext.xml中配置相关内容;
<bean id="studentDao" class="org.kay.dao.StudentDaoImpl"></bean>

	<bean id="studentService" class="org.kay.service.Impl.StudentServiceImpl">
		<property name="stuDao" ref="studentDao"></property>
	</bean>

	<bean id="myBeforeAdvice" class="org.kay.advice.MyBeforeAdvice"></bean>
	<aop:config>
		<aop:pointcut expression="execution(* org.kay.service.Impl.StudentServiceImpl.*(..))" id="myPointcut1"/>
		<aop:advisor advice-ref="myBeforeAdvice" pointcut-ref="myPointcut1"/>
	</aop:config>
测试: 全部都编写和配置好了之后,我们写一个Test类来进行一下测试;
import org.kay.dao.StudentDao;
import org.kay.dao.StudentDaoImpl;
import org.kay.entity.CollectionDemo;
import org.kay.entity.Student;
import org.kay.service.StudentService;
import org.springframework.context.ApplicationContext;
import org.springframework.context.support.ClassPathXmlApplicationContext;

public class Test {

	public static void beforeAdvice() {
		ApplicationContext context = new ClassPathXmlApplicationContext("applicationContext.xml");
		StudentService stuService = (StudentService)context.getBean("studentService");
		Student stu = new Student();
		stuService.removeStudent(stu);
	}

	public static void main(String[] args) {

		beforeAdvice();
	}
}
结果:

我们来使用继承接口来实现一个后置通知:
添加一下后置通知类:
import java.lang.reflect.Method;
import org.springframework.aop.AfterReturningAdvice;

public class MyAfterRunningAdvice implements AfterReturningAdvice{

	@Override
	public void afterReturning(Object arg0, Method arg1, Object[] arg2, Object arg3) throws Throwable {
		// TODO Auto-generated method stub
		System.out.println("这是一个 后置通知!");
	}
}
业务类就使用上面的类;
在applicationContext.xml中配置相关内容;
     <bean id="MyAfterRunningAdvice" class="org.kay.advice.MyAfterRunningAdvice">  <!-- 将通知纳入SpringIoc容器中 -->
	</bean>
	<aop:config>
		<aop:pointcut expression="execution(* org.kay.service.Impl.StudentServiceImpl.*(..))" id="myPointcut2"/>
		<aop:advisor advice-ref="MyAfterRunningAdvice" pointcut-ref="myPointcut2"></aop:advisor>
	</aop:config>
接着就是进行测试:
    public static void afterRunningAdvice() {
		ApplicationContext context = new ClassPathXmlApplicationContext("applicationContext.xml");
		StudentService stuService = (StudentService)context.getBean("studentService");
		Student stu = new Student();
		stuService.removeStudent(stu);
	}
这个后置通知测试的代码跟前置通知测试的代码一样,在SpringIoc容器中拿到studentService。进行studentService方法的调用。
结果:

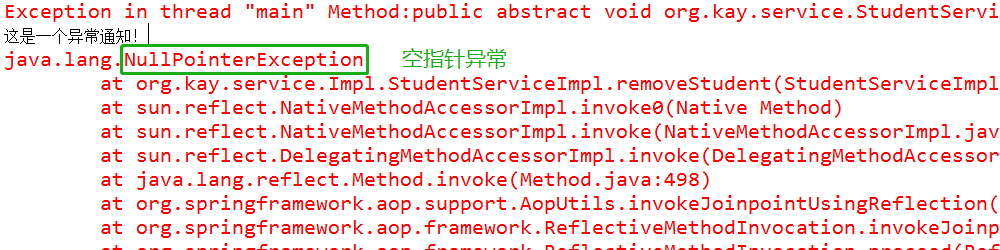
我们来使用继承接口来实现一个异常通知:
编写一个异常通知类:
import java.lang.reflect.Method;
import org.springframework.aop.ThrowsAdvice;

public class MyThrowAdvice implements ThrowsAdvice{

	public void afterThrowing(Method method, Object[] args, Object target, Exception ex) {
		System.out.println("这是一个异常通知!");
	}
}
业务类还是跟上面一样; 但是我们注意一下就是必须要发生异常才进行异常通知中的内容;
所以需要改变一些代码,就是将 stuDao == null; 给一个 空指针异常;
@Override
	public void removeStudent(Student stu) {
		// TODO Auto-generated method stub
		stuDao = null;  // 进行异常通知的测试代码。空指针异常。
		stuDao.removeStudent(stu);
	}
在applicationContext.xml中配置相关内容;
     <bean id="MyThrowAdvice" class="org.kay.advice.MyThrowAdvice"></bean>
	<aop:config>
		<aop:pointcut expression="execution(* org.kay.service.Impl.StudentServiceImpl.*(..))" id="myPointcut3"/>
		<aop:advisor advice-ref="MyThrowAdvice" pointcut-ref="myPointcut3"/>
	</aop:config>
接着就是进行测试:
    public static void throwAdvice() {
		ApplicationContext context = new ClassPathXmlApplicationContext("applicationContext.xml");
		StudentService stuService = (StudentService)context.getBean("studentService");
		Student stu = new Student();
		stuService.removeStudent(stu);
	}
结果:
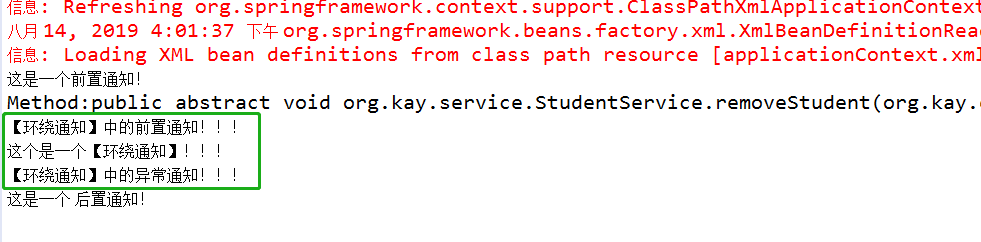
我们来使用继承接口来实现一个环绕通知:
编写一个环绕通知类:
import org.aopalliance.intercept.MethodInterceptor;
import org.aopalliance.intercept.MethodInvocation;

public class MyAroundAdvice implements MethodInterceptor{

	@Override
	public Object invoke(MethodInvocation invocation) throws Throwable {
		//方法体一
		Object result = null;
		try {
			System.out.println("【环绕通知】中的前置通知!!!");

			System.out.println("这个是一个【环绕通知】!!!");
			result = invocation.proceed(); // 控制目标方法的执行,XXXStudent();
			//result 就是目标方法的返回值。

			System.out.println("【环绕通知】中的前后置通知!!!");

		}catch(Exception e) {
			System.out.println("【环绕通知】中的异常通知!!!");
		}

		return result;
	}
}
业务类还是跟上面一样;
在applicationContext.xml中配置相关内容;
     <bean id="MyAroundAdvice" class="org.kay.advice.MyAroundAdvice"></bean>
	<aop:config>
		<aop:pointcut expression="execution(* org.kay.service.Impl.StudentServiceImpl.*(..))" id="myPointcut4"/>
		<aop:advisor advice-ref="MyAroundAdvice" pointcut-ref="myPointcut4"/>
	</aop:config>
接着就是进行测试:
       public static void aroundAdvice() {
		ApplicationContext context = new ClassPathXmlApplicationContext("applicationContext.xml");
		StudentService stuService = (StudentService)context.getBean("studentService");
		Student stu = new Student();
		stuService.removeStudent(stu);
	}
结果:
1、当没有发生异常的结果:

2、当发生异常时的结果:
二、通过注解实现通知
前置通知: 注解为 @Before
后置通知: 注解为 @AfterReturning
异常通知: 注解为 @AfterThrowing
环绕通知: 注解为 @Around
最终通知: 注解为 @After
使用注解进行通知的配置的话,与接口有一点不同,利用注解的话只需要在applicationContext.xml中开启注解对AOP的支持就行
<aop:aspectj-autoproxy></aop:aspectj-autoproxy>
两个注意点:
@Aspect 声明该类是一个通知;
@Component("annotationAdvice") 将AnnotationAdvice纳入到SpringIoc容器中。
其实 @Component("annotationAdvice") 等价于 <bean id="annotationAdvice" class="org.kay.advice.AnnotationAdvice"></bean>
如果用注解将通知纳入到SpringIoc容器中去的话,需要在applicationContext.xml文件中设置扫描器;
<context:component-scan base-package="org.kay.advice">   <!-- 里面放包的名字,可以放多个包。放在里面之后运行会在相关包中找相关的注解,找到了就将他们纳入到SpringIoc容器中 -->
</context:component-scan>
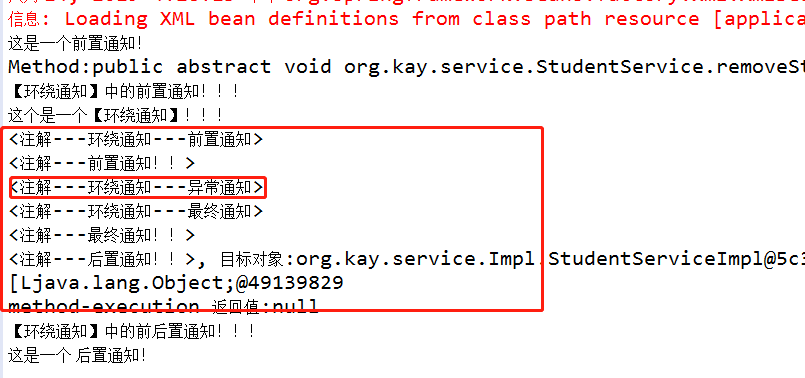
我们来使用注解来实现前置通知通知、后置、异常通知、环绕通知和最终通知:
编写一个普通的类:
import org.aspectj.lang.JoinPoint;
import org.aspectj.lang.ProceedingJoinPoint;
import org.aspectj.lang.annotation.After;
import org.aspectj.lang.annotation.AfterReturning;
import org.aspectj.lang.annotation.AfterThrowing;
import org.aspectj.lang.annotation.Around;
import org.aspectj.lang.annotation.Aspect;
import org.aspectj.lang.annotation.Before;
import org.springframework.stereotype.Component;

@Component("annotationAdvice") // 将AnnotationAdvice纳入到SpringIoc容器中。
@Aspect // 此类是一个通知类
public class AnnotationAdvice {

	@Before("execution(* org.kay.service.Impl.StudentServiceImpl.*(..))")
	public void myBefore() {
		System.out.println("<注解---前置通知!!>");
	}

	@AfterReturning(pointcut="execution(* org.kay.service.Impl.StudentServiceImpl.*(..))", returning="returningValue")
	public void myAfterReturning(JoinPoint jp, Object returningValue) {
		System.out.println("<注解---后置通知!!>, 目标对象:" + jp.getTarget()+"
" + jp.getArgs() + "
" + jp.getKind()+" 返回值:" + returningValue);
	}

	@AfterThrowing("execution(* org.kay.service.Impl.StudentServiceImpl.*(..))")
	public void myThrows() {
		System.out.println("<注解---异常通知!!>");
	}

	//环绕通知
	@Around("execution(* org.kay.service.Impl.StudentServiceImpl.*(..))")
	public void myAround(ProceedingJoinPoint jp) {

		try {
			//前置
			System.out.println("<注解---环绕通知---前置通知>");

			jp.proceed();

			//后置
			System.out.println("<注解---环绕通知---后置通知>");
		}catch(Throwable e) {
			//异常
			System.out.println("<注解---环绕通知---异常通知>");
		}finally{
			//最终
			System.out.println("<注解---环绕通知---最终通知>");
		}
	}

	//最终通知
	@After("execution(* org.kay.service.Impl.StudentServiceImpl.*(..))")
	public void myAfter() {
		System.out.println("<注解---最终通知!!>");
	}

}
业务类还是以前的一样的;
在applicationContext.xml中配置
<!-- 开启注解对AOP的支持  -->
	<aop:aspectj-autoproxy></aop:aspectj-autoproxy>
测试:
    public static void annotationAdvice() {
		ApplicationContext context = new ClassPathXmlApplicationContext("applicationContext.xml");
		StudentService stuService = (StudentService)context.getBean("studentService");
		Student stu = new Student();
		stuService.removeStudent(stu);
	}
结果:(大致的内容有了就行!)
1、没有异常:

2、发生异常:
三、通过配置实现通知
基于Schema配置;类似于接口的方式在applicationContext.xml中进行配置。
先编写一个普通的类:
import org.aspectj.lang.JoinPoint;
import org.aspectj.lang.ProceedingJoinPoint;

public class ConfigSchemaAdvice {

	public void myConfigBefore() {
		System.out.println("Schema---前置通知...");
	}

	public void myConfigAfterReturning(JoinPoint jp, Object returningValue) {
		System.out.println("Schema---后置通知..." + "返回值: " + returningValue);
	}

	public void myConfigThrows(JoinPoint jp, NullPointerException e) {
		System.out.println("Schema---异常通知..." + e.getMessage());
	}

	public void myConfigFinally() {
		System.out.println("Schema---最终通知...");
	}

	public Object myConfigAround(ProceedingJoinPoint jp) {
		Object result = null;
		try {
			System.out.println("Schema《环绕》 --- 前置通知¥¥¥");

			result = jp.proceed();//执行方法。
			System.out.println("目标函数: " + jp.getTarget());

			System.out.println("Schema《环绕》 --- 后置通知¥¥¥");
		}catch(Throwable e) {
			System.out.println("Schema《环绕》 --- 异常通知¥¥¥");
		}finally {
			System.out.println("Schema《环绕》 --- 最终通知¥¥¥");
		}
		return result;
	}
}
因为这个是一个普通的类,而且没有加注解;所以我们需要在applicationContext.xml中进行配置,使它先纳入SpringIoc容器中,在将他变成一个通知类;
     <bean id="configSchemaAdvice" class="org.kay.advice.ConfigSchemaAdvice"></bean>
     <aop:config>
		<aop:pointcut expression="execution(* org.kay.service.Impl.StudentServiceImpl.*(..))" id="mySchema"/>
		<aop:aspect ref="configSchemaAdvice">
			<aop:before method="myConfigBefore" pointcut-ref="mySchema"/>
			<aop:after-returning method="myConfigAfterReturning" returning="returningValue" pointcut-ref="mySchema"/>
			<aop:after-throwing method="myConfigThrows" pointcut-ref="mySchema"  throwing="e" />
			<aop:after method="myConfigFinally" pointcut-ref="mySchema"/>
			<aop:around method="myConfigAround" pointcut-ref="mySchema" />
		</aop:aspect>
	</aop:config>
测试:
     public static void schemaAdvice() {
		ApplicationContext context = new ClassPathXmlApplicationContext("applicationContext.xml");
		StudentService stuService = (StudentService)context.getBean("studentService");
		Student stu = new Student();
		stuService.removeStudent(stu);
	}
结果:

其他:
如果需要获取目标对象信息:
注解 和 Schema : JoinPoint ;
接口: Method method, Object[] args, Object target ;
注解和Schema的不同之处:
注解使用的是在普通类进行注解使它变成通知类;
而Schema是在applicationContext.xml中进行了配置,使普通类变成了通知类。
其中关于获取目标对象信息的参数都没有介绍感兴趣的可以看一下网易云 颜群老师的Spring课程,是我的Spring启蒙老师。^.^ !
颜群老师其他的课程也讲的很不错哦!