★★★★★★★★★★★★★★★★★★★★★★★★★★★★★★★★★★★★★★★★
➤微信公众号:山青咏芝(shanqingyongzhi)
➤博客园地址:山青咏芝(www.zengqiang.org)
➤GitHub地址:https://github.com/strengthen/LeetCode
➤原文地址:https://www.cnblogs.com/strengthen/p/11398890.html
➤如果链接不是山青咏芝的博客园地址,则可能是爬取作者的文章。
➤原文已修改更新!强烈建议点击原文地址阅读!支持作者!支持原创!
★★★★★★★★★★★★★★★★★★★★★★★★★★★★★★★★★★★★★★★★
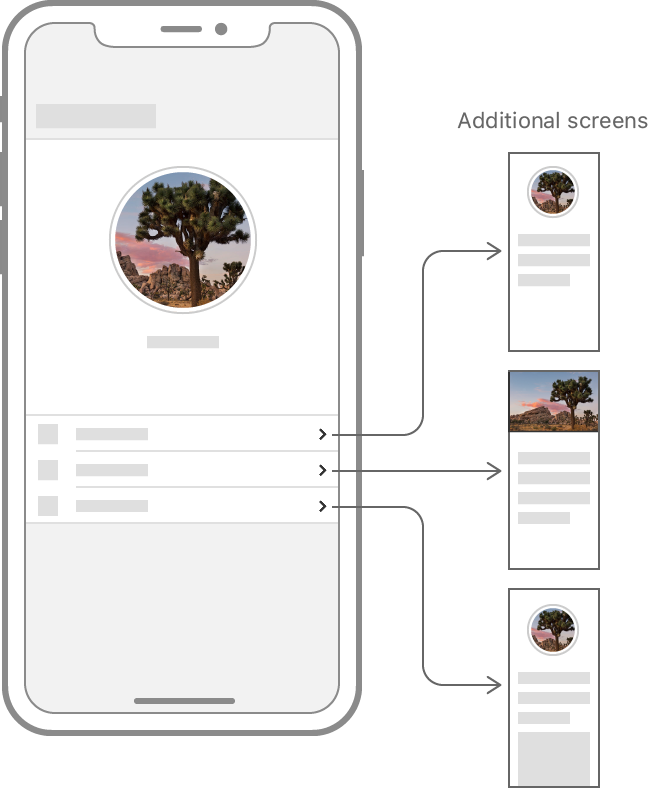
标记的主屏幕显示了一个滚动的类别列表,每个类别中都有水平滚动的标记。在构建此主导航时,您将探索合成视图如何适应不同的设备大小和方向。
按照步骤构建此项目,或者下载完成的项目以自行探索。
一、添加主视图
现在您已经拥有了标记应用程序所需的所有视图,现在是时候给它们一个家 - 一个统一视图的视图。主视图不仅包含所有其他视图,还提供了浏览和显示地标的方法。
第1步
创建一个名为的新文件中调用的自定义视图。CategoryHomeHome.swift
 1 import SwiftUI
 2
 3 struct CategoryHome: View {
 4     var body: some View {
 5         Text("Landmarks Content")
 6     }
 7 }
 8
 9 struct CategoryHome_Previews: PreviewProvider {
10     static var previews: some View {
11         CategoryHome()
12     }
13 }
第2步
修改场景委托,使其显示新视图而不是地标列表。CategoryHome
主视图作为标记应用程序的根,因此它需要一种方式来呈现所有其他视图。
 1 import SwiftUI
 2 import UIKit
 3
 4 class SceneDelegate: UIResponder, UIWindowSceneDelegate {
 5
 6     var window: UIWindow?
 7
 8     func scene(_ scene: UIScene, willConnectTo session: UISceneSession, options connectionOptions: UIScene.ConnectionOptions) {
 9         // Use this method to optionally configure and attach the UIWindow `window` to the provided UIWindowScene `scene`.
10         // If using a storyboard, the `window` property will automatically be initialized and attached to the scene.
11         // This delegate does not imply the connecting scene or session are new (see `application:configurationForConnectingSceneSession` instead).
12
13         // Use a UIHostingController as window root view controller
14         if let windowScene = scene as? UIWindowScene {
15             let window = UIWindow(windowScene: windowScene)
16             window.rootViewController = UIHostingController(
17                 rootView: CategoryHome()
18                     .environmentObject(UserData())
19             )
20             self.window = window
21             window.makeKeyAndVisible()
22         }
23     }
24 }
第3步
添加一个来托管地标中的不同视图。NavigationView
您可以使用导航视图以及实例和相关修饰符在应用程序中构建分层导航结构。NavigationLink
 1 import SwiftUI
 2
 3 struct CategoryHome: View {
 4     var body: some View {
 5         NavigationView {
 6             Text("Landmarks Content")
 7         }
 8     }
 9 }
10
11 struct CategoryHome_Previews: PreviewProvider {
12     static var previews: some View {
13         CategoryHome()
14     }
15 }
第4步
将导航栏的标题设置为“ 精选”。
 1 import SwiftUI
 2
 3 struct CategoryHome: View {
 4     var body: some View {
 5         NavigationView {
 6             Text("Landmarks Content")
 7                 .navigationBarTitle(Text("Featured"))
 8         }
 9     }
10 }
11
12 struct CategoryHome_Previews: PreviewProvider {
13     static var previews: some View {
14         CategoryHome()
15     }
16 }
二、创建类别列表
标记应用程序以垂直列排列的单独行显示所有类别,以便于浏览。您可以通过组合垂直和水平堆栈,并将滚动添加到列表中来完成此操作。
第1步
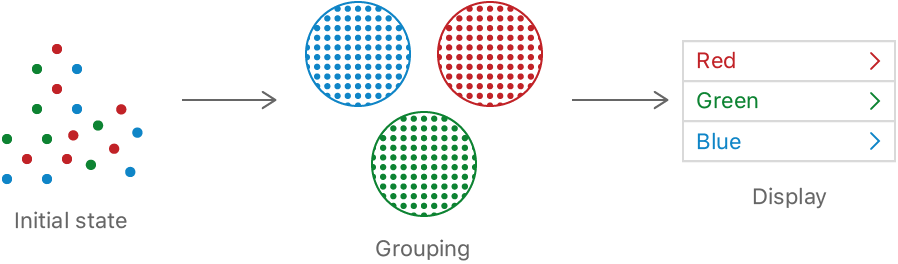
使用Dictionary结构的初始化程序将地标分组到类别中,键入地标的属性。init(grouping:by:)category
初始项目文件包括每个样本标志的预定义类别。
 1 import SwiftUI
 2
 3 struct CategoryHome: View {
 4     var categories: [String: [Landmark]] {
 5         Dictionary(
 6             grouping: landmarkData,
 7             by: { $0.category.rawValue }
 8         )
 9     }
10
11     var body: some View {
12         NavigationView {
13             Text("Landmarks Content")
14                 .navigationBarTitle(Text("Featured"))
15         }
16     }
17 }
18
19 struct CategoryHome_Previews: PreviewProvider {
20     static var previews: some View {
21         CategoryHome()
22     }
23 }
第2步
使用a在地标中显示类别List。
该案例名称标识列表中的每个项目,必须是其他类别中是独一无二的,因为它是一个枚举。Landmark.Category
 1 import SwiftUI
 2
 3 struct CategoryHome: View {
 4     var categories: [String: [Landmark]] {
 5         Dictionary(
 6             grouping: landmarkData,
 7             by: { $0.category.rawValue }
 8         )
 9     }
10
11     var body: some View {
12         NavigationView {
13             List {
14                 ForEach(categories.keys.sorted(), id: .self) { key in
15                     Text(key)
16                 }
17             }
18             .navigationBarTitle(Text("Featured"))
19         }
20     }
21 }
22
23 struct CategoryHome_Previews: PreviewProvider {
24     static var previews: some View {
25         CategoryHome()
26     }
27 }
三、添加地标行
地标显示水平滚动的行中的每个类别。添加新视图类型以表示行,然后在新视图中显示该类别的所有地标。
第1步
定义用于保存行内容的新自定义视图。
该视图需要存储有关其显示的特定地标类别的信息以及地标本身。
 1 import SwiftUI
 2
 3 struct CategoryRow: View {
 4     var categoryName: String
 5     var items: [Landmark]
 6
 7     var body: some View {
 8         Text(self.categoryName)
 9             .font(.headline)
10     }
11 }
12
13 struct CategoryRow_Previews: PreviewProvider {
14     static var previews: some View {
15         CategoryRow(
16             categoryName: landmarkData[0].category.rawValue,
17             items: Array(landmarkData.prefix(3))
18         )
19     }
20 }
第2步
更新正文以将类别信息传递给新行类型。CategoryHome
 1 import SwiftUI
 2
 3 struct CategoryHome: View {
 4     var categories: [String: [Landmark]] {
 5         Dictionary(
 6             grouping: landmarkData,
 7             by: { $0.category.rawValue }
 8         )
 9     }
10
11     var body: some View {
12         NavigationView {
13             List {
14                 ForEach(categories.keys.sorted(), id: .self) { key in
15                     CategoryRow(categoryName: key, items: self.categories[key]!)
16                 }
17             }
18             .navigationBarTitle(Text("Featured"))
19         }
20     }
21 }
22
23 struct CategoryHome_Previews: PreviewProvider {
24     static var previews: some View {
25         CategoryHome()
26     }
27 }
第3步
在一个中显示此类别的地标HStack。
 1 import SwiftUI
 2
 3 struct CategoryRow: View {
 4     var categoryName: String
 5     var items: [Landmark]
 6
 7     var body: some View {
 8         HStack(alignment: .top, spacing: 0) {
 9             ForEach(self.items) { landmark in
10                 Text(landmark.name)
11             }
12         }
13     }
14 }
15
16 struct CategoryRow_Previews: PreviewProvider {
17     static var previews: some View {
18         CategoryRow(
19             categoryName: landmarkData[0].category.rawValue,
20             items: Array(landmarkData.prefix(3))
21         )
22     }
23 }
第4步
通过指定高度并在滚动视图中包装堆栈,为行提供呼吸空间。frame(height:)
使用更大的数据采样更新视图预览可以更轻松地确保滚动行为正确。
 1 import SwiftUI
 2
 3 struct CategoryRow: View {
 4     var categoryName: String
 5     var items: [Landmark]
 6
 7     var body: some View {
 8         VStack(alignment: .leading) {
 9             Text(self.categoryName)
10                 .font(.headline)
11                 .padding(.leading, 15)
12                 .padding(.top, 5)
13
14             ScrollView(.horizontal, showsIndicators: false) {
15                 HStack(alignment: .top, spacing: 0) {
16                     ForEach(self.items) { landmark in
17                         Text(landmark.name)
18                     }
19                 }
20             }
21             .frame(height: 185)
22         }
23     }
24 }
25
26 struct CategoryRow_Previews: PreviewProvider {
27     static var previews: some View {
28         CategoryRow(
29             categoryName: landmarkData[0].category.rawValue,
30             items: Array(landmarkData.prefix(4))
31         )
32     }
33 }
四、撰写主视图
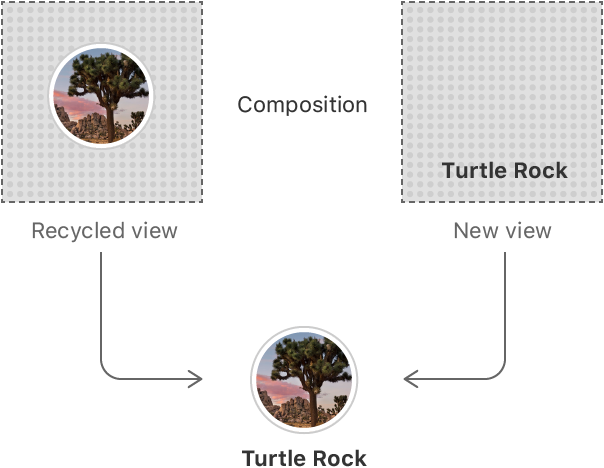
标记应用程序的主页需要在用户点击标记之前显示标记的简单表示以获取更多详细信息。
重用Landmark您在“ 创建和组合视图”中创建的视图的部分,以创建熟悉但更简单的类别和特征视图的地标预览。
第1步
创建一个名为旁边的新自定义视图,并用新视图替换包含地标名称文本的视图。CategoryItemCategoryRowText
 1 import SwiftUI
 2
 3 struct CategoryRow: View {
 4     var categoryName: String
 5     var items: [Landmark]
 6
 7     var body: some View {
 8         VStack(alignment: .leading) {
 9             Text(self.categoryName)
10                 .font(.headline)
11                 .padding(.leading, 15)
12                 .padding(.top, 5)
13
14             ScrollView(.horizontal, showsIndicators: false) {
15                 HStack(alignment: .top, spacing: 0) {
16                     ForEach(self.items) { landmark in
17                         CategoryItem(landmark: landmark)
18                     }
19                 }
20             }
21             .frame(height: 185)
22         }
23     }
24 }
25
26 struct CategoryItem: View {
27     var landmark: Landmark
28     var body: some View {
29         VStack(alignment: .leading) {
30             landmark.image
31                 .resizable()
32                 .frame( 155, height: 155)
33                 .cornerRadius(5)
34             Text(landmark.name)
35                 .font(.caption)
36         }
37         .padding(.leading, 15)
38     }
39 }
40
41 struct CategoryRow_Previews: PreviewProvider {
42     static var previews: some View {
43         CategoryRow(
44             categoryName: landmarkData[0].category.rawValue,
45             items: Array(landmarkData.prefix(4))
46         )
47     }
48 }
第2步
在,添加一个名为的简单视图,仅显示标记的地标。Home.swiftFeaturedLandmarksisFeatured
您将在后面的教程中将此视图转换为交互式轮播。目前,它会显示一个带有缩放和裁剪预览图像的特色地标。
 1 import SwiftUI
 2
 3 struct CategoryHome: View {
 4     var categories: [String: [Landmark]] {
 5         Dictionary(
 6             grouping: landmarkData,
 7             by: { $0.category.rawValue }
 8         )
 9     }
10
11     var featured: [Landmark] {
12         landmarkData.filter { $0.isFeatured }
13     }
14
15     var body: some View {
16         NavigationView {
17             List {
18                 FeaturedLandmarks(landmarks: featured)
19                     .scaledToFill()
20                     .frame(height: 200)
21                     .clipped()
22                 ForEach(categories.keys.sorted(), id: .self) { key in
23                     CategoryRow(categoryName: key, items: self.categories[key]!)
24                 }
25             }
26             .navigationBarTitle(Text("Featured"))
27         }
28     }
29 }
30
31 struct FeaturedLandmarks: View {
32     var landmarks: [Landmark]
33     var body: some View {
34         landmarks[0].image.resizable()
35     }
36 }
37
38 struct CategoryHome_Previews: PreviewProvider {
39     static var previews: some View {
40         CategoryHome()
41     }
42 }
第3步
在两种地标预览上将边缘插入设置为零,以便内容可以扩展到显示的边缘。
 1 import SwiftUI
 2
 3 struct CategoryHome: View {
 4     var categories: [String: [Landmark]] {
 5         Dictionary(
 6             grouping: landmarkData,
 7             by: { $0.category.rawValue }
 8         )
 9     }
10
11     var featured: [Landmark] {
12         landmarkData.filter { $0.isFeatured }
13     }
14
15     var body: some View {
16         NavigationView {
17             List {
18                 FeaturedLandmarks(landmarks: featured)
19                     .scaledToFill()
20                     .frame(height: 200)
21                     .clipped()
22                     .listRowInsets(EdgeInsets())
23
24                 ForEach(categories.keys.sorted(), id: .self) { key in
25                     CategoryRow(categoryName: key, items: self.categories[key]!)
26                 }
27                 .listRowInsets(EdgeInsets())
28             }
29             .navigationBarTitle(Text("Featured"))
30         }
31     }
32 }
33
34 struct FeaturedLandmarks: View {
35     var landmarks: [Landmark]
36     var body: some View {
37         landmarks[0].image.resizable()
38     }
39 }
40
41 struct CategoryHome_Previews: PreviewProvider {
42     static var previews: some View {
43         CategoryHome()
44     }
45 }
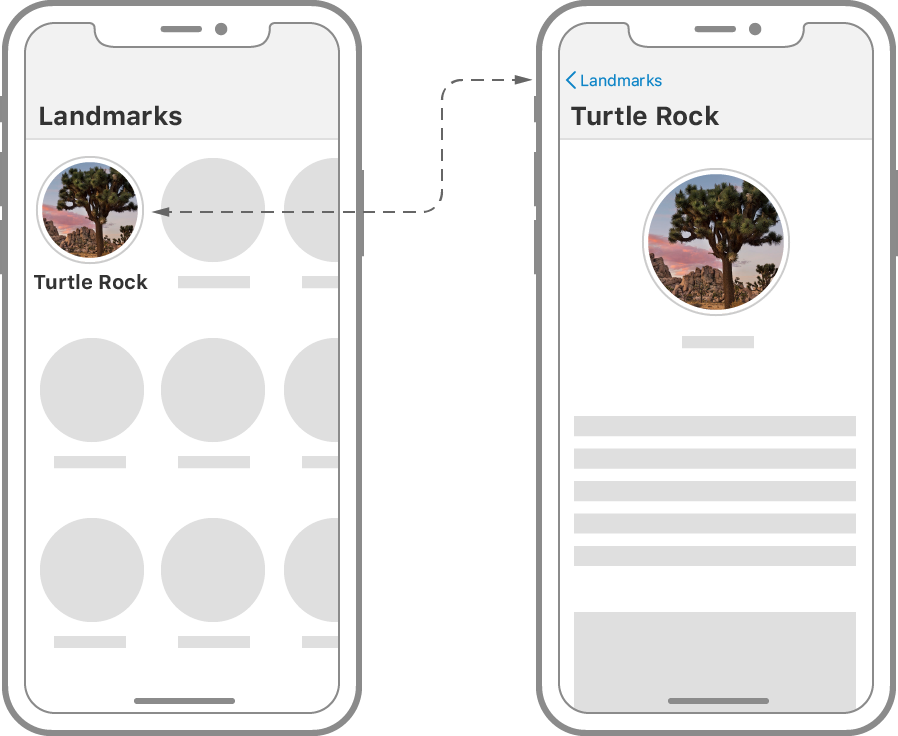
五、添加节之间的导航
现在,在主视图中可以看到所有不同分类的地标,用户需要一种方法来访问应用程序中的每个部分。使用导航和演示API可以从主视图中导航所有可导航的详细视图,收藏夹列表和用户配置文件。
第1步
在,用一个包裹现有的。CategoryRow.swiftCategoryItemNavigationLink
类别项本身是按钮的标签,其目的地是卡所代表的地标的地标详细视图。
注意
在Xcode 11 beta 6中,如果嵌套在a 内部且包含a ,则在用户点击时链接将不会导航到目标。ScrollViewListScrollViewNavigationLink
 1 import SwiftUI
 2
 3 struct CategoryRow: View {
 4     var categoryName: String
 5     var items: [Landmark]
 6
 7     var body: some View {
 8         VStack(alignment: .leading) {
 9             Text(self.categoryName)
10                 .font(.headline)
11                 .padding(.leading, 15)
12                 .padding(.top, 5)
13
14             ScrollView(.horizontal, showsIndicators: false) {
15                 HStack(alignment: .top, spacing: 0) {
16                     ForEach(self.items) { landmark in
17                         NavigationLink(
18                             destination: LandmarkDetail(
19                                 landmark: landmark
20                             )
21                         ) {
22                             CategoryItem(landmark: landmark)
23                         }
24                     }
25                 }
26             }
27             .frame(height: 185)
28         }
29     }
30 }
31
32 struct CategoryItem: View {
33     var landmark: Landmark
34     var body: some View {
35         VStack(alignment: .leading) {
36             landmark.image
37                 .resizable()
38                 .frame( 155, height: 155)
39                 .cornerRadius(5)
40             Text(landmark.name)
41                 .font(.caption)
42         }
43         .padding(.leading, 15)
44     }
45 }
46
47 struct CategoryRow_Previews: PreviewProvider {
48     static var previews: some View {
49         CategoryRow(
50             categoryName: landmarkData[0].category.rawValue,
51             items: Array(landmarkData.prefix(4))
52         )
53     }
54 }
第2步
通过应用和修改器更改类别项的导航外观。renderingMode(_:)foregroundColor(_:)
作为导航链接标签传递的文本使用环境的强调颜色渲染,图像可以渲染为模板图像。您可以修改任何一种最适合您设计的行为。
 1 import SwiftUI
 2
 3 struct CategoryRow: View {
 4     var categoryName: String
 5     var items: [Landmark]
 6
 7     var body: some View {
 8         VStack(alignment: .leading) {
 9             Text(self.categoryName)
10                 .font(.headline)
11                 .padding(.leading, 15)
12                 .padding(.top, 5)
13
14             ScrollView(.horizontal, showsIndicators: false) {
15                 HStack(alignment: .top, spacing: 0) {
16                     ForEach(self.items) { landmark in
17                         NavigationLink(
18                             destination: LandmarkDetail(
19                                 landmark: landmark
20                             )
21                         ) {
22                             CategoryItem(landmark: landmark)
23                         }
24                     }
25                 }
26             }
27             .frame(height: 185)
28         }
29     }
30 }
31
32 struct CategoryItem: View {
33     var landmark: Landmark
34     var body: some View {
35         VStack(alignment: .leading) {
36             landmark.image
37                 .renderingMode(.original)
38                 .resizable()
39                 .frame( 155, height: 155)
40                 .cornerRadius(5)
41             Text(landmark.name)
42                 .foregroundColor(.primary)
43                 .font(.caption)
44         }
45         .padding(.leading, 15)
46     }
47 }
48
49 struct CategoryRow_Previews: PreviewProvider {
50     static var previews: some View {
51         CategoryRow(
52             categoryName: landmarkData[0].category.rawValue,
53             items: Array(landmarkData.prefix(4))
54         )
55     }
56 }
第3步
在,在选项卡栏中点击配置文件图标后,添加一个在模态视图中显示用户配置文件的演示文稿。Home.swift
当状态变量设置为时,SwiftUI显示占位符用户配置文件,并设置回用户解除模式的时间。showProfiletrueshowProfilefalse
 1 import SwiftUI
 2
 3 struct CategoryHome: View {
 4     var categories: [String: [Landmark]] {
 5         Dictionary(
 6             grouping: landmarkData,
 7             by: { $0.category.rawValue }
 8         )
 9     }
10
11     var featured: [Landmark] {
12         landmarkData.filter { $0.isFeatured }
13     }
14
15     @State var showingProfile = false
16
17     var body: some View {
18         NavigationView {
19             List {
20                 FeaturedLandmarks(landmarks: featured)
21                     .scaledToFill()
22                     .frame(height: 200)
23                     .clipped()
24                     .listRowInsets(EdgeInsets())
25
26                 ForEach(categories.keys.sorted(), id: .self) { key in
27                     CategoryRow(categoryName: key, items: self.categories[key]!)
28                 }
29                 .listRowInsets(EdgeInsets())
30             }
31             .navigationBarTitle(Text("Featured"))
32             .sheet(isPresented: $showingProfile) {
33                 Text("User Profile")
34             }
35         }
36     }
37 }
38
39 struct FeaturedLandmarks: View {
40     var landmarks: [Landmark]
41     var body: some View {
42         landmarks[0].image.resizable()
43     }
44 }
45
46 struct CategoryHome_Previews: PreviewProvider {
47     static var previews: some View {
48         CategoryHome()
49     }
50 }
第4步
添加一个按钮用来切换导航栏从到挖掘时。showProfilefalsetrue
 1 import SwiftUI
 2
 3 struct CategoryHome: View {
 4     var categories: [String: [Landmark]] {
 5         .init(
 6             grouping: landmarkData,
 7             by: { $0.category.rawValue }
 8         )
 9     }
10
11     var featured: [Landmark] {
12         landmarkData.filter { $0.isFeatured }
13     }
14
15     @State var showingProfile = false
16
17     var profileButton: some View {
18         Button(action: { self.showingProfile.toggle() }) {
19             Image(systemName: "person.crop.circle")
20                 .imageScale(.large)
21                 .accessibility(label: Text("User Profile"))
22                 .padding()
23         }
24     }
25
26     var body: some View {
27         NavigationView {
28             List {
29                 FeaturedLandmarks(landmarks: featured)
30                     .scaledToFill()
31                     .frame(height: 200)
32                     .clipped()
33                     .listRowInsets(EdgeInsets())
34
35                 ForEach(categories.keys.sorted(), id: .self) { key in
36                     CategoryRow(categoryName: key, items: self.categories[key]!)
37                 }
38                 .listRowInsets(EdgeInsets())
39             }
40             .navigationBarTitle(Text("Featured"))
41             .navigationBarItems(trailing: profileButton)
42             .sheet(isPresented: $showingProfile) {
43                 Text("User Profile")
44             }
45         }
46     }
47 }
48
49 struct FeaturedLandmarks: View {
50     var landmarks: [Landmark]
51     var body: some View {
52         landmarks[0].image(forSize: 250).resizable()
53     }
54 }
55
56 struct CategoryHome_Previews: PreviewProvider {
57     static var previews: some View {
58         CategoryHome()
59     }
60 }
第5步
通过添加导航链接来完成主屏幕,该链接指向所有地标的可过滤列表。
 1 import SwiftUI
 2
 3 struct CategoryHome: View {
 4     var categories: [String: [Landmark]] {
 5         Dictionary(
 6             grouping: landmarkData,
 7             by: { $0.category.rawValue }
 8         )
 9     }
10
11     var featured: [Landmark] {
12         landmarkData.filter { $0.isFeatured }
13     }
14
15     @State var showingProfile = false
16
17     var profileButton: some View {
18         Button(action: { self.showingProfile.toggle() }) {
19             Image(systemName: "person.crop.circle")
20                 .imageScale(.large)
21                 .accessibility(label: Text("User Profile"))
22                 .padding()
23         }
24     }
25
26     var body: some View {
27         NavigationView {
28             List {
29                 FeaturedLandmarks(landmarks: featured)
30                     .scaledToFill()
31                     .frame(height: 200)
32                     .clipped()
33                     .listRowInsets(EdgeInsets())
34
35                 ForEach(categories.keys.sorted(), id: .self) { key in
36                     CategoryRow(categoryName: key, items: self.categories[key]!)
37                 }
38                 .listRowInsets(EdgeInsets())
39
40                 NavigationLink(destination: LandmarkList()) {
41                     Text("See All")
42                 }
43             }
44             .navigationBarTitle(Text("Featured"))
45             .navigationBarItems(trailing: profileButton)
46             .sheet(isPresented: $showingProfile) {
47                 Text("User Profile")
48             }
49         }
50     }
51 }
52
53 struct FeaturedLandmarks: View {
54     var landmarks: [Landmark]
55     var body: some View {
56         landmarks[0].image.resizable()
57     }
58 }
59
60 struct CategoryHome_Previews: PreviewProvider {
61     static var previews: some View {
62         CategoryHome()
63     }
64 }
第6步
在,删除包装地标列表,并将其添加到预览中。LandmarkList.swiftNavigationView
在应用程序的上下文中,将始终显示在声明的导航视图中。LandmarkListHome.swift
 1 import SwiftUI
 2
 3 struct LandmarkList: View {
 4     @EnvironmentObject var userData: UserData
 5
 6     var body: some View {
 7
 8         List {
 9             Toggle(isOn: $userData.showFavoritesOnly) {
10                 Text("Favorites only")
11             }
12
13             ForEach(userData.landmarks) { landmark in
14                 if !self.userData.showFavoritesOnly || landmark.isFavorite {
15                     NavigationLink(destination: LandmarkDetail(landmark: landmark)) {
16                         LandmarkRow(landmark: landmark)
17                     }
18                 }
19             }
20         }
21         .navigationBarTitle(Text("Landmarks"))
22
23     }
24 }
25
26 struct LandmarkList_Previews: PreviewProvider {
27     static var previews: some View {
28         NavigationView {
29             LandmarkList()
30                 .environmentObject(UserData())
31         }
32     }
33 }