1.Autolayout中“constrain to margins”
Autolayout中的页面边距的问题ios8以后的UIView增加了layoutMargins属性,在Storyboard/IB中使用AutoLayout布局时,一般都取消勾选“constrain to margins”,如果勾选,即使你在约束里设置某个控件的上下左右均为0,当查看其真实坐标时,发现x=16,y=20,而且控件的右侧离self.view的最右边也有16point的间距,下边没有间隙。故一般取消勾选即可。
2.
2.1 modal出来的控制器使用下面2个方法都能将其关闭,这两种写法有什么区别啊?
[self.presentingViewController dismissViewControllerAnimated:YES completion:nil];
[self dismissViewControllerAnimated:YES completion:nil];
2.2
window.rootViewController = tabBarController; //window特有方法,rootVC将与window同生同死
【tabBarController addChildViewController:navController】; //@property(nonatomic,copy) NSArray *viewControllers;
navController= [UINavigationController alloc] initWithRootViewController:viewController]; //rootVC被加入导航栈最底部,即navController.viewControllers的第一个元素,与navC同生同死。相当于Sb中Embed in NavigationController。
注意:
(1) 以上关系中,viewController的view会被自动添加到以window为基础的UI层级中(注意self.view并没有被直接加到window上,二者之间还有6/7个视图层级)。
(2) navC和tabC都有切换页面的功能,都有viewControllers属性,又有childViewControllers属性(二者的值完全相同,后者readonly)。而普通的viewController都只有childViewControllers属性,没有viewControllers属性。
(3) tabBar上面超过5个按钮,那么系统会自动将第5个按钮变为“更多”,第5个及以后的按钮就被放进“more”中。The "More" navigation controller will not be returned by -viewControllers, but it may be returned by -selectedViewController.
3. UIView.subviews
所有的UIView都有一个subviews数组属性,管理着它的所有子视图,可以通过以下方法在某个位置插入子视图
UIView *view = [[UIView alloc]initWithFrame:self.view.frame];
view.backgroundColor = [UIColor greenColor];
[self.view insertSubview:view atIndex:0];
4. 自定义UI控件init方法
//从Xib创建会调用如下两个方法
//最先调用
- (instancetype)initWithCoder:(NSCoder *)aDecoder {
    if (self = [super initWithCoder:aDecoder]) {
    }
    return self;
}
//接着调用
- (void)awakeFromNib {

}
//最后调用
- (void)drawRect:(CGRect)rect {
    [super drawRect:rect];
}


//完全代码创建
//先调用
- (instancetype)initWithFrame:(CGRect)frame {
    if (self = [super initWithFrame:frame]) {
    }
    return self;
}
//然后调用
- (void)drawRect:(CGRect)rect {
    [super drawRect:rect];
}
5.设置UI控件圆角方法
5.1代码设置(需要获取该控件的引用)
self.loginButton.layer.cornerRadius = 5;
self.loginButton.layer.masksToBounds = YES; //bounds默认是不可见的,只有盖住它才可见。
5.2在Xib中利用KVC直接设值

6.
不管UITextField加载self.view哪个子视图里,在任何一个方法中调用[self.view endEditing]; 都可以把界面上弹出的所有的键盘收回去。
通过修改某UI控件的约束来实现动画,在修改完约束后,在[UIView animateWithDuration:1.0 animations:^{ [self.view layoutIfNeeded]; }];中不一定非要用该UI控件的父视图来调用layoutIfNeeded方法,最简单的通用方法是直接让self.view重新布局。
7. 设置背景色的3种方法
titlesView.backgroundColor = [UIColor colorWithRed:1.0 green:1.0 blue:1.0 alpha:0.5]; //通用
titlesView.backgroundColor = [[UIColor whiteColor]colorWithAlphaComponent:0.5]; //设置常见颜色及Alpha
titlesView.backgroundColor = [UIColor colorWithWhite:1.0 alpha:0.5]; //特殊用法:设置RGB相同的灰色及Alpha
/*
+ (UIColor *)blackColor; // 0.0 white
+ (UIColor *)darkGrayColor; // 0.333 white
+ (UIColor *)lightGrayColor; // 0.667 white
+ (UIColor *)whiteColor; // 1.0 white
+ (UIColor *)grayColor; // 0.5 white
+ (UIColor *)clearColor; // 0.0 white, 0.0 alpha
*/
8. 计算文本框宽高的2种方法
NSDictionary *textDict = @{ NSFontAttributeName:[UIFont systemFontOfSize:12] };
//方法1:
CGFloat maxW = self.contentView.frame.size.width - 2* margin; //限定最大的宽度为:cell宽度-2*margin
CGRect textRect = [textStr boundingRectWithSize:CGSizeMake(maxW, MAXFLOAT) options:NSStringDrawingUsesLineFragmentOrigin attributes:textDict context:nil]; //如果不限制宽高,就写(MAXFLOAT, MAXFLOAT)
//方法2:
//计算文本框宽高,不设置最大宽度限制,所有文字显示在一横行上(等价于上一种方法不限制宽高)
CGSize textSize = [text sizeWithAttributes:attrDict];
9. 根据文字调整宽高sizeToFit:
[label sizeToFit]; [button sizeToFit];//调整里面的图片框和Label [button.titleLabel sizeToFit];
注意:调用sizeToFit会让控件的size立马有值,产生和[self.view layoutIfNeed]类似的效果。
10.
取消scrollView和tableView自动布局向下偏移64,要用当前控制器的属性self.automaticallyAdjustsScrollViewInsets = NO;
注意:该属性是视图控制器的属性,并不是scrollView和tableView的属性。因误以为是scrollView和tableView的属性,在敲代码时Xcode死活没提示。郁闷了一阵,下次不在此栽跟头了。
//以下写法报错(UIView并没有该属性)
scrollView.automaticallyAdjustsScrollViewInsets = NO; //直接编译报错
tableView.automaticallyAdjustsScrollViewInsets = NO; //直接编译报错
//以下属性用于关闭UIView的Autoresizing,一般是在使用AutoLayout给该UIView添加约束前使用。注意别和视图控制器的automaticallyAdjustsScrollViewInsets属性混淆了。
tableView.translatesAutoresizingMaskIntoConstraints = NO;
scrollView.translatesAutoresizingMaskIntoConstraints = NO;
11.
//scrollView子控件的frame是参考contentSize左上角(0,0)点来设定的,与scrollView坐标没有关系。

12. 关于scrollView的一些方法:
a.通过设置offSet让scrollView匀速滚动:[scrollView setContentOffset:offset animated:YES];
b.监听setContentOffset停止滚动的时刻:
//该方法专门监控setContentOffset: animated:方法后的滚动
- (void)scrollViewDidEndScrollingAnimation:(UIScrollView *)scrollView { }
c. 监听用户拖动后,停止滚动的时刻:
//带Decelerating的方法特指:用户拖拽过后的减速(用户不施力是匀速滚动)
- (void)scrollViewDidEndDecelerating:(UIScrollView *)scrollView { }
13. scrollView.pagingEnabled = YES; //启用分页(拖动时要么滚动一整页,要么不滚动,跟contentOffset有关)
14. 注意UI控件的viewWithTag:方法(如[self.view viewWithTag:0]),会返回view的视图层级中与给定tag匹配的view,也包含view自身在内。所有的UI控件不设置tag值,默认是0。
Return: The view in the receiver’s hierarchy whose tag property matches the value in the tag parameter.
14.
tableVC会自动调整tableView顶部内边距为64(状态栏20+导航栏44),即使设置tableViewController.automaticallyAdjustsScrollViewInsets = NO;仍然会被设置向下偏移20(状态栏宽度)。如果想让tableView顶格,需手动设置frame的y = 0;
//打印继承自scrollView的相关偏移属性
- (void)tableView:(UITableView *)tableView didSelectRowAtIndexPath:(NSIndexPath *)indexPath {
  NSLog(@"tableView.frame:%@",NSStringFromCGRect(tableView.frame));
 NSLog(@"tableView.contentInsets:%@",NSStringFromUIEdgeInsets(tableView.contentInset));//tableVC会自动调整tableView顶部内边距为64
  NSLog(@"tableView.contentOffset:%@",NSStringFromCGPoint(tableView.contentOffset));
  NSLog(@"tableView.contentSize:%@",NSStringFromCGSize(tableView.contentSize));
}

2016-05-17 18:54:34.622 904. 待办清单ToDoList[45231:2587500] *** -[NSKeyedUnarchiver initForReadingWithData:]: data is NULL
2016-05-17 18:55:03.588 904. 待办清单ToDoList[45231:2587500] tableView.frame:{{0, 0}, {320, 480}}
2016-05-17 18:55:03.588 904. 待办清单ToDoList[45231:2587500] tableView.contentInsets:{64, 0, 0, 0}
2016-05-17 18:55:03.588 904. 待办清单ToDoList[45231:2587500] tableView.contentOffset:{0, -64}
2016-05-17 18:55:03.588 904. 待办清单ToDoList[45231:2587500] tableView.contentSize:{320, 88}
15. 设置了tableView的内边距,同时也需要设置滚动条的内边距,否则不协调。
//设置tableView内边距(此代码必须放到addSubview之前,一显示页面才会生效)
tableView.contentInset = UIEdgeInsetsMake(CGRectGetMaxY(self.titlesView.frame), 0, self.tabBarController.tabBar.height, 0);
//设置滚动条的内边距
tableView.scrollIndicatorInsets = tableView.contentInset;
16.
//如果导航栏是半透明的,mj_header在停止刷新后虽然自动隐藏了,但是会被看到。这是只需要设置mj_header允许自动改变透明度即可
self.tableView.mj_header.automaticallyChangeAlpha = YES;
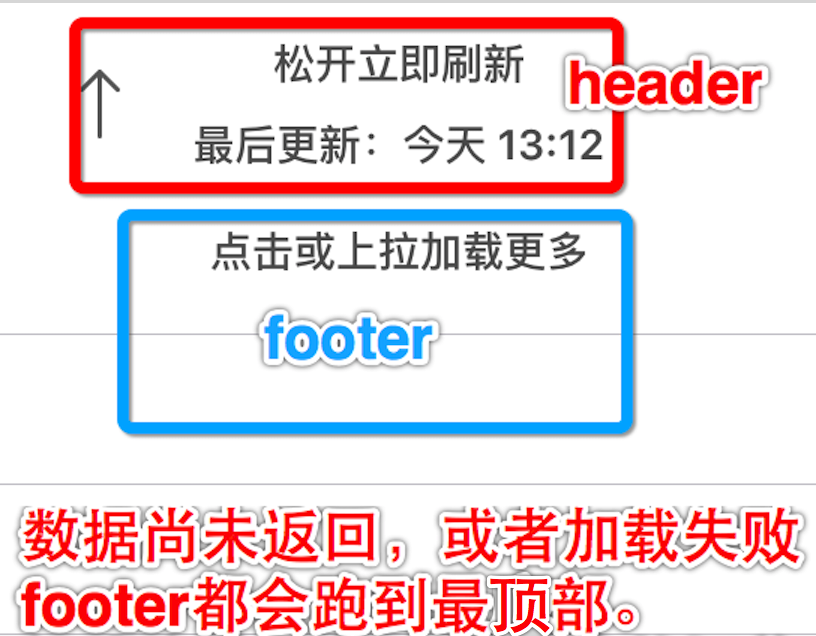
17. 使用MJRefreshAutoNormalFooter时的问题
使用如下代码添加footer刷新:self.tableView.mj_footer = [MJRefreshAutoNormalFooter footerWithRefreshingTarget:self refreshingAction:@selector(loadMoreTopics)]; 在数据尚未返回,或者加载失败footer都会跑到最顶部。
解决方法1: 第一次进来或者每次reloadData否会调一次numberOfRowsInSection:在此方法中控制footer是否隐藏 self.tableView.mj_header.hidden = (self.topics.count == 0);
解决方法2:直接使用[MJRefreshBackFooter footerWithRefreshingBlock:^(void)refreshingBlock];比较省事,数据为出现或加载失败,footer都会自动隐藏在最下方看不见的地方。
18.
SVProgressHUD 只需要在第一次尝试的时候采用默认黑色Mask的样式,以后就不需要设置了。
//提示用户加载失败
[SVProgressHUD setDefaultMaskType:SVProgressHUDMaskTypeBlack];
19.
因UIViewController有这样一个分类,所以对于所有的视图控制器只要是最底层是tabBarController,不管中间隔着多少个控制器,都可以拿到该属性。vc.tabBarController和vc.navigationController属性类似。
@interface UIViewController (UITabBarControllerItem)
@property(null_resettable, nonatomic, strong) UITabBarItem *tabBarItem; // Automatically created lazily with the view controller's title if it's not set explicitly.
@property(nullable, nonatomic, readonly, strong) UITabBarController *tabBarController; // If the view controller has a tab bar controller as its ancestor, return it. Returns nil otherwise.
@end
20. 设置ios素材图片的拉伸模式

21.
在布局时如果发现某个控件frame尺寸设置正确,但显示出来却不是想要的尺寸frame,一般很可能是因为autoresizing自动伸缩属性(只能设置自身和superView的关系)的影响。解决方法: iconImageView.autoresizingMask = UIViewAutoresizingNone;
22. UIImageView两种创建方法:
//1.常规方法:
UIImageView *imgView = [[UIImageView alloc]init]; imgView.image = [UIImage imageNamed:@"angle"];
//2.创建和image同等尺寸的imageView
UIImageView *imgView1 = [[UIImageView alloc]initWithImage:@"angle"];
23.
Xib中加载起来的视图控制器的self.view尺寸是(600,600),此时如果想拿到真实的屏幕尺寸,只能通过[UIScreen mainScreen].bounds来获取屏幕尺寸的准确值。
//WZShowViewController.h/.m/.xib测试结果如下:
- (void)viewDidLoad {
[super viewDidLoad];
NSLog(@"self.view:%@",self.view);
} //打印结果:self.view:<UIView: 0x7fb72d2ab860; frame = (0 0; 600 600);
24.将UIImage保存到相册:
UIImageWriteToSavedPhotosAlbum(self.imageView.image, self, @selector(image:didFinishSavingWithError:contextInfo:), nil);
//苹果推荐使用image:didFinishSavingWithError:contextInfo:
- (void)image:(UIImage *)image didFinishSavingWithError:(NSError *)error contextInfo:(void *)contextInfo{
if (error) {
[SVProgressHUD showErrorWithStatus:@"保存失败"];
} else {
[SVProgressHUD showSuccessWithStatus:@"保存成功"];
}
}
25. 九宫格的写法
    NSArray *images = @[@"video",@"picture",@"text",@"audio",@"publish-review",@"offline"];
    NSArray *titles = @[@"视频",@"图片",@"文字",@"声音",@"审核",@"离线"];

    CGFloat buttonW = 72;
    CGFloat buttonH = buttonW + 30;
    CGFloat leadingMargin = 15; //第一个按钮距屏幕左边沿举例
    NSInteger colomns = 3; //每行3个按钮
    NSInteger rows = (images.count % colomns == 0) ? (images.count / colomns) : (images.count/colomns + 1); //计算有多少行
    CGFloat maginX = (screenW - 2 * leadingMargin - colomns * buttonW) / (colomns - 1); //x方向间距
    CGFloat maginY = 15; //y方向间距
    CGFloat row1Y = (screenH - buttonH * rows - maginY * (rows - 1)) * 0.5; //垂直居中

    for (int i = 0; i < images.count; i++) {

        WZVerticalButton *button = [[WZVerticalButton alloc]init];
        [button setImage:[UIImage imageNamed:images[i]] forState:UIControlStateNormal];
        [button setTitle:titles[i] forState:UIControlStateNormal];
        [button setTitleColor:[UIColor blackColor] forState:UIControlStateNormal];

        button.x = leadingMargin + (i % colomns) * (buttonW + maginX);
        button.y = row1Y + (i / colomns) * (buttonH + maginY);
        button.width = buttonW;
        button.height = buttonH;

        [self.view addSubview:button];

    }
26.
将CGPoint类型包装成对象[NSValue valueWithCGPoint:CGPointMake(100, 100)];
27. 新建window并显示
UIWindow *window = [[UIWindow alloc]init];
window.hidden = NO;
Note1:想让新建的window显示出来,只需要设置hidden = NO;即可。窗口是老大,别人添加到它上面,它自己想显示,直接取消隐藏即可。
Note2: [window makeKeyAndVisible]; 等价于 [window makeKeyWindow]; window.hidden = NO;
Note3: 每个窗口的触摸事件是独立的,不会向后穿透。
Note4: 同级别的window,最后设置hidden=NO;的窗口显示在最上面。窗口有3种级别:Normal < StatusBar < Alert 级别。将一个window的windowLevel设置为statusBar级别,然后设置和状态栏一样的frame,相当于自定义状态栏。
28.
(1). 设置view的边框和阴影

(2).
view.layer.masksToBounds = YES; 官方解释:A Boolean indicating whether sublayers are clipped to the layer’s bounds. 设置YES, 则view内部的子layer都会被view.layer.bound所裁剪。 实现阴影效果时,必须设为NO,否则阴影效果消失。设置ImageLayer并显示边框时,必须将masksToBounds设为NO,否则子layer会露出来。

(3).
只要设置layer.cornerRadius=10; 和 layer.borderWidth=3; 就可以显示圆角,和layer.masksToBounds无关,该属性仅影响子layer是否被裁剪。
29.
(1) 利用transform属性可以对UIView控件进行平移Translation、缩放scale、旋转rotation
struct CGAffineTransform {
CGFloat a, b, c, d;
CGFloat tx, ty;
};
创建一个CGAffineTransform类型的transform属性
在某个transform的基础上进行叠加
CG_EXTERN const CGAffineTransform CGAffineTransformIdentity /* The identity transform: [ 1 0 0 1 0 0 ]. */
(2) 可以给UIView.layer添加transform.transition、transform.scale、transform.rotation核心动画
CABasicAnimation *anim = [CABasicAnimation animationWithKeyPath:@"transform.scale"];
anim.toValue = @0.5;
anim.repeatCount = MAXFLOAT;
[self.view.layer addAnimation:anim forKey:nil];
30. 让layoutSubViews方法中某段代码只执行一次
//1.使用内部全局BOOL变量记录代码是否被执行过
static BOOL excuted = NO; //定义内部全局变量
- (void)layoutSubviews{
if (excuted == NO) {
NSLog(@"该代码只会被执行一次!");
}
excuted = YES; //全局变量和程序同生同死,只要程序没有重启,下次执行layoutSubviews方法,excuted = YES;中间的代码不会被执行
}
//2.使用dispatch_once
static dispatch_once_t onceToken; dispatch_once(&onceToken, ^{ });