现在一直使用vue写项目,发现之前的js都很生疏了,写个小demo练下手,看一下最终效果展示
功能点:点击添加图片随机添加一张图片,图片可以拖动,可以点击删除
技能点: 主要使用了jQuery的一些方法
下面就一步一步来实现它吧
一开始我想做一个按钮可以让用户自己上传图片,结果写了之后发现没有图片上传的服务接口,也懒得去找了,就直接使用本地的图片了,这里也把图片上传的功能写一下,如果你有图片上传的api可以直接使用
<!DOCTYPE html>
<html lang="en">
<head>
  <meta charset="UTF-8">
  <meta name="viewport" content="width=device-width, initial-scale=1.0">
  <meta http-equiv="X-UA-Compatible" content="ie=edge">
  <title>Document</title>
  <link rel="stylesheet" href="./sass/index.css">
  <script src="https://code.jquery.com/jquery-3.4.1.min.js"></script>
</head>

<body>
  <div class="meaasge_contanier">
    <ul class="picture_list">
      <div class="upload">
        <div class="plus">添加照片</div>
        <input id="filebtn" type="file" accept="image/gif, image/jpeg">
      </div>
    </ul>
  </div>
</body>
<script type="text/javascript">
  $(function () {
    // 如果有后台图片接口,可以使用文件上传
    $('.plus').on('click', function (e) {
      // 点击添加照片,触发input上传事件
      if ($('#filebtn')) {
        $('#filebtn').click()
      }
      e.preventDefault()
    })
    $('#filebtn').change(function () {
      // input内容改变时,拿到文件,传给后台获取线上图片地址
      const file = $('#filebtn')[0].files
      console.log(777, file)
      $.ajax({
        url: '',
        .....
      })
    })
  })
</script>
</html>
这里我用的是本地的图片,写了一个img.js,在里面放了一些图片,图片地址都是百度找的
img.js
  var list = [
    {
      "id": 0,
      "name": "1",
      "date": "2017-5-26",
      "url": "http://img4.imgtn.bdimg.com/it/u=1433191751,1566568157&fm=26&gp=0.jpg"
    },
    ...
  ]
接着写一个点击事件,点击添加照片的按钮网页面上加一张图片
html的写法不变,把input标签去掉,这里不需要用户上传
script写法
先把图片文件引入,这样可以拿到图片地址数组
<script src="./img.js"></script>
<script type="text/javascript">
  $(function () {
    // 添加图片
    $('.plus').click(function () {
      const liList = $('.picture_list .item')
      // 限制图片不能多于30张
      if (liList && liList.length > 30) {
        window.alert('图片太多啦,先删掉一些图片')
        return
      }

      // 设置初始的top和left值
      let liTop = 150
      let liLeft = 100
      if (liList && liList.length) {
        // 获取最后一个li的位置
        let lastLi = $('.picture_list li:last-child')
        let t = Number(lastLi.css('top').replace('px', ''))
        let l = Number(lastLi.css('left').replace('px', ''))

        // 图片心型排列方法
        let length = liList.length
        if (length < 9) { // 右下走向
          liTop = t + 30
          liLeft = l + 30
        } else if (length > 8 && length < 17) { // 右上走向
          liTop = t - 30
          liLeft = l + 30
        } else if (length > 16 && length < 23) { // 左下走向
          if (length === 17) {
            liLeft = l - 60
          } else liLeft = l - 30
          liTop = t + 30
        } else if (length > 22) { // 左上走向
          liTop = t - 30
          liLeft = l - 30
        }
      }
      // console.log(index, liList)
      // 生成一个图片
      // 准备了7张图片,这里生成0-6的随机数,用于取图
      let index = Math.round(Math.random() * 10)
      if (index > 6) {
        index = Math.round(index * 0.6)
      }
      const url = list[index].url
      // 添加到ul中
      if (!liList || liList.length < 31) {
        const li = $(`<li class="item"><div class="delete">x</div><img src="${url}" /></li>`).css({
          'top': liTop,
          'left': liLeft
        })
        $('.picture_list').append(li)
      }
    })
  })
</script>
看一下效果:
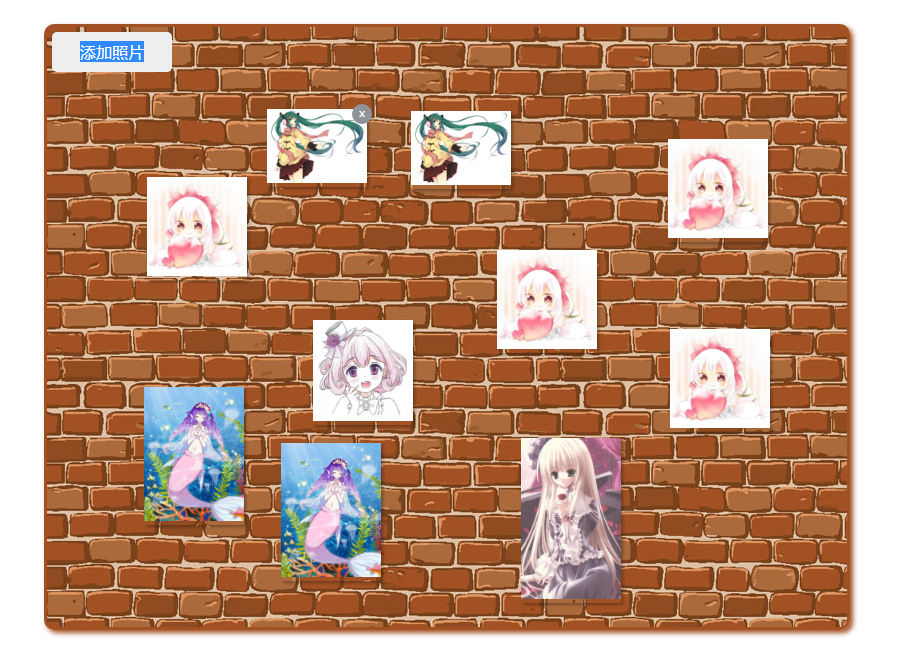
现在加上图片的移动和删除看看,加了图片的移动后,图片的位置就发生改动,使用上面的排列方式就没有意义.添加图片时我就直接在最后一张图片后偏移一点.这里需要限制一下图片的top和left的最大最小值,以免超出墙壁范围
<script type="text/javascript">
  $(function () {
    // 添加图片
    $('.plus').click(function () {
      const liList = $('.picture_list .item')
      if (liList && liList.length > 30) {
        window.alert('图片太多啦,先删掉一些图片')
        return
      }
      // 准备了7张图片,这里生成0-6的随机数,用于取图
      let index = Math.round(Math.random() * 10)
      if (index > 6) {
        index = Math.round(index * 0.6)
      }
      // 设置初始的top和left值
      let liTop = 150
      let liLeft = 100
      if (liList && liList.length) {
        // 获取最后一个li的位置
        let lastLi = $('.picture_list li:last-child')
        let t = Number(lastLi.css('top').replace('px', ''))
        let l = Number(lastLi.css('left').replace('px', ''))
        console.log(lastLi, t, l)
        // 图片边界判断,让生成的图片位置在一定范围
        l = l < 100 ? 100 : l
        l = l > contanier.width() - lastLi.width() - 100 ? 100 : l
        t = t < 100 ? 100 : t
        t = t > contanier.height() - lastLi.height() - 100 ? 100 : t
        // 每次图片都在上一张的基础上排列
        liTop = t + 30
        liLeft = l + 30
      }
      // console.log(index, liList)
      // 生成一个图片
      const url = list[index].url
      if (!liList || liList.length < 31) {
        const li = $(`<li class="item"><div class="delete">x</div><img src="${url}" /></li>`).css({
          'top': liTop,
          'left': liLeft
        })
        $('.picture_list').append(li)
      }
    })

    // 图片的盒子li标签是动态生成的,在绑定事件时不能直接绑定在li标签上,绑定在它的父元素上
    // 图片移动
    let pictureList = $('.picture_list')
    let contanier = $('.meaasge_contanier')
    pictureList.on('mousedown', '.item', function (e) {
      e.preventDefault()
      // 让点击的图片在第一层级
      let arr = Array.from($('.item'))
      arr.forEach(item => {
        $(item).css({
          zIndex: 0
        })
      })
      let item = $(this)
      $(item).css({
        zIndex: 99
      })
      // 获取当前位置的clientX,和当前图片的top值,left值,得到它们相减部分的值
      const disX = e.clientX - item[0].offsetLeft
      const disY = e.clientY - item[0].offsetTop

      contanier.mousemove(function (event) {
        event.preventDefault()
        // 用移动时的位置的clientX减去初始的差值,就得到现在的top值与left值
        let x = event.clientX - disX
        let y = event.clientY - disY
        x = x < 0 ? 0 : x
        x = x > contanier.width() - item.width() ? contanier.width() - item.width() : x
        y = y < 0 ? 0 : y
        y = y > contanier.height() - item.height() ? contanier.height() - item.height() : y
        item.css({
          top: y,
          left: x
        })
      })
      // 鼠标移出盒子停止图片移动
      contanier.mouseout(function () {
        contanier.off('mousemove')
        contanier.off('mouseup')
      })
      // 鼠标弹起停止图片移动
      contanier.mouseup(function () {
        contanier.off('mousemove')
        contanier.off('mouseup')
      })
    })

    // 图片删除
    // 图片和删除按钮都是动态添加的,都需要用on绑定事件
    pictureList.on('click', '.delete', function () {
      // 删除当前点击的图片
      $(this).parent('.item').remove()
    })
    // 鼠标移入,删除按钮展示
    pictureList.on('mouseover', '.item', function () {
      $(this).children('.delete').show()
    })
    // 鼠标移出,删除按钮隐藏
    pictureList.on('mouseout', '.item', function () {
      $(this).children('.delete').hide()
    })
  })
</script>
最终的效果:

css代码
li {
  list-style: none;
}
.meaasge_contanier {
   800px;
  height: 600px;
  margin: 100px auto 0;
  background-color: sienna;
  position: relative;
  background: url('../img/board.jpg');
  border: 3px solid #a25124;
  border-radius: 10px;
  box-shadow: 3px 3px 5px #a25124;
}
.meaasge_contanier .upload {
   120px;
  height: 40px;
  position: absolute;
  top: 5px;
  left: 5px;
  text-align: center;
}
.meaasge_contanier .upload .plus {
   100%;
  height: 100%;
  text-align: center;
  line-height: 40px;
  position: absolute;
  background-color: #eee;
  cursor: pointer;
  border-radius: 5px;
}
.meaasge_contanier .upload input {
   150px;
  overflow: hidden;
}
.meaasge_contanier .picture_list .item {
   100px;
  position: absolute;
  box-shadow: 2px 2px 3px rgba(0, 0, 0, 0.3);
}
.meaasge_contanier .picture_list .item img {
   100%;
}
.meaasge_contanier .picture_list .item .delete {
  position: absolute;
   20px;
  height: 20px;
  line-height: 17px;
  text-align: center;
  border-radius: 50%;
  background-color: #909399;
  color: #fff;
  font-size: 12px;
  top: -5px;
  right: -5px;
  display: none;
  cursor: default;
}