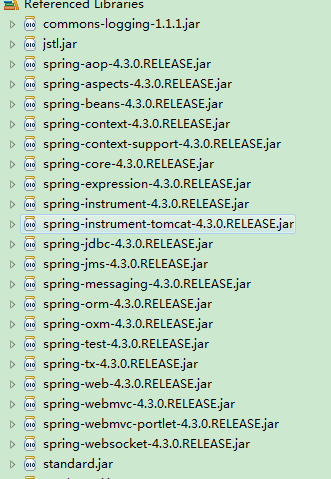
绿色版Spring MVC(单纯的springMVC)
一、导包,为了获取请求数据多添加一个 包
包

二、web.xml配置
<?xml version="1.0" encoding="UTF-8"?>

<web-app xmlns:xsi="http://www.w3.org/2001/XMLSchema-instance"
         xmlns="http://java.sun.com/xml/ns/javaee"
         xsi:schemaLocation="http://java.sun.com/xml/ns/javaee http://java.sun.com/xml/ns/javaee/web-app_2_5.xsd"
         id="WebApp_ID" version="2.5">

  <!-- 这就是一个名字 -->
  <display-name>webSpringMVC</display-name>

  <!-- 加载spring容器 -->
  <!-- 初始化参数-->
  <context-param>
    <param-name>contextConfigLocation</param-name>
    <param-value>/WEB-INF/classes/applicationContext.xml</param-value>
  </context-param>

  <!-- 监听 -->
  <listener>
    <listener-class>
            org.springframework.web.context.ContextLoaderListener
        </listener-class>
  </listener>

  <!-- springmvc前端控制器 -->
  <servlet>
    <servlet-name>dispatcherServlet</servlet-name>
    <servlet-class>
            org.springframework.web.servlet.DispatcherServlet
        </servlet-class>
    <init-param>
      <param-name>contextConfigLocation</param-name>
      <param-value>/WEB-INF/classes/springMvc.xml</param-value>
    </init-param>
    <load-on-startup>1</load-on-startup>
  </servlet>
  <servlet-mapping>
    <servlet-name>dispatcherServlet</servlet-name>
    <url-pattern>*.action</url-pattern>
  </servlet-mapping>

  <!-- 配置过滤器 -->
  <!-- post乱码过虑器 -->
  <filter>
    <filter-name>CharacterEncodingFilter</filter-name>
    <filter-class>
            org.springframework.web.filter.CharacterEncodingFilter
        </filter-class>
    <init-param>
      <param-name>encoding</param-name>
      <param-value>utf-8</param-value>
    </init-param>
    <init-param>
      <param-name>forceEncoding</param-name>
      <param-value>true</param-value>
    </init-param>
  </filter>
  <filter-mapping>
    <filter-name>CharacterEncodingFilter</filter-name>
    <url-pattern>/*</url-pattern>
  </filter-mapping>

  <!-- 首页 -->
  <welcome-file-list>
    <welcome-file>index.jsp</welcome-file>
  </welcome-file-list>

  <!-- session超时 -->
  <!--分钟为单位
      设置为0,-1 表示永不超时 -->
  <session-config>
    <session-timeout>30</session-timeout>
  </session-config>
</web-app>
三、springMvc.xml配置
<?xml version="1.0" encoding="UTF-8"?>
<beans xmlns="http://www.springframework.org/schema/beans"
       xmlns:xsi="http://www.w3.org/2001/XMLSchema-instance"
       xmlns:mvc="http://www.springframework.org/schema/mvc"
       xmlns:p="http://www.springframework.org/schema/p"
       xmlns:context="http://www.springframework.org/schema/context"
       xmlns:aop="http://www.springframework.org/schema/aop"
       xmlns:tx="http://www.springframework.org/schema/tx"
       xsi:schemaLocation="http://www.springframework.org/schema/beans
            http://www.springframework.org/schema/beans/spring-beans-3.0.xsd
            http://www.springframework.org/schema/context
            http://www.springframework.org/schema/context/spring-context-3.0.xsd
            http://www.springframework.org/schema/aop
            http://www.springframework.org/schema/aop/spring-aop-3.0.xsd
            http://www.springframework.org/schema/tx
            http://www.springframework.org/schema/tx/spring-tx-3.0.xsd
            http://www.springframework.org/schema/mvc
            http://www.springframework.org/schema/mvc/spring-mvc-3.0.xsd
            http://www.springframework.org/schema/context
            http://www.springframework.org/schema/context/spring-context-3.0.xsd">

<!-- 启用 spring 注解 -->
<context:component-scan base-package="test" />
<bean class="org.springframework.web.servlet.mvc.annotation.AnnotationMethodHandlerAdapter"/>

<!-- prefix和suffix:查找视图页面的前缀和后缀(前缀[逻辑视图名]后缀)
    比如传进来的逻辑视图名为hello,则该该jsp视图页面应该存放在“WEB-INF/jsp/hello.jsp” -->
<bean
    class="org.springframework.web.servlet.view.InternalResourceViewResolver">
    <property name="prefix" value="/jsp/" />
    <property name="suffix" value=".jsp" />
</bean>

</beans>
四、applicationContext.xml
即使没有内容也要配置,否则不能运行。
<?xml version="1.0" encoding="UTF-8"?>
<beans xmlns="http://www.springframework.org/schema/beans"
       xmlns:xsi="http://www.w3.org/2001/XMLSchema-instance"
       xmlns:mvc="http://www.springframework.org/schema/mvc"
       xmlns:p="http://www.springframework.org/schema/p"
       xmlns:context="http://www.springframework.org/schema/context"
       xmlns:aop="http://www.springframework.org/schema/aop"
       xmlns:tx="http://www.springframework.org/schema/tx"
       xsi:schemaLocation="http://www.springframework.org/schema/beans
            http://www.springframework.org/schema/beans/spring-beans-3.0.xsd
            http://www.springframework.org/schema/context
            http://www.springframework.org/schema/context/spring-context-3.0.xsd
            http://www.springframework.org/schema/aop
            http://www.springframework.org/schema/aop/spring-aop-3.0.xsd
            http://www.springframework.org/schema/tx
            http://www.springframework.org/schema/tx/spring-tx-3.0.xsd
            http://www.springframework.org/schema/mvc
            http://www.springframework.org/schema/mvc/spring-mvc-3.0.xsd
            http://www.springframework.org/schema/context
            http://www.springframework.org/schema/context/spring-context-3.0.xsd">

</beans>
四、hello.jsp
<%@ page language="java" pageEncoding="UTF-8"%>
<html>
<head>
<title>SpringMVC</title>
</head>
<body>
您好,${user }!
</body>
</html>
五、Controller
package test;

import java.util.Date;


import javax.servlet.http.HttpServletRequest;
import javax.servlet.http.HttpServletResponse;

import org.springframework.stereotype.Controller;
import org.springframework.web.bind.annotation.RequestMapping;
import org.springframework.web.servlet.ModelAndView;


@Controller
//可以配置也可以不配 多一级目录
//@RequestMapping("/hello")
public class HelloController{

    @SuppressWarnings("deprecation")
    public ModelAndView handleRequest(HttpServletRequest request,
            HttpServletResponse response) {
        ModelAndView mv = new ModelAndView();
        // 添加模型数据 可以是任意的POJO对象
        mv.addObject("user", request.getParameter("user") + "-->" + new Date().toLocaleString());
        // 设置逻辑视图名,视图解析器会根据该名字解析到具体的视图页面
        mv.setViewName("hello");
        return mv;
    }

    @SuppressWarnings("deprecation")
    @RequestMapping("/hello")
    public String hello(HttpServletRequest request,HttpServletResponse response){
        request.setAttribute("user", request.getParameter("user") + "-->" + new Date().toLocaleString());
        return "hello";
    }

}
六、tomcat部署好后访问地址
 http://localhost:8080/springMvc/hello.action?user=SpringMMM

 代码见 https://github.com/fangxiongwei007/springMvc