一:设置链路带宽
(一)在命令行中统一设置链路带宽
sudo mn --topo linear,10 --link tc,bw=10
(二)在python脚本中,设置每条链路自己的带宽
self.addLink(Host1,switch1, bw=5, delay='5ms', loss=0, max_queue_size=1000, use_htb=True)
注意:这里我们需要在使用命令行调用脚本时加上: --link tc
sudo mn --custom mytopo.py --topo=mytopo --switch=ovsk --link tc
二:补充常用查看网络状态的命令
net 查看网络链路情况
nodes 查看节点情况
links 查看链路情况---可以查看各个端口对应连接情况
pingpair/pingparifull 主机连通性测试
dump 查看网络链路详细信息
ports 查看端口连接
pingallpingallfull 网络节点链路联通性测试
iperf/iperfudp
三:OVS中端口设置Patch状态
(一)知识回顾
OVS常用命令
SDN实验---OVS了解(转载)
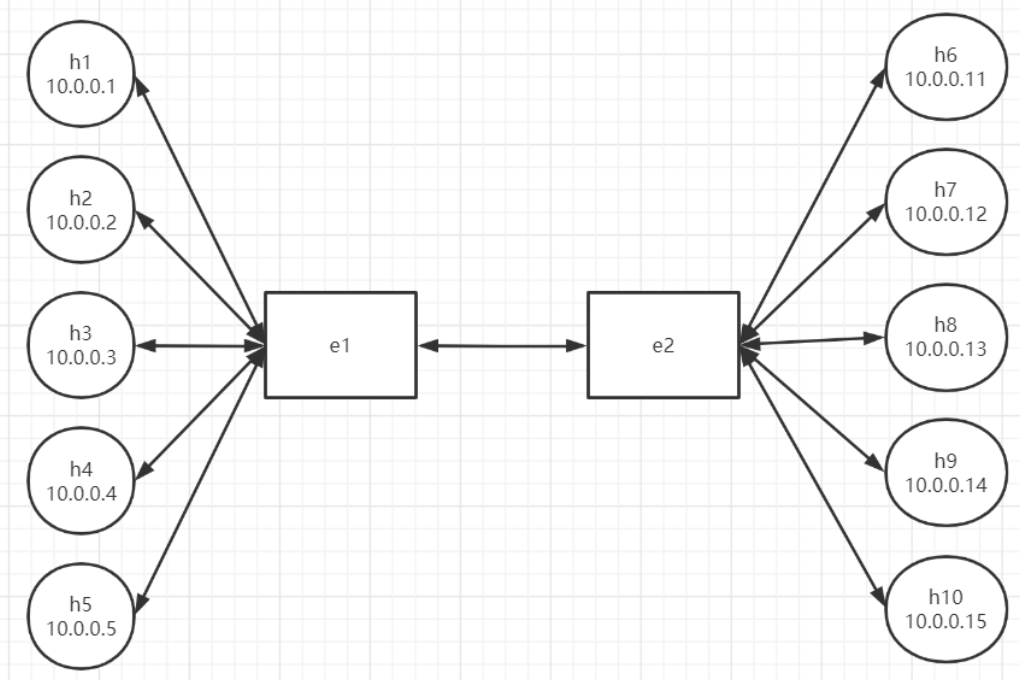


from mininet.topo import Topo
from mininet.net import Mininet
from mininet.node import RemoteController
from mininet.link import TCLink
from mininet.util import dumpNodeConnections

class MyTopo(Topo):
    def __init__(self):
        super(MyTopo,self).__init__()

        #add host
        Host1 = self.addHost('h1',ip='10.0.0.1')
        Host2 = self.addHost('h2',ip='10.0.0.2')
        Host3 = self.addHost('h3',ip='10.0.0.3')
        Host4 = self.addHost('h4',ip='10.0.0.4')
        Host5 = self.addHost('h5',ip='10.0.0.5')
        Host6 = self.addHost('h6',ip='10.0.0.11')
        Host7 = self.addHost('h7',ip='10.0.0.12')
        Host8 = self.addHost('h8',ip='10.0.0.13')
        Host9 = self.addHost('h9',ip='10.0.0.14')
        Host10 = self.addHost('h10',ip='10.0.0.15')

        switch1 = self.addSwitch('e1')
        switch4 = self.addSwitch('e2')

        self.addLink(Host1,switch1, bw=15, loss=0,max_queue_size=1000, use_htb=True)
        self.addLink(Host2,switch1, bw=15, loss=0,max_queue_size=1000, use_htb=True)
        self.addLink(Host3,switch1, bw=15, loss=0,max_queue_size=1000, use_htb=True)
        self.addLink(Host4,switch1, bw=15, loss=0,max_queue_size=1000, use_htb=True)
        self.addLink(Host5,switch1, bw=15, loss=0,max_queue_size=1000, use_htb=True)
        self.addLink(switch1,switch4, bw=100, loss=0,max_queue_size=1000, use_htb=True)
        self.addLink(switch4,Host6, bw=15, loss=0,max_queue_size=1000, use_htb=True)
        self.addLink(switch4,Host7, bw=15, loss=0,max_queue_size=1000, use_htb=True)
        self.addLink(switch4,Host8, bw=15, loss=0,max_queue_size=1000, use_htb=True)
        self.addLink(switch4,Host9, bw=15, loss=0,max_queue_size=1000, use_htb=True)
        self.addLink(switch4,Host10, bw=15, loss=0,max_queue_size=1000, use_htb=True)

topos = {"mytopo":(lambda : MyTopo())}
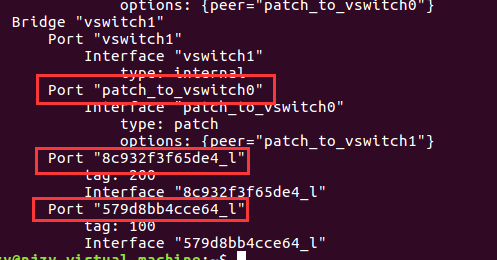
交换机与主机之间的端口为internal类型,交换机与交换机之间的端口类型为patch类型。
(二)问题一(待解决)
但是吧,使用mininet创建拓扑后,各主机之间可以通信,但是使用ovs-vsctl show查看信息后发现交换机之间的端口还是internal类型,这个为啥??(待解决)
(三)修改端口类型(注意:设置后我们还要修改流表才可以通信)
njzy@njzy-virtual-machine:~/SDN实验/VLAN$ sudo mn --topo=linear,2 --switch=ovsk
*** Creating network
*** Adding controller
*** Adding hosts:
h1 h2
*** Adding switches:
s1 s2
*** Adding links:
(h1, s1) (h2, s2) (s2, s1)
*** Configuring hosts
h1 h2
*** Starting controller
c0
*** Starting 2 switches
s1 s2 ...
*** Starting CLI:
mininet> links
h1-eth0<->s1-eth1 (OK OK)
h2-eth0<->s2-eth1 (OK OK)
s2-eth2<->s1-eth2 (OK OK)
mininet> sh ovs-vsctl set interface s1-eth2 type=patch
mininet> sh ovs-vsctl set interface s2-eth2 type=patch
mininet> sh ovs-vsctl set interface s2-eth2 options:peer=s1-eth2
mininet> sh ovs-vsctl set interface s1-eth2 options:peer=s2-eth2
mininet> pingall
*** Ping: testing ping reachability
h1 -> ^C
Interrupt
stopping h1
mininet> sh ovs-ofctl add-flow s1 "in_port=1,actions=output:2"
mininet> sh ovs-ofctl add-flow s1 "in_port=2,actions=output:1"
mininet> sh ovs-ofctl add-flow s2 "in_port=2,actions=output:1"
mininet> sh ovs-ofctl add-flow s2 "in_port=1,actions=output:2"
mininet> pingall
*** Ping: testing ping reachability
h1 -> h2
h2 -> h1
*** Results: 0% dropped (2/2 received)
mininet> exit
*** Stopping 1 controllers
c0
*** Stopping 3 links
...
*** Stopping 2 switches
s1 s2
*** Stopping 2 hosts
h1 h2
*** Done
completed in 165.695 seconds
四:查看openflow ID
(一)查看openflow ID
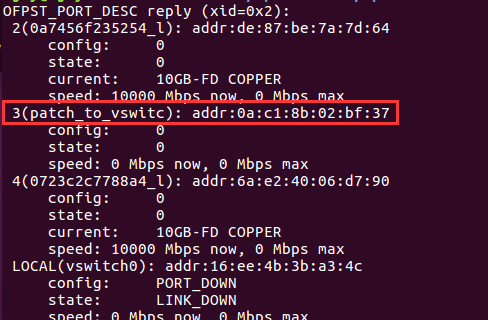
在流表中,我们常常要使用到openflowID,比如in_port,output这些都需要指定id,但是有时候我们并不知道ID,如下:
使用如下命令,查看交换机端口的openflowID信息:
sudo ovs-ofctl dump-ports-desc vswitch0 #最后面是指定交换机名

可以看到每个端口的openflowID信息。
(二)修改openflowID
sudo ovs-vsctl set interface patch_to_vswitch1 ofport_request=3