一:flume简介及安装
Flume学习笔记:Flume的安装与基础应用
Flume学习之路 (一)Flume的基础介绍
Flume学习笔记:Flume集群的Avro RPC实现
Flume学习之路 (二)Flume的Source类型
Flume学习之路 (三)Flume的配置方式
flume拦截器
Flume学习系列(四)---- Interceptors(拦截器)
Flume中的HDFS Sink配置
Flume常见错误整理
(一)flume连接Hadoop集群
1.启动Hadoop集群
(1)分布式集群HA模式部署:https://www.cnblogs.com/ssyfj/p/12369486.html

(2)若是启动过程出现下述问题:retry.RetryInvocationHandler (RetryInvocationHandler.java:invoke则重启zkfc  ----   hadoop-daemon.sh start zkfc
2.配置flume
(1)将hadoop根目录下的share/hadoop/common/下的jar包、以及share/hadoop/common/lib下的jar包拷贝到flume根目录的lib目录下
(2)将hadoop根目录下的share/hadoop/hdfs/下的jar包、以及share/hadoop/hdfs/lib下的jar包拷贝到flume根目录的lib目录下
(3)将hadoop根目录下的etc/hadoop/下的core-site.xml和hdfs-site.xml拷贝到flume根目录下的conf目录下
3.编写flume配置文件
#agent1
#name the component on this agent
a1.sources = r1
a1.channels = c1
a1.sinks = s1
#config source
a1.sources.r1.type = spooldir
a1.sources.r1.spoolDir = /home/hadoop/App/apache-flume-1.6.0-bin/SourceData
a1.sources.r1.channels = c1
#config channel --- file
a1.channels.c1.type = file
a1.channels.c1.dataDirs = /home/hadoop/App/apache-flume-1.6.0-bin/ChannelData
#config sink
a1.sinks.s1.type = hdfs
a1.sinks.s1.channel = c1
a1.sinks.s1.hdfs.path = hdfs://ns1/flume/logdfs/%y-%m-%d/%H%M/%S
a1.sinks.s1.hdfs.round = true
a1.sinks.s1.hdfs.roundValue = 10
a1.sinks.s1.hdfs.roundUnit = minute
a1.sinks.s1.hdfs.useLocalTimeStamp = true
a1.sinks.s1.hdfs.fileType = DataStream
4.启动flume
flume-ng agent --conf $FLUME_HOME/conf/ --conf-file ./agentdfs.conf --name a1 -Dflume.root.logger=INFO,console

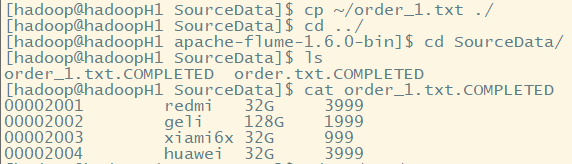
5.上传文件到spoolDir


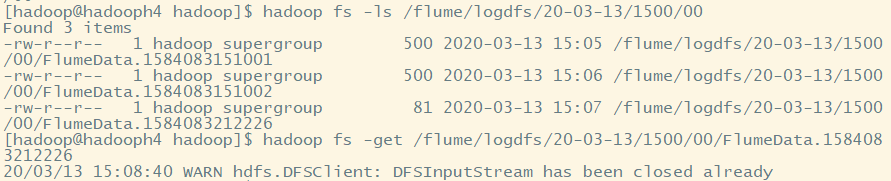
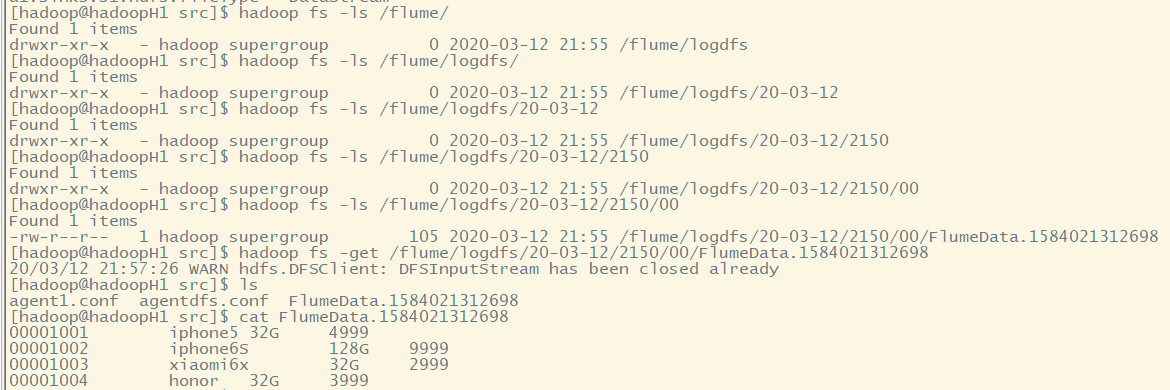
6.hdfs系统中查看文件(发现是flume采集的数据)
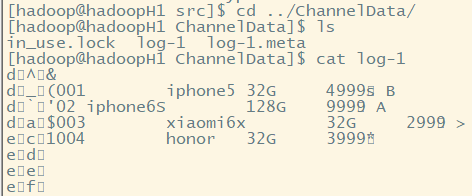
7.补充:采用的文件系统存储channel数据,是将数据持久化到磁盘中,所以我们可以在指定的目录下查看信息
(二)flume连接Kafka集群
1.先启动zookeeper集群
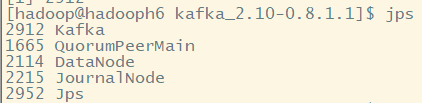
2.进入Kafka根目录,启动Kafka进程
bin/kafka-server-start.sh config/server.properties 1>/dev/null 2>&1 &
3.生成一个topic,用于从flume获取数据
bin/kafka-topics.sh --create --zookeeper hadoopH5:2181 --replication-factor 3 --partitions 1 --topic flume
只需要在任意一台中创建,后面会自动同步

4.编写flume配置文件
#agent1
#name the component on this agent
a1.sources = r1
a1.channels = c1
a1.sinks = s1
#config source
a1.sources.r1.type = spooldir
a1.sources.r1.spoolDir = /home/hadoop/App/apache-flume-1.6.0-bin/SourceData
a1.sources.r1.channels = c1
#config channel
a1.channels.c1.type = memory
a1.channels.c1.capacity=1000
a1.channels.c1.transactionCapacity = 100
#config sink
a1.sinks.s1.type = org.apache.flume.sink.kafka.KafkaSink
a1.sinks.s1.topic = flume
a1.sinks.s1.brokerList =hadoopH5:9092,hadoopH6:9092,hadoopH7:9092  #注意:主机名我们是在hosts文件中添加映射过的
a1.sinks.s1.channel = c1
5.启动flume
flume-ng agent --conf $FLUME_HOME/conf/ --conf-file ./agentkafka.conf --name a1 -Dflume.root.logger=INFO,console

6.拷贝文件到spoolDir中
7.开启Kafka消费者端,读取topic:flume数据
bin/kafka-console-consumer.sh --zookeeper hadoopH5:2181 --from-beginning --topic flume

二:flume分布式安装
flume高可用集群安装
Flume NG高可用集群搭建详解(基于flume-1.7.0)
flume集群高可用连接kafka集群
Flume架构
基于Flume的日志收集系统(一)架构和设计
(一)flume分布式简单实现
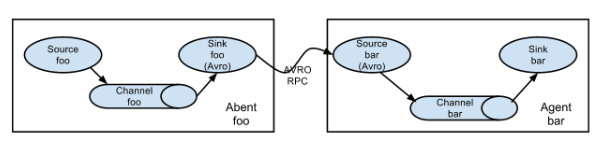
第一个是agent1,第二个是agent2
(二)配置文件修改
agent1.conf
#agent1
#name the component on this agent
a1.sources = r1
a1.channels = c1
a1.sinks = s1
#config source
a1.sources.r1.type = spooldir
a1.sources.r1.spoolDir = /home/hadoop/App/apache-flume-1.6.0-bin/data
a1.sources.r1.channels = c1
#config channel
a1.channels.c1.type = memory
a1.channels.c1.capacity=1000
a1.channels.c1.transactionCapacity = 100
#config sink
a1.sinks.s1.type = avro
a1.sinks.s1.channel = c1
a1.sinks.s1.hostname = hadoopH2
a1.sinks.s1.port = 4141
agent2.conf
#agent1
#name the component on this agent
a1.sources = r1
a1.channels = c1
a1.sinks = s1
#config source
a1.sources.r1.type = avro
a1.sources.r1.bind = 0.0.0.0  #绑定本机的ip和端口,进行监听
a1.sources.r1.port = 4141
a1.sources.r1.channels = c1
#config channel
a1.channels.c1.type = memory
a1.channels.c1.capacity=1000
a1.channels.c1.transactionCapacity = 100
#config sink
a1.sinks.s1.type = logger
a1.sinks.s1.channel = c1
(三)启动flume
1.先启动后面的节点agent2
flume-ng agent --conf $FLUME_HOME/conf/ --conf-file ./agent2.conf --name a1 -Dflume.root.logger=INFO,console

2.后启动agent1
flume-ng agent --conf $FLUME_HOME/conf/ --conf-file ./agent1.conf --name a1 -Dflume.root.logger=INFO,console

(四)flume数据采集测试
1.向指定目录下传送文件
2.agent2查看采集的数据

三:分布式flume集群对比(NG、OG)
(一)Flume简介
Flume NG是一个分布式、可靠、可用的系统,它能够将不同数据源的海量日志数据进行高效收集、聚合,最后存储到一个中心化数据存储系统中,方便进行数据分析。事实上flume也可以收集其他信息,不仅限于日志。由原来的Flume OG到现在的Flume NG,进行了架构重构,并且现在NG版本完全不兼容原来的OG版本。相比较而言,flume NG更简单更易于管理操作。
总之:Flume NG相比于Flume OG更好
(二)flume OG分布式集群组件---更符合我们之前学的分布式系统(用于理解,不进行实现)
OG有三个组件agent、collector、master,agent主要负责收集各个日志服务器上的日志,将日志聚合到collector,可设置多个collector,master主要负责管理agent和collector,最后由collector把收集的日志写的HDFS中,当然也可以写到本地、给storm、给Hbase。

(三)flume NG---不需要master节点,系统整体实现负载均衡
NG最大的改动就是不再有分工角色设置,所有的都是agent,可以彼此之间相连,多个agent连到一个agent,此agent也就相当于collector了,NG也支持负载均衡.

四:高可用flume分布式系统集群安装(NG)
防止一个agent失败,导致数据采集失败:
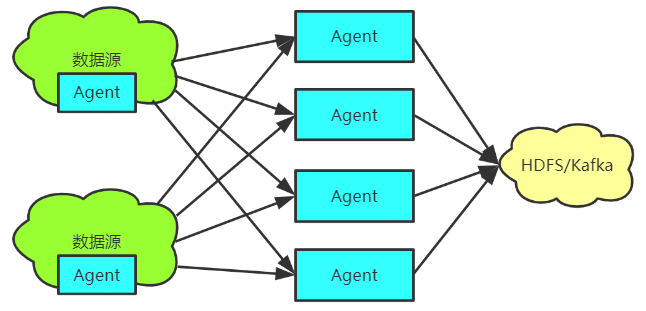
控制Source的链接数:Source无法同时保持很大的连接数。分组实现

控制Sink的链接数:每个Agent Sink都会和数据库保持一个连接,当Agent变多时,连接数最终会超过数据库的限制。分层实现
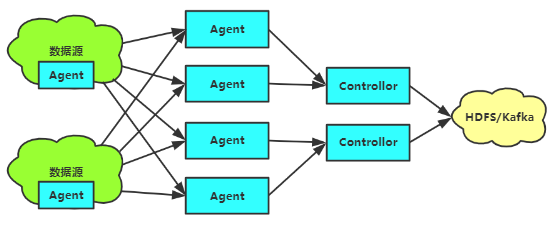
这里采用该拓扑图进行集群构建。注意:数据只是在一条链路中传送,如果某个节点出现故障,会按照优先级选择一条其他路径传递数据,避免了链路数据冗余
(一)集群节点规划

(二)启动zookeeper集群(同上)
(三)启动hdfs系统(同上)
(四)flume配置文件编写---数据源agent(注意:编写的代码后面不要加空格和注释)
1.在hadoopH3中编写agentdata.conf
#agent 在数据源节点上,这里是在hadoopH3上
ag.sources = r1
ag.channels = c1
ag.sinks = k1 k2 k3 k4
#set group
ag.sinkgroups = g1
#set source
ag.sources.r1.channels = c1
ag.sources.r1.type = spooldir
ag.sources.r1.spoolDir = /home/hadoop/App/apache-flume-1.6.0-bin/data
#set channel
ag.channels.c1.type = memory
ag.channels.c1.capacity = 1000
ag.channels.c1.transactionCapacity = 100
#set sink1  #配置agent1主机
ag.sinks.k1.channel = c1
ag.sinks.k1.type = avro
ag.sinks.k1.hostname = hadoopH1
ag.sinks.k1.port = 6666
#set sink2  #配置agent2主机
ag.sinks.k2.channel = c1
ag.sinks.k2.type = avro
ag.sinks.k2.hostname = hadoopH2
ag.sinks.k2.port = 6666
#set sink2  #配置agent3主机
ag.sinks.k3.channel = c1
ag.sinks.k3.type = avro
ag.sinks.k3.hostname = hadoopH3
ag.sinks.k3.port = 6666
#set sink2  #配置agent4主机
ag.sinks.k4.channel = c1
ag.sinks.k4.type = avro
ag.sinks.k4.hostname = hadoopH4
ag.sinks.k4.port = 6666
#set sink group
ag.sinkgroups.g1.sinks = k1 k2 k3 k4
ag.sinkgroups.g1.processor.type = failover
ag.sinkgroups.g1.processor.priority.k1 = 10
ag.sinkgroups.g1.processor.priority.k2 = 9
ag.sinkgroups.g1.processor.priority.k3 = 5
ag.sinkgroups.g1.processor.priority.k4 = 4
ag.sinkgroups.g1.processor.maxpenalty = 10000
2.在hadoopH4中编写agentdata.conf
#agent 在数据源节点上,这里是在hadoopH4上
ag.sources = r1
ag.channels = c1
ag.sinks = k1 k2 k3 k4
#set group
ag.sinkgroups = g1
#agent 在数据源节点上,这里是在hadoopH4上
ag.sources = r1
ag.channels = c1
ag.sinks = k1 k2 k3 k4
#set group
ag.sinkgroups = g1
#set source
ag.sources.r1.channels = c1
ag.sources.r1.type = spooldir
ag.sources.r1.spoolDir = /home/hadoop/App/apache-flume-1.6.0-bin/data
#set channel
ag.channels.c1.type = memory
ag.channels.c1.capacity = 1000
ag.channels.c1.transactionCapacity = 100
#set sink1  #设置agent1主机
ag.sinks.k1.channel = c1
ag.sinks.k1.type = avro
ag.sinks.k1.hostname = hadoopH1
ag.sinks.k1.port = 6666
#set sink2  #设置agent2主机
ag.sinks.k2.channel = c1
ag.sinks.k2.type = avro
ag.sinks.k2.hostname = hadoopH2
ag.sinks.k2.port = 6666
#set sink2  #设置agent3主机
ag.sinks.k3.channel = c1
ag.sinks.k3.type = avro
ag.sinks.k3.hostname = hadoopH3
ag.sinks.k3.port = 6666
#set sink2  #设置agent4主机
ag.sinks.k4.channel = c1
ag.sinks.k4.type = avro
ag.sinks.k4.hostname = hadoopH4
ag.sinks.k4.port = 6666
#set sink group
ag.sinkgroups.g1.sinks = k1 k2 k3 k4
ag.sinkgroups.g1.processor.type = failover
ag.sinkgroups.g1.processor.priority.k1 = 5
ag.sinkgroups.g1.processor.priority.k2 = 4
ag.sinkgroups.g1.processor.priority.k3 = 10
ag.sinkgroups.g1.processor.priority.k4 = 9
ag.sinkgroups.g1.processor.maxpenalty = 10000
(五)flume配置文件编写---数据采集agent
1.在hadoopH1、hadoopH2中配置agent1.conf
#agent信息采集节点 agent1 agent2
ag.sources = r1
ag.channels = c1
ag.sinks = k1
#set source
ag.sources.r1.channels = c1
ag.sources.r1.type = avro
ag.sources.r1.bind = 0.0.0.0
ag.sources.r1.port = 6666
#set channel
ag.channels.c1.type = memory
ag.channels.c1.capacity = 1000
ag.channels.c1.transactionCapacity = 100
#set sink1
ag.sinks.k1.channel = c1
ag.sinks.k1.type = avro
#设置controller主机
ag.sinks.k1.hostname = hadoopH3
ag.sinks.k1.port = 8888
2.在hadoopH1、hadoopH2中配置agent1.conf
#agent信息采集节点 agent3 agent4
ag.sources = r1
ag.channels = c1
ag.sinks = k1
#set source
ag.sources.r1.channels = c1
ag.sources.r1.type = avro
ag.sources.r1.bind = 0.0.0.0
ag.sources.r1.port = 6666
#set channel
ag.channels.c1.type = memory
ag.channels.c1.capacity = 1000
ag.channels.c1.transactionCapacity = 100
#set sink1
ag.sinks.k1.channel = c1
ag.sinks.k1.type = avro
#设置controller主机
ag.sinks.k1.hostname = hadoopH4
ag.sinks.k1.port = 8888
(六)flume配置文件编写---数据控制controller
1.在hadoopH3、hadoopH4中配置controller.conf
#controller节点,进行数据读取和写入
ag.sources = r1
ag.channels = c1
ag.sinks = k1
#set source
ag.sources.r1.channels = c1
ag.sources.r1.type = avro
ag.sources.r1.bind = 0.0.0.0
ag.sources.r1.port = 8888
#set channel
ag.channels.c1.type = memory
ag.channels.c1.capacity = 1000
ag.channels.c1.transactionCapacity = 100
#set sink1
ag.sinks.k1.type = hdfs
ag.sinks.k1.channel = c1
ag.sinks.k1.hdfs.path = hdfs://ns1/flume/logdfs/%y-%m-%d/%H%M/%S
ag.sinks.k1.hdfs.round = true
ag.sinks.k1.hdfs.roundValue = 10
ag.sinks.k1.hdfs.roundUnit = minute
ag.sinks.k1.hdfs.useLocalTimeStamp = true
ag.sinks.k1.hdfs.fileType = DataStream
(七)启动flume集群
1.启动hadoopH3、hadoopH4主机中controller节点
flume-ng agent --conf $FLUME_HOME/conf/ --conf-file ./controller.conf --name ag -Dflume.root.logger=INFO,console
2.启动hadoopH1、hadoopH2、hadoopH3、hadoopH4主机中的agent采集节点
flume-ng agent --conf $FLUME_HOME/conf/ --conf-file ./agent1.conf --name ag -Dflume.root.logger=INFO,console
3.启动hadoopH3、hadoopH4主机的数据源点采集节点agentdata.conf
flume-ng agent --conf $FLUME_HOME/conf/ --conf-file ./agentdata.conf --name ag -Dflume.root.logger=INFO,console
(八)数据采集测试
1.拷贝数据到spoolDir目录下
2.查看hdfs系统目录