Nginx auto_index和auth_basic
1、nginx auto_index
nginx站点目录浏览功能,默认情况下为关闭
启用或禁用目录列表输出
开启这个功能的前提是站点目录下没有首页index.html
官方说明:http://nginx.org/en/docs/http/ngx_http_autoindex_module.html
语法Syntax: autoindex on | off;
默认值Default: autoindex off;
使用字段Context: http(全局选项), server(单个网站选项), location(针对单个location)
使用范围:分享文件,搭建yum源等
1.1 在http下开启
http {
include mime.types;
default_type application/octet-stream;
sendfile on;
keepalive_timeout 65;
autoindex on;
server {
省略其他内容
1.2 在location下开启
location / {
autoindex on;
省略其他内容
}
1.3 在server下开启
server {
listen 80;
server_name localhost;
autoindex on;
location
省略其他内容
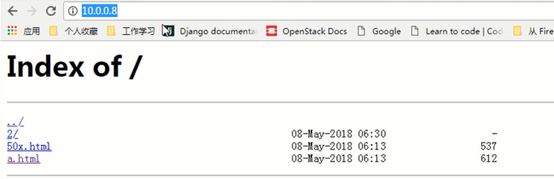
开启目录浏览功能后,即可通过浏览器访问到站点并浏览目录,也可针对于某一目录
2、nginx auth_basic
有时,我们需要为网站设置访问账号和密码权限,这样操作后,只有拥有账号密码的用户才能访问网站内容,这种使用账号密码才可以访问网站的功能主要应用在企业内部人员访问的地址上,例如:企业网站后台,MySQL客户端phpMyAdmin、企业内部的CRM、WIKI网站平台等。
官方说明:http://nginx.org/en/docs/http/ngx_http_auth_basic_module.html
2.1 HTTP基本认证协议启用用户名和密码验证
语法Syntax: auth_basic string(任意字符串) | off(关闭);
默认值Default: auth_basic off;
使用字段Context: http, server, location, limit_except
用法
修改配置文件,指定后面生成的密码文件保存路径(相对路径或绝对路径)
location / {
auth_basic "closed site";
auth_basic_user_file conf/htpasswd;
}
2.2 生成密码文件的方法
2.2.1 通过软件httpd-tools生成
安装生成验证密码文件的软件
yum install httpd-tools –y
查看安装httpd-tools后可用的二进制命令
rpm -ql httpd-tools
[root@Web01 conf]# rpm -ql httpd-tools
/usr/bin/ab
/usr/bin/htdbm
/usr/bin/htdigest
/usr/bin/htpasswd
省略输出
查看htpasswd用法
[root@Web01 conf]# htpasswd --help
Usage:
htpasswd [-cmdpsD] passwordfile username
htpasswd -b[cmdpsD] passwordfile username password
htpasswd -n[mdps] username
htpasswd -nb[mdps] username password
-c Create a new file.
-n Don't update file; display results on stdout.
-m Force MD5 encryption of the password.
-d Force CRYPT encryption of the password (default).
-p Do not encrypt the password (plaintext).
-s Force SHA encryption of the password.
-b Use the password from the command line rather than prompting for it.
-D Delete the specified user.
On Windows, NetWare and TPF systems the '-m' flag is used by default.
On all other systems, the '-p' flag will probably not work.
使用第二种方法非交互式一条命令生成密码文件
[root@Web01 conf]# htpasswd -bc /application/nginx/conf/htpasswd test 123456
Adding password for user test
[root@Web01 conf]# cat /application/nginx/conf/htpasswd
test:Hf2ctuRKkWaig
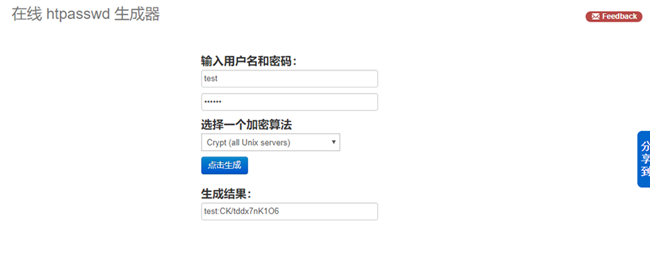
2.2.2 在线生成
利用网站在线生成
链接: http://tool.oschina.net/htpasswd
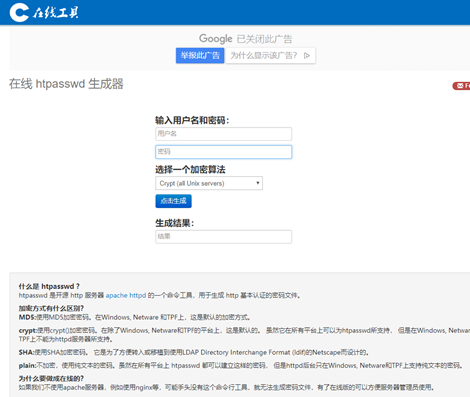
输入用户名和密码,选择适合当前web服务器的加密算法,然后把生成的结果手动添加到密码文件中
2.3 修改配置文件并生效
[root@Web01 conf]# vim nginx.conf
location / {
root html;
index index.html index.htm;
auth_basic "test";
auth_basic_user_file /application/nginx/conf/htpasswd;
}
省略其他内容
[root@Web01 conf]# nginx -t #检查语法
nginx: the configuration file /application/nginx-1.12.2/conf/nginx.conf syntax is ok
nginx: configuration file /application/nginx-1.12.2/conf/nginx.conf test is successful
[root@Web01 conf]# nginx -s reload #平滑重启
清除浏览器缓存,访问站点测试,输入用户名密码后能进行访问

博主原创文章,转载请务必注明出处