原文:https://www.yuque.com/yuejiangliu/dotnet/qq7lgs
05 Resource Owner Password Credentials 授权.mp4 (93.5 MB)
一、回顾 Client Credentials
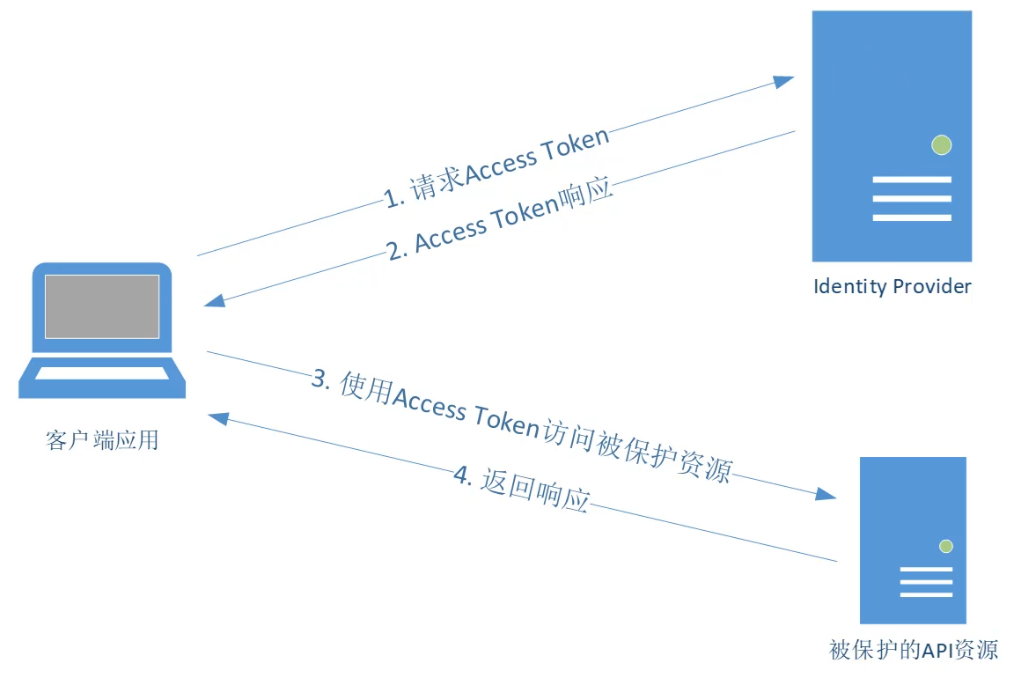
- 客户端应用不代表用户,客户端应用本身就相当于资源所有者
- 通常用于机器对机器的通信
- 客户端也需要身份认证
Token 请求:
POST http://xxx/connect/token HTTP/1.1
Accept: application/json
Content-Type: application/x-www-form-urlencoded
Content-Length: 116
Host: localhost:5000

grant_type=client_credentials
&scope=api1
&client_id=console+client
&client_secret=xxx
Token 响应:
HTTP/1.1 200 OK
Date: Thu, 02 May 2019 03:52:13 GMT
Content-Type: application/json; charset=UTF-8
Server: Kestrel
Cache-Control: no-store, no-cache, max-age=0
Pragma: no-cache
Transfer-Encoding: chunked

{"access_token":"xxxxxx","expires_in":3600,"token_type":"Bearer"}
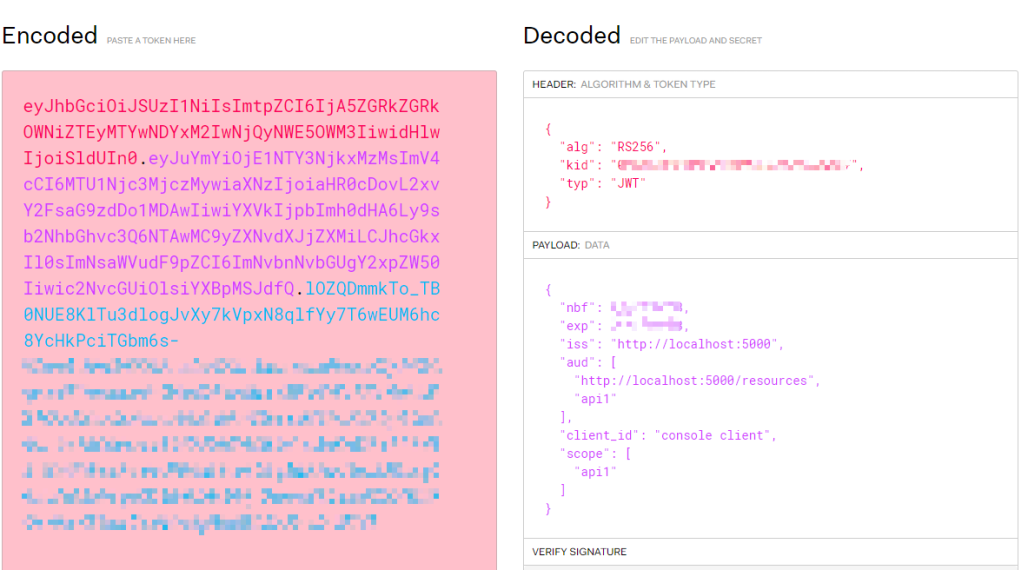
可以复制 access_token 后在 jwt.io 解码查看:
二、Resource Owner Password Credentials
- 资源所有者的密码凭证(例如用户名和密码)直接被用来请求 Access Token
- 通常用于遗留的应用
- 资源所有者和客户端应用间必须高度信任
- 其它授权方式不可用的时候才使用,尽量不用
1、在 IdentityServer 中配置客户端
配置 OpenID 相关资源,并添加 WPF Client:
public static IEnumerable<IdentityResource> GetIdentityResources()
{
    return new IdentityResource[]
    {
        // 要请求下面几个 OpenID 相关的资源,必须先添加它
        new IdentityResources.OpenId(),

        new IdentityResources.Profile(),
        new IdentityResources.Address(),
        new IdentityResources.Phone(),
        new IdentityResources.Email()
    };
}
...

public static IEnumerable<Client> GetClients()
{
    return new[]
    {
        // client credentials flow client
        ...
        // WPF client, password grant
        new Client
        {
            ClientId = "wpf client",
            AllowedGrantTypes = GrantTypes.ResourceOwnerPassword,
            ClientSecrets = {new Secret("wpf secret".Sha256())},
            AllowedScopes = {
                "api1",
                IdentityServerConstants.StandardScopes.OpenId,
                IdentityServerConstants.StandardScopes.Profile,
                IdentityServerConstants.StandardScopes.Email,
                IdentityServerConstants.StandardScopes.Address,
                IdentityServerConstants.StandardScopes.Phone}
        }
    };
}
测试用的 User 已定义在 TestUsers 里:
new TestUser{SubjectId = "818727", Username = "alice", Password = "alice",
    Claims =
    {
        new Claim(JwtClaimTypes.Name, "Alice Smith"),
        new Claim(JwtClaimTypes.GivenName, "Alice"),
        new Claim(JwtClaimTypes.FamilyName, "Smith"),
        new Claim(JwtClaimTypes.Email, "AliceSmith@email.com"),
        new Claim(JwtClaimTypes.EmailVerified, "true", ClaimValueTypes.Boolean),
        ...
    }
},
2、配置 WPF 客户端
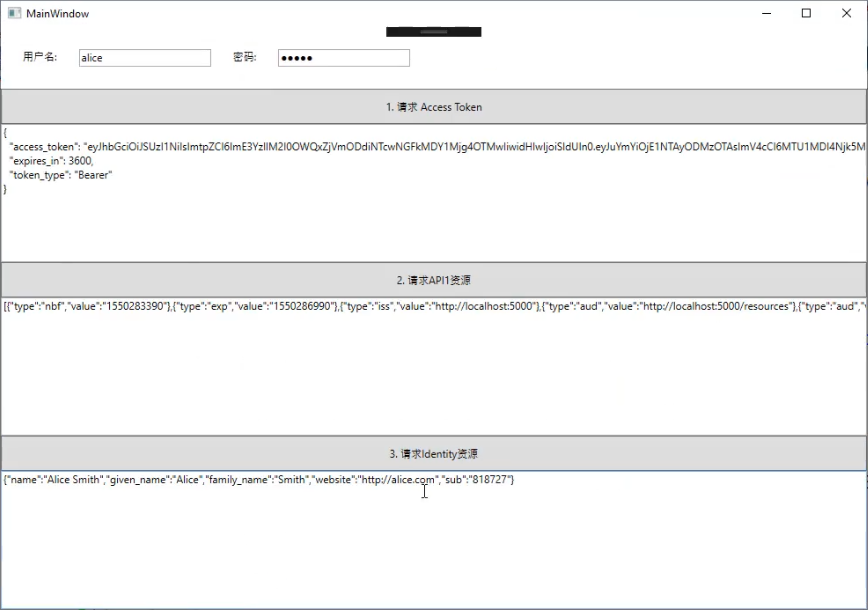
整体界面:
记得安装 IdentityModel。
public partial class MainWindow : Window
{
    private string _accessToken;
    private DiscoveryResponse _disco;

    public MainWindow()
    {
        InitializeComponent();
    }

    private async void RequestAccessToken_ButtonClick(object sender, RoutedEventArgs e)
    {
        var userName = UserNameInput.Text;
        var password = PasswordInput.Password;

        var client = new HttpClient();
        var disco = await client.GetDiscoveryDocumentAsync("http://localhost:5000/");
        _disco = disco;
        if (disco.IsError)
        {
            Console.WriteLine(disco.Error);
            return;
        }

        // request access token
        var tokenResponse = await client.RequestPasswordTokenAsync(new PasswordTokenRequest
        {
            Address = disco.TokenEndpoint,
            ClientId = "wpf client",
            ClientSecret = "wpf secret",
            Scope = "api1 openid profile address phone email",

            UserName = userName,
            Password = password
        });

        if (tokenResponse.IsError)
        {
            MessageBox.Show(tokenResponse.Error);
            return;
        }

        _accessToken = tokenResponse.AccessToken;
        AccessTokenTextBlock.Text = tokenResponse.Json.ToString();
    }

    private async void RequestApi1Resource_ButtonClick(object sender, RoutedEventArgs e)
    {
        // call API1 Resource
        var apiClient = new HttpClient();
        apiClient.SetBearerToken(_accessToken);

        var response = await apiClient.GetAsync("http://localhost:5001/identity");
        if (!response.IsSuccessStatusCode)
        {
            MessageBox.Show(response.StatusCode.ToString());
        }
        else
        {
            var content = await response.Content.ReadAsStringAsync();
            Api1ResponseTextBlock.Text = content;
        }
    }

    private async void RequestIdentityResource_ButtonClick(object sender, RoutedEventArgs e)
    {
        // call Identity Resource from Identity Server
        var apiClient = new HttpClient();
        apiClient.SetBearerToken(_accessToken);

        var response = await apiClient.GetAsync(_disco.UserInfoEndpoint);
        if (!response.IsSuccessStatusCode)
        {
            MessageBox.Show(response.StatusCode.ToString());
        }
        else
        {
            var content = await response.Content.ReadAsStringAsync();
            IdentityResponseTextBlock.Text = content;
        }
    }
}
3、OpenID 预设的 4 个 Scope
5.4. Requesting Claims using Scope Values
- profile
- OPTIONAL. This scope value requests access to the End-User's default profile Claims, which are:
name, family_name, given_name, middle_name, nickname, preferred_username, profile, picture, website, gender, birthdate, zoneinfo, locale, andupdated_at.
- OPTIONAL. This scope value requests access to the
emailandemail_verifiedClaims.
- address
- OPTIONAL. This scope value requests access to the
addressClaim.
- phone
- OPTIONAL. This scope value requests access to the
phone_numberandphone_number_verifiedClaims.
4、Token 请求与响应
Token 请求:
POST /oauth/token HTTP/1.1
Host:authorization-server.com

grant_type=password
&username=user@example.com
&password=xxx
&client_id=xxx
&client_secret=xxx
响应:
{
    "access_token'; "MTQONjOkZmQ5OTM5NDE9ZTZjNGZmZjI3",
    "token_type":"bearer",
    "expires_in":3600,
}
5、示意图
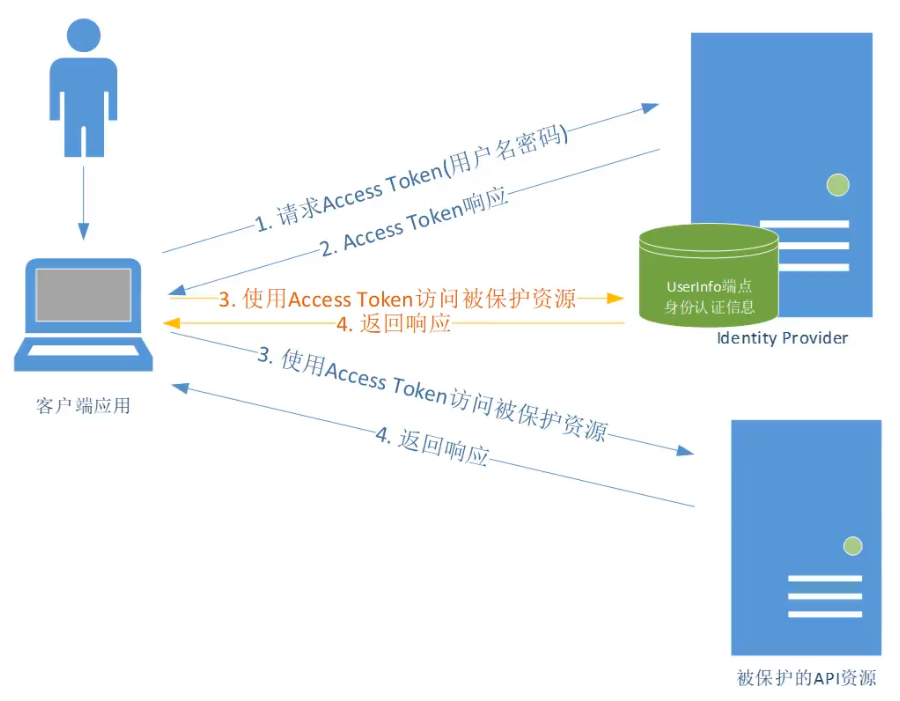
和 Client Credentials 相比:
- 多了用户角色
- 可以访问身份认证信息


