一,为什么需要拦截器?
早期MVC框架将一些通用操作写死在核心控制器中,致使框架灵活性不足、可扩展性降低 Struts 2将核心功能放到多个拦截器中实现,拦截器可自由选择和组合,增强了灵活性,有利于系统的解耦
二,什么是拦截器?
拦截对Action请求的一个类。
实现Interceptor接口。继承AbstractInterceptor类
Struts 2大多数核心功能是通过拦截器实现的,每个拦截器完成某项功能
拦截器方法在Action执行之前或者之后执行
三,拦截器工作原理?
拦截器的执行过程是一个递归的过程
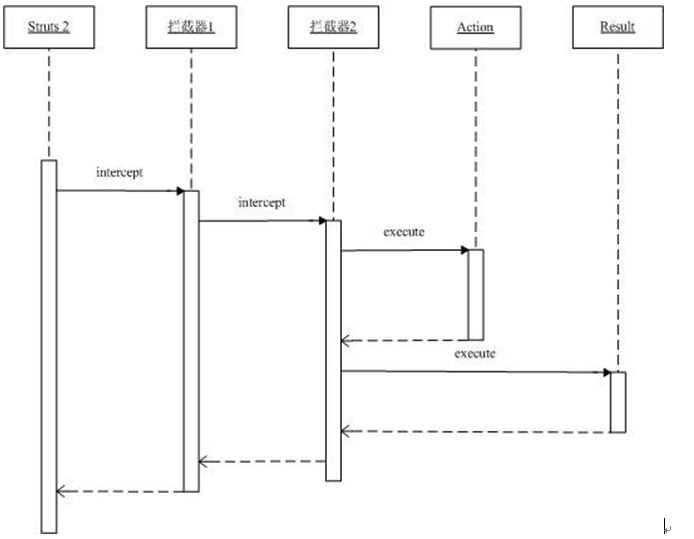
三阶段执行周期:
1、做一些Action执行前的预处理
2、将控制交给后续拦截器或返回结果字符串
3、做一些Action执行后的处理
四,Struts2 拦截器接口实现?
Struts2规定用户自定义拦截器必须实现com.opensymphony.xwork2.interceptor.Interceptor接口。该接口声明了3个方法,其中,init和destroy方法会在程序开始和结束时各执行一遍,不管使用了该拦截器与否,只要在struts.xml中声明了该Struts2拦截器就会被执行。intercept方法就是拦截的主体了,每次拦截器生效时都会执行其中的逻辑。
void init();
void destroy();
String intercept(ActionInvocation invocation) throws Exception;
1:所有拦截器都使用接口Interceptor ,Action去实现这个接口;
Init()方法:在服务器起动的时候加载一次,并且只加载一次;
Destroy()方法:当拦截器销毁时执行的方法;
Interceptor()方法:其中里边有一个参数invocation;
public String intercept(ActionInvocation invocation) throws xception {
System.out.println("interceptor!!");
String result=invocation.invoke();
return result;
}
其中intercept方法是拦截器的核心方法,所有安装的拦截器都会调用之个方法。在Struts2中已经在struts-default.xml中预定义了一些自带的拦截器,如timer、params等。如果在<package>标签中继承struts-default,则当前package就会自动拥有struts-default.xml中的所有配置。
Invocation.invoke()是如果只有一个拦截器执行完这个方法后,会返回给视图,如果有多个拦截器,它顺序的执行完所有的拦截器,才返回给视图,也就是调用后面的action继续执行。
五,Demo
1,创建实体类UserInfo
public class UserInfo {
    private  String username;
    private  String password;

    public String getUsername() {
        return username;
    }
    public void setUsername(String username) {
        this.username = username;
    }

    public String getPassword() {
        return password;
    }

    public void setPassword(String password) {
        this.password = password;
    }
}
2,创建一个名称为LoginAction的类
public class LoginAction implements Action{
    private  UserInfo user=new UserInfo();

    public String execute() throws Exception {
        System.out.println(user.getUsername()+"======user====="+user.getPassword());
        Map<String,Object> session= ActionContext.getContext().getSession();
        //如果你的用户名和密码都是admin,return success.反之,走到login
        if(user!=null){
            if(user.getUsername().equals("1")&&user.getPassword().equals("1")){
             System.out.println("====================");
             //省略一个步骤,记录session
             session.put("username",user.getUsername());
        return SUCCESS;
             }else {
        return LOGIN;
              }
        }else{  //不是登陆界面过来的
            if(session!=null&&session.get("username")!=null){
                return "success";
            }else{
                System.out.println("Action中的自定义代码");
                return "login";
            }
        }
    }    public UserInfo getUser() {
        return user;
    }

    public void setUser(UserInfo user) {
        this.user = user;
    }

}
3,设置自己的Interceptor进行拦截
public class MyInterceptor implements Interceptor {

    public void destroy() {

    }

    public void init() {

    }
//ActionInvocation具备Action的执行权
    public String intercept(ActionInvocation actionInvocation) throws Exception {
        System.out.println("对象"+actionInvocation);
        //Action是谁
        Object action=actionInvocation.getAction();
        System.out.println("action================"+action);
        String value;   //将来对应的逻辑视图名
        //判定session里面的key值对应的value是否存在
        Map<String,Object> session= ActionContext.getContext().getSession();
        //断定到底现在session中有没有uname这个key
        Object name=session.get("username");


         String actionName=actionInvocation.getProxy().getActionName();
        actionInvocation.getProxy().getNamespace();//user
        System.out.println(name+"=====name");
        System.out.println("actionName======"+actionName);
        if(actionName.equals("loginInterceptor"))
        {
            System.out.println("=========Action是Login");
            //user/login.Action
            value=actionInvocation.invoke();
        }else if(name!=null){
            //已经登陆了,,放行 让请求继续流转到下一个拦截器 或者是最终的请求处理管,action
            value =actionInvocation.invoke();
            String method=actionInvocation.getProxy().getMethod();
            System.out.println("方法"+method);
        }else{
            //走到这个else,证明你访问的Action,既不是登陆,也不是被授权的操作
            value="login";
        }
        System.out.println("逻辑视图名"+value);
            return value;
    }
}
4,配置struts.xml
<struts>
<constant name="struts.devMode" value="true"/>

<package name="Interceptoraction" namespace="/" extends="default">
    <interceptors>
        <interceptor name="myInter" class="cn.happy.controller.Interceptor.MyInterceptor"></interceptor>
        <interceptor-stack name="myStack">
            <interceptor-ref name="defaultStack"></interceptor-ref>
            <interceptor-ref name="myInter"></interceptor-ref>
        </interceptor-stack>
    </interceptors>
    <action name="loginInterceptor" class="cn.happy.controller.Interceptor.LoginAction">
        <result name="success">/day01/success.jsp</result>
        <result name="login">/day01/login.jsp</result>
    </action>
</package>
</struts>
5,配置login.jsp页面
<%@taglib prefix="s" uri="/struts-tags" %>
<%@ page contentType="text/html;charset=UTF-8" language="java" %>
<html>
<head>
    <title>Title</title>
</head>
<body>
<s:debug/>
<s:form name="form1" namespace="/" method="post" action="loginInterceptor">
    请输入用户名:</br>  <s:textfield name="user.username"/>
    请输入密码:<s:password name="user.password"/>
    <s:submit value="登陆"></s:submit>
</s:form>

</body>
</html>