前面我们说了第一个类型——Toast通知,这玩意儿不知大家是不是觉得很新鲜,以前玩.NET编程应该没接触过吧?
其实这东西绝对不复杂,只是刚接触的时候会有点莫名罢了,Toast通知和今天要说的磁贴通知,都有一个共同点,那就是格式都规定死了D。
本质就是向特定的URI地址POST一个XML文档罢了,相信很多人都会,如果你还不会,真的,要补一补基础课了。
多说无益,还是快点切入主题,开门见水吧。
首先,我们要知道我们在服务器端要POST什么样的XML文档,来,一起来看看。
- <?xml version="1.0" encoding="utf-8" ?>
- <wp:Notification xmlns:wp="WPNotification">
- <wp:Tile ID="导航URI">
- <wp:BackgroundImage>正面背景图片</wp:BackgroundImage>
- <wp:Count>计数器</wp:Count>
- <wp:Title>正面标题</wp:Title>
- <wp:BackBackgroundImage>背面背景图片</wp:BackBackgroundImage>
- <wp:BackTitle>背面标题</wp:BackTitle>
- <wp:BackContent>背面内容</wp:BackContent>
- </wp:Tile>
- </wp:Notification>
前面关于磁贴的内容,大家有印象吧?
磁帖者,有正面的标题、背景图、计数器;背面有标题、背景图和正文。有印象就好,不用我打水口枪。
来吧,我们通过一个现场演练来体会体会吧。
先做服务器端,这回我选择用ASP.NET,不要告诉我你不会。
启动VS,建一个ASP.NET网站,然后,把default.aspx改造一下,如果你嫌生成的代码不好看,可以把文件删除,然后新建一个页面。
好了,页面布局嘛,我贴一下HTML就行了。
- <%@ Page Language="C#" AutoEventWireup="true" CodeFile="Default.aspx.cs" Inherits="_Default" %>
- <!DOCTYPE html PUBLIC "-//W3C//DTD XHTML 1.0 Transitional//EN" "http://www.w3.org/TR/xhtml1/DTD/xhtml1-transitional.dtd">
- <html xmlns="http://www.w3.org/1999/xhtml">
- <head runat="server">
- <title></title>
- </head>
- <body>
- <form id="form1" runat="server">
- <div>
- <div>
- 目标URI:
- <asp:TextBox ID="txtURI" runat="server" Width="911px"></asp:TextBox>
- </div>
- <div>
- <table border="0">
- <tr>
- <td>正面背景:</td>
- <td>
- <asp:TextBox ID="txtBackImg" runat="server" Width="316px"></asp:TextBox></td>
- </tr>
- <tr>
- <td>正面标题:</td>
- <td>
- <asp:TextBox ID="txtTitle" runat="server" Width="316px"></asp:TextBox>
- </td>
- </tr>
- <tr>
- <td>计数:</td>
- <td>
- <asp:TextBox ID="txtCount" runat="server" Width="313px"></asp:TextBox>
- </td>
- </tr>
- <tr>
- <td>背面背景:</td>
- <td>
- <asp:TextBox ID="txtBackBackImg" runat="server" Width="316px"></asp:TextBox>
- </td>
- </tr>
- <tr>
- <td>背面标题:</td>
- <td>
- <asp:TextBox ID="txtBackTitle" runat="server" Width="321px"></asp:TextBox>
- </td>
- </tr>
- <tr>
- <td>背面正文:</td>
- <td>
- <asp:TextBox ID="txtBackContent" runat="server" Width="309px"></asp:TextBox>
- </td>
- </tr>
- </table>
- <div style="margin-left:20px; margin-top:10px;">
- <asp:Button ID="btnSend" runat="server" Text="发送" onclick="btnSend_Click" /></div>
- </div>
- <div style=" margin-top:20px;">
- <asp:TextBox ID="txtRes" runat="server" Height="155px" TextMode="MultiLine"
- Width="729px"></asp:TextBox>
- </div>
- </div>
- </form>
- </body>
- </html>
还是别少了后台代码。
- /*
- <?xml version="1.0" encoding="utf-8" ?>
- <wp:Notification xmlns:wp="WPNotification">
- <wp:Tile ID="导航URI">
- <wp:BackgroundImage>正面背景图片</wp:BackgroundImage>
- <wp:Count>计数器</wp:Count>
- <wp:Title>正面标题</wp:Title>
- <wp:BackBackgroundImage>背面背景图片</wp:BackBackgroundImage>
- <wp:BackTitle>背面标题</wp:BackTitle>
- <wp:BackContent>背面内容</wp:BackContent>
- </wp:Tile>
- </wp:Notification>
- * 清除磁贴的属性值
- <?xml version="1.0" encoding="utf-8" ?>
- <wp:Notification xmlns:wp="WPNotification">
- <wp:Tile ID="导航URI">
- <wp:BackgroundImage></wp:BackgroundImage>
- <wp:Count Action="Clear"></wp:Count>
- <wp:Title Action="Clear"></wp:Title>
- <wp:BackBackgroundImage Action="Clear"></wp:BackBackgroundImage>
- <wp:BackTitle Action="Clear"></wp:BackTitle>
- <wp:BackContent Action="Clear"></wp:BackContent>
- </wp:Tile>
- </wp:Notification>
- * HTTP标头
- X-WindowsPhone-Target: token
- X-NotificationClass:1
- 1 立即发送
- 11 450秒发送
- 21 900秒发送
- */
- using System;
- using System.Collections.Generic;
- using System.Linq;
- using System.Web;
- using System.Web.UI;
- using System.Web.UI.WebControls;
- using System.Net;
- using System.Net.Mime;
- using System.IO;
- using System.Text;
- public partial class _Default : System.Web.UI.Page
- {
- protected void Page_Load(object sender, EventArgs e)
- {
- }
- protected void btnSend_Click(object sender, EventArgs e)
- {
- HttpWebRequest request = (HttpWebRequest)WebRequest.Create(txtURI.Text);
- request.Method = WebRequestMethods.Http.Post;
- // 加上HTTP标头
- request.Headers.Add("X-WindowsPhone-Target", "token");
- request.Headers.Add("X-NotificationClass", "1");
- // 拼接内容,XML文档
- string Msg = "<?xml version=\"1.0\" encoding=\"utf-8\" ?>" +
- "<wp:Notification xmlns:wp=\"WPNotification\">" +
- "<wp:Tile>" +
- "<wp:BackgroundImage>" + txtBackImg.Text + "</wp:BackgroundImage>" +
- "<wp:Count>" + txtCount.Text + "</wp:Count>" +
- "<wp:Title>" + txtTitle.Text + "</wp:Title>" +
- "<wp:BackBackgroundImage>" + txtBackBackImg.Text + "</wp:BackBackgroundImage>" +
- "<wp:BackTitle>" + txtBackTitle.Text + "</wp:BackTitle>" +
- "<wp:BackContent>" + txtBackContent.Text + "</wp:BackContent>" +
- "</wp:Tile>" +
- "</wp:Notification>";
- byte[] buffer = Encoding.UTF8.GetBytes(Msg);
- request.ContentType = MediaTypeNames.Text.Xml;
- // POST数据要记得设置内容长度
- request.ContentLength = buffer.Length;
- // 写入流
- using (Stream stream = request.GetRequestStream())
- {
- stream.Write(buffer, 0, buffer.Length);
- }
- // 接收回应
- HttpWebResponse response = (HttpWebResponse)request.GetResponse();
- // 读出响应的HTTP头
- string headers = "";
- foreach (string key in response.Headers.AllKeys)
- {
- headers += key + " : " + response.Headers.Get(key) + "\r\n";
- }
- txtRes.Text = headers;
- }
- }
补充一下,上面代码中,前面的注释我已经写上了,其实MSDN上都有,我想很多人不看,我说一下,如果你打算清除磁贴某些属性的值,如标题等,这可以用以下的XML文档。
- <?xml version="1.0" encoding="utf-8" ?>
- <wp:Notification xmlns:wp="WPNotification">
- <wp:Tile ID="导航URI">
- <wp:BackgroundImage></wp:BackgroundImage>
- <wp:Count Action="Clear"></wp:Count>
- <wp:Title Action="Clear"></wp:Title>
- <wp:BackBackgroundImage Action="Clear"></wp:BackBackgroundImage>
- <wp:BackTitle Action="Clear"></wp:BackTitle>
- <wp:BackContent Action="Clear"></wp:BackContent>
- </wp:Tile>
- </wp:Notification>
重点就是,Action="Clear",但要注意,磁贴正面的背景图不能清除。
好,再来新建一个WP应用,这回要做客户端。
直接新建即可,XAML文档不用改,因为我们不需要界面设计了,直打开后台代码吧。
- using System;
- using System.Collections.Generic;
- using System.Linq;
- using System.Net;
- using System.Windows;
- using System.Windows.Controls;
- using System.Windows.Documents;
- using System.Windows.Input;
- using System.Windows.Media;
- using System.Windows.Media.Animation;
- using System.Windows.Shapes;
- using Microsoft.Phone.Controls;
- using Microsoft.Phone.Notification;
- namespace WPClient
- {
- public partial class MainPage : PhoneApplicationPage
- {
- // 构造函数
- public MainPage()
- {
- InitializeComponent();
- HttpNotificationChannel Channel = null;
- // 通道名,随便弄一个,不要与其它应用程序重复
- string Channel_Name = "TileNoftification";
- // 在现有的通道里面找找,看能不能找着?
- Channel = HttpNotificationChannel.Find(Channel_Name);
- if (Channel == null)
- {
- // 找不到,那就新建一个呗
- Channel = new HttpNotificationChannel(Channel_Name);
- // 打开通道前要先注册事件处理,为什么?自己想一下吧
- // 就是因为ChannelUriUpdated事件,如不这样,
- // 当第一次获取URI时你就得不到更新通知
- Channel.ChannelUriUpdated += new EventHandler<NotificationChannelUriEventArgs>(Channel_ChannelUriUpdated);
- // 出事了,总得向上级汇报一下吧?
- Channel.ErrorOccurred += new EventHandler<NotificationChannelErrorEventArgs>(Channel_ErrorOccurred);
- // 登记注册完毕,着手办喜事
- Channel.Open();
- // 办喜事别忘记了发请帖啊,调用BindToShellTile
- Channel.BindToShellTile();
- }
- else
- {
- // 如果找到了通道,还是要注册一下事件
- // 老夫妻也可以再拍一回婚纱照吧?
- Channel.ChannelUriUpdated+=new EventHandler<NotificationChannelUriEventArgs>(Channel_ChannelUriUpdated);
- Channel.ErrorOccurred+=new EventHandler<NotificationChannelErrorEventArgs>(Channel_ErrorOccurred);
- // 把住址告诉人家,相册做好之后,数码冲印店送货上门
- System.Diagnostics.Debug.WriteLine("URI: {0}", Channel.ChannelUri.ToString());
- }
- }
- void Channel_ErrorOccurred(object sender, NotificationChannelErrorEventArgs e)
- {
- // 向上级汇报一下错误
- Dispatcher.BeginInvoke(() =>
- {
- MessageBox.Show(e.Message);
- });
- }
- void Channel_ChannelUriUpdated(object sender, NotificationChannelUriEventArgs e)
- {
- // 搬家了记得通知一下大家新住址
- Dispatcher.BeginInvoke(() =>
- {
- System.Diagnostics.Debug.WriteLine("URI: {0}", e.ChannelUri.ToString());
- });
- }
- }
- }
先动行WP端,当然,同时运行两个都可以了。
在“输出”窗口中,把这个URI复制到服务器端的网页上。

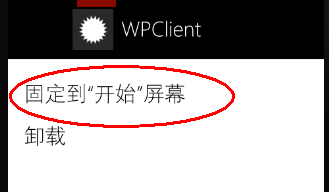
接着,按模拟器的“开始”按钮,来到“开始”屏幕,向右滑动,看到应用程序列表,在本应用程序上长按,从弹出的菜单中选“固定到开始屏幕”.
然后,回到服务器端页面,填好所有参数,点击“发送”。看结果。


都看到效果了?
图片可以自己准备,png格式,173*173,随便用画图工具搞两下就行了,只是为了测试,把图片加到项目后,设置以下属性就行了。
