0、QQ好友列表实现
-
0、首先说说实现思路
- 自定义
UITableView,每一个分组都是一个UITableViewHeaderFooterView,然后自定义cell,这里分组的实现主要是自定义UITableViewHeaderFooterView,这个折叠效果主要靠这个header的响应
- 自定义
1、实现数据源方法
#pragma mark - UITableViewDataSource
- (NSInteger)numberOfSectionsInTableView:(UITableView *)tableView
{
    // 返回分组个数
    return 10;
}
- (NSInteger)tableView:(UITableView *)tableView numberOfRowsInSection:(NSInteger)section
{
    // 取出具体的组数,然后再取出每组的内容
    SLQFriendGroup *group = self.friendList[section];
    // 根据分组是否打开情况确定如何显示分组,默认关闭
    return group.friends.count;
}
/**
 *  返回自定义cell
 */
- (UITableViewCell *)tableView:(UITableView *)tableView cellForRowAtIndexPath:(NSIndexPath *)indexPath
{
    // 1、生成cell
    SLQFriendCell *cell = [SLQFriendCell cellWithTableView:tableView];
    // 3、返回cell
    return cell;
}
2、模型定义
- 2.0、在控制器定义个数组,存放解析的plist数据
/**朋友数组*/ @property (nonatomic, copy) NSArray *friendList;
- 2.1、自定义分组模型
@class SLQFriend;
@interface SLQFriendGroup : NSObject
/**分组名称*/
@property (nonatomic, copy) NSString *name;
/**在线人数*/
@property (nonatomic, assign) int online;
/**分组中用户数量*/
@property (nonatomic, copy) NSArray *friends;
/**分组是隐藏还是展开*/
@property (nonatomic, assign,getter=isOpened) BOOL opened;

- (instancetype)initWithDictionary:(NSDictionary *)dict;
+ (instancetype)FriendGroupWithDictionary:(NSDictionary *)dict;
@end

// 实现文件
#import "SLQFriendGroup.h"
#import "SLQFriend.h"

@implementation SLQFriendGroup

- (instancetype)initWithDictionary:(NSDictionary *)dict
{
    if (self = [super init]) {
        // 1、KVC字典转模型
        [self setValuesForKeysWithDictionary:dict];
        // 2、然后再转换数组中信息
        NSMutableArray *groupFriends = [NSMutableArray array];
        for (NSDictionary *dict in self.friends) {
            // 3、字典转模型
            SLQFriend *friend = [SLQFriend friendWithDict:dict];
            [groupFriends addObject:friend];
        }
        self.friends = groupFriends;
    }
    return self;
}
+ (instancetype)FriendGroupWithDictionary:(NSDictionary *)dict
{
    return [[self alloc] initWithDictionary:dict];
}
@end
- 2.2、朋友模型
#import <Foundation/Foundation.h>

@interface SLQFriend : NSObject
/**头像*/
@property (nonatomic, copy) NSString *icon;
/**昵称*/
@property (nonatomic, copy) NSString *name;
/**好友签名*/
@property (nonatomic, copy) NSString *intro;
/**是否是vip*/
@property (nonatomic, assign, getter=isVip) BOOL vip;

- (instancetype)initFriendWithDict:(NSDictionary *)dict;
+ (instancetype)friendWithDict:(NSDictionary *)dict;
@end

// 实现文件
@implementation SLQFriend

- (instancetype)initFriendWithDict:(NSDictionary *)dict
{
    if (self = [super init]) {
        // kvc字典转模型
        [self setValuesForKeysWithDictionary:dict];
    }
    return self;
}

+ (instancetype)friendWithDict:(NSDictionary *)dict
{
    return [[self alloc] initFriendWithDict:dict];
}
@end
3、字典转模型
- 在控制器里加载字典数据并转换成模型
#pragma mark - 懒加载
- (NSArray *)friendList
{
    if (!_friendList) {
        _friendList = [NSArray array];
        // 从plist读取用户信息
        NSString *path = [[NSBundle mainBundle] pathForResource:@"friends.plist" ofType:nil];
        NSArray *friends = [NSArray arrayWithContentsOfFile:path];
         /**
         *  字典转模型
         */
        NSMutableArray *mutableFriends = [NSMutableArray array];
        for (NSDictionary *dict in friends) {
            SLQFriendGroup *group = [SLQFriendGroup FriendGroupWithDictionary:dict];
            [mutableFriends addObject:group];
        }
        _friendList = mutableFriends;
    }
    return  _friendList;
}
- 3.1、修改数据源方法
- (NSInteger)numberOfSectionsInTableView:(UITableView *)tableView
{
    // 返回分组个数
    return self.friendList.count;
}

- (NSInteger)tableView:(UITableView *)tableView numberOfRowsInSection:(NSInteger)section
{
    // 取出具体的组数,然后再取出每组的内容
    SLQFriendGroup *group = self.friendList[section];
    // 根据分组是否打开情况确定如何显示分组,默认关闭
    return group.isOpened ? group.friends.count : 0;
}

/**
 *  返回自定义cell
 */
- (UITableViewCell *)tableView:(UITableView *)tableView cellForRowAtIndexPath:(NSIndexPath *)indexPath
{
    // 1、生成cell
    SLQFriendCell *cell = [SLQFriendCell cellWithTableView:tableView];
    // 2、传递SLQFriend模型
    SLQFriendGroup *group = self.friendList[indexPath.section];
    cell.Friend = group.friends[indexPath.row];
    // 3、返回cell
    return cell;
}
4、自定义cell
- 这个自定义cell就不多说了
#import <UIKit/UIKit.h>
@class SLQFriend;

@interface SLQFriendCell : UITableViewCell

/**模型数组*/
@property (nonatomic, strong) SLQFriend *Friend;


+ (SLQFriendCell *)cellWithTableView:(UITableView *)tableView;

@end


#import "SLQFriendCell.H"
#import "SLQFriendGroup.h"
#import "SLQFriend.h"

@implementation SLQFriendCell
/**
 *  setter方法
 */
- (void)setFriend:(SLQFriend *)Friend
{
    _Friend = Friend;
    // 更新数据到控件上
    self.textLabel.text = Friend.name;
    self.detailTextLabel.text = Friend.intro;
    self.imageView.image = [UIImage imageNamed:Friend.icon];
    self.textLabel.textColor = Friend.isVip ? [UIColor redColor] : [UIColor blackColor];
}
/**
 *  返回cell
 */
+ (SLQFriendCell *)cellWithTableView:(UITableView *)tableView
{
    static NSString *ID = @"Cell";
    SLQFriendCell *cell = [tableView dequeueReusableCellWithIdentifier:ID];
    if (cell == nil) {
        cell = [[SLQFriendCell alloc] initWithStyle:UITableViewCellStyleSubtitle reuseIdentifier:ID];
    }
    return cell;
}
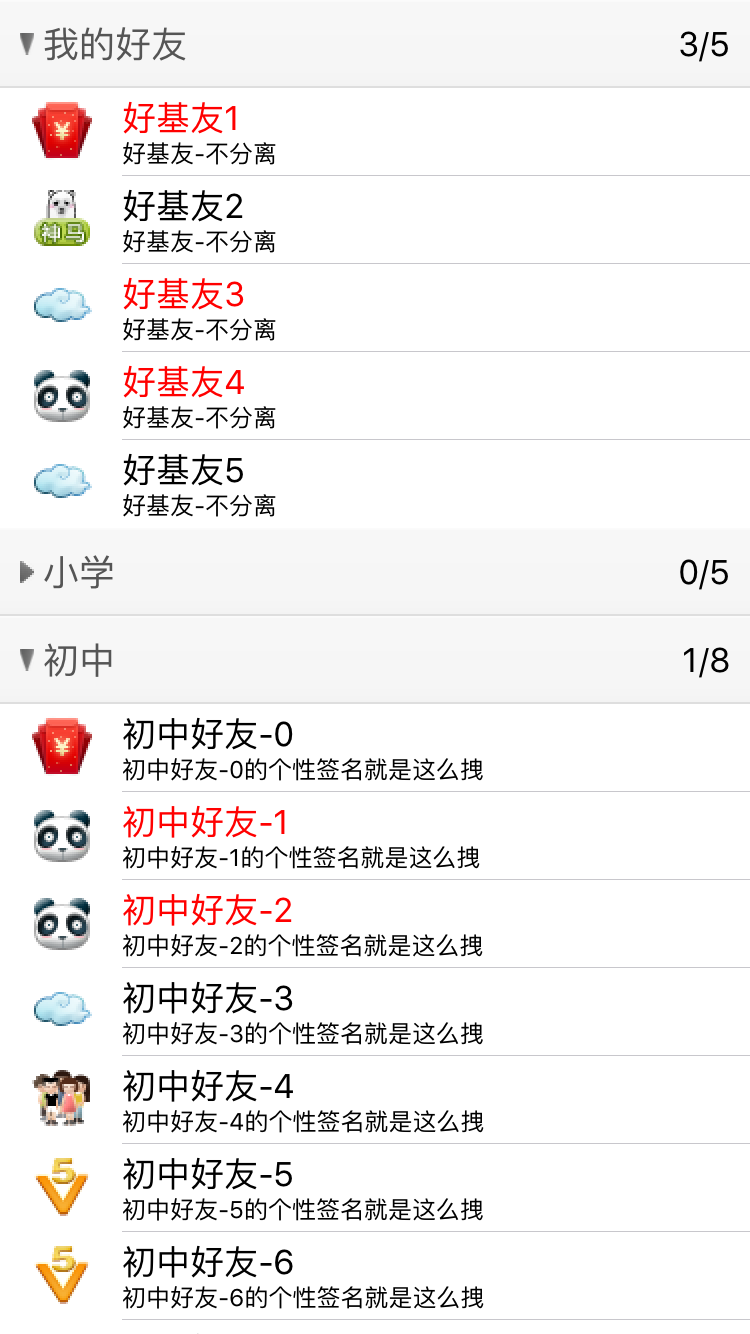
5、自定义HeaderFooterView
- 这个才是弹出列表的关键所在
#import <UIKit/UIKit.h>
@class SLQFriendGroup;
@interface SLQHeader : UITableViewHeaderFooterView
/**用户分组*/
@property (nonatomic, strong) SLQFriendGroup *friendGroup;
/** 按钮*/
@property (nonatomic, weak) UIButton *contentButton;
/** 标签*/
@property (nonatomic, weak) UILabel *onlineLabel;
+ (instancetype)headerWithTableView:(UITableView *)tableView;
@end
- 5.0、重写setter方法,设置数据
- (void)setFriendGroup:(SLQFriendGroup *)friendGroup
{
    _friendGroup = friendGroup;
    // 加空格,让图片和文字产生一个间隔
    NSString *name = [NSString stringWithFormat:@" %@",friendGroup.name];
    [self.contentButton setTitle:name forState:UIControlStateNormal];
    [self.contentButton setTitleColor:[UIColor darkGrayColor] forState:UIControlStateNormal];
    self.onlineLabel.text = [NSString stringWithFormat:@"%zd/%zd",friendGroup.online,friendGroup.friends.count];
}
- 5.1、封装header生成操作,返回header
// 返回生成好的header
+ (instancetype)headerWithTableView:(UITableView *)tableView
{
    static NSString *ID = @"header";
    SLQHeader *header = [tableView dequeueReusableHeaderFooterViewWithIdentifier:ID];
    if (header == nil) {
        header = [[SLQHeader alloc] initWithReuseIdentifier:ID];
    }
    return header;
}
- 5.2、布局子控件
- (void)layoutSubviews
{
    [super layoutSubviews];
    // 布局添加的子控件
    // 1、背景
    self.contentButton.frame = self.bounds;
    // 稍微向右偏移一点
    self.contentButton.contentEdgeInsets = UIEdgeInsetsMake(0, 10, 0, 0);
    // 2、标签:在线人数/组内总人数
    NSInteger countWidth = 150;
    NSInteger countHeight = self.bounds.size.height;
    NSInteger countX = self.bounds.size.width - 10 - countWidth;
    NSInteger countY = 0;
    self.onlineLabel.frame = CGRectMake(countX, countY, countWidth, countHeight);
    // 3、改变小箭头的方向
    // 由于tableView刷新数据后,所有header会被重新创建,所以要在这里对箭头朝向做出修改
    // 改变箭头朝向,顺时针旋转90度
    CGFloat rotation = self.friendGroup.isOpened? M_PI_2 : 0;
    self.contentButton.imageView.transform = CGAffineTransformMakeRotation(rotation);
}
- 5.3、自定义
initWithReuseIdentifier:ID方法,添加自定义控件
/** 重写初始化方法, 给header加上图标、组名、在线人数等子控件 */
- (instancetype)initWithReuseIdentifier:(NSString *)reuseIdentifier
{
   if (self = [super initWithReuseIdentifier:reuseIdentifier])
   {
       // 1、添加按钮
       UIButton *contentButton = [[UIButton alloc] init];
       [self.contentView addSubview:contentButton];
       // 1.0 添加背景图片
       [contentButton setImage:[UIImage imageNamed:@"buddy_header_arrow"] forState:UIControlStateNormal];
       [contentButton setBackgroundImage:[UIImage imageNamed:@"buddy_header_bg"] forState:UIControlStateNormal];
       [contentButton setBackgroundImage:[UIImage imageNamed:@"buddy_header_bg_highlighted"] forState:UIControlStateHighlighted];
       // 设置对齐方式
       contentButton.contentHorizontalAlignment = UIControlContentHorizontalAlignmentLeft;
       // 1.1 添加点击事件
       [contentButton addTarget:self action:@selector(contentButtonClick:) forControlEvents:UIControlEventTouchUpInside];
       _contentButton = contentButton;
       // 2、最右边标签
       UILabel *onlineLabel = [[UILabel alloc] init];
       [self.contentView addSubview:onlineLabel];
       [onlineLabel setTextAlignment:NSTextAlignmentRight];
       _onlineLabel = onlineLabel;
   }
    return self;
}
- 5.4、响应header点击事件,点击过后展开或者收缩内部cell,这个牵涉到tableView的数据更新,那么可以将这个事件传递出去(使用代理)
- (void)contentButtonClick:(UIButton *)btn
{
    // 隐藏显示 好友
    self.friendGroup.opened = !self.friendGroup.isOpened;
    // 调用代理方法传递按钮点击消息
    if ([self.delegate respondsToSelector:@selector(headerDidClicked:)]) {
        [self.delegate headerDidClicked:self];
    }
}
- 5.5、代理实现,只需实现一个方法就行,而且是可选的
@class SLQHeader;
@protocol SLQHeaderDelegate <NSObject>

@optional
- (void)headerDidClicked:(SLQHeader *)header;

@end

@interface SLQHeader : UITableViewHeaderFooterView

/**用户分组*/
@property (nonatomic, strong) SLQFriendGroup *friendGroup;

/** 按钮*/
@property (nonatomic, weak) UIButton *contentButton;
/** 标签*/
@property (nonatomic, weak) UILabel *onlineLabel;

/**delegate*/
@property (nonatomic, weak) id<SLQHeaderDelegate> delegate;
+ (instancetype)headerWithTableView:(UITableView *)tableView;

@end
- 5.6、在控制器里设置代理监听按钮点击即可
#pragma mark - UITableViewDelegate
- (UIView *)tableView:(UITableView *)tableView viewForHeaderInSection:(NSInteger)section
{
    // 1、自定义header
    SLQHeader *header = [SLQHeader headerWithTableView:tableView];
    // 2、传递模型
    SLQFriendGroup *group = self.friendList[section];
    header.friendGroup = group;
    header.delegate = self;
    // 3、返回头部
    return header;
}

- (void)headerDidClicked:(SLQHeader *)header
{
    // 刷新表格
    [self.tableView reloadData];
}
- 这是俺的github
https://github.com/slq0378/05-QQ- - 还有一点就是原作者的那个工程有点问题,就是那个按钮图片的旋转不起作用,我这里直接把旋转代码放到
layoutSubviews,这样只要布局改变就会旋转箭头