Volley是android官方开发的一个HTTP框架,简化了利用java中原生的HTTP操作API-HttpURLConnection和HttpClient的操作。
一、首先是Volley的简单使用示例:


  1 package com.dqxst.first;
  2
  3 import android.graphics.Bitmap;
  4 import android.graphics.BitmapFactory;
  5 import android.os.Bundle;
  6 import android.os.Handler;
  7 import android.os.Message;
  8 import android.support.v7.app.AppCompatActivity;
  9 import android.util.LruCache;
 10 import android.widget.ImageView;
 11 import android.widget.Toast;
 12
 13 import com.android.volley.RequestQueue;
 14 import com.android.volley.Response;
 15 import com.android.volley.VolleyError;
 16 import com.android.volley.toolbox.ImageLoader;
 17 import com.android.volley.toolbox.ImageRequest;
 18 import com.android.volley.toolbox.NetworkImageView;
 19 import com.android.volley.toolbox.Volley;
 20 import com.dqxst.first.adapter.Images;
 21
 22 import java.io.IOException;
 23 import java.net.HttpURLConnection;
 24 import java.net.MalformedURLException;
 25 import java.net.URL;
 26
 27 public class HttpActivity extends AppCompatActivity {
 28     private final static int LOAD_FAIL = 0;
 29     private final static int LOAD_SUCCESS = 1;
 30
 31     private final Handler handler = new Handler() {
 32         //        private Context that=context;
 33         @Override
 34         public void handleMessage(Message msg) {
 35             Bitmap photo = (Bitmap) msg.obj;
 36             switch (msg.what) {
 37                 case LOAD_FAIL:
 38 //                    Toast.makeText(that,"加载失败",Toast.LENGTH_SHORT).show();
 39                     break;
 40                 case LOAD_SUCCESS:
 41                     iv.setImageBitmap(photo);
 42             }
 43         }
 44     };
 45
 46     private static ImageView iv;
 47     private NetworkImageView niv;
 48
 49     @Override
 50     protected void onCreate(Bundle savedInstanceState) {
 51         super.onCreate(savedInstanceState);
 52         setContentView(R.layout.activity_http);
 53         init();
 54 //        httpURLConnection();
 55 //        volley();
 56         volley2();
 57         volley3();
 58     }
 59
 60     private void volley3() {
 61         //这是第三种加载图片的方式,其实内部还是第二种凡是进行实现,但是通过一种自定义控件的形式表现
 62         RequestQueue queue=Volley.newRequestQueue(this);
 63         ImageLoader loader=new ImageLoader(queue,new BitmapCache());
 64
 65         niv.setDefaultImageResId(R.drawable.loading);
 66         niv.setErrorImageResId(R.drawable.load_error);
 67         niv.setImageUrl(Images.imageThumbUrls[3],loader);
 68     }
 69
 70     private void volley2() {
 71         //这是Volley中一种加载图片的方式,和最基本的Request方式不同,
 72         //优点是在loader中可以传入一个用于缓存的参数,可以利用LruCache来进行缓存管理
 73         RequestQueue queue = Volley.newRequestQueue(HttpActivity.this);
 74         ImageLoader loader = new ImageLoader(queue, new BitmapCache());
 75         ImageLoader.ImageListener listener = ImageLoader.getImageListener(iv,R.drawable.loading,R.drawable.load_error);
 76         loader.get(Images.imageThumbUrls[2],listener);
 77     }
 78
 79     public class BitmapCache implements ImageLoader.ImageCache{
 80         private int maxMemory=10*1024*1024;
 81         private LruCache<String,Bitmap> cache=new LruCache<String,Bitmap>(maxMemory){
 82             @Override
 83             protected int sizeOf(String key, Bitmap value) {
 84                 return value.getByteCount();
 85             }
 86         };
 87         @Override
 88         public Bitmap getBitmap(String s) {
 89             return cache.get(s);
 90         }
 91
 92         @Override
 93         public void putBitmap(String s, Bitmap bitmap) {
 94             cache.put(s,bitmap);
 95         }
 96     }
 97
 98     private void volley() {
 99         //Volley基本使用分3步
100         //1、创建RequestQueue请求队列,
101         RequestQueue queue = Volley.newRequestQueue(HttpActivity.this);
102         //2、创建一个请求对象,这里是加载图片的请求对象
103         ImageRequest request = new ImageRequest(Images.imageThumbUrls[1], new Response.Listener<Bitmap>() {
104             @Override
105             public void onResponse(Bitmap bitmap) {
106                 iv.setImageBitmap(bitmap);
107             }
108         }, 500, 500, null, new Response.ErrorListener() {
109             @Override
110             public void onErrorResponse(VolleyError volleyError) {
111                 Toast.makeText(getApplicationContext(), "加载出错", Toast.LENGTH_SHORT).show();
112             }
113         });
114         //3、最后,需要将请求对象添加到请求队列中进行工作。
115         queue.add(request);
116     }
117
118     private void httpURLConnection() {
119         new Thread(new Runnable() {
120             @Override
121             public void run() {
122                 try {
123                     Bitmap bitmap;
124                     URL url = new URL(Images.imageThumbUrls[0]);
125                     HttpURLConnection con = (HttpURLConnection) url.openConnection();
126                     con.setConnectTimeout(5 * 1000);
127                     con.setReadTimeout(10 * 1000);
128                     bitmap = BitmapFactory.decodeStream(con.getInputStream());
129                     Message msg = new Message();
130                     if (bitmap != null) {
131                         msg.what = LOAD_SUCCESS;
132                         msg.obj = bitmap;
133                     } else {
134                         msg.what = LOAD_FAIL;
135                     }
136                     handler.sendMessage(msg);
137                 } catch (MalformedURLException e) {
138                     e.printStackTrace();
139                 } catch (IOException e) {
140                     e.printStackTrace();
141                 }
142             }
143         }).start();
144     }
145
146     private void init() {
147         iv = (ImageView) findViewById(R.id.http_imageView);
148         niv= (NetworkImageView) findViewById(R.id.volley_NetworkImageView);
149     }
150 }
 1 <?xml version="1.0" encoding="utf-8"?>
 2 <LinearLayout xmlns:android="http://schemas.android.com/apk/res/android"
 3     xmlns:tools="http://schemas.android.com/tools"
 4     android:layout_width="match_parent"
 5     android:layout_height="match_parent"
 6     android:orientation="vertical"
 7     android:paddingBottom="@dimen/activity_vertical_margin"
 8     android:paddingLeft="@dimen/activity_horizontal_margin"
 9     android:paddingRight="@dimen/activity_horizontal_margin"
10     android:paddingTop="@dimen/activity_vertical_margin"
11     tools:context="com.dqxst.first.HttpActivity">
12
13     <ImageView
14         android:layout_width="wrap_content"
15         android:layout_height="wrap_content"
16         android:id="@+id/http_imageView"
17         android:src="@drawable/loading"
18         android:contentDescription="test"/>
19
20     <com.android.volley.toolbox.NetworkImageView
21         android:id="@+id/volley_NetworkImageView"
22         android:layout_width="200dp"
23         android:layout_height="200dp" />
24 </LinearLayout>
通过以上的基本使用代码,可以看到一些Volley的基本情况
1、由于android的UI线程的限制,所以需要在新建线程中进行网络操作,所以网络操作需要涉及线程之间的通信,而一般使用的HTTP框架都需要对其进行自动处理进行简化,Volley框架也是如此,关于具体实现见下文的源码分析部分
2、可以看到,Volley中最基本的使用就是第一种方式,就是通过继承Request对象来实现的请求方式。Volley本身就有StringRequest等一系列具体的实现。详细的说明见二。
二、继承Request实现的HTTP请求。
首先先看Volley中的StringRequest的实现,
 1 package com.android.volley.toolbox;
 2
 3 import com.android.volley.NetworkResponse;
 4 import com.android.volley.Request;
 5 import com.android.volley.Response;
 6 import com.android.volley.Response.ErrorListener;
 7 import com.android.volley.Response.Listener;
 8 import com.android.volley.toolbox.HttpHeaderParser;
 9 import java.io.UnsupportedEncodingException;
10
11 public class StringRequest extends Request<String> {
12     private final Listener<String> mListener;
13
14     //构造函数,主要作用有2,
15     //1、调用父类来进行初始化
16     //2、初始化监听类属性,用于监听Response服务器返回的结果
17     public StringRequest(int method, String url, Listener<String> listener, ErrorListener errorListener) {
18         super(method, url, errorListener);
19         this.mListener = listener;
20     }
21
22     public StringRequest(String url, Listener<String> listener, ErrorListener errorListener) {
23         this(0, url, listener, errorListener);
24     }
25
26     //该方法是响应的处理,调用监听器中的相应方法
27     protected void deliverResponse(String response) {
28         this.mListener.onResponse(response);
29     }
30
31     //处理响应数据的方法,
32     //参数NetworkResponse是对响应结果的一种封装,包括了响应头和响应体data
33     protected Response<String> parseNetworkResponse(NetworkResponse response) {
34         String parsed;
35         try {
36             parsed = new String(response.data, HttpHeaderParser.parseCharset(response.headers));
37         } catch (UnsupportedEncodingException var4) {
38             parsed = new String(response.data);
39         }
40
41         return Response.success(parsed, HttpHeaderParser.parseCacheHeaders(response));
42     }
43 }
44
通过学习上面的实现过程,可以对Volley进行扩展实现,满足个性化的使用。例如,
1、对响应结果为XML的数据进行解析(就是将parseNetworkResponse中的数据通过xml的方式进行解析即可),
2、使用Gson/fastjson对JSON数据进行解析,因为Volley中使用的是Android中自带的json解析方式,并且分为JsonArrayRequest和JsonObjectRequest两个具体实现。
三、源码解析:
1、在使用Volley时,第一步是创建一个RequestQueue对象,通常是由Volley对象的方法创建而不是直接new一个,源码见下
 1     RequestQueue queue = Volley.newRequestQueue(HttpActivity.this);
 2
 3     public static RequestQueue newRequestQueue(Context context) {
 4         return newRequestQueue(context, (HttpStack)null);
 5     }
 6
 7     public static RequestQueue newRequestQueue(Context context, HttpStack stack) {
 8         File cacheDir = new File(context.getCacheDir(), "volley");
 9         String userAgent = "volley/0";
10
11         try {
12             String network = context.getPackageName();
13             PackageInfo queue = context.getPackageManager().getPackageInfo(network, 0);
14             userAgent = network + "/" + queue.versionCode;
15         } catch (NameNotFoundException var6) {
16             ;
17         }
18
19         //1、创建http连接操作对象,其内部使用的是HttpURLConnection(sdk>=9)和HttpClient(sdk<9)
20         if(stack == null) {
21             if(VERSION.SDK_INT >= 9) {
22                 stack = new HurlStack();
23             } else {
24                 stack = new HttpClientStack(AndroidHttpClient.newInstance(userAgent));
25             }
26         }
27
28         //2、创建一个Network对象,这里使用的是Volley中的实现BasicNetwork,
29         //!!!该对象主要是调用上面的http连接进行连接,并对响应结果进行处理,
30         BasicNetwork network1 = new BasicNetwork((HttpStack)stack);
31
32         //3、创建RequestQueue对象,并调用start(),这一部分解释见2
33         RequestQueue queue1 = new RequestQueue(new DiskBasedCache(cacheDir), network1);
34         queue1.start();
35         return queue1;
36     }
2、RequestQueue对象是整个Volley中最重要的一个对象,它的一部分功能类似于一个线程池(可以生成和管理线程)
 1     public void start() {
 2         this.stop();
 3
 4         //1、 创建一个mCacheDispatcher并调用其start(),其实就是创建一个缓存线程
 5         this.mCacheDispatcher = new CacheDispatcher(this.mCacheQueue, this.mNetworkQueue, this.mCache, this.mDelivery);
 6         this.mCacheDispatcher.start();
 7
 8         //2、这里默认循环4次,创建4个NetworkDispatcher对象并调用start(),其实是创建四个工作线程
 9         for(int i = 0; i < this.mDispatchers.length; ++i) {
10             NetworkDispatcher networkDispatcher = new NetworkDispatcher(this.mNetworkQueue, this.mNetwork, this.mCache, this.mDelivery);
11             this.mDispatchers[i] = networkDispatcher;
12             networkDispatcher.start();
13         }
14
15     }
3、使用Volley的最后一步就是使用RequestQueue的add()将实现的Request加入到队列中,如queue.add(request);
 1     public <T> Request<T> add(Request<T> request) {
 2         request.setRequestQueue(this);
 3         Set var2 = this.mCurrentRequests;
 4         synchronized(this.mCurrentRequests) {
 5             this.mCurrentRequests.add(request);
 6         }
 7
 8         request.setSequence(this.getSequenceNumber());
 9         request.addMarker("add-to-queue");
10         //这里判断的是请求是否可以缓存,使用的是mShouldCache属性,默认值为true,即可以缓存
11         if(!request.shouldCache()) {
12             this.mNetworkQueue.add(request);
13             return request;
14         } else {
15             Map var8 = this.mWaitingRequests;
16             synchronized(this.mWaitingRequests) {
17                 String cacheKey = request.getCacheKey();
18                 if(this.mWaitingRequests.containsKey(cacheKey)) {
19                     Object stagedRequests = (Queue)this.mWaitingRequests.get(cacheKey);
20                     if(stagedRequests == null) {
21                         stagedRequests = new LinkedList();
22                     }
23
24                     ((Queue)stagedRequests).add(request);
25                     this.mWaitingRequests.put(cacheKey, stagedRequests);
26                     if(VolleyLog.DEBUG) {
27                         VolleyLog.v("Request for cacheKey=%s is in flight, putting on hold.", new Object[]{cacheKey});
28                     }
29                 } else {
30                     this.mWaitingRequests.put(cacheKey, (Object)null);
31                     //在这里将Request对象加入到缓存队列中进行操作
32                     this.mCacheQueue.add(request);
33                 }
34
35                 return request;
36             }
37         }
38     }
4、通过上面的源码可以看到,最终的操作是落在
 1 public class CacheDispatcher extends Thread {
 2
 3     @Override
 4     public void run() {
 5         if (DEBUG) VolleyLog.v("start new dispatcher");
 6         Process.setThreadPriority(Process.THREAD_PRIORITY_BACKGROUND);
 7         // Make a blocking call to initialize the cache.
 8         mCache.initialize();
 9         //这里表明该线程一直在运行
10         while (true) {
11             try {
12                 // Get a request from the cache triage queue, blocking until
13                 // at least one is available.
14                 final Request<?> request = mCacheQueue.take();
15                 request.addMarker("cache-queue-take");
16                 // 检测请求是否被取消,是则退出
17                 if (request.isCanceled()) {
18                     request.finish("cache-discard-canceled");
19                     continue;
20                 }
21                 // 检测是否有缓存的结果,没有则调用NetworkQueue重新进行请求
22                 Cache.Entry entry = mCache.get(request.getCacheKey());
23                 if (entry == null) {
24                     request.addMarker("cache-miss");
25                     // Cache miss; send off to the network dispatcher.
26                     mNetworkQueue.put(request);
27                     continue;
28                 }
29                 // 检测缓存是否过期,是则重新请求
30                 if (entry.isExpired()) {
31                     request.addMarker("cache-hit-expired");
32                     request.setCacheEntry(entry);
33                     mNetworkQueue.put(request);
34                     continue;
35                 }
36                 // We have a cache hit; parse its data for delivery back to the request.
37                 request.addMarker("cache-hit");
38                 Response<?> response = request.parseNetworkResponse(
39                         new NetworkResponse(entry.data, entry.responseHeaders));
40                 request.addMarker("cache-hit-parsed");
41                 if (!entry.refreshNeeded()) {
42                     // Completely unexpired cache hit. Just deliver the response.
43                     mDelivery.postResponse(request, response);
44                 } else {
45                     // Soft-expired cache hit. We can deliver the cached response,
46                     // but we need to also send the request to the network for
47                     // refreshing.
48                     request.addMarker("cache-hit-refresh-needed");
49                     request.setCacheEntry(entry);
50                     // Mark the response as intermediate.
51                     response.intermediate = true;
52                     // Post the intermediate response back to the user and have
53                     // the delivery then forward the request along to the network.
54                     mDelivery.postResponse(request, response, new Runnable() {
55                         @Override
56                         public void run() {
57                             try {
58                                 mNetworkQueue.put(request);
59                             } catch (InterruptedException e) {
60                                 // Not much we can do about this.
61                             }
62                         }
63                     });
64                 }
65             } catch (InterruptedException e) {
66                 // We may have been interrupted because it was time to quit.
67                 if (mQuit) {
68                     return;
69                 }
70                 continue;
71             }
72         }
73     }
74 }
 1     public void run() {
 2         Process.setThreadPriority(10);
 3
 4         //外层循环,保证工作线程持续工作
 5         while(true) {
 6             Request request;
 7             //内层循环,循环访问工作队列,从其中取出需要处理的任务,
 8             //注意这里使用了take(),是一种阻塞的实现,详见线程深入学习二
 9             while(true) {
10                 try {
11                     request = (Request)this.mQueue.take();
12                     break;
13                 } catch (InterruptedException var4) {
14                     if(this.mQuit) {
15                         return;
16                     }
17                 }
18             }
19
20             try {
21                 request.addMarker("network-queue-take");
22                 if(request.isCanceled()) {
23                     request.finish("network-discard-cancelled");
24                 } else {
25                     this.addTrafficStatsTag(request);
26                    //这里说明真正执行http的是mNetwork对象,
27                    //Volley中默认就是HttpURLConnection(API9之后)或HttpClient
28                    //这在1中源码部分可见,
29                    //最终将HTTP相应封装成NetworkResponse
30                     NetworkResponse e = this.mNetwork.performRequest(request);
31                     request.addMarker("network-http-complete");
32                     //这里是检测的notModified属性其实是检测返回的状态码是否为304
33                     //第二个是判断响应是否已经提交过
34                     if(e.notModified && request.hasHadResponseDelivered()) {
35                         request.finish("not-modified");
36                     } else {
37                         Response response = request.parseNetworkResponse(e);
38                         request.addMarker("network-parse-complete");
39                         //!!!在这里将获取的数据进行缓存
40                         if(request.shouldCache() && response.cacheEntry != null) {
41                             this.mCache.put(request.getCacheKey(), response.cacheEntry);
42                             request.addMarker("network-cache-written");
43                         }
44
45                         request.markDelivered();
46                         this.mDelivery.postResponse(request, response);
47                     }
48                 }
49             } catch (VolleyError var5) {
50                 this.parseAndDeliverNetworkError(request, var5);
51             } catch (Exception var6) {
52                 VolleyLog.e(var6, "Unhandled exception %s", new Object[]{var6.toString()});
53                 this.mDelivery.postError(request, new VolleyError(var6));
54             }
55         }
56     }
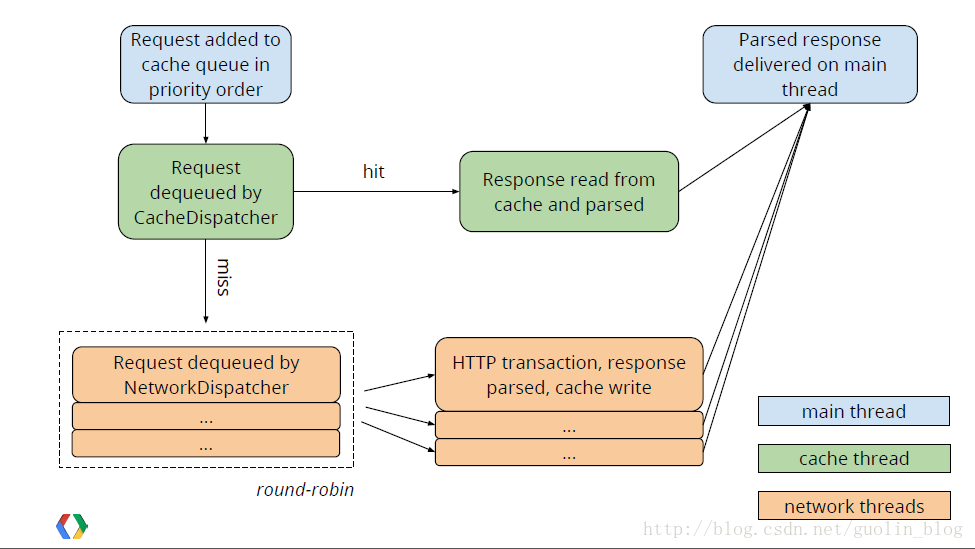
看完了源码的简要分析,就可以搞明白Volley官方对其进行解释的一幅图了,如下:
四、其他问题:
1、Volley发送POST请求
通过上面的源码分析,可以知道最终的HTTP操作会在
  1     public HttpResponse performRequest(Request<?> request, Map<String, String> additionalHeaders) throws IOException, AuthFailureError {
  2         String url = request.getUrl();
  3         HashMap map = new HashMap();
  4         map.putAll(request.getHeaders());
  5         map.putAll(additionalHeaders);
  6         if(this.mUrlRewriter != null) {
  7             String parsedUrl = this.mUrlRewriter.rewriteUrl(url);
  8             if(parsedUrl == null) {
  9                 throw new IOException("URL blocked by rewriter: " + url);
 10             }
 11
 12             url = parsedUrl;
 13         }
 14
 15         URL parsedUrl1 = new URL(url);
 16         //创建HttpURLConnection对象用于连接,下面的方法就是对连接进行基本设置
 17         HttpURLConnection connection = this.openConnection(parsedUrl1, request);
 18         Iterator protocolVersion = map.keySet().iterator();
 19
 20         while(protocolVersion.hasNext()) {
 21             String responseCode = (String)protocolVersion.next();
 22             connection.addRequestProperty(responseCode, (String)map.get(responseCode));
 23         }
 24
 25         //这个方法是根据请求方式对请求进行一些设置,主要就是对一些请求如POST的参数进行传递
 26         setConnectionParametersForRequest(connection, request);
 27         ProtocolVersion protocolVersion1 = new ProtocolVersion("HTTP", 1, 1);
 28         int responseCode1 = connection.getResponseCode();
 29         if(responseCode1 == -1) {
 30             throw new IOException("Could not retrieve response code from HttpUrlConnection.");
 31         } else {
 32             BasicStatusLine responseStatus = new BasicStatusLine(protocolVersion1, connection.getResponseCode(), connection.getResponseMessage());
 33             BasicHttpResponse response = new BasicHttpResponse(responseStatus);
 34             response.setEntity(entityFromConnection(connection));
 35             Iterator i$ = connection.getHeaderFields().entrySet().iterator();
 36
 37             while(i$.hasNext()) {
 38                 Entry header = (Entry)i$.next();
 39                 if(header.getKey() != null) {
 40                     BasicHeader h = new BasicHeader((String)header.getKey(), (String)((List)header.getValue()).get(0));
 41                     response.addHeader(h);
 42                 }
 43             }
 44
 45             return response;
 46         }
 47     }
 48
 49     //对请求进行一些基本设置
 50     private HttpURLConnection openConnection(URL url, Request<?> request) throws IOException {
 51         HttpURLConnection connection = this.createConnection(url);
 52         int timeoutMs = request.getTimeoutMs();
 53         connection.setConnectTimeout(timeoutMs);
 54         connection.setReadTimeout(timeoutMs);
 55         connection.setUseCaches(false);
 56         connection.setDoInput(true);
 57         if("https".equals(url.getProtocol()) && this.mSslSocketFactory != null) {
 58             ((HttpsURLConnection)connection).setSSLSocketFactory(this.mSslSocketFactory);
 59         }
 60
 61         return connection;
 62     }
 63
 64     //根据请求方式进行设置,主要是对POST等请求传递参数
 65     static void setConnectionParametersForRequest(HttpURLConnection connection, Request<?> request) throws IOException, AuthFailureError {
 66         switch(request.getMethod()) {
 67         case -1:
 68             //!!!这里调用请求对象来获取POST传递的参数
 69             byte[] postBody = request.getPostBody();
 70             if(postBody != null) {
 71                 connection.setDoOutput(true);
 72                 connection.setRequestMethod("POST");
 73                 connection.addRequestProperty("Content-Type", request.getPostBodyContentType());
 74                 DataOutputStream out = new DataOutputStream(connection.getOutputStream());
 75                 out.write(postBody);
 76                 out.close();
 77             }
 78             break;
 79         case 0:
 80             connection.setRequestMethod("GET");
 81             break;
 82         case 1:
 83             connection.setRequestMethod("POST");
 84             addBodyIfExists(connection, request);
 85             break;
 86         case 2:
 87             connection.setRequestMethod("PUT");
 88             addBodyIfExists(connection, request);
 89             break;
 90         case 3:
 91             connection.setRequestMethod("DELETE");
 92             break;
 93         case 4:
 94             connection.setRequestMethod("HEAD");
 95             break;
 96         case 5:
 97             connection.setRequestMethod("OPTIONS");
 98             break;
 99         case 6:
100             connection.setRequestMethod("TRACE");
101             break;
102         case 7:
103             addBodyIfExists(connection, request);
104             connection.setRequestMethod("PATCH");
105             break;
106         default:
107             throw new IllegalStateException("Unknown method type.");
108         }
109
110     }
111
112     private static void addBodyIfExists(HttpURLConnection connection, Request<?> request) throws IOException, AuthFailureError {
113         byte[] body = request.getBody();
114         if(body != null) {
115             connection.setDoOutput(true);
116             connection.addRequestProperty("Content-Type", request.getBodyContentType());
117             DataOutputStream out = new DataOutputStream(connection.getOutputStream());
118             out.write(body);
119             out.close();
120         }
121
122     }
从上面可以看到最终调用Request去获取POST传递的参数,而最终调用的方法就是getParams()。
1 protected Map<String, String> getParams() throws AuthFailureError {
2     return null;
3 }
结论:要实现POST请求,需要重写Request中的getParams()方法传递参数,并将method设置为1或-1(为-1时是判断是否有请求参数,即getParams()是否为null)。
注意:上面是将参数以普通的形式即键值对的形式进行发送,但有时需要以json串的形式进行发送,此时就需要使用JsonObjectRequest/JsonArrayRequest,并需要重写getHeaders()添加json处理的头信息
1
2     @Override
3     public Map<String, String> getHeaders() {
4         HashMap<String, String> headers = new HashMap<String, String>();
5         headers.put("Accept", "application/json");
6         headers.put("Content-Type", "application/json; charset=UTF-8");
7
8         return headers;
9     }
参考:http://blog.csdn.net/guolin_blog/article/details/17482095
http://blog.csdn.net/gaolu/article/details/38439375
2、加载图片:在一中的基本使用部分代码里,有两种专门针对图片的操作方式,一个是使用ImageLoader,一个是使用自定义图片控件NetworkImageView。从本质上来说两者使用的都是ImageLoader进行实现的。两者的区别在于:
①如果要是针对普通的图片展示形式(因为NetworkImageView仅仅是增加了通过URL来添加图片的功能,基本显示还是ImageView)可以使用该自定义控件,更简便一些;
②如果有特殊的展示需求,例如需要圆形图片而使用自定义控件(circularimageview)时可以使用ImageLoader方式。
其实通过源码可以发现,ImageLoader就是对Request方式进行封装,可以将图片直接显示在指定的ImageView控件上而已,方便了用户的操作。但是最主要的一个区别是:使用这种方式没有使用默认的磁盘缓存DiskBaseedCache方案,而是需要用户指定缓存的方式。
3、Volley的缓存:在上面对缓存介绍的比较少,其实缓存是Volley中比较重要的部分。有了缓存可以降低HTTP请求的次数,提升用户的体验。从上图中可以看到Volley首先是从缓存中进行查询,如果缓存没有才对服务器进行请求。具体见如下分析。
①首先是在创建RequestQueue对象时需要传入一个实现了Cache接口的对象,通过Volley类创建的时候默认使用的就是DiskBasedCache,从名字可以看到这是一个机遇硬盘的缓存方案,缓存路径就是应用的cache目录(可以从上面的3.1部分源码看到)。
 1     public RequestQueue(Cache cache, Network network, int threadPoolSize, ResponseDelivery delivery) {
 2         this.mSequenceGenerator = new AtomicInteger();
 3         this.mWaitingRequests = new HashMap();
 4         this.mCurrentRequests = new HashSet();
 5         this.mCacheQueue = new PriorityBlockingQueue();
 6         this.mNetworkQueue = new PriorityBlockingQueue();
 7         this.mCache = cache;
 8         this.mNetwork = network;
 9         this.mDispatchers = new NetworkDispatcher[threadPoolSize];
10         this.mDelivery = delivery;
11     }
12
13     public RequestQueue(Cache cache, Network network, int threadPoolSize) {
14         this(cache, network, threadPoolSize, new ExecutorDelivery(new Handler(Looper.getMainLooper())));
15     }
16
17     public RequestQueue(Cache cache, Network network) {
18         this(cache, network, 4);
19     }
②对于DiskBaseedCache对象,会在Volley创建RequestQueue时传入,并在其start()用于创建CacheDispatcher对象,作用域缓存。最后会在其run()中被初始化。
1 //Volley.newRequestQueue()
2 RequestQueue queue1 = new RequestQueue(new DiskBasedCache(cacheDir), network1);
3
4 //RequestQueue。start()
5         this.mCacheDispatcher = new CacheDispatcher(this.mCacheQueue, this.mNetworkQueue, this.mCache, this.mDelivery);
6         this.mCacheDispatcher.start();
7
8 //CacheDispatcher.run()
9    this.mCache.initialize();
③缓存操作:默认的存储路径是data/data/<package>/Volley下。有了DiskBaseedCache缓存对象之后就可以实现保存(在NetworkDispatcher中)和取出缓存(在CacheDispatcher中)的操作,通过调用其put()/get()实现,还可以通过调用其remove()方法删除缓存。
当网络断开的情况下,Volley同样首先从缓存中获取数据,会先判断其是否过期,根据缓存中的ttl,就是缓存头的MaxAge。
4、多线程间通信的实现:其内部使用了handler机制。解析如下:
①在通过网络线程或者缓存线程获取到响应之后,都会调用一个方法来提交响应
 1 //CacheDispatcher的run()中部分
 2 this.mDelivery.postResponse(e, response);
 3
 4 this.mDelivery.postResponse(e, response, new Runnable() {
 5                                             public void run() {
 6                                                 try {
 7                                                     CacheDispatcher.this.mNetworkQueue.put(e);
 8                                                 } catch (InterruptedException var2) {
 9                                                     ;
10                                                 }
11
12                                             }
13                                         });
14
15 //NetWorkDispatcher的run()中部分
16 this.mDelivery.postResponse(request, response);
②默认使用的是ExecutorDelivery来进行提交响应结果
 1 //RequestQueue构造函数,传入ExecutorDelivery对象执行提交响应
 2 //并且将绑定主UI线程的Handler对象传入
 3     public RequestQueue(Cache cache, Network network, int threadPoolSize) {
 4         this(cache, network, threadPoolSize, new ExecutorDelivery(new Handler(Looper.getMainLooper())));
 5     }
 6
 7
 8 //ExecutorDelivery部分
 9     public ExecutorDelivery(final Handler handler) {
10         this.mResponsePoster = new Executor() {
11             public void execute(Runnable command) {
12                 handler.post(command);
13             }
14         };
15     }
16     //执行提交的部分
17     public void postResponse(Request<?> request, Response<?> response) {
18         this.postResponse(request, response, (Runnable)null);
19     }
20     public void postResponse(Request<?> request, Response<?> response, Runnable runnable) {
21         request.markDelivered();
22         request.addMarker("post-response");
23         this.mResponsePoster.execute(new ExecutorDelivery.ResponseDeliveryRunnable(request, response, runnable));
24     }
③经过上述处理,最终实际提交的是其内部的ResponseDeliveryRunnable。由Handler机制可知,最后处理消息就是该Runnable的run().在向下就可以看到最后使用了我们提供的监听器中的方法进行处理,实现了线程间通信。
 1         public void run() {
 2             if(this.mRequest.isCanceled()) {
 3                 this.mRequest.finish("canceled-at-delivery");
 4             } else {
 5                 if(this.mResponse.isSuccess()) {
 6                     this.mRequest.deliverResponse(this.mResponse.result);
 7                 } else {
 8                     this.mRequest.deliverError(this.mResponse.error);
 9                 }
10
11                 if(this.mResponse.intermediate) {
12                     this.mRequest.addMarker("intermediate-response");
13                 } else {
14                     this.mRequest.finish("done");
15                 }
16
17                 if(this.mRunnable != null) {
18                     this.mRunnable.run();
19                 }
20
21             }
22         }
五、源码分析续之HTTP处理
上面的源码分析中没有分析Volley中是如何具体处理HTTP协议的,在这里进行分析。从上面知道,Volley的网络请求最终是由BasicNetwork这个类进行调度处理的(真正的处理时HttpURLConnection类),当然也可以自定义一个处理类,只要实现Network接口,完成其中的网络操作的方法即可。
1 public interface Network {
2     NetworkResponse performRequest(Request<?> var1) throws VolleyError;
3 }
1、下面是BasicNetwork中的performRequest(),就是通过这个方法对HTTP请求过程进行调度的。但是实际的请求并不在这里执行,见下面分析:
 1     public NetworkResponse performRequest(Request<?> request) throws VolleyError {
 2         long requestStart = SystemClock.elapsedRealtime();
 3
 4         while(true) {
 5             HttpResponse httpResponse = null;
 6             Object responseContents = null;
 7             HashMap responseHeaders = new HashMap();
 8
 9             try {
10                 HashMap e = new HashMap();
11                 this.addCacheHeaders(e, request.getCacheEntry());
12                 httpResponse = this.mHttpStack.performRequest(request, e);
13                 StatusLine statusCode2 = httpResponse.getStatusLine();
14                 int networkResponse1 = statusCode2.getStatusCode();
15                 Map responseHeaders1 = convertHeaders(httpResponse.getAllHeaders());
16                 if(networkResponse1 != 304) {
17                     byte[] responseContents1;
18                     if(httpResponse.getEntity() != null) {
19                         responseContents1 = this.entityToBytes(httpResponse.getEntity());
20                     } else {
21                         responseContents1 = new byte[0];
22                     }
23
24                     long requestLifetime = SystemClock.elapsedRealtime() - requestStart;
25                     this.logSlowRequests(requestLifetime, request, responseContents1, statusCode2);
26                     if(networkResponse1 >= 200 && networkResponse1 <= 299) {
27                         return new NetworkResponse(networkResponse1, responseContents1, responseHeaders1, false);
28                     }
29
30                     throw new IOException();
31                 }
32
33                 return new NetworkResponse(304, request.getCacheEntry() == null?null:request.getCacheEntry().data, responseHeaders1, true);
34             } catch (SocketTimeoutException var12) {
35                 attemptRetryOnException("socket", request, new TimeoutError());
36             } catch (ConnectTimeoutException var13) {
37                 attemptRetryOnException("connection", request, new TimeoutError());
38             } catch (MalformedURLException var14) {
39                 throw new RuntimeException("Bad URL " + request.getUrl(), var14);
40             } catch (IOException var15) {
41                 boolean statusCode = false;
42                 NetworkResponse networkResponse = null;
43                 if(httpResponse == null) {
44                     throw new NoConnectionError(var15);
45                 }
46
47                 int statusCode1 = httpResponse.getStatusLine().getStatusCode();
48                 VolleyLog.e("Unexpected response code %d for %s", new Object[]{Integer.valueOf(statusCode1), request.getUrl()});
49                 if(responseContents == null) {
50                     throw new NetworkError(networkResponse);
51                 }
52
53                 networkResponse = new NetworkResponse(statusCode1, (byte[])responseContents, responseHeaders, false);
54                 if(statusCode1 != 401 && statusCode1 != 403) {
55                     throw new ServerError(networkResponse);
56                 }
57
58                 attemptRetryOnException("auth", request, new AuthFailureError(networkResponse));
59             }
60         }
61     }
①请求时间记录:在2,24,25行可以看到有记录整个请求时间的数据并且进行打印
②执行HTTP请求,使用的是mHttpStack进行操作,现在主要使用的就是HurlStack进行的,其内部使用HttpURLConnection(在下面进行说明)。
③对部分状态码的结果进行处理(16-31行):注意,这里处理的状态码只有200-299和304,其余的状态码都抛出IOException,在异常处理中尝试处理。
a、304状态:说明请求的文档的缓存仍然有效,则直接将缓存数据直接封装在最终的响应中以供使用。
b、2xx状态:对于非304的状态,进行的处理是将其中的content信息从流中读取出来存放到responseContents1属性中,还有之前就已经读取的头信息集合放在responseHeaders1属性中。如果状态在200-299之间,则将这些数据进行封装最终返回,其他状态则抛出异常。
④异常处理:从③可知,这里的异常可能不是真正的异常,处理过程如下,
a、超时(连接超时和读取超时):针对两种不同的连接方式(HttpURLConnection/HttpClient)的不同异常进行处理,就是执行重试策略。默认的重试策略就是超时时间增加一倍然后重试1次。超时时间增加是由乘积因子决定的。
b、URL格式错误:直接报错
c、IOException:该异常可能有两种情况引起:
1、确实是IOException即读取过程的异常:这部分就是对响应结果进行检测,如果响应的结果为null则报错。(在42-51行)
2、由于上面没有处理的状态码报错:如果是401或403状态,直接报错,其他状态进行重试。
2、执行HTTP请求的就是HurlStack中的方法,下面对其过程进行说明:
 1     public HttpResponse performRequest(Request<?> request, Map<String, String> additionalHeaders) throws IOException, AuthFailureError {
 2         String url = request.getUrl();
 3         HashMap map = new HashMap();
 4         map.putAll(request.getHeaders());
 5         map.putAll(additionalHeaders);
 6         if(this.mUrlRewriter != null) {
 7             String parsedUrl = this.mUrlRewriter.rewriteUrl(url);
 8             if(parsedUrl == null) {
 9                 throw new IOException("URL blocked by rewriter: " + url);
10             }
11
12             url = parsedUrl;
13         }
14
15         URL parsedUrl1 = new URL(url);
16         HttpURLConnection connection = this.openConnection(parsedUrl1, request);
17         Iterator protocolVersion = map.keySet().iterator();
18
19         while(protocolVersion.hasNext()) {
20             String responseCode = (String)protocolVersion.next();
21             connection.addRequestProperty(responseCode, (String)map.get(responseCode));
22         }
23
24         setConnectionParametersForRequest(connection, request);
25         ProtocolVersion protocolVersion1 = new ProtocolVersion("HTTP", 1, 1);
26         int responseCode1 = connection.getResponseCode();
27         if(responseCode1 == -1) {
28             throw new IOException("Could not retrieve response code from HttpUrlConnection.");
29         } else {
30             BasicStatusLine responseStatus = new BasicStatusLine(protocolVersion1, connection.getResponseCode(), connection.getResponseMessage());
31             BasicHttpResponse response = new BasicHttpResponse(responseStatus);
32             response.setEntity(entityFromConnection(connection));
33             Iterator i$ = connection.getHeaderFields().entrySet().iterator();
34
35             while(i$.hasNext()) {
36                 Entry header = (Entry)i$.next();
37                 if(header.getKey() != null) {
38                     BasicHeader h = new BasicHeader((String)header.getKey(), (String)((List)header.getValue()).get(0));
39                     response.addHeader(h);
40                 }
41             }
42
43             return response;
44         }
45     }