4.2. WebService请求深入分析
1). 分析WebService的WSDL文档结构
1.1). 实例截图

<definitions>
<types>
<schema>
<element>
<message>
<portType>
<operation>
<input>
<output>
<binding>
<operation>
<input>
<output>
<service>
<port>
binding属性
<address>
1.2). 文档结构
<definitions>
<types>
<schema>
<element>
</types>
<message>
<part>
</message>
<portType>
<operation>
<input>
<output>
</portType>
<binding>
<operation>
<input>
<output>
</binding>
<service>
<port>
<address>
</service>
</definitions>
1.3). 文档结构图

1.4). 重要标签的说明
- types - 数据类型(标签)定义的容器,里面使用schema
- 定义了一些标签结构供message引用
- 定义了一些标签结构供message引用
- message - 通信消息的数据结构的抽象类型化定义。
- 引用types中定义的标签
- 引用types中定义的标签
- operation - 对服务中所支持的操作的抽象描述,
- 一个operation描述了一个访问入口的请求消息与响应消息对。
- 一个operation描述了一个访问入口的请求消息与响应消息对。
- portType - 对于某个访问入口点类型所支持的操作的抽象集合,
- 这些操作可以由一个或多个服务访问点来支持。
- 这些操作可以由一个或多个服务访问点来支持。
- binding - 特定端口类型的具体协议和数据格式规范的绑定。
- service- 相关服务访问点的集合
- port - 定义为协议/数据格式绑定与具体Web访问地址组合的单个服务访问点。
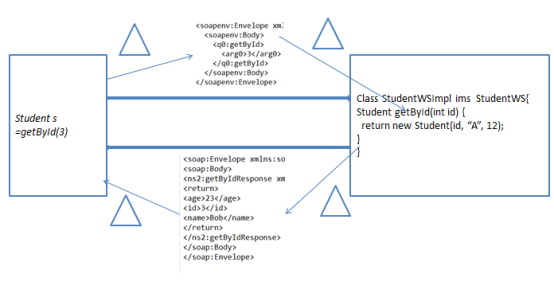
2). 测试CXF支持的数据类型
- 基本类型
– int,float,boolean等
- 引用类型
– String
– 集合:数组,List, Set, Map
– 自定义类型 Student
Jdk:不支持 map.
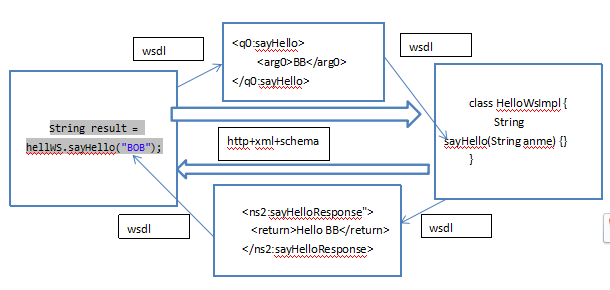
3). 一次Web service请求的流程
一次web service请求的本质:
1)客户端向服务器端发送了一个soap消息(http请求+xml片断)
2) 服务器端处理完请求后, 向客户端返回一个soap消息
那么它的流程是怎样的呢?
4.3. CXF框架的深入使用
1).CXF的拦截器
1.1) 理解
- 为什么设计拦截器?
- 为了在webservice请求过程中,能动态操作请求和响应数据, CXF设计了拦截器.
- 拦截器分类:
- 按所处的位置分:服务器端拦截器,客户端拦截器
- 按消息的方向分:入拦截器,出拦截器
- 按定义者分:系统拦截器,自定义拦截器
- 拦截器API
Interceptor(拦截器接口)
AbstractPhaseInterceptor(自定义拦截器从此继承)
LoggingInInterceptor(系统日志入拦截器类)
LoggingOutInterceptor(系统日志出拦截器类)
1.2) 编码实现拦截器
- 使用日志拦截器,实现日志记录
– LoggingInInterceptor
– LoggingOutInterceptor
- 使用自定义拦截器,实现用户名与密码的检验
– 服务器端的in拦截器
– 客户端的out拦截器


 1 服务端:
 2 public  class CheckUserInterceptor extends AbstractPhaseInterceptor<SoapMessage> {
 3
 4     public CheckUserInterceptor() {
 5         super(Phase.PRE_PROTOCOL);
 6     }
 7
 8     @Override
 9     public void handleMessage(SoapMessage msg) throws Fault {
10         Header header = msg.getHeader(new QName("thecheck"));
11         if(header != null){
12             Element chenkEle = (Element) header.getObject();
13             String username = chenkEle.getElementsByTagName("username").item(0).getTextContent();
14             String password = chenkEle.getElementsByTagName("password").item(0).getTextContent();
15
16             if("ymmm".equals(username) && "123456".equals(password)){
17                 System.out.println("Client de "+username+" 通过了 服务器的检查");
18                 return;
19             }
20         }
21         System.out.println("client 没有通过拦截器检查");
22
23         throw new Fault(new RuntimeException("请输入正确的用户名和密码!!!"));
24
25     }
26
27 }
28
29
30 客户端:
31 public class AddUserInterceptor extends AbstractPhaseInterceptor<SoapMessage> {
32     private String username;
33     private String password;
34
35     public AddUserInterceptor(String username , String password) {
36         super(Phase.PRE_PROTOCOL);
37         this.username = username;
38         this.password = password;
39     }
40     /*
41      <Envelope>
42          <head>
43              <chenkEle>
44                  <name>xfzhang</name>
45                  <password>123456</password>
46              </chenkEle>
47              <chenkEle2>
48                  <name>xfzhang</name>
49                  <password>123456</password>
50              </chenkEle2>
51          <head>
52          <Body>
53              <sayHello>
54                  <arg0>BOB</arg0>
55              <sayHello>
56          </Body>
57      </Envelope>
58  */
59
60     @Override
61     public void handleMessage(SoapMessage msg) throws Fault {
62         List<Header> list = msg.getHeaders();
63
64         DocumentBuilderFactory factory = DocumentBuilderFactory.newInstance();
65         Document document;
66         try {
67             document = factory.newDocumentBuilder().newDocument();
68
69             Element chenkEle = document.createElement("thecheck");
70
71             Element usernameEle = document.createElement("username");
72             usernameEle.setTextContent(username);
73             chenkEle.appendChild(usernameEle);
74
75             Element passwordEle = document.createElement("password");
76             passwordEle.setTextContent(password);
77             chenkEle.appendChild(passwordEle);
78
79             list.add(new Header(new QName("thecheck"), chenkEle));
80         } catch (ParserConfigurationException e) {
81             // TODO Auto-generated catch block
82             e.printStackTrace();
83         }
84     }
85 }
 1 public class TestService2 {
 2
 3     public static void main(String[] args) {
 4         String address = "http://192.168.1.102:8787/webService_02_sayService/hellows";
 5         Endpoint publish = Endpoint.publish(address, new HelloWsImpl());
 6         EndpointImpl endImpl = (EndpointImpl) publish;
 7
 8         //添加日志入拦截器拦截器
 9         List<Interceptor<? extends Message>> inList = endImpl.getInInterceptors();
10         inList.add(new LoggingInInterceptor());
11         inList.add(new CheckUserInterceptor());
12
13         //添加日志出拦截器
14         List<Interceptor<? extends Message>> outIplm = endImpl.getOutInterceptors();
15         outIplm.add(new LoggingOutInterceptor());
16
17
18         System.out.println("发布 webService_01_cxf_sayService 成功");
19     }
20 }
 1 public class Test2 {
 2
 3     public static void main(String[] args) {
 4         HelloWsImplService factory = new HelloWsImplService();
 5         HelloWs helloWs = factory.getHelloWsImplPort();
 6
 7         Client client = ClientProxy.getClient(helloWs);
 8
 9         List<Interceptor<? extends Message>> outList = client.getOutInterceptors();
10         outList.add(new AddUserInterceptor("ymmm", "123456"));
11
12         String string = helloWs.sayHello("cxf-client3 yyy");
13         System.out.println(string);
14     }
15 }
2). 用CXF编写基于spring的web service
2.1). 编码实现
- Server端
– 创建spring的配置文件beans.xml,在其中配置SEI
 1 <?xml version="1.0" encoding="UTF-8"?>
 2 <beans xmlns="http://www.springframework.org/schema/beans"
 3        xmlns:xsi="http://www.w3.org/2001/XMLSchema-instance"
 4        xmlns:jaxws="http://cxf.apache.org/jaxws"
 5        xsi:schemaLocation="http://www.springframework.org/schema/beans
 6                            http://www.springframework.org/schema/beans/spring-beans.xsd
 7                            http://cxf.apache.org/jaxws http://cxf.apache.org/schemas/jaxws.xsd">
 8                 <!-- 如果是低版本,还要引入更多文件 -->
 9             <import resource="classpath:META-INF/cxf/cxf.xml" />
10             <!-- 配置终端 -->
11             <jaxws:endpoint
12                 id="orderWS"
13                 implementor="com.ittest.servcie_02_cxf_.ws.OrderWsImpl"
14                 address="/orderws" >
15                 <!-- 配置拦截器 -->
16                 <jaxws:inInterceptors>
17                      <bean class="com.ittest.ws.interceptor.CheckUserInterceptor"></bean>
18                  </jaxws:inInterceptors>
19
20             </jaxws:endpoint>
21 </beans>
– 在web.xml中,配置上CXF的一些核心组件
 1      <context-param>
 2         <param-name>contextConfigLocation</param-name>
 3         <param-value>classpath:applicationContext.xml</param-value>
 4     </context-param>
 5
 6     <listener>
 7         <listener-class>
 8             org.springframework.web.context.ContextLoaderListener
 9         </listener-class>
10     </listener>
11
12     <servlet>
13         <servlet-name>CXFServlet</servlet-name>
14             <servlet-class>
15                 org.apache.cxf.transport.servlet.CXFServlet
16             </servlet-class>
17         <load-on-startup>1</load-on-startup>
18     </servlet>
19
20     <servlet-mapping>
21         <servlet-name>CXFServlet</servlet-name>
22         <url-pattern>/*</url-pattern>
23     </servlet-mapping>
注意:各种cxf版本在配置xml的时候有区别( 在Cxf的高版本中要引入的其它文件较少 ).
- Client端
– 生成客户端代码
– 创建客户端的spring配置文件beans-client.xml,并配置
 1 <?xml version="1.0" encoding="UTF-8"?>
 2 <beans xmlns="http://www.springframework.org/schema/beans"
 3     xmlns:xsi="http://www.w3.org/2001/XMLSchema-instance"
 4     xmlns:jaxws="http://cxf.apache.org/jaxws"
 5     xsi:schemaLocation="http://www.springframework.org/schema/beans
 6                         http://www.springframework.org/schema/beans/spring-beans.xsd
 7                         http://cxf.apache.org/jaxws http://cxf.apache.org/schemas/jaxws.xsd">
 8
 9
10     <jaxws:client id="orderClient" serviceClass="com.ittest.servcie_02_cxf_.ws.OrderWs"
11         address="http://localhost:8080/webService_02_cxf_sayService_spring/orderws" >
12
13         <!-- 添加拦截器 -->
14         <jaxws:outInterceptors>
15                 <bean class="org.apache.cxf.interceptor.LoggingOutInterceptor"/>
16                 <bean class="com.ittest.ws.client.intercepter.AddUserInterceptor">
17                     <constructor-arg name="username" value="ymmm"/>
18                     <constructor-arg name="password" value="123456"/>
19                 </bean>
20         </jaxws:outInterceptors>
21
22     </jaxws:client>
23
24 </beans>
– 编写测试类请求web service
 1 public class Test1 {
 2
 3
 4     public static void main(String[] args) {
 5         String path = "classpath:applicationContext.xml";
 6         ClassPathXmlApplicationContext applicationContext = new ClassPathXmlApplicationContext(path);
 7
 8         OrderWs orderWs = (OrderWs) applicationContext.getBean("orderClient");
 9         Order order = orderWs.getOrder(3);
10         System.out.println(order);
11     }
12 }
2.2). 添加自定义拦截器
- Server端
– 在beans.xml中,在endpoint中配置上入拦截器 (同上)
- Client端
– 通过Client对象设置出拦截器 (同上)
4.4. 其它调用WebService的方式
1). Ajax调用webService
跨域请求问题:
1. 什么是跨域请求? (jquery还要求都是 localhost)
1. sina.com--=->baidu.com/xxx.jsp
2. localhost----à192.168.42.165
2. 解决ajax跨域请求webservice的问题?
在客户端应用中使用java编码去请求webservice, 在页面中去请求自己的后台
2). Jquery调用WebService
3). HttpURLConnection调用WebService
以上三个的代码(一起):
  1 <%@ page language="java" contentType="text/html; charset=UTF-8"
  2     pageEncoding="UTF-8"%>
  3 <!DOCTYPE html PUBLIC "-//W3C//DTD HTML 4.01 Transitional//EN" "http://www.w3.org/TR/html4/loose.dtd">
  4 <html>
  5 <head>
  6 <meta http-equiv="Content-Type" content="text/html; charset=UTF-8">
  7 <title>Insert title here</title>
  8 <script type="text/javascript" src="jquery-1.8.3.js" ></script>
  9 <script type="text/javascript">
 10
 11     $(document).ready(function(){
 12
 13         $("#btn2").click(function(){
 14             var name = document.getElementById("name").value;
 15             $.post(
 16                     "HttpURLConnectionServlet",
 17                     "name="+name,
 18                     function(msg){
 19                         var $Result = $(msg);
 20                         var value = $Result.find("return").text();
 21                         alert(value);
 22                     },
 23                     "xml"
 24             );
 25         });
 26
 27         $("#btn1").click(function(){
 28
 29             var name = document.getElementById("name").value;
 30             var date = '<soap:Envelope xmlns:soap="http://schemas.xmlsoap.org/soap/envelope/"><soap:Header><thecheck><username>ymmm</username><password>123456</password></thecheck></soap:Header><soap:Body><ns2:getOrder xmlns:ns2="http://ws.servcie_02_cxf_.ittest.com/"><arg0>3</arg0></ns2:getOrder></soap:Body></soap:Envelope>';
 31             alert(name+"  "+date);
 32             $.ajax({
 33                 type : "POST",
 34                 url : "http://localhost:8080/webService_02_cxf_sayService_spring/orderws",
 35                 data : date,
 36                 success : function(msg){
 37                     alert("------");
 38                     var $Result = $(msg);
 39                     var value = $Result.find("return").text();
 40                     alert(value);
 41                 },
 42                 error : function(msg) {
 43                     //alert("-----"+msg);
 44                 },
 45                 dataType : "xml"
 46             });
 47         });
 48     });
 49
 50
 51     function reqWebService() {
 52
 53         var name = document.getElementById("name").value;
 54         var date = '<soap:Envelope xmlns:soap="http://schemas.xmlsoap.org/soap/envelope/"><soap:Body><ns2:sayHello xmlns:ns2="http://service.ws.ittest.com/"><arg0>'
 55                 + name + '</arg0></ns2:sayHello></soap:Body></soap:Envelope>';
 56
 57         var xmlhttp = getRequest();
 58         alert("---");
 59         xmlhttp.onreadystatechange = function() {
 60             if (xmlhttp.readyState == 4 && xmlhttp.status == 200) {
 61                 alert("前");
 62                 var result = xmlhttp.responseXML;
 63                 alert("后");
 64                 var returnEle = result.getElementsByTagName("return")[0];
 65                 var vale = returnEle.firstChild.data;
 66                 alert(vale);
 67
 68             }
 69         };
 70
 71         xmlhttp.open("POST",
 72                 "http://192.168.1.102:8787/webService_02_sayService/hellows");
 73
 74         xmlhttp.setRequestHeader("Content-type",
 75                 "application/x-www-form-urlencoded");
 76
 77         xmlhttp.send(date);
 78
 79     }
 80
 81     function getRequest() {
 82         var xmlhttp = null;
 83         if (window.XMLHttpRequest) {// code for IE7+, Firefox, Chrome, Opera, Safari
 84             xmlhttp = new XMLHttpRequest();
 85         } else {// code for IE6, IE5
 86             xmlhttp = new ActiveXObject("Microsoft.XMLHTTP");
 87         }
 88         return xmlhttp;
 89     }
 90 </script>
 91
 92
 93 </head>
 94 <body>
 95     用户名:
 96     <input type="text" id="name" name="username" />
 97     <br />
 98     <div>
 99     <button onclick="reqWebService()">使用Ajax连接 webservice</button></div>
100     <button id="btn1">使用JQuery链接webService</button>
101     <button id="btn2">使用Connection链接webService</button>
102
103 </body>
104 </html>
 1 package com.ittest.servcie_02_cxf_.web;
 2
 3 import java.io.IOException;
 4 import java.io.InputStream;
 5 import java.io.OutputStream;
 6 import java.net.HttpURLConnection;
 7 import java.net.URL;
 8 import java.net.URLConnection;
 9
10 import javax.servlet.ServletException;
11 import javax.servlet.ServletOutputStream;
12 import javax.servlet.annotation.WebServlet;
13 import javax.servlet.http.HttpServlet;
14 import javax.servlet.http.HttpServletRequest;
15 import javax.servlet.http.HttpServletResponse;
16
17 import org.apache.jasper.tagplugins.jstl.core.Url;
18
19 import com.sun.jndi.toolkit.url.Uri;
20
21 /**
22  * Servlet implementation class HttpURLConnectionServlet
23  */
24 @WebServlet("/HttpURLConnectionServlet")
25 public class HttpURLConnectionServlet extends HttpServlet {
26     private static final long serialVersionUID = 1L;
27
28     /**
29      * 跨域请求webService
30      */
31     protected void doPost(HttpServletRequest request, HttpServletResponse response) throws ServletException, IOException {
32         String name = request.getParameter("name");
33
34         String path = "http://192.168.1.102:8787/webService_02_sayService/hellows";
35         String data = "<soap:Envelope xmlns:soap='http://schemas.xmlsoap.org/soap/envelope/'><soap:Body><ns2:sayHello xmlns:ns2='http://service.ws.ittest.com/'><arg0>"
36                 + name + "</arg0></ns2:sayHello></soap:Body></soap:Envelope>";
37
38         URL url = new URL(path);
39         HttpURLConnection connection = (HttpURLConnection) url.openConnection();
40         connection.setRequestMethod("POST");
41         connection.setDoOutput(true);
42         connection.setDoInput(true);
43         connection.setRequestProperty("Content-Type", "text/xml;charset=utf-8");
44
45         OutputStream os = connection.getOutputStream();
46         os.write(data.getBytes("utf-8"));
47         os.flush();
48
49         int code = connection.getResponseCode();
50         if(code==200){
51             InputStream is = connection.getInputStream();
52
53             response.setContentType("text/xml;charset=utf-8");
54             ServletOutputStream outputStream = response.getOutputStream();
55
56             int len=0;
57             byte[] buff = new byte[1024];
58
59             while((len = is.read(buff))>0){
60                 outputStream.write(buff,0,len);
61             }
62
63             outputStream.flush();
64             outputStream.close();
65         }
66     }
67 }
4.5. 通过注解修改wsdl文档
1). JDK中的相关注解
1.1). @WebService
|
l 作用在具体类上。而不是接口。 l 一个类只有添加了此注解才可以通过Endpoint发布为一个web服务。 l 一个添加了此注解的类,必须要至少包含一个实例方法。静态方法和final方法不能被发布为服务方法。 l WebService注解包含以下参数: |

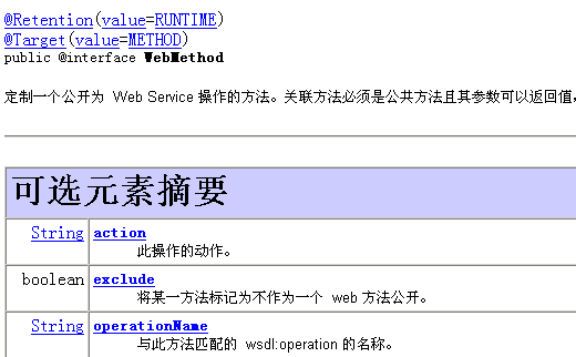
1.2). @WebMethod
|
l 此注解用在方法上,用于修改对外暴露的方法。 |
1.3). @WebResult
|
用于定制返回值到WSDL的映射 |

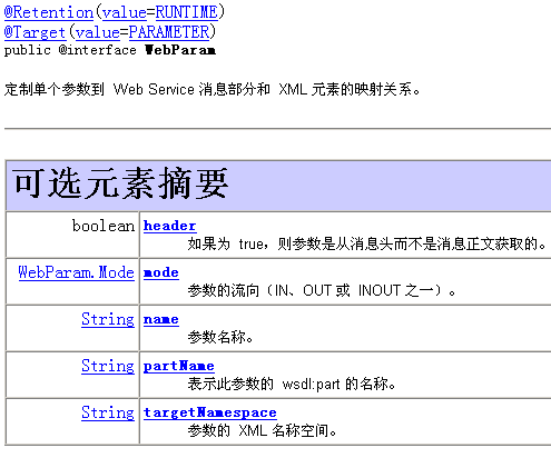
1.4). @WebParam
|
用于定义WSDL中的参数映射 |
1.5). @XmlElement
|
用于定义实体类的属性到WSDL中的映射(get/set方法上) |

2). 说明
|
即使是没有修改源代码,只修改了注解,客户端的代码也必须要重新生成, 否则调用将会失败。 |