引用:http://www.jb51.net/article/32321.htm
用过新版本android 360手机助手都人都对 360中只在桌面显示一个小小悬浮窗口羡慕不已吧?
其实实现这种功能,主要有两步:
1.判断当前显示的是为桌面。这个内容我在前面的帖子里面已经有过介绍,如果还没看过的赶快稳步看一下哦。
2.使用windowManager往最顶层添加一个View
.这个知识点就是为本文主要讲解的内容哦。在本文的讲解中,我们还会讲到下面的知识点:
a.如果获取到状态栏的高度
b.悬浮窗口的拖动
c.悬浮窗口的点击事件
有开始之前,我们先来看一下效果图: 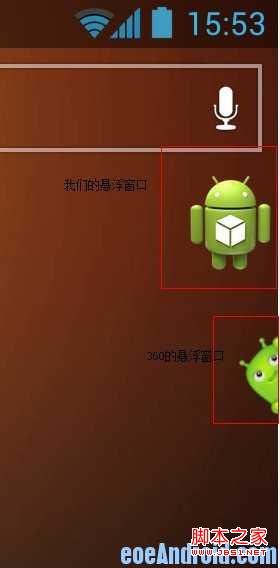
接下来我们来看看FloatView的代码:
public class FloatView extends ImageView{
private float mTouchX;
private float mTouchY;
private float x;
private float y;
private float mStartX;
private float mStartY;
private OnClickListener mClickListener;
private WindowManager windowManager = (WindowManager) getContext()
.getApplicationContext().getSystemService(Context.WINDOW_SERVICE);
// 此windowManagerParams变量为获取的全局变量,用以保存悬浮窗口的属性
private WindowManager.LayoutParams windowManagerParams = ((FloatApplication) getContext()
.getApplicationContext()).getWindowParams();
public FloatView(Context context) {
super(context);
}
@Override
public boolean onTouchEvent(MotionEvent event) {
//获取到状态栏的高度
Rect frame = new Rect();
getWindowVisibleDisplayFrame(frame);
int statusBarHeight = frame.top;
System.out.println("statusBarHeight:"+statusBarHeight);
// 获取相对屏幕的坐标,即以屏幕左上角为原点
x = event.getRawX();
y = event.getRawY() - statusBarHeight; // statusBarHeight是系统状态栏的高度
Log.i("tag", "currX" + x + "====currY" + y);
switch (event.getAction()) {
case MotionEvent.ACTION_DOWN: // 捕获手指触摸按下动作
// 获取相对View的坐标,即以此View左上角为原点
mTouchX = event.getX();
mTouchY = event.getY();
mStartX = x;
mStartY = y;
Log.i("tag", "startX" + mTouchX + "====startY"
+ mTouchY);
break;
case MotionEvent.ACTION_MOVE: // 捕获手指触摸移动动作
updateViewPosition();
break;
case MotionEvent.ACTION_UP: // 捕获手指触摸离开动作
updateViewPosition();
mTouchX = mTouchY = 0;
if ((x - mStartX) < 5 && (y - mStartY) < 5) {
if(mClickListener!=null) {
mClickListener.onClick(this);
}
}
break;
}
return true;
}
@Override
public void setOnClickListener(OnClickListener l) {
this.mClickListener = l;
}
private void updateViewPosition() {
// 更新浮动窗口位置参数
windowManagerParams.x = (int) (x - mTouchX);
windowManagerParams.y = (int) (y - mTouchY);
windowManager.updateViewLayout(this, windowManagerParams); // 刷新显示
}
}
代码解释:
int statusBarHeight = frame.top;
为获取状态栏的高度,为什么在event.getRawY()的时候减去状态栏的高度呢?
因为我们的悬浮窗口不可能显示到状态栏中去,而后getRawY为获取到屏幕原点的距离。当我们屏幕处于全屏模式时,获取到的状态栏高度会变成0
(x - mStartX) < 5 && (y - mStartY) < 5
如果我们在触摸过程中,移动距离少于5 ,则视为点击,触发点击的回调。
另外我们需要自定义一个application:
public class FloatApplication extends Application {
private WindowManager.LayoutParams windowParams = new WindowManager.LayoutParams();
public WindowManager.LayoutParams getWindowParams() {
return windowParams;
}
}
代码解释:
自定义application的目的是为了保存windowParams的值 ,因为我们在拖动悬浮窗口的时候,如果每次都重新new一个layoutParams的话,在update
的时候会在异常发现。
windowParams的值也不一定非得在自定义application里面来保存,只要是全局的都行。
最后我们再来看看Activity中的实现。
public class MainActivity extends Activity implements OnClickListener{
private WindowManager windowManager = null;
private WindowManager.LayoutParams windowManagerParams = null;
private FloatView floatView = null;
@Override
public void onCreate(Bundle savedInstanceState) {
super.onCreate(savedInstanceState);
requestWindowFeature(Window.FEATURE_NO_TITLE);//取消标题栏
getWindow().setFlags(WindowManager.LayoutParams. FLAG_FULLSCREEN ,
WindowManager.LayoutParams. FLAG_FULLSCREEN);//全屏
setContentView(R.layout.activity_main);
createView();
}
@Override
public boolean onCreateOptionsMenu(Menu menu) {
getMenuInflater().inflate(R.menu.activity_main, menu);
return true;
}
public void onDestroy() {
super.onDestroy();
// 在程序退出(Activity销毁)时销毁悬浮窗口
windowManager.removeView(floatView);
}
private void createView() {
floatView = new FloatView(getApplicationContext());
floatView.setOnClickListener(this);
floatView.setImageResource(R.drawable.ic_launcher); // 这里简单的用自带的icon来做演示
// 获取WindowManager
windowManager = (WindowManager) getApplicationContext().getSystemService(Context.WINDOW_SERVICE);
// 设置LayoutParams(全局变量)相关参数
windowManagerParams = ((FloatApplication) getApplication()).getWindowParams();
windowManagerParams.type = LayoutParams.TYPE_PHONE; // 设置window type
windowManagerParams.format = PixelFormat.RGBA_8888; // 设置图片格式,效果为背景透明
// 设置Window flag
windowManagerParams.flags = LayoutParams.FLAG_NOT_TOUCH_MODAL
| LayoutParams.FLAG_NOT_FOCUSABLE;
/*
* 注意,flag的值可以为:
* LayoutParams.FLAG_NOT_TOUCH_MODAL 不影响后面的事件
* LayoutParams.FLAG_NOT_FOCUSABLE 不可聚焦
* LayoutParams.FLAG_NOT_TOUCHABLE 不可触摸
*/
// 调整悬浮窗口至左上角,便于调整坐标
windowManagerParams.gravity = Gravity.LEFT | Gravity.TOP;
// 以屏幕左上角为原点,设置x、y初始值
windowManagerParams.x = 0;
windowManagerParams.y = 0;
// 设置悬浮窗口长宽数据
windowManagerParams.width = LayoutParams.WRAP_CONTENT;
windowManagerParams.height = LayoutParams.WRAP_CONTENT;
// 显示myFloatView图像
windowManager.addView(floatView, windowManagerParams);
}
public void onClick(View v) {
Toast.makeText(this, "Clicked", Toast.LENGTH_SHORT).show();
}
}
代码解释:
在activity中我们主要是添加悬浮窗,并且设置他的位置。另外需要注意flags的应用:
LayoutParams.FLAG_NOT_TOUCH_MODAL 不影响后面的事件
LayoutParams.FLAG_NOT_FOCUSABLE 不可聚焦
LayoutParams.FLAG_NOT_TOUCHABLE 不可触摸
最后我们在onDestroy()中移除到悬浮窗口。所以,我们测试的时候,记得按Home键来切换到桌面。
最后千万记得,在androidManifest.xml中来申明我们需要用到的android.permission.SYSTEM_ALERT_WINDOW权限
并且记得申明我们自定义的application哦。
AndroidManifest.xml代码如下:
<manifest xmlns:android="http://schemas.android.com/apk/res/android"
package="com.krislq.floating"
android:versionCode="1"
android:versionName="1.0" >
<uses-sdk
android:minSdkVersion="8"
android:targetSdkVersion="15" />
<uses-permission android:name="android.permission.SYSTEM_ALERT_WINDOW" />
<application
android:icon="@drawable/ic_launcher"
android:label="@string/app_name"
android:theme="@style/AppTheme" android:name="FloatApplication">
<activity
android:name=".MainActivity"
android:label="@string/title_activity_main" >
<intent-filter>
<action android:name="android.intent.action.MAIN" />
<category android:name="android.intent.category.LAUNCHER" />
</intent-filter>
</activity>
</application>
</manifest>