六,配置VIP漂移
| 主机名 | IP地址(NAT) | 漂移VIP | 描述 |
|---|---|---|---|
| mysql-db01 | eth0:192.168.0.51 | VIP:192.168.0.60 | 系统:CentOS6.5(6.x都可以) 安装:mysql5.6 |
| mysql-db02 | eth0:192.168.0.52 | VIP:192.168.0.60 | 系统:CentOS6.5(6.x都可以) 安装:mysql5.6 |
| mysql-db03 | eth0:192.168.0.53 | VIP:192.168.0.60 | 系统:CentOS6.5(6.x都可以) 安装:mysql5.6 |
6.1 IP漂移的两种方式
- 通过keepalived的方式,管理虚拟IP的漂移
- 通过MHA自带脚本方式,管理虚拟IP的漂移
6.2 MHA脚本管理方式
(1)获取管理脚本master_ip_failover
提示:yum安装的manager是没有这个脚本的。
我们需要从manager的源码包里复制一个。
[root@mysql-db03 ~]# ll mha4mysql-manager-0.56.tar.gz
-rw-r--r--. 1 root root 113914 Sep  4 18:43 mha4mysql-manager-0.56.tar.gz
[root@mysql-db03 ~]# tar xf mha4mysql-manager-0.56.tar.gz
[root@mysql-db03 ~]# cd mha4mysql-manager-0.56
[root@mysql-db03 mha4mysql-manager-0.56]# cd samples/scripts/
[root@mysql-db03 scripts]# ll
total 32
-rwxr-xr-x. 1 4984 users  3648 Mar 31  2014 master_ip_failover  #这就是管理虚拟IP的脚本
-rwxr-xr-x. 1 4984 users  9870 Mar 31  2014 master_ip_online_change
-rwxr-xr-x. 1 4984 users 11867 Mar 31  2014 power_manager
-rwxr-xr-x. 1 4984 users  1360 Mar 31  2014 send_report
[root@mysql-db03 scripts]# cp master_ip_failover /usr/local/bin/    #复制到/usr/local/bin目录下
[root@mysql-db03 scripts]# which master_ip_failover
/usr/local/bin/master_ip_failover
(2)修改mha配置文件
 [root@mysql-db03 scripts]# vim /etc/mha/mha1.cnf
[root@mysql-db03 scripts]# cat /etc/mha/mha1.cnf
[server default]
manager_log=/var/log/mha/mha1/manager
manager_workdir=/var/log/mha/mha1
master_binlog_dir=/usr/local/mysql/data
master_ip_failover_script=/usr/local/bin/master_ip_failover     #添加脚本位置
password=123123
ping_interval=2
repl_password=123123
repl_user=rep
ssh_user=root
user=mha

#candidate_master=1         #留着备用的注释项
#check_repl_delay=0         #留着备用的注释项

[server1]
hostname=192.168.0.51
port=3306

[server2]
hostname=192.168.0.52
port=3306

[server3]
hostname=192.168.0.53
port=3306
(3)修改源程序自带VIP漂移脚本
#在下边的脚本里添加如下4行代码:
[root@mysql-db03 scripts]# sed -n '34,37p' /usr/local/bin/master_ip_failover
my $vip = '192.168.0.60/24';        #定义VIP
my $key = '0';                      #定义网卡后缀数值,如果eth0就是0,eth1就是1
my $ssh_start_vip = "/sbin/ifconfig eth0:$key $vip";    #绑定VIP的命令
my $ssh_stop_vip = "/sbin/ifconfig eth0:$key down";     #关闭VIP的命令
特别提示:
由于自带的模板脚本特别的坑,需要修改的地方太多,因此,同学们可以直接拷贝脚本文件放到/usr/local/bin目录下,并赋予x权限。
修改后的master_ip_failover脚本的内容如下:
[root@mysql-db03 ~]# cat /usr/local/bin/master_ip_failover
#!/usr/bin/env perl


use strict;
use warnings FATAL => 'all';

use Getopt::Long;

my (
  $command,        $ssh_user,         $orig_master_host,
  $orig_master_ip, $orig_master_port, $new_master_host,
  $new_master_ip,  $new_master_port
);

my $vip = '192.168.0.60/24';
my $key = '0';
my $ssh_start_vip = "/sbin/ifconfig eth0:$key $vip";
my $ssh_stop_vip = "/sbin/ifconfig eth0:$key down";

GetOptions(
  'command=s'             => $command,
  'ssh_user=s'            => $ssh_user,
  'orig_master_host=s'    => $orig_master_host,
  'orig_master_ip=s'      => $orig_master_ip,
  'orig_master_port=i'    => $orig_master_port,
  'new_master_host=s'     => $new_master_host,
  'new_master_ip=s'       => $new_master_ip,
  'new_master_port=i'     => $new_master_port,
);

exit &main();

sub main {
    if ( $command eq "stop" || $command eq "stopssh" ) {
            my $exit_code = 1;
        eval {
            print "Disabling the VIP on old master:$orig_master_host
";
            &stop_vip();
            $exit_code = 0;
        };
        if ($@) {
            warn "Got Error: $@
";
            exit $exit_code;
        }
        exit $exit_code;
    }
    elsif ( $command eq "start" ) {
            my $exit_code = 10;
        eval {
            print "Enabling the VIP - $vip on the new master - $new_master_host
";
            &start_vip();
            $exit_code = 0;
        };
        if ($@) {
            warn $@;
            exit $exit_code;
        }
        exit $exit_code;
    }
    elsif ( $command eq "status" ) {
            print "Checking the Status of the script..OK
";
            `ssh $ssh_user@$orig_master_host " $ssh_start_vip "`;
            exit 0;
    }
    else {
            &usage();
            exit 1;
    }
    }

sub start_vip() {
    `ssh $ssh_user@$new_master_host " $ssh_start_vip "`;
}

sub stop_vip() {
    `ssh $ssh_user@$orig_master_host " $ssh_stop_vip "`;
}

sub usage {
  print
"Usage: master_ip_failover --command=start|stop|stopssh|status --orig_master_host=host --orig_master_ip=ip --orig_master_port=port --new_master_host=host --new_master_ip=ip --new_master_port=port
";
}
(4)重启动mha管理端
[root@mysql-db03 ~]# ps -ef | grep mha | grep -v grep       #查看mha进程
root      14138  13211  0 19:22 pts/3    00:00:00 perl /usr/bin/masterha_manager --conf=/etc/mha/mha1.cnf --remove_dead_master_conf --ignore_last_failover
[root@mysql-db03 ~]# pkill perl         #杀掉perl进程
[1]+  Exit 1                  nohup masterha_manager --conf=/etc/mha/mha1.cnf --remove_dead_master_conf --ignore_last_failover < /dev/null > /var/log/mha/mha1/manager.log 2>&1
[root@mysql-db03 ~]# ps -ef | grep mha | grep -v grep       #查看mha进程
[root@mysql-db03 ~]# nohup masterha_manager --conf=/etc/mha/mha1.cnf --remove_dead_master_conf --ignore_last_failover < /dev/null >      #启动mha进程 /var/log/mha/mha1/manager.log 2>&1 &
提示:
如果启动mha进程失败,需要进行mha的连接检测masterha_check_ssh --conf=/etc/mha/mha1.cnfssh连接检测masterha_check_repl --conf=/etc/mha/mha1.cnf主从复制检测
6.3 VIP漂移脚本验证测试。
架构初始状态:
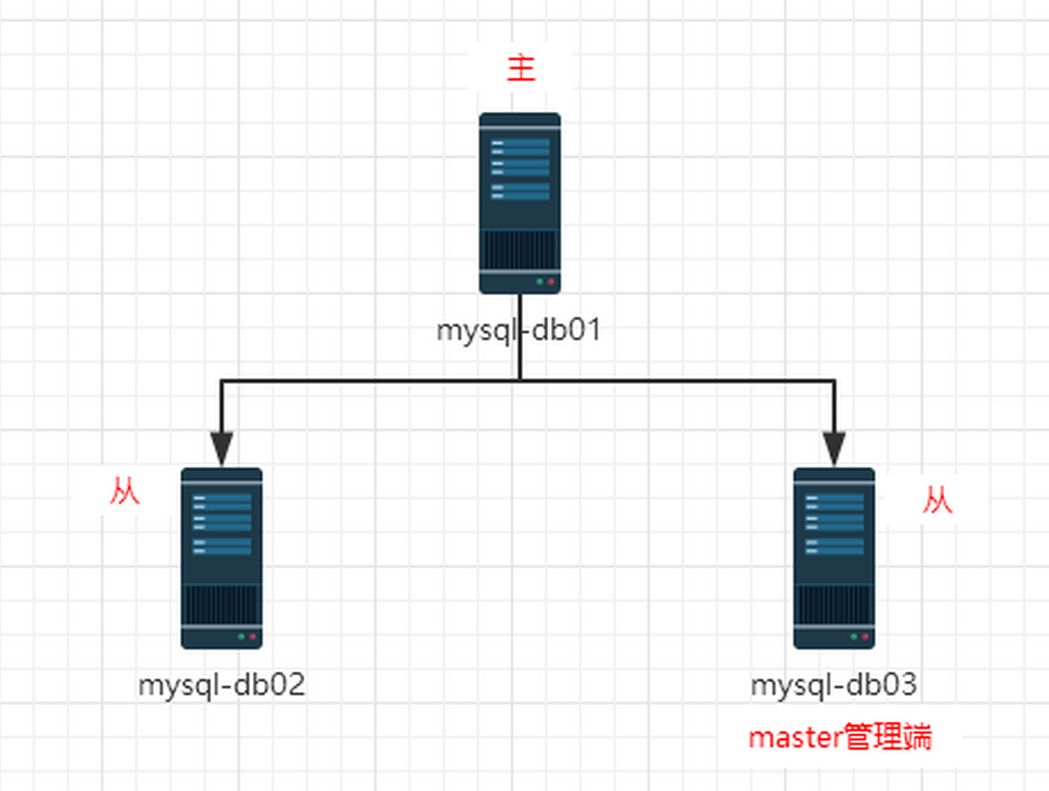
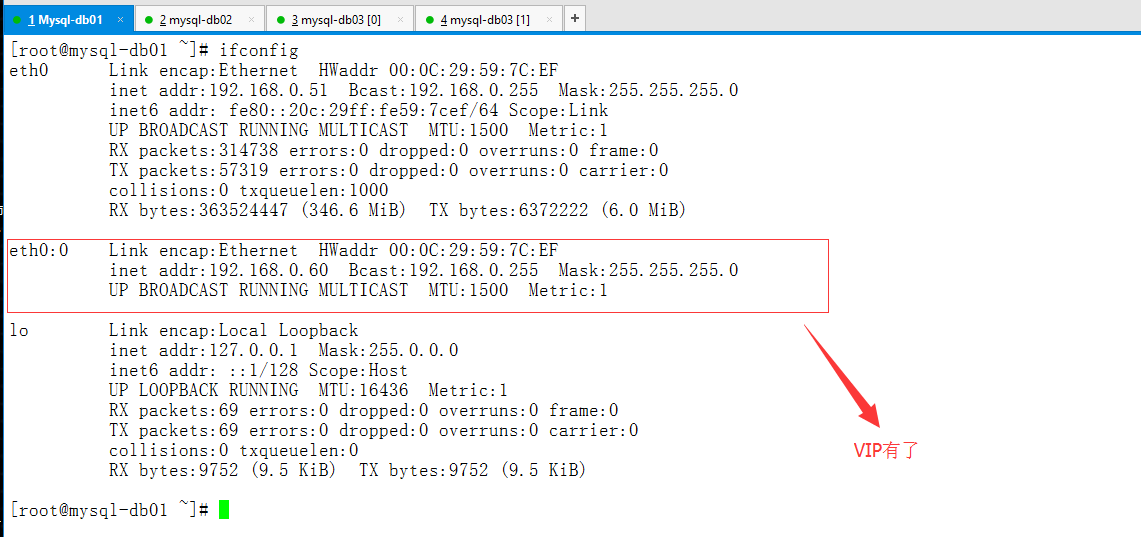
(1)查看mysql-db01网络状态
(2)停掉mysql-db01的MySQL数据库服务
[root@mysql-db01 ~]# /etc/init.d/mysqld stop
Shutting down MySQL..... SUCCESS!
[root@mysql-db01 ~]# ifconfig                   #VIP消失了
eth0      Link encap:Ethernet  HWaddr 00:0C:29:59:7C:EF
          inet addr:192.168.0.51  Bcast:192.168.0.255  Mask:255.255.255.0
          inet6 addr: fe80::20c:29ff:fe59:7cef/64 Scope:Link
          UP BROADCAST RUNNING MULTICAST  MTU:1500  Metric:1
          RX packets:316130 errors:0 dropped:0 overruns:0 frame:0
          TX packets:58058 errors:0 dropped:0 overruns:0 carrier:0
          collisions:0 txqueuelen:1000
          RX bytes:363635227 (346.7 MiB)  TX bytes:6462008 (6.1 MiB)

lo        Link encap:Local Loopback
          inet addr:127.0.0.1  Mask:255.0.0.0
          inet6 addr: ::1/128 Scope:Host
          UP LOOPBACK RUNNING  MTU:16436  Metric:1
          RX packets:69 errors:0 dropped:0 overruns:0 frame:0
          TX packets:69 errors:0 dropped:0 overruns:0 carrier:0
          collisions:0 txqueuelen:0
          RX bytes:9752 (9.5 KiB)  TX bytes:9752 (9.5 KiB)
(3)查看mysql-db02
[root@mysql-db02 ~]# ifconfig           #VIP出现了
eth0      Link encap:Ethernet  HWaddr 00:0C:29:4C:D5:92
          inet addr:192.168.0.52  Bcast:192.168.0.255  Mask:255.255.255.0
          inet6 addr: fe80::20c:29ff:fe4c:d592/64 Scope:Link
          UP BROADCAST RUNNING MULTICAST  MTU:1500  Metric:1
          RX packets:287225 errors:0 dropped:0 overruns:0 frame:0
          TX packets:47133 errors:0 dropped:0 overruns:0 carrier:0
          collisions:0 txqueuelen:1000
          RX bytes:361247254 (344.5 MiB)  TX bytes:5159560 (4.9 MiB)

eth0:0    Link encap:Ethernet  HWaddr 00:0C:29:4C:D5:92
          inet addr:192.168.0.60  Bcast:192.168.0.255  Mask:255.255.255.0
          UP BROADCAST RUNNING MULTICAST  MTU:1500  Metric:1

lo        Link encap:Local Loopback
          inet addr:127.0.0.1  Mask:255.0.0.0
          inet6 addr: ::1/128 Scope:Host
          UP LOOPBACK RUNNING  MTU:16436  Metric:1
          RX packets:45 errors:0 dropped:0 overruns:0 frame:0
          TX packets:45 errors:0 dropped:0 overruns:0 carrier:0
          collisions:0 txqueuelen:0
          RX bytes:7718 (7.5 KiB)  TX bytes:7718 (7.5 KiB)
(4)查看mysql-db03的主从同步情况
[root@mysql-db03 ~]# mysql -uroot -p123123 -e 'show slave statusG'
Warning: Using a password on the command line interface can be insecure.
*************************** 1. row ***************************
               Slave_IO_State: Waiting for master to send event
                  Master_Host: 192.168.0.52     #mysql-db03的主库已经切换为mysql-db02
                  Master_User: rep
                  Master_Port: 3306
                Connect_Retry: 60
              Master_Log_File: mysql-bin.000008
          Read_Master_Log_Pos: 271
               Relay_Log_File: mysql-db03-relay-bin.000002
                Relay_Log_Pos: 361
        Relay_Master_Log_File: mysql-bin.000008
             Slave_IO_Running: Yes
            Slave_SQL_Running: Yes
(5)mysql-db01故障恢复
[root@mysql-db01 ~]# /etc/init.d/mysqld start
Starting MySQL. SUCCESS!
[root@mysql-db01 ~]# mysql -uroot -p123123
mysql> CHANGE MASTER TO MASTER_HOST='192.168.0.52', MASTER_PORT=3306, MASTER_AUTO_POSITION=1, MASTER_USER='rep', MASTER_PASSWORD='123123';
Query OK, 0 rows affected, 2 warnings (0.02 sec)

mysql> start slave;
Query OK, 0 rows affected, 1 warning (0.01 sec)

mysql> show slave statusG
*************************** 1. row ***************************
               Slave_IO_State: Waiting for master to send event
                  Master_Host: 192.168.0.52
                  Master_User: rep
                  Master_Port: 3306
                Connect_Retry: 60
              Master_Log_File: mysql-bin.000008
          Read_Master_Log_Pos: 271
               Relay_Log_File: mysql-db01-relay-bin.000002
                Relay_Log_Pos: 361
        Relay_Master_Log_File: mysql-bin.000008
             Slave_IO_Running: Yes
            Slave_SQL_Running: Yes
(6)补上缺失的mha配置文件
[root@mysql-db03 ~]# vim /etc/mha/mha1.cnf
[root@mysql-db03 ~]# cat /etc/mha/mha1.cnf
[server default]
manager_log=/var/log/mha/mha1/manager
manager_workdir=/var/log/mha/mha1
master_binlog_dir=/usr/local/mysql/data
master_ip_failover_script=/usr/local/bin/master_ip_failover
password=123123
ping_interval=2
repl_password=123123
repl_user=rep
ssh_user=root
user=mha

[server1]
hostname=192.168.0.51
port=3306

[server2]
hostname=192.168.0.52
port=3306

[server3]
hostname=192.168.0.53
port=3306
(7)启动mha管理进程
[root@mysql-db03 ~]# ps -ef | grep mha | grep -v grep
[root@mysql-db03 ~]# nohup masterha_manager --conf=/etc/mha/mha1.cnf --remove_dead_master_conf --ignore_last_failover < /dev/null > /var/log/mha/mha1/manager.log 2>&1 &
[1] 14921
[root@mysql-db03 ~]# ps -ef | grep mha | grep -v grep
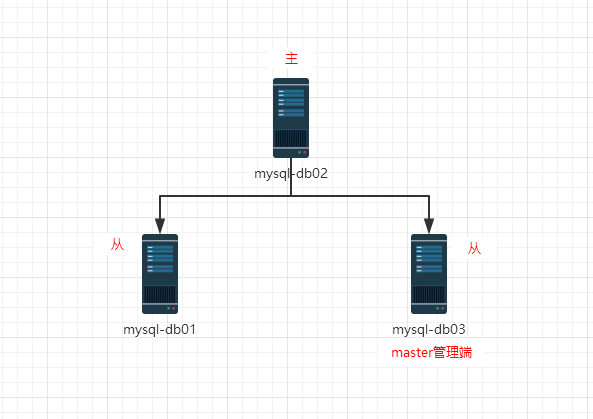
root 14921 13211 3 20:11 pts/3 00:00:00 perl /usr/bin/masterha_manager --conf=/etc/mha/mha1.cnf --remove_dead_master_conf --ignore_last_failover此时的架构状态
七,配置binlog-server备份服务器
主库宕机,也许会造成主库binlog复制不及时而导致数据丢失的情况出现,因此配置binlog-server进行时时同步备份,是必要的一种安全手段。
7.1 修改mha配置文件
[root@mysql-db03 ~]# cat /etc/mha/mha1.cnf
[server default]
manager_log=/var/log/mha/mha1/manager
manager_workdir=/var/log/mha/mha1
master_binlog_dir=/usr/local/mysql/data     #全局的binlog存放位置
master_ip_failover_script=/usr/local/bin/master_ip_failover
password=123123
ping_interval=2
repl_password=123123
repl_user=rep
ssh_user=root
user=mha

[server1]
hostname=192.168.0.51
port=3306

[server2]
hostname=192.168.0.52
port=3306

[server3]
hostname=192.168.0.53
port=3306

[binlog1]           #添加binlog模块
no_master=1         #不允许切换为主
hostname=192.168.0.53       #存放IP
master_binlog_dir=/data/mysql/binlog/       #binlog存放位置优先级比全局的高
7.2 拉取主库上的binlog日志到mysql-db03的存放目录里
[root@mysql-db03 ~]# mkdir -p /data/mysql/binlog    #创建存放目录
[root@mysql-db03 ~]# cd /data/mysql/binlog/ #进入存放目录
[root@mysql-db03 binlog]# ll
total 0
[root@mysql-db03 binlog]# which mysqlbinlog
/usr/local/bin/mysqlbinlog
[root@mysql-db03 binlog]# mysqlbinlog -R --host=192.168.0.52 --user=mha --password=123123 --raw --stop-never mysql-bin.000001 &     #拉取主库binlog
[2] 15694
[root@mysql-db03 binlog]# Warning: Using a password on the command line interface can be insecure.

[root@mysql-db03 binlog]# ll
total 32
-rw-r--r--. 1 root root  143 Sep  5 20:53 mysql-bin.000001
-rw-r--r--. 1 root root  143 Sep  5 20:53 mysql-bin.000002
-rw-r--r--. 1 root root  331 Sep  5 20:53 mysql-bin.000003
-rw-r--r--. 1 root root 3114 Sep  5 20:53 mysql-bin.000004
-rw-r--r--. 1 root root  254 Sep  5 20:53 mysql-bin.000005
-rw-r--r--. 1 root root  800 Sep  5 20:53 mysql-bin.000006
-rw-r--r--. 1 root root 2714 Sep  5 20:53 mysql-bin.000007
-rw-r--r--. 1 root root  120 Sep  5 20:53 mysql-bin.000008
[root@mysql-db03 binlog]# ps -ef | grep mysqlbinlog | grep -v grep
root      16061  12786  0 20:53 pts/2    00:00:00 mysqlbinlog -R --host=192.168.0.52 --user=mha --password=x xxxx --raw --stop-never mysql-bin.000001
7.3 启动mha管理进程
[root@mysql-db03 binlog]# nohup masterha_manager --conf=/etc/mha/mha1.cnf --remove_dead_master_conf --ignore_last_failover < /dev/null > /var/log/mha/mha1/manager.log 2>&1 &
[root@mysql-db03 binlog]# ps -ef | grep perl | grep -v grep
root      15697  13211  0 20:42 pts/3    00:00:00 perl /usr/bin/masterha_manager --conf=/etc/mha/mha1.cnf --remove_dead_master_conf --ignore_last_failover
八,mysql中间件Atlas
8.1 Atlas简介
Atlas是由Qihoo-360公司web平台部基础架构团队开发维护的一个基于MySQL协议的数据中间层项目。它在MySQL官方推出的MySQL-Proxy-0.8.2版本的基础上,修改了大量bug,添加了很多功能特性。它在MySQL官方推出的MySQL-Proxy0.8.2版本的基础上,修改了大量bug,添加了很多功能特性。
8.2 Atlas主要功能
- 读写分离
- 从库负载均衡
- IP过滤
- 自动分表
- DBA可平滑上下线DB
- 自动摘除宕机的DB
8.3 Atlas相对于官方MySQL-Proxy的优势
- 将主流程中所有Lua代码用C重写,Lua仅用于管理接口。
- 重写网络模型,线程模型
- 实现了真正意义上的连接池
- 优化了锁机制,性能提高数十倍
8.4 安装Atlas
同学么比较有福气,安装Atlas超级简单,官方提供的Atlas有两种:
(普通):Atlas-2.2.1.el6.x86_64.rpm
(分表):Atlas-sharding_1.0.1-el6.x86_64.rpm
这里我们只需要下载普通的即可
[root@mysql-db03 rpm]# rpm -ivh Atlas-2.2.1.el6.x86_64.rpm
Preparing...                ########################################### [100%]
    package Atlas-2.2.1-1.x86_64 is already installed
8.5 配置Atlas
当我们用vim打开/usr/local/mysql-proxy/conf时,我们惊喜的发现。。。这个配置文件完全都根本不用讲。。。简直太简单了。好了课程到此结束,同学们自行阅读。
(1)配置文件里需要做如下修改:
#需要修改的内容一览:
[root@mysql-db03 ~]# cat -n /usr/local/mysql-proxy/conf/test.cnf.bak | egrep -w "12|15|18|30|36|48"
    12  proxy-backend-addresses = 127.0.0.1:3306
    15  #proxy-read-only-backend-addresses = 127.0.0.1:3305@1
    18  pwds = user1:+jKsgB3YAG8=, user2:GS+tr4TPgqc=
    30  log-level = message
    36  #sql-log = OFF
    45  proxy-address = 0.0.0.0:1234
    48  admin-address = 0.0.0.0:2345

#将上边内容修改为如下配置:
[root@mysql-db03 ~]# cat -n /usr/local/mysql-proxy/conf/test.cnf | egrep -w "12|15|18|30|36|48"
    12  proxy-backend-addresses = 192.168.0.60:3307     #这里添加VIP地址
    15  proxy-read-only-backend-addresses = 192.168.0.51:3307@1,192.168.0.53:3307@1 #从库地址
    18  pwds = root:++gAN07C/Q0=,mha:++gAN07C/Q0=   #MySQL授权用户账号密码(密码要加密)
    30  log-level = error                   #日志级别
    36  sql-log = ON                        #打开日志
    45  proxy-address = 192.168.0.53:3306        #Atlas的工作监听端口(提供代理服务)
    48  admin-address = 192.168.0.53:1234        #Atlas的管理监听端口


> 提示:
> 主从复制的主从数据库的默认3306端口需要修改成3307
> 第18行为登陆MySQL的授权账号信息,其中密码需要加密(通过/usr/local/mysql-proxy/bin/encrypt加密工具来加密)
(2)修改每个数据库的服务端口为3307
 #先杀掉mha管理进程
 [root@mysql-db03 conf]# ps -ef | grep mha | grep -v grep
root      15697      1  0 Sep05 ?        00:00:09 perl /usr/bin/masterha_manager --conf=/etc/mha/mha1.cnf --remove_dead_master_conf --ignore_last_failover
[root@mysql-db03 conf]# kill -9 15697
[root@mysql-db03 conf]# ps -ef | grep mha | grep -v grep

#修改mysql-db01,mysql-db02,mysql-db03上的MySQL服务端口为3307
[root@mysql-db03 conf]# sed -n '13p' /etc/my.cnf
port            = 3307
[root@mysql-db02 conf]# sed -n '13p' /etc/my.cnf
port            = 3307
[root@mysql-db01 conf]# sed -n '13p' /etc/my.cnf
port            = 3307
(3)重启每个数据库的服务
过程略
(4)将从库mysql-db01和mysql-db03指向主库mysql-db02进行同步
#mysql-db01和mysql-db03的操作步骤相同

mysql> stop slave;              #停止从同步
Query OK, 0 rows affected (0.00 sec)

mysql> CHANGE MASTER TO MASTER_HOST='192.168.0.52', MASTER_PORT=3307, MASTER_AUTO_POSITION=1, MASTER_USER='rep', MASTER_PASSWORD='123123';            #授权同步信息
Query OK, 0 rows affected, 2 warnings (0.01 sec)

mysql> start slave;                 #开始同步
ERROR 1064 (42000): You have an error in your SQL syntax; check the manual that corresponds to your MySQL server version for the right syntax to use near 'slavee' at line 1
mysql> start slave;
Query OK, 0 rows affected, 1 warning (0.02 sec)

mysql> show slave statusG
*************************** 1. row ***************************
               Slave_IO_State: Waiting for master to send event
                  Master_Host: 192.168.0.52
                  Master_User: rep
                  Master_Port: 3307
                Connect_Retry: 60
              Master_Log_File: mysql-bin.000010
          Read_Master_Log_Pos: 271
               Relay_Log_File: mysql-db01-relay-bin.000002
                Relay_Log_Pos: 361
        Relay_Master_Log_File: mysql-bin.000010
             Slave_IO_Running: Yes              #同步成功
            Slave_SQL_Running: Yes              #同步成功
              Replicate_Do_DB:
(5)修改mha配置文件
[server default]
manager_log=/var/log/mha/mha1/manager
manager_workdir=/var/log/mha/mha1
master_binlog_dir=/usr/local/mysql/data
master_ip_failover_script=/usr/local/bin/master_ip_failover
password=123123
ping_interval=2
repl_password=123123
repl_user=rep
ssh_user=root
user=mha

[server1]
hostname=192.168.0.51
port=3307                   #修改端口号

[server2]
hostname=192.168.0.52
port=3307                   #修改端口号

[server3]
hostname=192.168.0.53
port=3307                   #修改端口号

[binlog1]
no_master=1
hostname=192.168.0.53
master_binlog_dir=/data/mysql/binlog/
(6)启动mysqlbinlog日志备份的进程
[root@mysql-db03 binlog]# ps -ef | grep mysqlbinlog | grep -v grep
[root@mysql-db03 binlog]# mysqlbinlog -R --host=192.168.0.52 --port=3307 --user=mha --password=123123 --raw --stop-never mysql-bin.000001 &
[1] 24880
[root@mysql-db03 binlog]# ps -ef | grep mysqlbinlog | grep -v grep
root      24880  22198  0 01:38 pts/1    00:00:00 mysqlbinlog -R --host=192.168.0.52 --port=3307 --user=mha --password=x xxxx --raw --stop-never mysql-bin.000001
(7)启动mha管理进程
[root@mysql-db03 conf]# ps -ef | grep perl | grep -v grep
[root@mysql-db03 conf]# nohup masterha_manager --conf=/etc/mha/mha1.cnf --remove_dead_master_conf --ignore_last_failover < /dev/null > /var/log/mha/mha1/manager.log 2>&1 &
[1] 24895
[root@mysql-db03 conf]# ps -ef | grep perl | grep -v grep
root      24895  17795  3 01:41 pts/0    00:00:00 perl /usr/bin/masterha_manager --conf=/etc/mha/mha1.cnf --remove_dead_master_conf --ignore_last_failover
(8)启动Atlas服务
[root@mysql-db03 conf]# /usr/local/mysql-proxy/bin/mysql-proxyd test start
OK: MySQL-Proxy of test is started
[root@mysql-db03 conf]# ps -ef | grep mysql-proxy | grep -v grep
root      25005      1  0 01:43 ?        00:00:00 /usr/local/mysql-proxy/bin/mysql-proxy --defaults-file=/usr/local/mysql-proxy/conf/test.cnf
root      25006  25005  0 01:43 ?        00:00:00 /usr/local/mysql-proxy/bin/mysql-proxy --defaults-file=/usr/local/mysql-proxy/conf/test.cnf
[root@mysql-db03 conf]#

#说明:
#为何启动服务需要加test,因为在Atlas配置文件里定义了一个实例名字为test
#Atlas实际是启动了某个实例(当然也可以多实例)

[root@mysql-db03 conf]# netstat -antup | grep mysql-proxy
tcp        0      0 0.0.0.0:1234                0.0.0.0:*                   LISTEN      25006/mysql-proxy
tcp        0      0 0.0.0.0:3306                0.0.0.0:*                   LISTEN      25006/mysql-proxy

#说明:
#监听3306的为Atlas对外提供代理的端口;监听1234是Atlas的管理监听端口
8.6 登陆Atlas管理端口
[root@mysql-db03 conf]# mysql -uuser -ppwd -P1234 -h 192.168.0.53     #登陆Atlas管理端
Warning: Using a password on the command line interface can be insecure.
Welcome to the MySQL monitor.  Commands end with ; or g.
Your MySQL connection id is 1
Server version: 5.0.99-agent-admin

Copyright (c) 2000, 2014, Oracle and/or its affiliates. All rights reserved.

Oracle is a registered trademark of Oracle Corporation and/or its
affiliates. Other names may be trademarks of their respective
owners.

Type 'help;' or 'h' for help. Type 'c' to clear the current input statement.

mysql> show databases;      #看所有库,报错,并不让看
ERROR 1105 (07000): use 'SELECT * FROM help' to see the supported commands
mysql> select * from help;       #按提示输入命令
+----------------------------+---------------------------------------------------------+
| command                    | description                                             |
+----------------------------+---------------------------------------------------------+
| SELECT * FROM help         | shows this help                                         |
| SELECT * FROM backends     | lists the backends and their state                      |
| SET OFFLINE $backend_id    | offline backend server, $backend_id is backend_ndxs id |
| SET ONLINE $backend_id     | online backend server, ...                              |
| ADD MASTER $backend        | example: "add master 127.0.0.1:3306", ...               |
| ADD SLAVE $backend         | example: "add slave 127.0.0.1:3306", ...                |
| REMOVE BACKEND $backend_id | example: "remove backend 1", ...                        |
| SELECT * FROM clients      | lists the clients                                       |
| ADD CLIENT $client         | example: "add client 192.168.1.2", ...                  |
| REMOVE CLIENT $client      | example: "remove client 192.168.1.2", ...               |
| SELECT * FROM pwds         | lists the pwds                                          |
| ADD PWD $pwd               | example: "add pwd user:raw_password", ...               |
| ADD ENPWD $pwd             | example: "add enpwd user:encrypted_password", ...       |
| REMOVE PWD $pwd            | example: "remove pwd user", ...                         |
| SAVE CONFIG                | save the backends to config file                        |
| SELECT VERSION             | display the version of Atlas                            |
+----------------------------+---------------------------------------------------------+
16 rows in set (0.00 sec)
mysql> select * from backends;         #输入上边列表里的命令,出现下表
+-------------+-------------------+-------+------+
| backend_ndx | address           | state | type |
+-------------+-------------------+-------+------+
|           1 | 192.168.0.60:3307 | up    | rw   |
|           2 | 192.168.0.51:3307 | up    | ro   |
|           3 | 192.168.0.53:3307 | up    | ro   |
+-------------+-------------------+-------+------+
3 rows in set (0.00 sec)
这里是平滑管理界面,可以在这里根据选项修改设置
8.7 进行读写分离及读负载均衡测试
(1)在mysql-db01和mysql-db03上的本地MySQL(3307端口)创建一个库
#在mysql-db03上的本地3307端口的数据库里创建一个库
[root@mysql-db03 binlog]# mysql -uroot -p123123 -P3307          #登陆本地MySQL
Warning: Using a password on the command line interface can be insecure.
Welcome to the MySQL monitor.  Commands end with ; or g.
Your MySQL connection id is 30
Server version: 5.6.17-log MySQL Community Server (GPL)

Copyright (c) 2000, 2014, Oracle and/or its affiliates. All rights reserved.

Oracle is a registered trademark of Oracle Corporation and/or its
affiliates. Other names may be trademarks of their respective
owners.

Type 'help;' or 'h' for help. Type 'c' to clear the current input statement.

mysql> show databases;
+--------------------+
| Database           |
+--------------------+
| information_schema |
| benet              |
| mysql              |
| performance_schema |
| test               |
| yunjisuan          |
+--------------------+
6 rows in set (0.00 sec)

mysql> create database db03;                            #创建一个库db03
Query OK, 1 row affected (0.00 sec)

mysql> show databases;
+--------------------+
| Database           |
+--------------------+
| information_schema |
| benet              |
| db03               |
| mysql              |
| performance_schema |
| test               |
| yunjisuan          |
+--------------------+
7 rows in set (0.00 sec)


#在mysql-db01上的本地3307端口的数据库里创建一个库
[root@mysql-db01 ~]# mysql -uroot -p123123 -P3307
Warning: Using a password on the command line interface can be insecure.
Welcome to the MySQL monitor.  Commands end with ; or g.
Your MySQL connection id is 37
Server version: 5.6.17-log MySQL Community Server (GPL)

Copyright (c) 2000, 2014, Oracle and/or its affiliates. All rights reserved.

Oracle is a registered trademark of Oracle Corporation and/or its
affiliates. Other names may be trademarks of their respective
owners.

Type 'help;' or 'h' for help. Type 'c' to clear the current input statement.

mysql> show databases;
+--------------------+
| Database           |
+--------------------+
| information_schema |
| benet              |
| mysql              |
| performance_schema |
| test               |
| yunjisuan          |
+--------------------+
6 rows in set (0.00 sec)

mysql> create database db01;
Query OK, 1 row affected (0.00 sec)

mysql> show databases;
+--------------------+
| Database           |
+--------------------+
| information_schema |
| benet              |
| db01               |
| mysql              |
| performance_schema |
| test               |
| yunjisuan          |
+--------------------+
7 rows in set (0.00 sec)
(2)登陆mysql-db02(主库)进行查看
[root@mysql-db02 ~]# mysql -uroot -p123123 -P3307
Warning: Using a password on the command line interface can be insecure.
Welcome to the MySQL monitor.  Commands end with ; or g.
Your MySQL connection id is 11
Server version: 5.6.17-log MySQL Community Server (GPL)

Copyright (c) 2000, 2014, Oracle and/or its affiliates. All rights reserved.

Oracle is a registered trademark of Oracle Corporation and/or its
affiliates. Other names may be trademarks of their respective
owners.

Type 'help;' or 'h' for help. Type 'c' to clear the current input statement.

mysql> show databases;
+--------------------+
| Database           |
+--------------------+
| information_schema |
| benet              |
| mysql              |              #主库192.168.0.52里并没有之前创建的db01或db03
| performance_schema |
| test               |
| yunjisuan          |
+--------------------+
6 rows in set (0.00 sec)
(3)在mysql-db03的本地登陆Atlas代理的3306端口
[root@mysql-db03 ~]# mysql -uroot -p123123 -h 192.168.0.53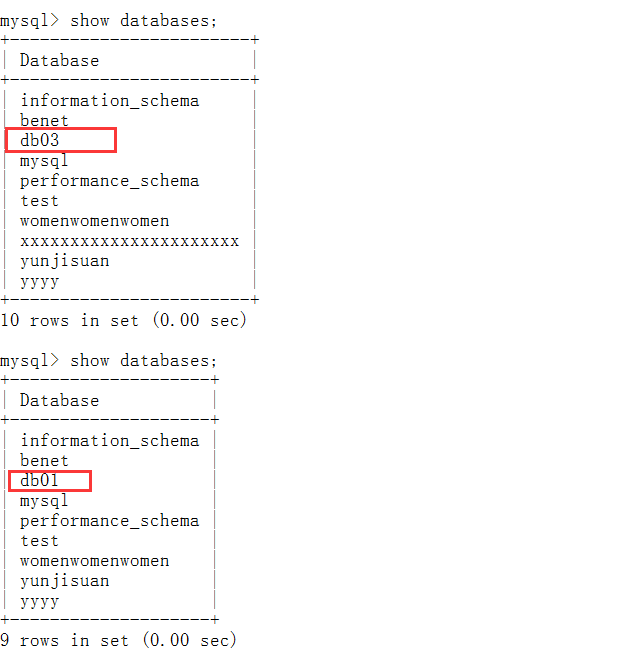
由此可见,已经实现了读负载均衡
(4)我们在mysql-db03的Atlas代理的MySQL服务端口里进行写入操作,测试读写分离
[root@mysql-db03 ~]# mysql -uroot -p123123 -h 192.168.0.53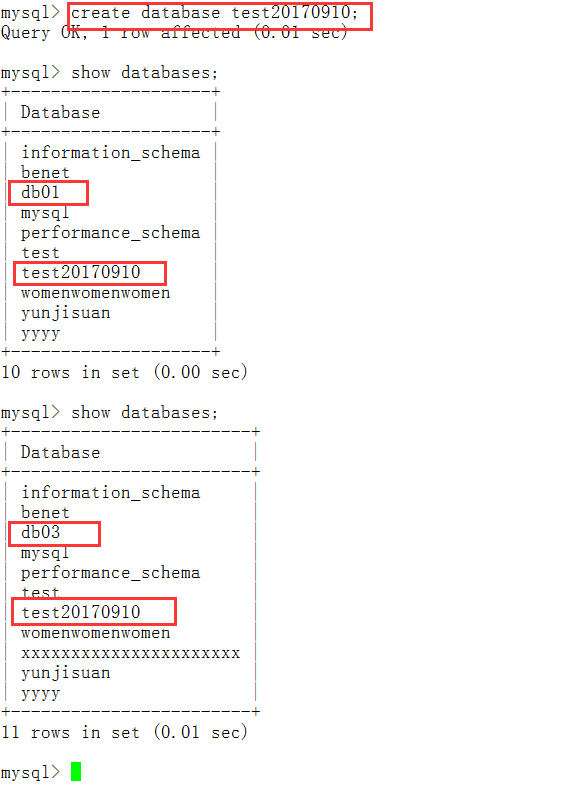
由此可见,mysql-db01和mysql-db3的库里都出现了test20170910的库。只有一个可能,数据是被写入了主库192.168.0.52里,然后同步到的从库。因此,读写分离测试完毕。