Gradle 是什么
是构建工具,不是语言
它用了 Groovy 这个语言,创造了一种 DSL,但它本身不是语⾔
Gradle常用命令
./gradlew build --stacktrace > logs.txt 2>logErrors.txt
输出错误日志

gradlew assembleDebug
gradlew tinkerPatchDebug

```
# 查看构建版本
./gradlew -v
# 清除build文件夹
./gradlew clean
# 检查依赖并编译打包
./gradlew build
# 编译并安装debug包
./gradlew installDebug
# 编译并打印日志
./gradlew build --info
# 译并输出性能报告,性能报告一般在 构建工程根目录 build/reports/profile
./gradlew build --profile
# 调试模式构建并打印堆栈日志
./gradlew build --info --debug --stacktrace
# 强制更新最新依赖,清除构建并构建
./gradlew clean build --refresh-dependencies

# 编译并打Debug包
./gradlew assembleDebug
# 这个是简写 assembleDebug
./gradlew aD
# 编译并打Release的包
./gradlew assembleRelease
# 这个是简写 assembleRelease
./gradlew aR

./gradlew app:dependencies 去除重复依赖库优化
减少apk体积
android {
    ...
    buildTypes {
        release {
            shrinkResources true
            minifyEnabled true
        }
    }
}
1. minifyEnabled 会对代码进行混淆和压缩,shrinkResources 会对比R文件对无用资源进行删除
2. minifyEnabled 设置为true时shrinkResources 的设置才会生效
全局变量的使用
在多个module的情况下,不同module的build.gradle文件中有部分配置项类似,或者依赖的类库,有部分是相同的,在维护上不是很方便,这个时候就可以考虑统一配置。在项目根目录的build.gradle文件中添加以下代码和android{}同级
ext {
    //全局变量控制,可在module中的build.gradle文件通过rootProject.ext.xxx开头来使用
    compileSdkVersion = 24
    buildToolsVersion = '24.0.3'
    supportVersion = '24.2.1'
}
配置打包用的签名
主要有接过分享或者授权登录功能的都应该知道,像微信或者微博的分享和授权登录提供sdk,只有在指定的签名下才能生效,而我们平时开发都习惯使用默认的androidkeystore打包签名,这个时候想要测试分享或者登录功能就需要手动去打包指定keystore的签名。非常影响开发效率,这个时候可以通过配置gradle,根据release或者是debug打包指定的签名。
项目根目录新建一个签名用到的密码管理文件signing.properties
signing.alias=dou361            #release
signing.password=dou361            #release
signing.jjdxm_alias=dou361        #debug
signing.jjdxm_password=dou361    #debug
在主程序build.gradle的apply plugin: 'com.android.application'下面添加
Properties props = new Properties()
props.load(new FileInputStream(file(rootProject.file("signing.properties"))))
在android{}节点里面添加
signingConfigs {
    release {
        keyAlias props['signing.alias']
        keyPassword props['signing.password']
        storeFile file(rootProject.file("debug.keystore"))
        storePassword props['signing.password']
    }

    debug {
        keyAlias props['signing.jjdxm_alias']
        keyPassword props['signing.jjdxm_password']
        storeFile file(rootProject.file("debug.keystore"))
        storePassword props['signing.jjdxm_password']
    }
}
buildTypes {
    debug {
        signingConfig signingConfigs.debug
        minifyEnabled false
        proguardFiles getDefaultProguardFile('proguard-android.txt'), 'proguard-rules.pro'
    }

    release {
        signingConfig signingConfigs.release
        minifyEnabled false
        proguardFiles getDefaultProguardFile('proguard-android.txt'), 'proguard-rules.pro'
    }
}
运行不同的接口环境的apk
项目可以通过定义多个不同的productFlavors来实现应用的不同定制版本,每一个Flavor与buildTypes配合产出对应的一种输出类型的apk文件,新建的项目初始化只有一个默认的Flavor:defaultConfig
   productFlavors {
        //接口正式环境还是测试环境
        env_public {
            buildConfigField "boolean", "isTestEnv", "false"
        }

        env_test {
            buildConfigField "boolean", "isTestEnv", "true"
        }
    }
跟buildTypes结合就有四种Build Variants(构建变种)。可以不修改代码直接运行相应的apk
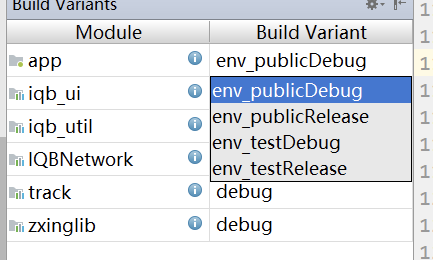
会自动运行到BuildConfig里,可以判断不同的值去加载不同的接口环境
 /**
     * 是否测试环境
     */
    public static boolean isTest() {
        return BuildConfig.isTestEnv;
    }

ServiceInfoManager.getInstance().setEnv(IqbConfig.isTest() ? ServiceInfoManager.Environment.TestEnv : ServiceInfoManager.Environment.PublicEnv);
BuildConfig.DEBUG 始终为 false
BuildConfig.java 是编译时自动生成的,并且每个 Module 都会生成一份,以该 Module 的 packageName 为 BuildConfig.java 的 packageName。所以如果你的应用有多个 Module 就会有多个 BuildConfig.java 生成,编译时被依赖的 Module 默认会提供 Release 版给其他 Module 或工程使用,这就导致该 BuildConfig.DEBUG 会始终为 false。
AndroidManifest.xml 中 application 节点的 android:debuggable 值是不同的。Debug 包值为 true,Release 包值为 false,这是编译自动修改的。可以通过 ApplicationInfo 的这个属性去判断是否是 Debug 版本。
public class AppUtils {

    private static Boolean isDebug = null;

    public static boolean isDebug() {
        return isDebug == null ? false : isDebug.booleanValue();
    }
    public static void syncIsDebug(Context context) {
        if (isDebug == null) {
            isDebug = context.getApplicationInfo() != null &&
                    (context.getApplicationInfo().flags & ApplicationInfo.FLAG_DEBUGGABLE) != 0;
        }
    }
}
//在自己的 Application 内调用进行初始化
AppUtils.syncIsDebug(getApplicationContext());
混淆
不想混淆的类需要一个个添加到 proguard-rules.pro(或 proguard.cfg) 中吗?这样会导致 proguard 配置文件变得杂乱无章,同时需要团队所有成员对其语法有所了解。
解决方法1:
//新建表示统一标识的注解 NotProguard
@Retention(RetentionPolicy.CLASS)
@Target({ElementType.TYPE, ElementType.METHOD, ElementType.CONSTRUCTOR, ElementType.FIELD})
public @interface NotProguard {

}
NotProguard 是个编译时注解,不会对运行时性能有任何影响。可修饰类、方法、构造函数、属性。
然后在Proguard 配置文件中过滤被这个注解修饰的元素,表示不混淆被 NotProguard 修饰的类、属性和方法。
# Keep annotated by NotProguard
-keep @cn.trinea.android.lib.annotation.NotProguard class * {*;}
-keep,allowobfuscation @interface cn.trinea.android.lib.annotation.NotProguard
-keepclassmembers class * {
    @cn.trinea.android.lib.annotation.NotProguard *;
}
解决方法2:
## keep 不想要混淆的类
-keep class com.xx.xx.base.utils.ProguardKeep {*;}
-keep class * implements com.xx.xx.base.utils.ProguardKeep {*;}

/**
 * 实现这个接口的类不会进行混淆
 *  proguard keep
 */
public interface ProguardKeep  {
}
找不到so
新建jniLibs,将so放进来
sourceSets {
    main {
        jniLibs.srcDir 'jniLibs'
    }
}
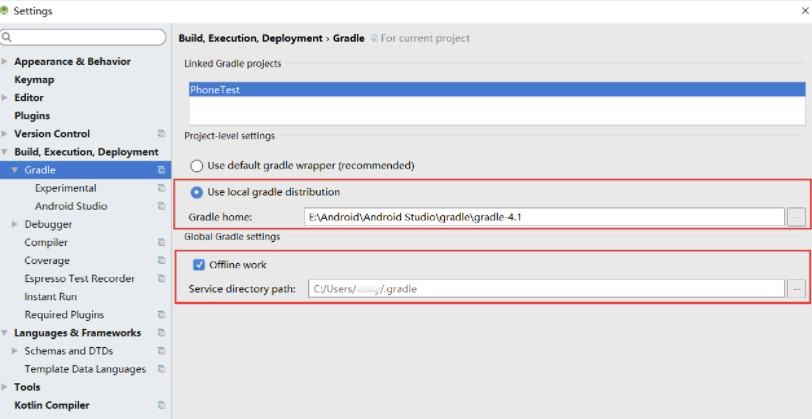
配置gradle离线工作
在gradle中引用第三方模块时采用maven方式依赖,每次打开Android Studio或者点击sync按钮时,都会去maven中央仓库去取第三方的库文件,一般是jar或者aar文件。如果下载完可以配置gradle离线工作 ,勾选gradle会使得速度更快,但同时存在一个问题,如果需要从网上加载第三方库,会无法下载,所以酌情使用。所以需要没有的第三方模块记得把这个关了。
external libraries下的库在C:Users用户名.gradlecachesmodules-2files-2.1下,或者右击某个库下面的某个类,点击file path就可以查看
直接运行release版本
有时候调试SDK必须要用release版本,例如地图、登录,但是每次打包混淆太麻烦,希望能在IDE中直接跑出release版本的应用,简单来说就是在debug模式下产生release版本的
//配置keystore签名
signingConfigs {
        release {
            storeFile file("KeyStore")
            storePassword "98765432"
            keyAlias "lyly"
            keyPassword "98765432"
        }
}

appbuildTypes {
        debug {
            signingConfig signingConfigs.release
        }
        release {
            signingConfig signingConfigs.release
        }
    }
这样编译出来的debug版本直接用的是正式签名。
依赖包重复的问题
遇到这样的一个错误:com.android.dex.DexException: Multiple dex files define XXXX,一般情况下,是我们项目中引用了重复的库或者jar包引起的,我们找到去掉即可解决

com.loonggg.saoyisao.lib:1.1.0 这个依赖里引用了第三方zxing。com.timmy.qrcode.lib:1.4.1这个依赖里也引用了zxing这个库,在com.timmy.qrcode.lib:1.4.1的依赖里添加语句 exclude group: ‘com.google.zxing’,意思是编译的时候将group为com.google.zxing的所有library都去除在外,这样com.timmy.qrcode.lib:1.4.1就会自动去引用com.loonggg.saoyisao.lib:1.1.0项目里的zxing依赖了。这样问题就解决了。
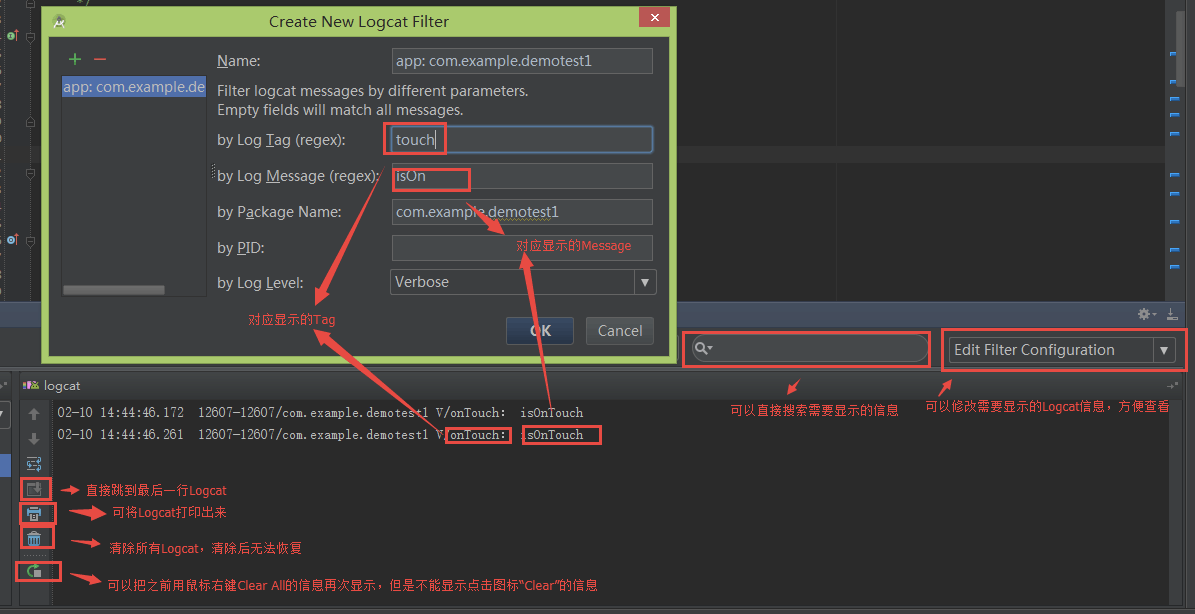
过滤日志
^(?!.*(你要过滤掉的tag)).*$
^(?!.*(UserConnection|BroadcastConnection)).*$
根据Build.BRAND 字段判断不同机型Rom
public class Rom {

    private Rom() {
        //no instance
    }

    /**
     * 是否是Oppo
     */
    public static final boolean IS_OPPO;
    /**
     * 是否是Vivo
     */
    public static final boolean IS_VIVO;
    /**
     * 是否是华为,注意不包括华为荣耀
     */
    public static final boolean IS_HUAWEI;
    /**
     * 是否是华为荣耀
     */
    public static final boolean IS_HUAWEI_HONOR;
    /**
     * 是否是三星
     */
    public static final boolean IS_SAMSUNG;
    /**
     * 是否是努比亚
     */
    public static final boolean IS_NUBIA;

    static {

        final String brand = Build.BRAND.toUpperCase();

        IS_OPPO = brand.equalsIgnoreCase("OPPO");
        IS_VIVO = brand.equalsIgnoreCase("VIVO");
        IS_HUAWEI = brand.equalsIgnoreCase("HUAWEI");

        IS_HUAWEI_HONOR = brand.contains("HONOR");
        IS_SAMSUNG = brand.contains("SAMSUNG");

        IS_NUBIA = brand.contains("NUBIA");
    }

}
Module单独运行
通过在组件工程下的gradle.properties文件中设置一个isRunAlone的变量来区分不同的场景,在组件的build.gradle开头这样写:
if(isRunAlone.toBoolean()){
  apply plugin: 'com.android.application'
}else{
  apply plugin: 'com.android.library'
}