1 前言
关于序列化:
Spring 提供的 Cache 默认使用 JDK 方式序列化结果,这要求我们的结果都必须实现 Serializable 接口,且在缓存中保存的数据是二进制的,给后续调试带来不少麻烦。
关于 TTL:
Spring 提供的 Redis 实现仅支持设置全局 TTL ,如果想要细度控制只能直接操作 RedisTemplate 。
2 使用 Jackson
2.1 配置代码
/**
 * @author pancc
 * @version 1.0
 */
@Slf4j
@Configuration
public class CacheConfig extends CachingConfigurerSupport {
    @Autowired
    private CacheProperties cacheProperties;
    @Autowired
    private RedisConnectionFactory redisConnectionFactory;

    @Override
    public CacheManager cacheManager() {
        return new RedisCacheManager(RedisCacheWriter.nonLockingRedisCacheWriter(redisConnectionFactory), redisCacheConfiguration());
    }

    public RedisCacheConfiguration redisCacheConfiguration() {
        RedisCacheConfiguration config = RedisCacheConfiguration.defaultCacheConfig();
        CacheProperties.Redis redis = cacheProperties.getRedis();
        if (redis.isUseKeyPrefix()) {
            config = config.computePrefixWith(k -> redis.getKeyPrefix() + k);
        }
        if (!redis.isCacheNullValues()) {
            config = config.disableCachingNullValues();
        }
        config = config.entryTtl(Optional.ofNullable(redis.getTimeToLive()).orElse(Duration.ofSeconds(-1)));
        config = config.serializeKeysWith(RedisSerializationContext.SerializationPair.fromSerializer(RedisSerializer.string()));
        config = config.serializeValuesWith(RedisSerializationContext.SerializationPair.fromSerializer(new GenericJackson2JsonRedisSerializer()));
        return config;
    }
}
2.2 配置核心类 GenericJackson2JsonRedisSerializer
GenericJackson2JsonRedisSerializer 实际上使用了额外的字段 @class 来保存类信息,从它的实现来看,我们也可以注意到实质上我们是调用了 jackson 的序列化与反序列过程,本质上与 redis 的交互是用 RedisStringCommands#set 完成的。
2.3 测试类
我们模拟一个注册信息
@Data
public class Form {
    private String username;
    private String password;
    private Address address;

    @Data
    public static class Address {
        private Long code;
    }
}
还有与之相对的注册返回体:
@Data
@NoArgsConstructor
@AllArgsConstructor
public class User {
    private String username;
    private Long code;
}
在 service 层,我们这样子调用:
    @Cacheable(key = "#root.methodName+'('+ #form.hashCode() +')'", condition = "#form!=null", unless = "#result ==null")
    public User location(Form form) {
        if (form != null && form.getAddress().getCode() != null && form.getUsername() != null) {
            return new User(form.getUsername(), form.getAddress().getCode());
        }
        return null;
    }
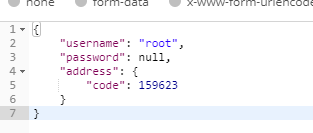
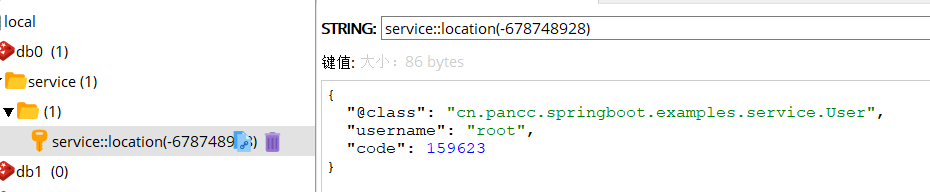
使用 POSTMan 传递如下参数,可以看到被很好的缓存起来了,重复入参调用也会产生同样的结果:
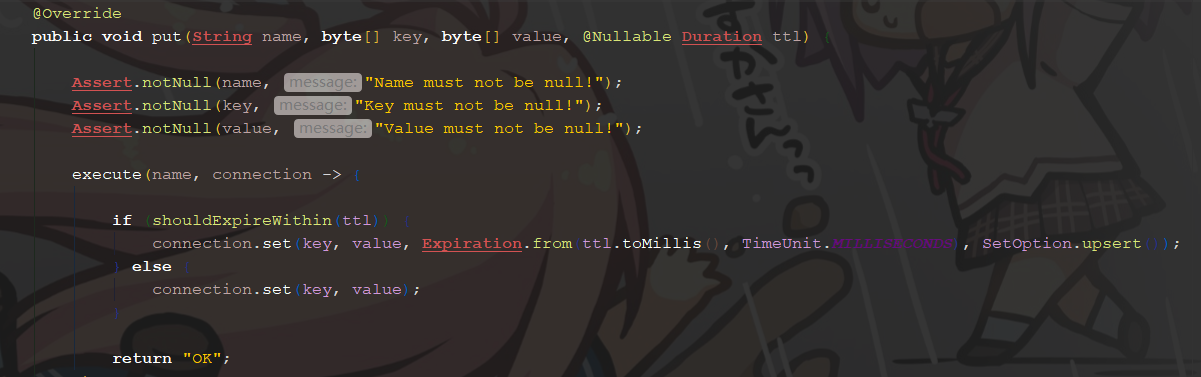
3 自定义 TTL
3.1 避免重复劳动
网上有很多通过设定不同 cacheName 与写配置文件来适应不同的 TTL,这是个很有实践性的方式,但是, cacheName 可能在不断的开发中会不断地增加,需要增加的配置也越来越多,因此,需要有一套约定来动态设置 TTL。
3.2 改写 CacheManage
 1     public static class TtlCacheManager extends RedisCacheManager {
 2         public TtlCacheManager(RedisCacheWriter cacheWriter, RedisCacheConfiguration defaultCacheConfiguration) {
 3             super(cacheWriter, defaultCacheConfiguration);
 4         }
 5
 6         @Nonnull
 7         @Override
 8         protected RedisCache createRedisCache(String name, RedisCacheConfiguration cacheConfig) {
 9             String[] array = StringUtils.delimitedListToStringArray(name, "#");
10             name = array[0];
11             if (array.length > 1) {
12                 try {
13                     Duration duration = Duration.parse(array[1]);
14                     cacheConfig = cacheConfig.entryTtl(duration);
15                 } catch (DateTimeParseException e) {
16                     log.error("错误的 TTL 格式");
17                     throw e;
18                 }
19             }
20             return super.createRedisCache(name, cacheConfig);
21         }
22     }
这是个约定优先的配置,首先我们从 cacheName 中以 # 为分隔符将 cacheName 分为实际的 name 和 代表 duration 的字符串(如果存在的话),如果 duration 存在,我们则渲染该字符串并将结果设置进 cacheConfig ,如果 duration 格式不正确,则向开发人员输出错误警告并使用默认的 TTL (全局配置)。
接下来,将 2.1 中的配置代码中的 CacheManage 更换为我们的超类 .
3.3 测试用例
改写我们的 cacheNames ,这时候我们增加一个 # 符号与正确的 Duration 字符串
1     @Cacheable(cacheNames="register#PT5M",key = "#root.methodName+'('+ #form.hashCode() +')'", condition = "#form!=null", unless = "#result ==null")
2     public User location(Form form) {
3         if (form != null && form.getAddress().getCode() != null && form.getUsername() != null) {
4             return new User(form.getUsername(), form.getAddress().getCode());
5         }
6         return null;
7     }
再执行测试,观察到 TTL 已经被正确设置了
