用qemu+gdb tcp server+CDT调试linux内核启动-起步
说明: 环境信息与 用virtualbox+模拟串口+CDT调试linux内核 TCP IP协议栈-起步 提到的一样,并且本文中会有很多个步骤与之相同,请参考。
S1. 开发机:我是将一个老的索尼的笔记本装了Ubuntu桌面版本作为开发环境,版本号是Ubuntu 16.04.4 LTS,后面在某些步骤中也会称之为host。
S2. JDK使用的是java version "1.7.0_80"。 官网也有下载。后面CDT开发工具要用。
S3. Eclipse版本 Mars.2 Release (4.5.2),CDT(8.8.1)使用的插件的方式安装的。 相关软件在eclipse官网均可以获得。至于怎么装插件,请网上搜索。
S4. 开发机安装build工具链。
sudo apt-get install gcc
sudo apt-get install build-essential
S5. 开发机安装qemu sudo apt-get install qemu
创建虚拟磁盘
创建rootfs
dd if=/dev/zero of=rootfs.img bs=1M count=10
mkfs.ext3 rootfs.img
mkdir rootfs
sudo mount -t ext3 -o loop rootfs.img rootfs
cd rootfs/
sudo mkdir dev proc sys
S6. 编译安装busybox到rootfs
cd ~
mkdir 04.busybox
cd 04.busybox/
wget https://busybox.net/downloads/busybox-1.25.1.tar.bz2
tar -xjvf busybox-1.25.1.tar.bz2
cd busybox-1.25.1

make menuconfig
配置编译采用静态链接
BusyboxSettings->Build options->BuildBusybox as a static binary
sudo make install CONFIG_PREFIX=/home/simon/005.vm/01.qemu/rootfs
cd 005.vm/01.qemu
sudo umount rootfs
```shell

S7. 在开发机上准备内核代码。
到[内核官网](https://mirrors.edge.kernel.org/pub/linux/kernel/v4.x/)下载你要用的内核,我的用的是[4.4.19]版本(https://mirrors.edge.kernel.org/pub/linux/kernel/v4.x/linux-4.4.19.tar.gz)。可以用wget xxx内核链接地址的办法下载,我的是:
```shell
cd ~
mkdir 004.code
cd 004.code
wget https://mirrors.edge.kernel.org/pub/linux/kernel/v4.x/linux-4.4.19.tar.gz
tar -xzvf linux-4.4.19.tar.gz
cd linux-4.4.19

S8. 在开发机上准备编译安装内核。
修改Makefile文件(linux-4.4.19目录下),将其中的O2字样修改成O1,目前不支持O0编译。但是[有个文章](https://github.com/figozhang/runninglinuxkernel_4.0)说可以通过修改内核代码达到使用O0编译的目的。我试了试,没成功。如果谁成功了,可以告诉我,谢谢。
安装必要的依赖:
```shell
sudo apt-get install libncurses5-dev
sudo apt-get install libssl-dev
sudo apt-get install bc
调试目标机安装build工具链。
sudo apt-get install gcc
sudo apt-get install build-essential
配置内核选项,其实只需要执行这步生成config文件,配置项不用修改,我们要的都有。
make menuconfig
然后选择 exit 然后选择yes 生成config文件。
make CONFIG_DEBUG_SECTION_MISMATCH=y -j2
此步骤需要很长时间,2-5小时不等,正常可以在睡觉前执行,第二天早上起来看结果。
编译成功后,在你的linux-4.4.19目录/arch/x86_64/boot/bzImage 这个文件,后面启动会用
S9. 验证
qemu-system-x86_64 -kernel 004.code/linux-source-4.4.19/arch/x86_64/boot/bzImage -hda ~/005.vm/01.qemu/rootfs.img -append "root=/dev/sda"
能成功启动即可。
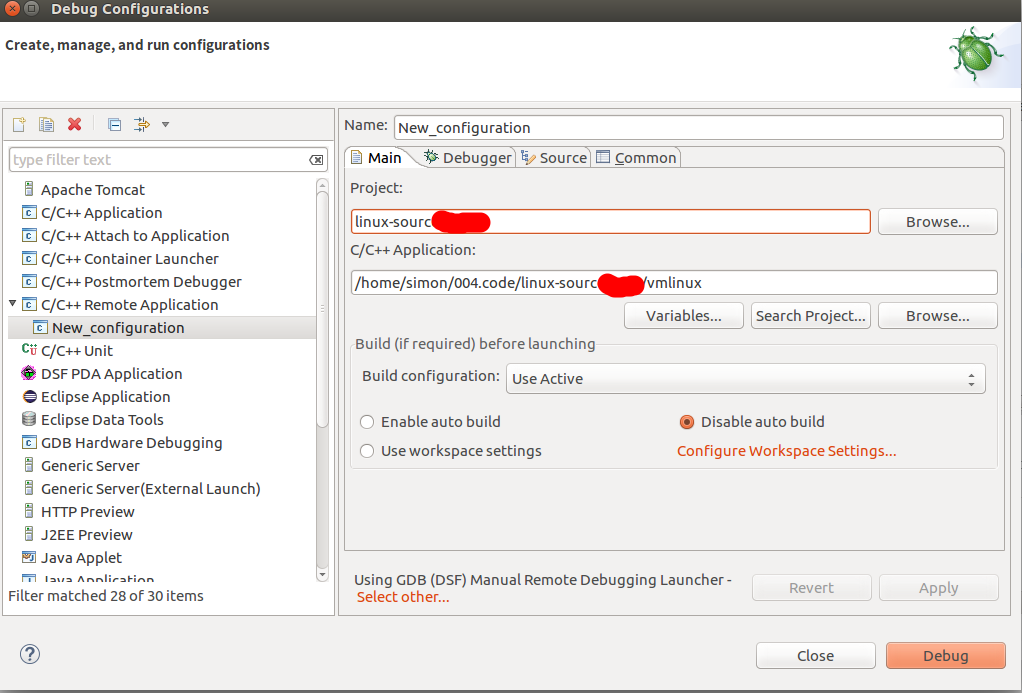
S10. 创建CDT工程
打开装了CDT插件的eclipse。
window-->preferences-->General-->Workspace 去掉勾选 Build Automatically。
window-->preferences-->C/C++-->indexer 去掉勾选 Enable indexer。
file-->new-->c project-->project name填写你自己合意的,比如linux-kernel-study / 去掉use default location,location输入框中选择你的linux-4.4.19路径。 / project type 选择 Makefile project-Empty project / Toolschains选择Linux GCC-->next-->Advanced Setting-->C/C++ Build-->去掉勾选use default build command, build command输入框内写上 make CONFIG_DEBUG_SECTION_MISMATCH=y -j2,build directory选择你的linux-4.4.19路径。 / Behavior页签 Build(Increament build) 输入框中输入一个空格即可。然后完成工程创建即可。
点击工具栏中的绿色小虫子右边的箭头,选择Debug Configurations-->C/C++ Remote Application(双击)-->proiect选择你刚创建的project / C/C++ Application选择你的linux-4.4.19路径下的vmlinux。 / 选中 Disable auto build 点击select other换一个启动器 选择 GDB(DSF)Manual Remote Debugging...
点击debugger页签 stop on startup at 填写start_kernel,点击connection子页签,type选择TCP,hostname填写localhost,prort number填写1234 。此处标志为待填13.1。
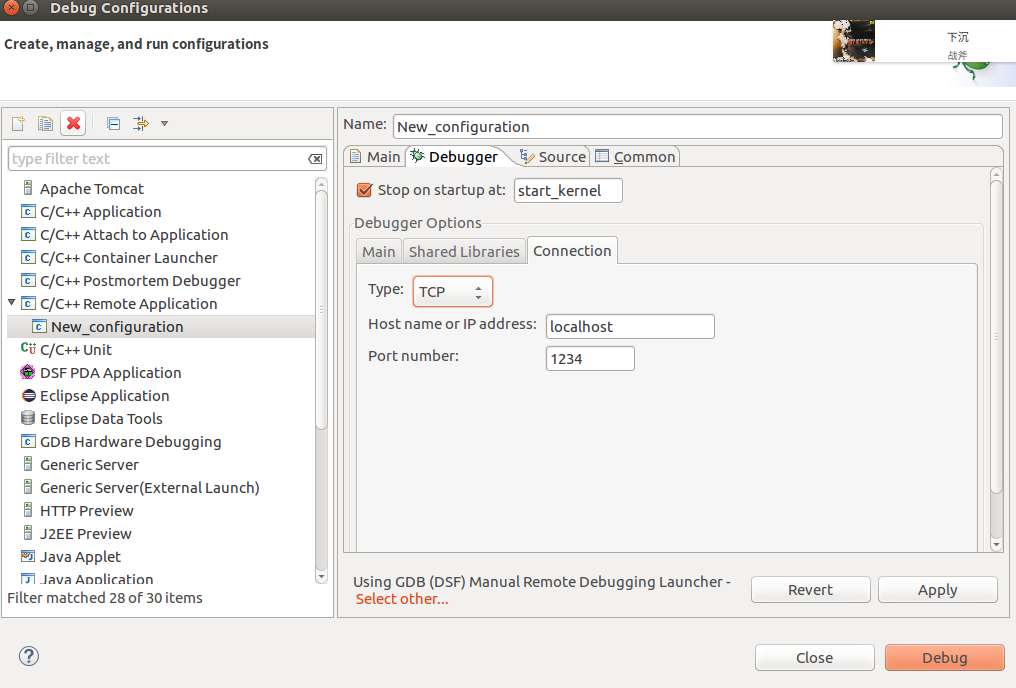
点击apply close即可。
S11. 修复GDB问题
后面步骤用gdb远程调试时会报错: Remote ‘g’ packet reply is too long
先看下您的gdb的版本,然后下载相同版本进行修复并并编译。
gdb -version
wget http://ftp.gnu.org/gnu/gdb/gdb-7.11.1.tar.gz
tar -xzvf gdb-7.11.1.tar.gz
cd gdb-7.11.1
vi gdb/remote.c
将下面两行注释掉
//  if (buf_len > 2 * rsa->sizeof_g_packet)
//    error (_("Remote 'g' packet reply is too long: %s"), rs->buf);
sudo ./configure
sudo make
sudo make install
S12. 启动调试目标机并调试
qemu-system-x86_64 -s -S -kernel 004.code/linux-source-4.4.19/arch/x86_64/boot/bzImage -hda ~/005.vm/01.qemu/rootfs.img -append "root=/dev/sda"
cd 你的linux-4.4.19路径
gdb vmlinux
target remote localhost:1234
此时就应该连接上目标机器了。
b start_kernel
按gdb的c指令便可以使得调试目标机继续启动下去。
执行到内核启动时,断点便会被命中。
S13. 在开发机用CDT调试。
重新启动调试目标机,这次不用gdb命令行的方式,用CDT可视化界面。
点击CDT工具栏中的绿色小虫子右边的箭头,选择1New_configuration,如果有什么错误提示不用理会,继续proceed。 连接成功后,控制台会有输出,也可以在控制台输入gdb调试指令,也可以在CDT上直接加断点。
这时你会发现在 start_kernel处停了下来。
F5 F6这些快捷键都可以用。