目标跟踪算法包括单目标跟踪和多目标跟踪,单目标跟踪在每张图片中只跟踪一个目标。目前单目标跟踪的主要方法分为两大类,基于相关滤波(correlation filter)的跟踪算法, 如CSK, KCF, DCF, SRDCF等;基于深度学习的跟踪算法,如SiamFC, SiamRPN, SiamRPN++等。相比之下,相关滤波的速度更快,深度学习的准确性更高。
跟踪算法综述:https://www.zhihu.com/question/26493945, https://zhuanlan.zhihu.com/p/26415984
跟踪相关算法如下:
这里主要记录下对SIamRPN跟踪算法的学习过程,SiamRPN是商汤在2018年的论文High Performance Visual Tracking with Siamese Region Proposal Network中提出,随后在其基础上商汤又发展出DaSiamRPN, SiamRPN++, SiamMask等算法,公开代码地址https://github.com/STVIR/pysot。
对于SiamRPN的理解,从网络结构,anchor设置,损失函数,跟踪流程四个方面简单介绍下。
1. SiamRPN网络结构
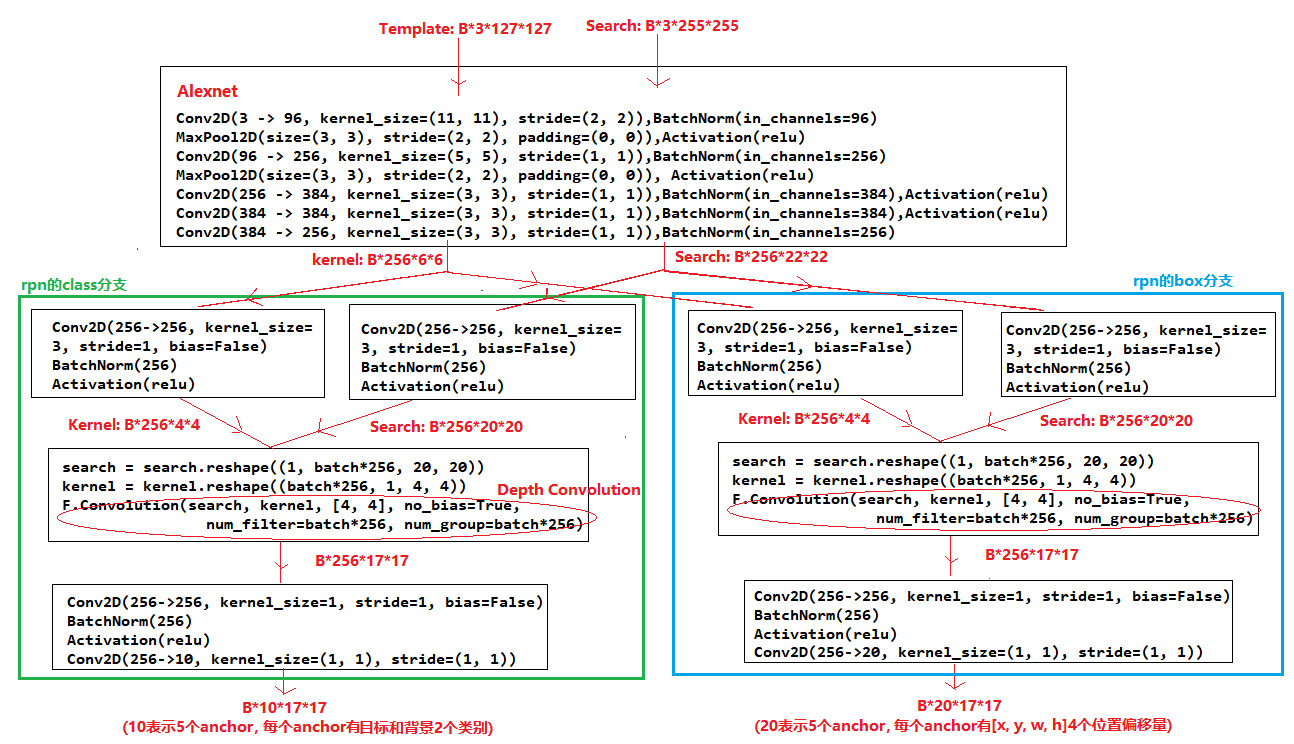
SiamRPN的网络结构如下图所示,主要包括Siamese Network和Region Proposal Network(RPN)两部分,Siamese Network用来提取图片特征,RPN用来预测目标的位置和置信度。

SiamRPN详细的网络结构如下,Siamese Network采用的是Alexnet特征提取网络,训练时整个网络的计算流程为:
1. 第一帧图片中截取尺寸为(127, 127, 3)的Template Image,下一帧图片中截取的尺寸为(255, 255, 3)的Search Image,将Template和Search分别送入alexnet提取特征
2. Teamplate通过Alexnet提取特征后尺寸为(1, 256, 6, 6), Search通过Alexnet提取特征后尺寸为(1, 256, 22, 22)
3. 尺寸为(1, 256, 6, 6)的特征和尺寸为(1, 256, 22, 22)的特征,送入RPN网络的class分支,输出尺寸为(1, 10, 17, 17)的类别预测结果,其中10表示5个anchor,每个anchor属于背景和目标的类别的概率
4. 尺寸为(1, 256, 6, 6)的特征和尺寸为(1, 256, 22, 22)的特征,送入RPN网络的box分支,输出尺寸为(1, 20, 17, 17)的位置回归结果,其中20表示5个anchor,每个anchor的[x, y, w, h]偏移量
其中有两点值得注意下:
Siamese Network: Template Image和Search Image输入的是同一个Alexnet网络进行特征提取(即siamese network),所以两个目标越相似,得到的特征也越相似;
Depthwise Convolution: RPN的两个分支中将template的特征和search的特征进行了depthwise convolution,即在每个channel上分别进行卷积,卷积响应值越高的位置表示特征越相似(在每个channel上,template的特征图(4x4)作为卷积核,在search的特征图(20x20)上进行卷积)
2. SiamRPN的anchor设置
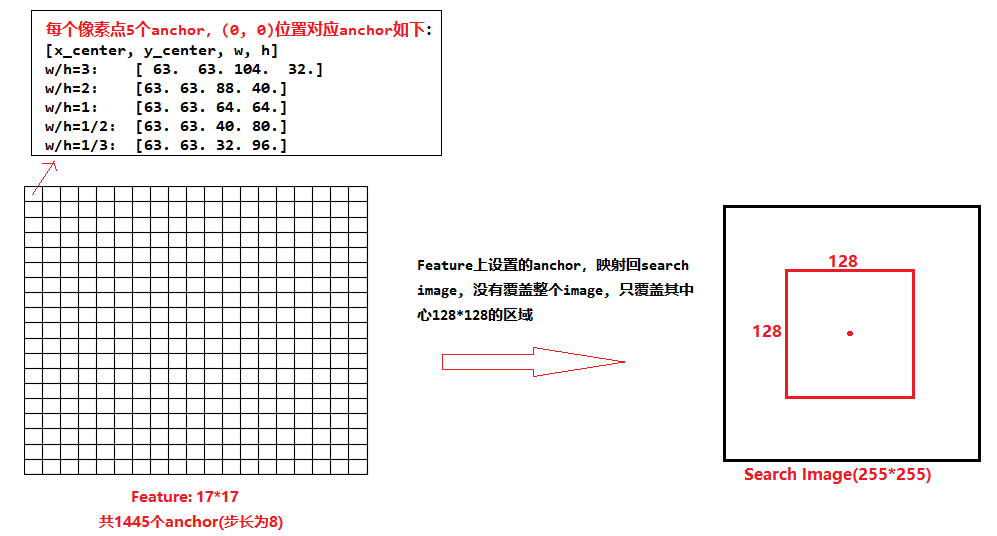
SiamRPN的RPN网络中,在每个位置设置了5个anchor,5个anchor的宽高比分别为[3, 2, 1, 1/2, 1/3],由于最后网络的输出特征图尺寸为17*17,则共设置了1445(17x17x5)个anchor,如下图所示。需要注意的是,这些anchor的中心点对应search image中的位置并不是整个search image,只是search image中心128x128的区域,这是由于两帧图片时间间隔短,目标中心点移动后落在search image边界区域的概率较小。
和目标检测一样,SiamRPN网络在训练时,为了平衡正负样本的比例,会根据anchor和gt_box的IOU挑选64个样本给RPN网络学习 ,其挑选规则如下:
1.计算所有anchor和gt_box的IOU, IOU>0.6的为正样本,IOU<0.3的为负样本
2.随机挑选出64个样本,正样本16个,负样本48。(若正样本不够16个时,有多少取多少,若正样本超过16个,随机选取16个正样本,多余的标注为忽略样本;负样本一般会多余48个,随机选取48个负样本,多余的标注为忽略样本)
生成anchor的代码如下所示:


import math
from collections import namedtuple
import numpy as np


Corner = namedtuple('Corner', 'x1 y1 x2 y2')
BBox = Corner
Center = namedtuple('Center', 'x y w h')


def corner2center(corner):
    """
    convert (x1, y1, x2, y2) to (cx, cy, w, h)

    Parameters
    ----------
        conrner: list or np.ndarray
            Corner lefttop and rightdown location

    Return:
        Center location weight and height
    """
    if isinstance(corner, Corner):
        x_min, y_min, x_max, y_max = corner
        return Center((x_min + x_max) * 0.5, (y_min + y_max) * 0.5,
                      (x_max - x_min), (y_max - y_min))
    else:
        x_min, y_min, x_max, y_max = corner[0], corner[1], corner[2], corner[3]
        center_x = (x_min + x_max) * 0.5
        center_y = (y_min + y_max) * 0.5
        bbox_w = x_max - x_min
        bbox_h = y_max - y_min
        return center_x, center_y, bbox_w, bbox_h


def center2corner(center):
    """ convert (cx, cy, w, h) to (x1, y1, x2, y2)

    Parameters
    ----------
        center: list or np.ndarray
            center location, weight and height

    Return:
        Corner lefttop and rightdown location
    """
    if isinstance(center, Center):
        center_x, center_y, bbox_w, bbox_h = center
        return Corner(center_x - bbox_w * 0.5, center_y - bbox_h * 0.5,
                      center_x + bbox_w * 0.5, center_y + bbox_h * 0.5)
    else:
        center_x, center_y, bbox_w, bbox_h = center[0], center[1], center[2], center[3]
        x_min = center_x - bbox_w * 0.5
        y_min = center_y - bbox_h * 0.5
        x_max = center_x + bbox_w * 0.5
        y_max = center_y + bbox_h * 0.5
        return x_min, y_min, x_max, y_max

class Anchors:
    """This generate anchors.

    Parameters
    ----------
    stride : int
        Anchor stride
    ratios : tuple
        Anchor ratios
    scales : tuple
        Anchor scales
    size : int
        anchor size
    """
    def __init__(self, stride, ratios, scales, image_center=0, size=0):
        self.stride = stride
        self.ratios = ratios
        self.scales = scales
        self.image_center = image_center
        self.size = size
        self.anchor_num = len(self.scales) * len(self.ratios)
        self.anchors = None
        self.generate_anchors()

    def generate_anchors(self):
        """generate anchors based on predefined configuration"""
        self.anchors = np.zeros((self.anchor_num, 4), dtype=np.float32)
        size = self.stride * self.stride
        count = 0
        for r in self.ratios:
            ws = int(math.sqrt(size*1. / r))
            hs = int(ws * r)

            for s in self.scales:
                w = ws * s
                h = hs * s
                self.anchors[count][:] = [-w*0.5, -h*0.5, w*0.5, h*0.5][:]
                count += 1

    def generate_all_anchors(self, im_c, size):
        """
        generate all anchors

        Parameters
        ----------
        im_c: int
            image center
        size:
            image size
        """
        if self.image_center == im_c and self.size == size:
            return False
        self.image_center = im_c
        self.size = size

        a0x = im_c - size // 2 * self.stride
        ori = np.array([a0x] * 4, dtype=np.float32)
        zero_anchors = self.anchors + ori

        x1 = zero_anchors[:, 0]
        y1 = zero_anchors[:, 1]
        x2 = zero_anchors[:, 2]
        y2 = zero_anchors[:, 3]

        x1, y1, x2, y2 = map(lambda x: x.reshape(self.anchor_num, 1, 1),
                             [x1, y1, x2, y2])
        cx, cy, w, h = corner2center([x1, y1, x2, y2])

        disp_x = np.arange(0, size).reshape(1, 1, -1) * self.stride
        disp_y = np.arange(0, size).reshape(1, -1, 1) * self.stride

        cx = cx + disp_x
        cy = cy + disp_y

        # broadcast
        zero = np.zeros((self.anchor_num, size, size), dtype=np.float32)
        cx, cy, w, h = map(lambda x: x + zero, [cx, cy, w, h])
        x1, y1, x2, y2 = center2corner([cx, cy, w, h])

        self.all_anchors = (np.stack([x1, y1, x2, y2]).astype(np.float32),
                            np.stack([cx, cy, w, h]).astype(np.float32))
        return True

if __name__ == "__main__":
    train_search_size = 255
    anchor_stride = 8
    anchor_scales = [8]
    anchor_ratios = (0.33, 0.5, 1, 2, 3)
    train_base_size = 0
    train_output_size = 17
    anchors = Anchors(anchor_stride, anchor_ratios, anchor_scales)
    print(anchors.anchors)
    anchors.generate_all_anchors(im_c=train_search_size // 2,
                                 size=train_output_size)
    print(anchors.all_anchors[0].shape)
    print(anchors.all_anchors[0])
    print(anchors.all_anchors[1].shape)
    print(anchors.all_anchors[1])

    d = anchors.all_anchors[0].transpose((2, 3, 1, 0))
    print(d)
    import cv2
    mask = np.ones((255, 255, 3), dtype=np.uint8)*8
    for i in range(17):
        for j in range(17):
            for k in range(5):
                box = d[i, j, k, :]
                # print(box)
                cv2.rectangle(mask, (box[0], box[1]), (box[2], box[3]), (0, 255, 0), 2)
            cv2.imshow("img", mask)
            cv2.waitKey(0)
            cv2.destroyAllWindows()
    # cv2.imshow("img", mask)
    # cv2.waitKey(0)
    # cv2.destroyAllWindows()
3.损失函数
和目标检测一样,SiamRPN的loss函数包括分类损失cls_losses和坐标损失box_losses,cls_losses采用的交叉熵损失函数,box_losses采用的是smooth_L1损失函数。
4.跟踪流程
训练完成后保存网络参数,在跟踪时使用。整个跟踪过程看代码比较好理解,跟踪流程简要介绍如下:
1.从第一帧图片中,以跟踪目标的中心点截取127*127的区域,作为template
2.在随后的图片中,以上一帧跟踪目标的中心点截取255*255的区域,作为search
3.将template,search送入siamrpn网络预测出目标的box和score
4.对score进行window penalty,即采用窗函数(汉宁窗,余弦窗等)对距离中心点较远的边缘区域分数进行惩罚。
5.取分数最高的box中心点作为新的中心点,上一帧目标的宽高和box的宽高进行平滑加权作为新的宽高
6.采用新的中心点和宽高作为当前帧的box
参考:https://www.cnblogs.com/shyern/p/10669221.html