MySQL 主主复制+KeepAlive实现高可用
1. 环境搭建
| 节点ip | 角色 |
|---|---|
| 192.168.147.102 | Master1 |
| 192.168.147.103 | Master2 |
| 192.168.147.150 | 虚拟ip |
2. MySQL主主环境搭建
2.1 MySQL的安装
2.1.1 MySQL下载
分别在两台节点上安装MySQL,采用rpm方式安装,首先从MySQL官网下载rpm包。选择对应的系统。
rpm包下载地址:https://dev.mysql.com/downloads/mysql/5.7.html#downloads
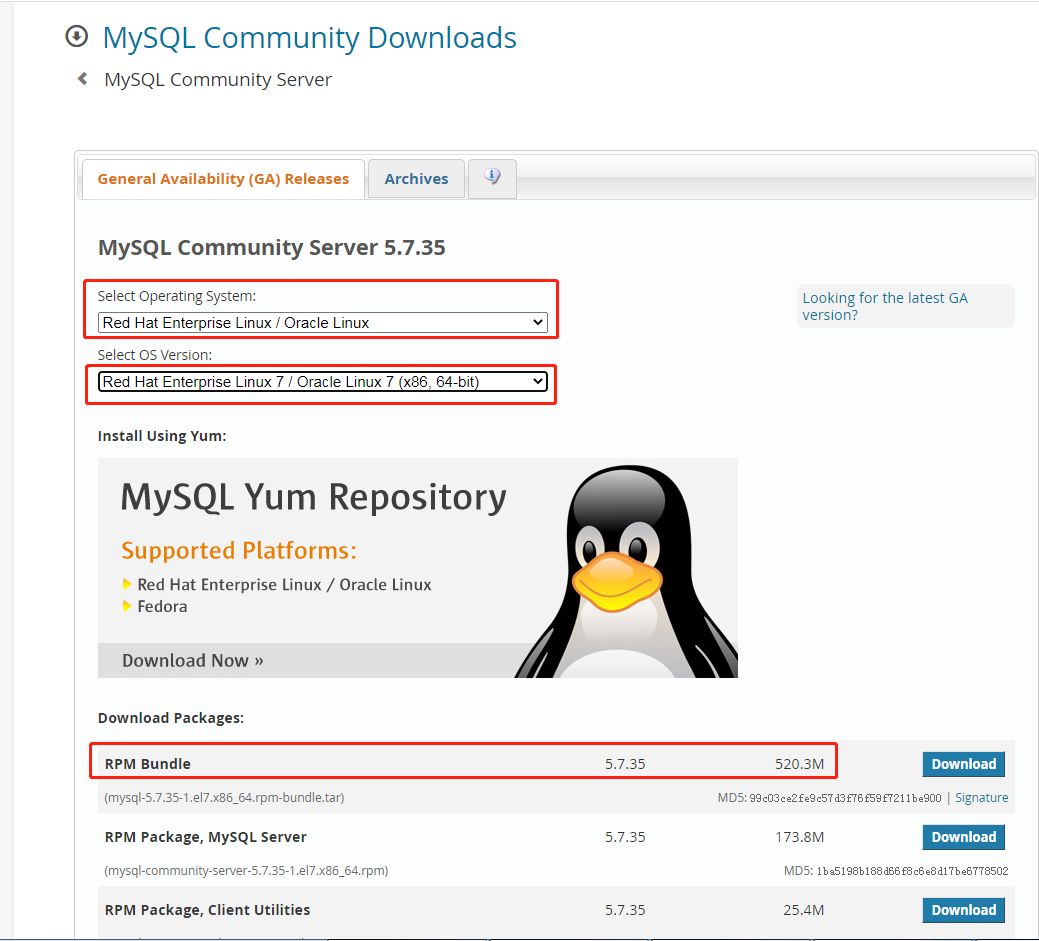
此处,我们采用rpm方式安装MySQL 5.7.x系列。
使用SecureCRT SFTP工具(或者同类型的XShell中的XFTP)将安装包上传到Linux服务器上。
2.1.2 安装部分依赖
查看Linux上是否已经安装了mysql,如果有,卸载
一般cent os 7默认安装了Mariadb,这里需要卸载
### 查看Mariadb依赖
rpm -qa|grep mariadb
### 卸载
rpm -e --nodeps mariadb-libs-5.5.68-1.el7.x86_64
安装MySQL 5.7所需要的依赖
yum -y install libaio perl net-tools
2.1.3 解压MySQL 5.7 安装包
tar -xvf mysql-5.7.35-1.el7.x86_64.rpm-bundle.tar
2.1.4 安装MySQL 5.7
 rpm -ivh mysql-community-common-5.7.35-1.el7.x86_64.rpm
 rpm -ivh mysql-community-libs-5.7.35-1.el7.x86_64.rpm
 rpm -ivh mysql-community-client-5.7.35-1.el7.x86_64.rpm
 rpm -ivh mysql-community-server-5.7.35-1.el7.x86_64.rpm
2.2 初始化MySQL
2.2.1 启动MySQL
# 启动
service mysqld start
# 查看状态
service mysqld status
2.2.2 修改默认启动密码
查看临时密码,得知临时密码如下
[root@bigdata01 ~]# grep password /var/log/mysqld.log
2021-09-05T06:46:31.997952Z 1 [Note] A temporary password is generated for root@localhost: frDpjttai8?0
# 登录mysql shell
mysql -uroot -p
# 使用临时密码mysql登录
mysql> set password = password("frDpjttai8?0")
2.2.3 开启远程连接,允许远程连接数据库
# 允许远程连接数据库
mysql> GRANT ALL PRIVILEGES ON *.* TO 'root'@'%' IDENTIFIED BY 'Root123456+' WITH GRANT OPTION;
# 刷新权限
mysql> FLUSH PRIVILEGES;
2.2.4 检查防火墙状态
# 关闭防火墙
systemctl stop firewalld
# 查看当前防火墙状态
systemctl status firewalld
# 禁止开机自启防火墙
systemctl disable firewalld
2.3 测试连接
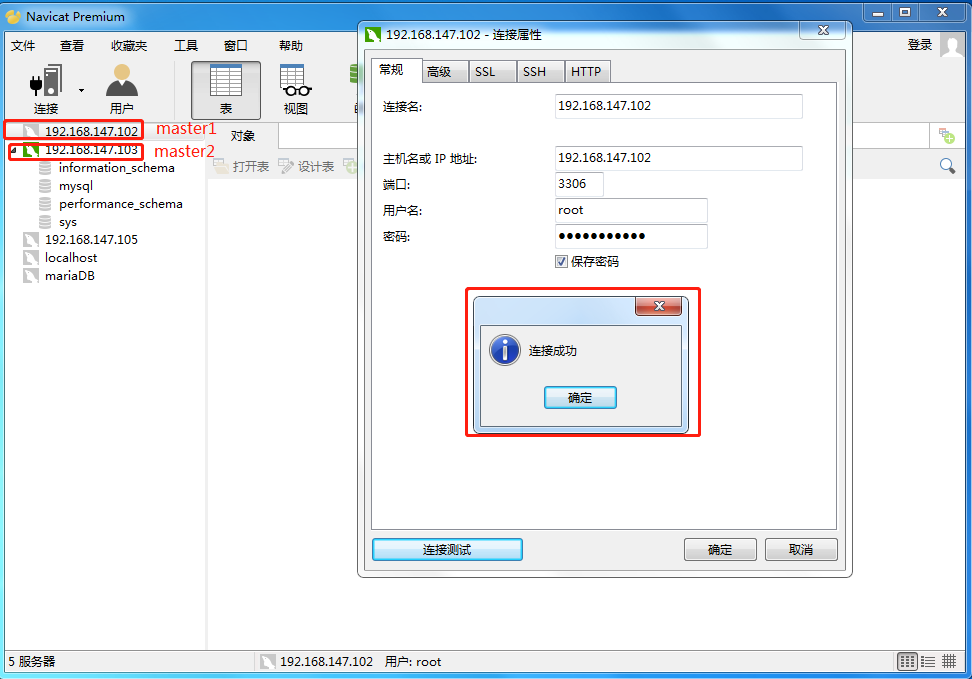
使用 navicat 或其他客户端连接工具连接, 提示连接成功即完远程连接授权
2.4 配置MySQL主主模式
2.4.1 修改MySQL配置文件
首先修改master1(192.168.147.102)的配置文件
vi /etc/my.cnf
# mysql.conf中配置文件
[root@bigdata01 ~]# cat /etc/my.cnf
[mysqld]
datadir=/var/lib/mysql
socket=/var/lib/mysql/mysql.sock
symbolic-links=0

log-error=/var/log/mysqld.log
pid-file=/var/run/mysqld/mysqld.pid

# 配置server-id 每个MySQL实例的server-id都不能相同
server-id=1
# MySQL的日志文件名称
log-bin=mysql_master1
# 作为从库时 更新操作是否写入日志 on:写入 其他数据库以此数据库为主库时才能进行同步
log-slave-updates=on

# MySQL系统库的数据不需要同步
# 同步数据时忽略以下数据库,但是必须在使用use db的情况下才会忽略
replicate-ignore-db=information_schema
replicate-ignore-db=mysql
replicate-ignore-db=performance_schema
replicate-ignore-db=sys

# 使用通配符忽略MySQL系统库 这样在creae user时也不会进行同步
replicate_wild_ignore_table=information_schema.%
replicate_wild_ignore_table=mysql.%
replicate_wild_ignore_table=performance_schema.%
replicate_wild_ignore_table=sys.%

# MySQL系统库的日志不计入binlog
binlog-ignore-db=information_schema
binlog-ignore-db=mysql
binlog-ignore-db=performance_schema
binlog-ignore-db=sys
在Master2(192.168.147.103)上也修改my.cnf文件,对刚配置的Master1配置文件稍加修改即可。
# master1机器
scp -r /etc/my.cnf root@bigdata02:/etc/
# 编辑my.cnf
vi /etc/my.cnf
# 需要修改的地方

# 配置master2的server-id
server-id=2
# MySQL的日志文件名称(非强制,建议修改)
log-bin=mysql_master2
完成配置文件修改后,分别在master1和master2上重启MySQL服务。
service mysqld restart
2.4.2 配置主主模式
先配置master1 -> master2 的主从
登录master1的数据库,并执行如下命令
# 对repl_master用户授权备份的权限 此处设置repl_master用户可以在192.168.147.103机器上登录
grant replication slave, replication client on *.* to 'repl_master'@'192.168.147.103' identified by 'Root123456+';
# 刷新权限
flush privileges;
# 查看Master1主节点的状态
show master status;
+----------------------+----------+--------------+-------------------------------------------------+-------------------+
| File                 | Position | Binlog_Do_DB | Binlog_Ignore_DB                                | Executed_Gtid_Set |
+----------------------+----------+--------------+-------------------------------------------------+-------------------+
| mysql_master1.000001 |      630 |              | information_schema,mysql,performance_schema,sys |                   |
+----------------------+----------+--------------+-------------------------------------------------+-------------------+
此处需要记住bin log文件名称mysql_master1.000001及位置630
然后登录到master2的数据库,执行如下命令
mysql> CHANGE MASTER TO MASTER_HOST='192.168.147.102',MASTER_PORT=3306,MASTER_USER='repl_master', MASTER_PASSWORD='Root123456+',MASTER_LOG_FILE='mysql_master1.000001',MASTER_LOG_POS=630;
# 开启从库
mysql> start slave;
# 查看从库状态
mysql> show slave status  G
第一次查看从库状态的时候, Slave_IO_Running: Connecting,后排查发现是用于授权repl_master用户的ip设置为master1(192.168.147.102),故在master2机器上使用repl_master远程登录出错。
# 查看授权用户/ip/权限
select * from user;
# 修改授权host信息
update user set `Host` = '192.168.147.103' where `User`='repl_master';
# 刷新权限
flush privileges;

这样,Master1(192.168.147.102) -> Master2(192.168.147.103)的主从复制就搭建好了。然后,反过来,搭建Master2 -> Master1的主从复制。
先登录master2的数据库,执行如下命令
# 创建备份账号repl_master,并授权网段192.168.147.102
grant replication slave, replication client on *.* to 'repl_master'@'192.168.147.102' identified by 'Root123456+';
# 刷新权限
flush privileges;
# 查看master2节点的状态
mysql> show master status;
+----------------------+----------+--------------+-------------------------------------------------+-------------------+
| File                 | Position | Binlog_Do_DB | Binlog_Ignore_DB                                | Executed_Gtid_Set |
+----------------------+----------+--------------+-------------------------------------------------+-------------------+
| mysql_master2.000001 |      630 |              | information_schema,mysql,performance_schema,sys |                   |
+----------------------+----------+--------------+-------------------------------------------------+-------------------+
1 row in set (0.00 sec)
再登录到master1的数据库,执行如下命令
CHANGE MASTER TO MASTER_HOST='192.168.147.103',MASTER_PORT=3306,MASTER_USER='repl_master', MASTER_PASSWORD='Root123456+',MASTER_LOG_FILE='mysql_master2.000001',MASTER_LOG_POS=630;
# 开启从库
start slave;
# 查看从库状态
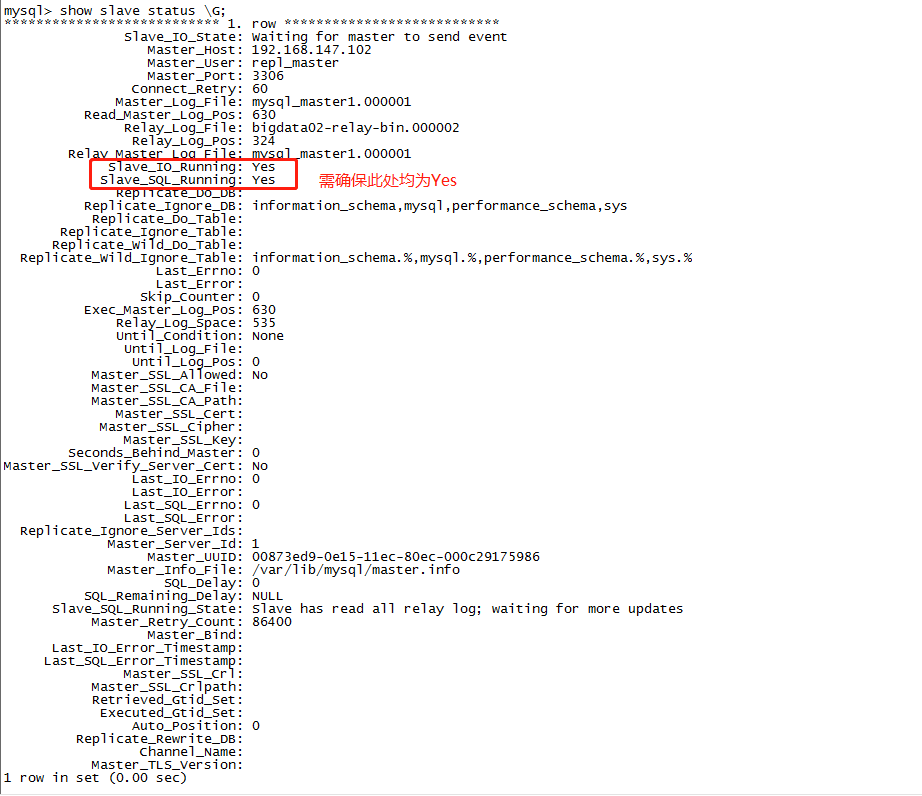
show slave status G;
mysql> show slave status G;
*************************** 1. row ***************************
               Slave_IO_State: Waiting for master to send event
                  Master_Host: 192.168.147.103
                  Master_User: repl_master
                  Master_Port: 3306
                Connect_Retry: 60
              Master_Log_File: mysql_master2.000001
          Read_Master_Log_Pos: 630
               Relay_Log_File: bigdata01-relay-bin.000002
                Relay_Log_Pos: 324
        Relay_Master_Log_File: mysql_master2.000001
             Slave_IO_Running: Yes
            Slave_SQL_Running: Yes
              Replicate_Do_DB:
          Replicate_Ignore_DB: information_schema,mysql,performance_schema,sys
           Replicate_Do_Table:
       Replicate_Ignore_Table:
      Replicate_Wild_Do_Table:
  Replicate_Wild_Ignore_Table: information_schema.%,mysql.%,performance_schema.%,sys.%
                   Last_Errno: 0
                   Last_Error:
                 Skip_Counter: 0
          Exec_Master_Log_Pos: 630
              Relay_Log_Space: 535
              Until_Condition: None
               Until_Log_File:
                Until_Log_Pos: 0
           Master_SSL_Allowed: No
           Master_SSL_CA_File:
           Master_SSL_CA_Path:
              Master_SSL_Cert:
            Master_SSL_Cipher:
               Master_SSL_Key:
        Seconds_Behind_Master: 0
Master_SSL_Verify_Server_Cert: No
                Last_IO_Errno: 0
                Last_IO_Error:
               Last_SQL_Errno: 0
               Last_SQL_Error:
  Replicate_Ignore_Server_Ids:
             Master_Server_Id: 2
                  Master_UUID: 4a322df3-0ff4-11ec-ba12-000c29c15afc
             Master_Info_File: /var/lib/mysql/master.info
                    SQL_Delay: 0
          SQL_Remaining_Delay: NULL
      Slave_SQL_Running_State: Slave has read all relay log; waiting for more updates
           Master_Retry_Count: 86400
                  Master_Bind:
      Last_IO_Error_Timestamp:
     Last_SQL_Error_Timestamp:
               Master_SSL_Crl:
           Master_SSL_Crlpath:
           Retrieved_Gtid_Set:
            Executed_Gtid_Set:
                Auto_Position: 0
         Replicate_Rewrite_DB:
                 Channel_Name:
           Master_TLS_Version:
1 row in set (0.00 sec)
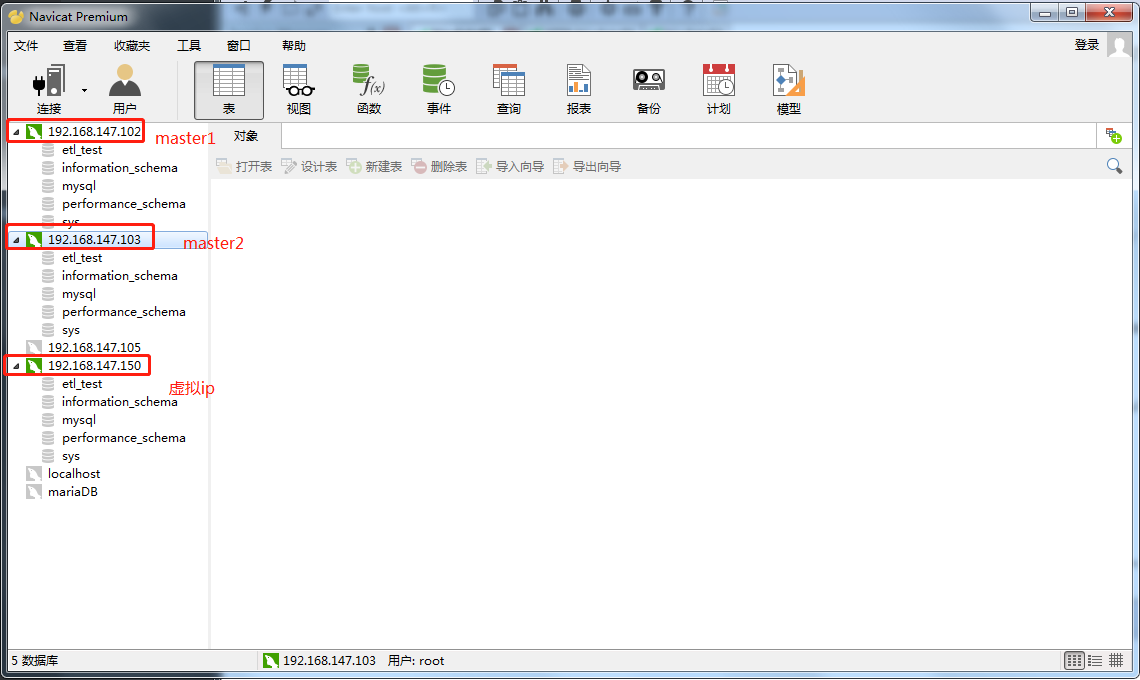
这样,Master2 -> Master1的主从也就搭建好了, 可以使用navicate分别连接master1和master2,验证主主模式搭建是否正常。

3. Keep Alive实现故障切换
3.1 KeepAlive安装
分别在两台节点上安装keepAlived
下载地址:https://www.keepalived.org/download.html
此处选择keepalived-2.0.18版本进行下载。
3.1.1 安装依赖
# 安装gcc libnl/libnl-3
yum -y install gcc libnl libnl-devel  openssl openssl-devel
3.1.2 上传并解压
# 解压
tar -zxvf keepalived-2.0.18.tar.gz -C /data/
3.1.3安装
安装目录及配置文件
# 进入解压后的keepalived-2.0.18目录
cd /data/keepalived-2.0.18/
# 安装
./configure --prefix=/usr/local/keepalived
配置安装目录过程中出现的报错
configure: error: in `/data/keepalived-2.0.18':
configure: error: no acceptable C compiler found in $PATH
安装gcc依赖即可
yum -y install gcc
configure: error:
  !!! OpenSSL is not properly installed on your system. !!!
  !!! Can not include OpenSSL headers files.            !!!
安装openssl和openssl-devel:
yum -y install openssl openssl-devel
WARNING - this build will not support IPVS with IPv6. Please install libnl/libnl-3 dev libraries to support IPv6 with IPVS.
安装 libnl/libnl-3
yum -y install libnl libnl-devel
安装了依赖后需要重新执行
./configure --prefix=/usr/local/keepalived
安装
make && make install
3.2 配置系统服务及开机自启
# keepalived启动脚本变量引用文件(安装目录下)
cp /usr/local/keepalived/etc/sysconfig/keepalived /etc/sysconfig/keepalived
# 将keepalived主程序加入到环境变量(安装目录下)
cp /usr/local/keepalived/sbin/keepalived /usr/sbin/keepalived
# keepalived启动脚本(源码目录下),放到/etc/init.d/目录下就可以使用service命令便捷调用
cp /data/keepalived-2.0.18/keepalived/etc/init.d/keepalived /etc/init.d/keepalived
# 将配置文件放到默认路径下
mkdir /etc/keepalived
cp /usr/local/keepalived/etc/keepalived/keepalived.conf /etc/keepalived/
配置开机自启
# 添加系统服务
chkconfig --add keepalived
# 添加开机自启
chkconfig keepalived on
尝试启动
# 启动服务
systemctl start keepalived
# 查看状态
systemctl status keepalived
发现报错systemd[1]: Can't open PID file /run/keepalived.pid (yet?) after start: No such file or directory
使用pkill keepalived 清除进程后重新启动
发现依旧未成功启动。查看输出日志
cat /var/log/message
日志中出现interface eth0等字样,需要对keepalived.conf进行配置
Sep 10 01:31:08 bigdata01 Keepalived_vrrp[52160]: (Line 21) WARNING - interface eth0 for vrrp_instance VI_1 doesn't exist
Sep 10 01:31:08 bigdata01 Keepalived_vrrp[52160]: (Line 30) Default interface eth0 doesn't exist for static address 192.168.200.16.
Sep 10 01:31:08 bigdata01 Keepalived_vrrp[52160]: (Line 31) Default interface eth0 doesn't exist for static address 192.168.200.17.
Sep 10 01:31:08 bigdata01 Keepalived_vrrp[52160]: (Line 32) Default interface eth0 doesn't exist for static address 192.168.200.18.
Sep 10 01:31:08 bigdata01 Keepalived_vrrp[52160]: Non-existent interface specified in configuration
Sep 10 01:31:08 bigdata01 Keepalived_vrrp[52160]: Stopped - used 0.000000 user time, 0.001987 system time
3.3 配置master1上的Keepalived
# 进入配置文件目录
vi /etc/keepalived/keepalived.conf
keepalived中的配置文件内容
! Configuration File for keepalived

global_defs {
   notification_email {
     acassen@firewall.loc
     failover@firewall.loc
     sysadmin@firewall.loc
   }
   notification_email_from Alexandre.Cassen@firewall.loc
   smtp_server 192.168.200.1
   smtp_connect_timeout 30
   router_id MASTER1_HA
}

vrrp_script chk_mysql_port {
    script "/opt/chk_mysql.sh"
    interval 2
    weight -5
    fall 2
    rise 1
}

vrrp_instance VI_1 {
    state MASTER
    interface ens33
    virtual_router_id 51
    priority 101
    advert_int 1
    authentication {
        auth_type PASS
        auth_pass 1111
    }
    virtual_ipaddress {
        192.168.147.150
    }

    track_script {
       chk_mysql_port
    }
}
编写切换脚本,KeepAlived做心跳检测,如果Master服务停止,那么keepAlived选择kill,Slave的KeepAlived通过心跳发现这个情况,就会将VIP的请求接管。
[root@bigdata01 keepalived-2.0.18]# vi /opt/chk_mysql.sh
#!/bin/bash
counter=$(netstat -na|grep "LISTEN"|grep "3306"|wc -l)
if [ "${counter}" -eq 0 ]; then
    /etc/init.d/keepalived stop
fi
chmod 755 /opt/chk_mysql.sh
# 启动keepalived服务
[root@bigdata01 keepalived-2.0.18]# /etc/init.d/keepalived start
Starting keepalived (via systemctl):                       [  OK  ]
检查keepAlived是否启动成功
# 启动
systemctl start keepalived
# 查看状态
systemctl status keepalived
# 查看进程信息
ps -ef |grep keepalived
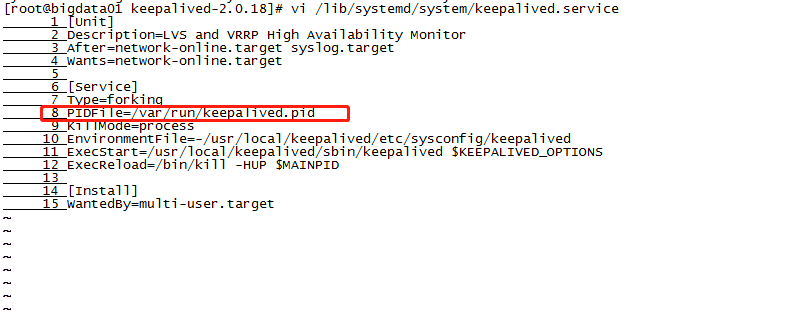
发现keepalived并未启动,报错信息为systemd: Can't open PID file /run/keepalived.pid (yet?) after start: No such file or directory
修改PID 文件位置
vi /lib/systemd/system/keepalived.service
# 将PID File修改为/var/run/keepalived.pid
PIDFile=/var/run/keepalived.pid
将KeepAlived.service配置改动生效
systemctl daemon-reload
再次启动报错SECURITY VIOLATION - scripts are being executed but script_security not enabled.
表示脚本已经执行,但脚本安全未允许
修改keepalived配置文件,在global_defs配置中添加: enable_script_security
global_defs {
    router_id lb-master
    enable_script_security
}
重新启动,发现KeepAlived已经正常运行。
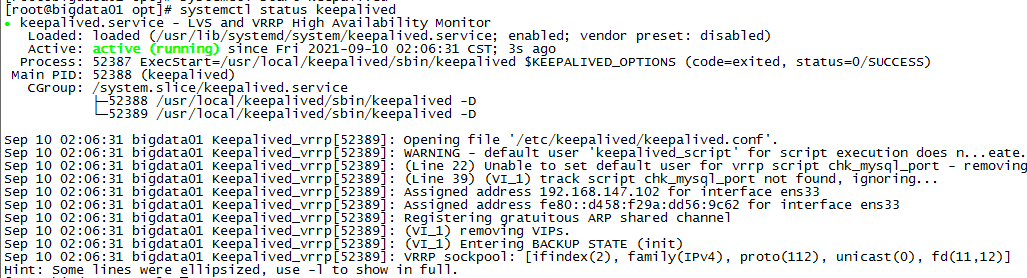
查看对应的进程信息
[root@bigdata01 opt]# ps -ef |grep keepalived
root      52388      1  0 02:06 ?        00:00:00 /usr/local/keepalived/sbin/keepalived -D
root      52389  52388  0 02:06 ?        00:00:00 /usr/local/keepalived/sbin/keepalived -D
root      52393   1509  0 02:09 pts/0    00:00:00 grep --color=auto keepalived
使用ip addr查看网络信息已经可以在网卡ens33下找到虚拟ip

3.4 配置Master2上的Keepalived
Master2上的KeepAlived与Master1上的内容基本相同,只需修改priority,state, router_id
! Configuration File for keepalived

global_defs {
   notification_email {
     acassen@firewall.loc
     failover@firewall.loc
     sysadmin@firewall.loc
   }
   notification_email_from Alexandre.Cassen@firewall.loc
   smtp_server 192.168.200.1
   smtp_connect_timeout 30
   router_id MASTER2_HA
   enable_script_security
}

vrrp_script chk_mysql_port {
    script "/opt/chk_mysql.sh"
    interval 2
    weight -5
    fall 2
    rise 1
}

vrrp_instance VI_1 {
    state BACKUP
    interface ens33
    virtual_router_id 51
    priority 98
    advert_int 1
    authentication {
        auth_type PASS
        auth_pass 1111
    }
    virtual_ipaddress {
        192.168.147.150
    }

    track_script {
       chk_mysql_port
    }
}
将chk_mysql.sh同样配置在/opt目录下
#!/bin/bash
counter=$(netstat -na|grep "LISTEN"|grep "3306"|wc -l)
if [ "${counter}" -eq 0 ]; then
    /etc/init.d/keepalived stop
fi
# 权限
chmod 755 /opt/chk_mysql.sh
修改 PIDFile
vi /lib/systemd/system/keepalived.service


[Unit]
Description=LVS and VRRP High Availability Monitor
After=network-online.target syslog.target
Wants=network-online.target

[Service]
Type=forking
PIDFile=/var/run/keepalived.pid
KillMode=process
EnvironmentFile=-/usr/local/keepalived/etc/sysconfig/keepalived
ExecStart=/usr/local/keepalived/sbin/keepalived $KEEPALIVED_OPTIONS
ExecReload=/bin/kill -HUP $MAINPID

[Install]
WantedBy=multi-user.target
# 生效对pid修改
systemctl daemon-reload
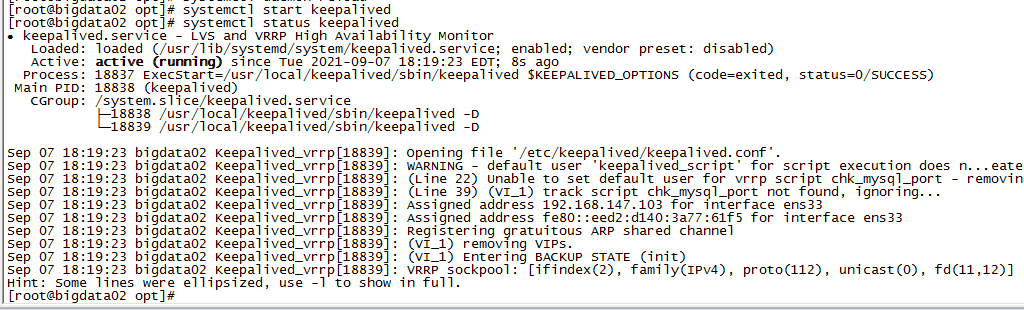
启动KeepAlived
systemctl start keepalived
查看KeepAlived服务状态
systemctl status keepalived
3.5 验证故障切换
使用naviate 连接虚拟ip 提供的mysql服务。
查看当前虚拟ip所处的机器
master1
[root@bigdata01 ~]# ip addr |grep 192.168.147.150
    inet 192.168.147.150/32 scope global ens33
master2
[root@bigdata02 opt]# ip addr |grep 192.168.147.150
此刻虚拟ip在master1机器上,停止master1的mysql服务,验证虚拟ip是否会漂移到master2机器。
systemctl stop mysqld
查看master2节点上的ip信息
[root@bigdata02 opt]# ip addr |grep 192.168.147.150
    inet 192.168.147.150/32 scope global ens33
使用navaite连接虚拟ip 192.168.147.150,发现依旧可以提供服务。

随后,重新启动master1上的mysql服务及keepalived服务。
# 启动MySQL
systemctl start mysqld
# 启动keepalived
systemctl start keepalived
查看虚拟ip信息
[root@bigdata01 opt]# ip addr | grep 192.168.147.150
    inet 192.168.147.150/32 scope global ens33
发现虚拟ip又重新漂移到了master1节点。

至此,完成基于MySQL主主环境+KeepAlived 自动故障迁移。