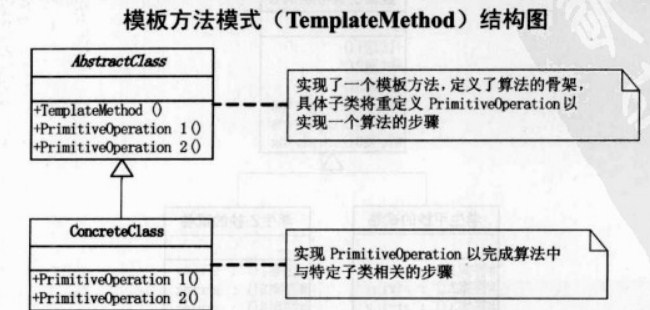
模板方法模式结构图如下。原理是过程实现不一样,但是执行的顺序是按照模板固定好了的。即简单理解为都有1,2,3步骤,但是每一步的实现交由具体实现类不同实现。
1.过程式编程
 1 // 模板方法模式
 2 package main
 3
 4 import "fmt"
 5
 6 type Template interface {
 7     fun1()
 8     fun2()
 9 }
10
11 //此处采取过程式编程,因为Go没有抽象类的概念
12 func result(t Template) {
13     t.fun1()
14     t.fun2()
15 }
16
17 type ConcreteA struct{}
18
19 func (c *ConcreteA) fun1() {
20     fmt.Println("A类实现fun1")
21 }
22
23 func (c *ConcreteA) fun2() {
24     fmt.Println("A类实现fun2")
25 }
26
27 type ConcreteB struct{}
28
29 func (c *ConcreteB) fun1() {
30     fmt.Println("B类实现fun1")
31 }
32
33 func (c *ConcreteB) fun2() {
34     fmt.Println("B类实现fun2")
35 }
36
37 func main() {
38     // var ta = new(ConcreteA)
39     // result(ta)
40
41     var tb = new(ConcreteB)
42     result(tb)
43 }
2.面向对象编程
 1 // 模板方法模式
 2 package main
 3
 4 import "fmt"
 5
 6 type Template interface {
 7     fun1()
 8     fun2()
 9     Result()
10 }
11
12 // 抽象结构体
13 type Funcs struct {
14     temp Template
15 }
16
17 // 抽象结构体部分实现接口
18 func (r *Funcs) Result() {
19     r.temp.fun2()
20     r.temp.fun1()
21 }
22
23 //A具体实现。继承自抽象结构体的方法+自身实现的方法=实现Template接口
24 type ConcreteA struct {
25     //会继承抽象结构体中的方法
26     Funcs
27 }
28
29 func (c *ConcreteA) fun1() {
30     fmt.Println("A类实现fun1")
31 }
32
33 func (c *ConcreteA) fun2() {
34     fmt.Println("A类实现fun2")
35 }
36
37 //B具体实现。继承自抽象结构体的方法+自身实现的方法=实现Template接口
38 type ConcreteB struct {
39     //会继承抽象结构体中的方法
40     Funcs
41 }
42
43 func (c *ConcreteB) fun1() {
44     fmt.Println("B类实现fun1")
45 }
46
47 func (c *ConcreteB) fun2() {
48     fmt.Println("B类实现fun2")
49 }
50
51 func main() {
52     interf := new(ConcreteB)
53     fmt.Printf("%P
", interf.Funcs)
54     // interf.Result() 此处报空指针错误,因为new(ConcreteB),其中方法Funcs并未实例化,也就不存在Result()
55
56     ta := Funcs{temp: interf}
57     ta.Result()
58 }