2019年7月16日15:55:11
感觉虚拟视点也是视觉slam里头一个重要的需求和应该实现的功能,但是好像
没看到什么资料。
百度的全景地图,或者有些公司网站上的3d装修效果图,可以用鼠标拖动查看不同视角,但是
图片看起来很奇怪,那不是虚拟视点,只是对图片做了变换。
虚拟视点的一些资料:
https://www.cnblogs.com/riddick/p/8511960.html
https://www.zhihu.com/question/40793359/answer/130155294
其他有点关联的方向:
https://zhuanlan.zhihu.com/p/73599241
谷歌也有篇文章把短基线变成长基线的文章,也有点虚拟视点的意思。
这里利用sfmlearner的设施做了个简单的demo:
原始图:
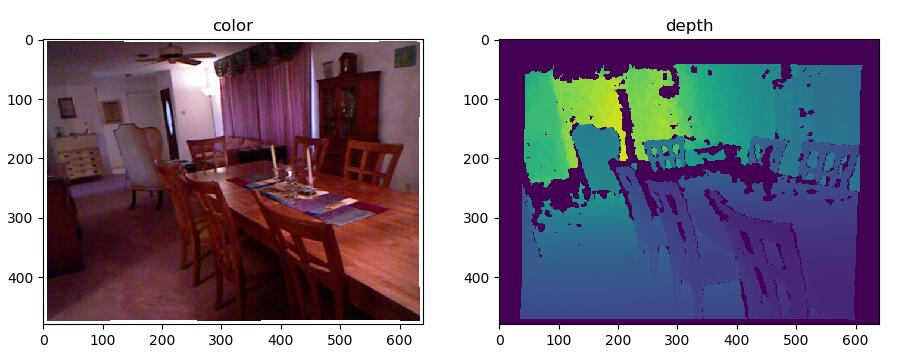
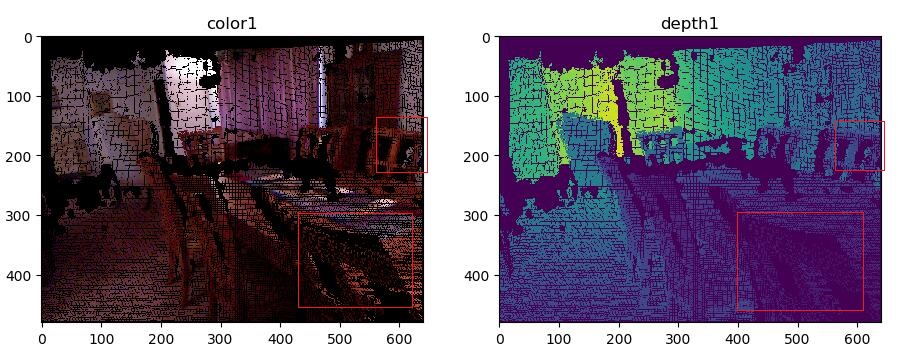
相机沿着Z轴往前移动0.5m,注意红框处和上图的对比,的确是往前移动了,这里没做插值,所以
不是太好看 pose = np.array([0, 0, -0.5, 0, 0, 0]) # tx, ty, tz, rx, ry, rz -- [B, 6] 弧度制!!!
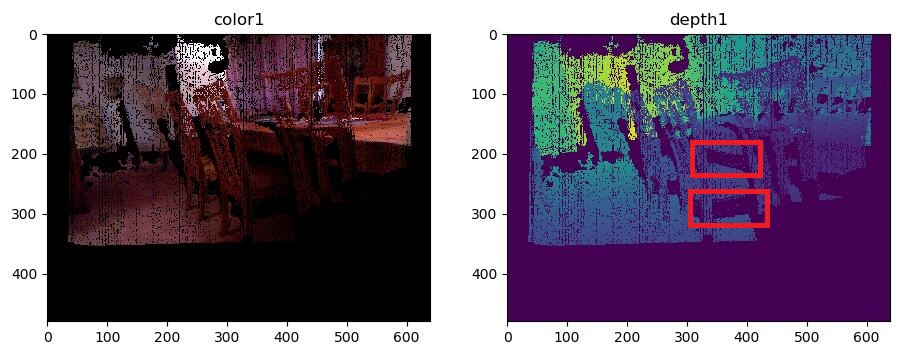
下面是pose = np.array([0, -0.5, 0, 0, 0, 0],相机往下走了,y=-0.5
注意depth图红框处,原本从上往下拍时被桌面或者凳子挡住的部分现在看的到了,但是对应的深度图
在之前的角度是测不到的,相机往下移动之后这部分的深度图就显示为空缺了,对应的color1部分也
是黑色的。
下面是代码:


  1 # -*- coding: utf-8 -*-
  2 """
  3 Created on Tue Jul 16 11:57:48 2019
  4
  5 @author: scj
  6
  7 project test
  8
  9 https://pytorch.org/docs/stable/nn.html?highlight=f%20grid_sample#torch.nn.functional.grid_sample
 10
 11 https://blog.csdn.net/chamber_of_secrets/article/details/83512540
 12
 13 https://blog.csdn.net/houdong1992/article/details/88122682
 14
 15
 16 """
 17
 18 import torch
 19
 20 import numpy as np
 21 import cv2
 22 import matplotlib.pyplot as plt
 23
 24 #depth = cv2.imread('/media/scj/work/depth/joinMap/depth/1.pgm', -1)
 25 depth = cv2.imread('D:\depth\joinMap\depth\1.pgm', -1)
 26 depth = depth/1000
 27
 28 depth_copy = depth.copy()
 29
 30 #fig = plt.subplots(1)
 31 #plt.imshow( depth_copy  )
 32 #plt.title("depth")
 33
 34
 35 #color = cv2.imread('/media/scj/work/depth/joinMap/color/1.png')
 36 color = cv2.imread('D:\depth\joinMap\color\1.png')
 37
 38 #fig = plt.subplots(1)
 39 #plt.imshow( cv2.cvtColor(color, cv2.COLOR_BGR2RGB)  )
 40 #plt.title("color")
 41
 42 #####################
 43 fig=plt.figure()
 44
 45 plt.subplot(121)
 46 plt.imshow(cv2.cvtColor(color, cv2.COLOR_BGR2RGB))
 47 plt.title("color")
 48
 49 plt.subplot(122)
 50 plt.imshow(depth_copy)
 51 plt.title("depth")
 52
 53 plt.show()
 54
 55 #####################
 56
 57 #color = np.transpose(color, (2, 0, 1))
 58
 59 # print(depth.shape, color.shape) # (480, 640)  (3, 480, 640)
 60
 61 depth = depth[np.newaxis, :].astype(np.float64)
 62 depth = torch.from_numpy(depth)
 63
 64 #print(depth.size() ) # torch.Size([1, 480, 640])
 65
 66
 67 cx = 325.5
 68 cy = 253.5
 69 fx = 518.0
 70 fy = 519.0
 71
 72 intrinsics = np.array([
 73                          [fx, 0, cx],
 74                          [0, fy, cy],
 75                          [0,  0,  1],
 76                          ]).astype(np.float64)
 77
 78 intrinsics = intrinsics[np.newaxis, :]
 79
 80 intrinsics = torch.from_numpy(intrinsics)
 81 #print( intrinsics.size() ) # (1, 3, 3)
 82
 83 ##########
 84 from inverse_warp import pixel2cam  # uv2xyz
 85
 86 cam_coords = pixel2cam(depth, intrinsics.inverse() )
 87
 88 #print(cam_coords.size() )
 89
 90 xyz1 = cam_coords.detach().numpy().squeeze()
 91 #print(xyz1.shape)
 92 #
 93 #fig = plt.subplots(1)
 94 #plt.imshow( xyz1[0, :, :]  )
 95 #plt.title("x")
 96 #
 97 #fig = plt.subplots(1)
 98 #plt.imshow( xyz1[1, :, :]  )
 99 #plt.title("y")
100 #
101 #fig = plt.subplots(1)
102 #plt.imshow( xyz1[2, :, :]  )
103 #plt.title("z")
104
105 #               tx, ty, tz,   rx, ry, rz -- [B, 6]  弧度制!!!
106 pose = np.array([0, -0.5,  0,   0, 0, 0]).astype(np.float64)
107 pose = pose[np.newaxis, :]
108 pose = torch.from_numpy(pose)
109
110 from inverse_warp import pose_vec2mat
111 pose_mat = pose_vec2mat(pose, rotation_mode='euler')  # [B,3,4]
112
113 print(pose_mat)
114
115 proj_cam_to_src_pixel = intrinsics @ pose_mat  # [B, 3, 4]  K*T_21
116 #print(proj_cam_to_src_pixel)
117
118 from inverse_warp import cam2pixel
119 # cam2pixel 多传了一个Z出来
120 src_pixel_coords, Z2 = cam2pixel(cam_coords,     # XYZ
121                             proj_cam_to_src_pixel[:,:,:3],   # R
122                             proj_cam_to_src_pixel[:,:,-1:],  # t
123                             padding_mode='zeros')    # [B,H,W,2]
124
125 print(src_pixel_coords.size() )
126
127 uv2 = src_pixel_coords.detach().numpy().squeeze()
128
129 #fig = plt.subplots(1)
130 #plt.imshow( uv2[:, :, 0]  )
131 #plt.title("u2")
132 #
133 #fig = plt.subplots(1)
134 #plt.imshow( uv2[:, :, 1]  )
135 #plt.title("v2")
136
137 #################
138 b = color[:, :, 0]
139 g = color[:, :, 1]
140 r = color[:, :, 2]
141
142 b = b.reshape(307200, 1)
143 g = g.reshape(307200, 1)
144 r = r.reshape(307200, 1)
145
146 u2 = uv2[:, :, 0].reshape(307200, 1)
147 v2 = uv2[:, :, 1].reshape(307200, 1)
148
149 color1 = np.zeros_like(color)
150
151 zz = Z2.detach().numpy().squeeze()  # (307200, )
152
153 #zz[133, 182] - depth_copy[133, 182] # 深度的确有变化 相差0.5
154
155 depth1 = np.zeros((480, 640))
156
157
158 for i in range(307200):
159     uu = u2[i]
160     vv = v2[i]
161
162     if uu>-1 and uu < 1 and vv>-1 and vv<1:
163         xx = int(0.5*(uu+1)*639)
164         yy = int(0.5*(vv+1)*479)
165
166         color1[yy, xx, 0] = b[i]
167         color1[yy, xx, 1] = g[i]
168         color1[yy, xx, 2] = r[i]
169
170         depth1[yy, xx] = zz[i]
171
172
173 #fig = plt.subplots(1)
174 #plt.imshow( cv2.cvtColor(color1, cv2.COLOR_BGR2RGB)  )
175 #plt.title("color1")
176 #
177 #
178 #fig = plt.subplots(1)
179 #plt.imshow( depth1  )
180 #plt.title("depth1")
181
182 fig=plt.figure()
183
184 plt.subplot(121)
185 plt.imshow(cv2.cvtColor(color1, cv2.COLOR_BGR2RGB))
186 plt.title("color1")
187
188 plt.subplot(122)
189 plt.imshow(depth1)
190 plt.title("depth1")
191
192 plt.show()
当然,上图的效果不行,还要做插值才能好看点。