2019年2月22日13:52:37
https://zhuanlan.zhihu.com/p/29968267
这里有个tensorlfow代码的阅读博客:
https://zhuanlan.zhihu.com/p/29664269
跑的是这个版本: https://github.com/ClubAI/MonoDepth-PyTorch
对比了下 tf 和 pt 版本的代码,比较简单,就不分析了。
输入的图片先resize到 256x512 大小
model部分生成了4个不同尺度的视差图:
print("self disp1 size:", self.disp1.size() )  # torch.Size([1, 2, 256, 512])
print("self disp2 size:", self.disp2.size() )  # torch.Size([1, 2, 128, 256])
print("self disp3 size:", self.disp3.size() )  # torch.Size([1, 2, 64, 128])
print("self disp4 size:", self.disp4.size() )  # torch.Size([1, 2, 32, 64])
return self.disp1, self.disp2, self.disp3, self.disp4  # 输出各个尺度的左右视差图
然后 loss 部分 loss = loss_function(disps, [left, right])
因为双目相机视差公式 x_left = x_right + disparity 是假设两个相机的光轴平行,
然后代码中真的就是直接加。
所以输入到网络中的 左-右图像对都要先做 立体校正 !
参考 cv2.stereoRectify 的相关知识。
https://www.cnblogs.com/zyly/p/9373991.html


  1 # -*- coding: utf-8 -*-
  2 """
  3 Created on Wed Feb 27 13:43:29 2019
  4
  5 @author: x
  6
  7 这个用opencv的函数完成了深度估计
  8
  9 https://github.com/aaliomer/Home-Drone/blob/
 10 a22f9d78644996d7876716ee961e29a9f4e8a705/python/depth%20map/calibrationExample.py
 11
 12
 13 https://blog.csdn.net/xiao__run/article/details/78887362
 14
 15 """
 16
 17 import numpy as np
 18 import cv2
 19
 20 numBoards = 30  #how many boards would you like to find
 21
 22 criteria = (cv2.TERM_CRITERIA_EPS + cv2.TERM_CRITERIA_MAX_ITER, 30, 0.001)
 23
 24 w = 9
 25 h = 6
 26
 27 # Arrays to store object points and image points from all the images.
 28 object_points = [] # 3d point in real world space
 29 imagePoints1 = [] # 2d points in image plane.
 30 imagePoints2 = [] # 2d points in image plane.
 31
 32 corners1 = []
 33 corners2 = []
 34
 35 obj = np.zeros((9*6, 3), np.float32)
 36 obj[:,:2] = np.mgrid[0:9, 0:6].T.reshape(-1,2)
 37 obj = obj*25  # 25 mm  18.1
 38
 39
 40 cap = cv2.VideoCapture("./calibration.avi")
 41
 42 success = 0
 43 k = 0
 44 found1 = False
 45 found2 = False
 46
 47
 48
 49 i = 0
 50 while True:
 51    i += 1
 52    ret, frame = cap.read()
 53    if ret is False:
 54        break
 55
 56    img1 = frame[:, 640:]  # left
 57    img2 = frame[:, 0:640] # right
 58
 59 #   retL, img1 = vidStreamL.read()
 60 #   retR, img2 = vidStreamR.read()
 61
 62 #   height, width, depth  = img1.shape
 63
 64    gray1 = cv2.cvtColor(img1, cv2.COLOR_BGR2GRAY)
 65    gray2 = cv2.cvtColor(img2, cv2.COLOR_BGR2GRAY)
 66
 67    found1, corners1 = cv2.findChessboardCorners(img1, (w,h), None)
 68    found2, corners2 = cv2.findChessboardCorners(img2, (w,h), None)
 69
 70    if (found1):
 71        cv2.cornerSubPix(gray1, corners1, (11, 11), (-1, -1),criteria)
 72        cv2.drawChessboardCorners(gray1, (w,h), corners1, found1)
 73
 74    if (found2):
 75        cv2.cornerSubPix(gray2, corners2, (11, 11), (-1, -1), criteria)
 76        cv2.drawChessboardCorners(gray2, (w,h), corners2, found2)
 77
 78    cv2.imshow('image1 left', gray1)
 79    cv2.imshow('image2 right', gray2)
 80
 81    k = cv2.waitKey(1)
 82
 83
 84    if (found1 != 0 and found2 != 0):
 85
 86        if i%20 == 0:
 87            imagePoints1.append(corners1);
 88            imagePoints2.append(corners2);
 89            object_points.append(obj);
 90
 91            print("Corners stored
")
 92
 93            success+=1
 94
 95            if (success >= numBoards):
 96                break
 97
 98
 99 cap.release()
100 cv2.destroyAllWindows()
101 #%%
102 # 下面是matlab标定的结果,应该比opencv的更准一点
103 mtx_left = np.array([
104  [767.49,       1.927,  314.49],
105  [  0.        ,766.64,  237.19],
106  [  0.        ,0.          ,1.],
107  ])
108
109 dist_left = np.array([0.0047, 0.0793, 1.39e-04, 0.0030, -0.6080])
110
111
112 mtx_right = np.array([
113  [767.72,     1.3963,      330.26],
114  [  0.       ,765.37,      160.09],
115  [  0.       ,0.          ,1.        ],
116  ])
117
118 dist_right = np.array([ 0.0411,-0.3073,-3.037e-04,0.0041,0.9156])
119 #%%
120 print("Starting Calibration
")
121
122 width = 640
123 height = 480
124
125 retval, cameraMatrix1, distCoeffs1, cameraMatrix2, distCoeffs2, R, T, E, F
126    = cv2.stereoCalibrate(object_points, imagePoints1, imagePoints2,
127                          mtx_left, dist_left, mtx_right, dist_right,
128                          (width, height) )
129
130 print("Done Calibration
")
131 #%%
132 size = (640, 480) # 图像尺寸
133
134 # 进行立体更正
135 R1, R2, P1, P2, Q, validPixROI1, validPixROI2 =
136     cv2.stereoRectify(mtx_left, dist_left,
137                       mtx_right, dist_right, size, R, T)
138
139 # 计算更正map
140 left_map1, left_map2 =
141 cv2.initUndistortRectifyMap(mtx_left, dist_left, R1, P1, size, cv2.CV_16SC2)
142
143 right_map1, right_map2 =
144 cv2.initUndistortRectifyMap(mtx_right, dist_right, R2, P2, size, cv2.CV_16SC2)
145 #%%
146 #cv2.namedWindow("left")
147 #cv2.namedWindow("right")
148 cv2.namedWindow("depth")
149
150 #cv2.moveWindow("left", 0, 0)
151 #cv2.moveWindow("right", 600, 0)
152
153 cv2.createTrackbar("num", "depth", 0, 10, lambda x: None)
154 cv2.createTrackbar("blockSize", "depth", 5, 255, lambda x: None)
155
156
157 # 添加点击事件,打印当前点的距离
158 def callbackFunc(e, x, y, f, p):
159     if e == cv2.EVENT_LBUTTONDOWN:
160         print(threeD[y][x])
161
162 cv2.setMouseCallback("depth", callbackFunc, None)
163
164 cap = cv2.VideoCapture("./outdoor_cam_1547865993.avi")
165 #cap = cv2.VideoCapture("./calibration.avi")
166
167 while True:
168     ret, frame = cap.read()
169     if ret is False:
170        break
171
172     frame1 = frame[:, 640:]  # left
173     frame2 = frame[:, 0:640] # right
174
175     if ret is False:
176         break
177
178     # 根据更正map对图片进行重构
179     img1_rectified = cv2.remap(frame1, left_map1,  left_map2,  cv2.INTER_LINEAR)
180     img2_rectified = cv2.remap(frame2, right_map1, right_map2, cv2.INTER_LINEAR)
181
182     # 将图片置为灰度图,为StereoBM作准备
183     imgL = cv2.cvtColor(img1_rectified, cv2.COLOR_BGR2GRAY)
184     imgR = cv2.cvtColor(img2_rectified, cv2.COLOR_BGR2GRAY)
185
186     # 两个trackbar用来调节不同的参数查看效果
187     num = cv2.getTrackbarPos("num", "depth")
188     blockSize = cv2.getTrackbarPos("blockSize", "depth")
189     if blockSize % 2 == 0:
190         blockSize += 1
191     if blockSize < 5:
192         blockSize = 5
193
194     # 根据Block Maching方法生成差异图(opencv里也提供了
195     # SGBM/Semi-Global Block Matching算法,有兴趣可以试试)
196     stereo = cv2.StereoBM_create(numDisparities=16*num, blockSize=blockSize)
197     disparity = stereo.compute(imgL, imgR)
198
199     disp = cv2.normalize(disparity, disparity, alpha=0, beta=255,
200                          norm_type=cv2.NORM_MINMAX, dtype=cv2.CV_8U)
201
202     disp = cv2.applyColorMap(disp, cv2.COLORMAP_HOT)
203
204     # 将图片扩展至3d空间中,其z方向的值则为当前的距离
205     threeD = cv2.reprojectImageTo3D(disparity.astype(np.float32)/16., Q)
206
207
208 #    cv2.imshow("left",  img1_rectified)
209 #    cv2.imshow("right", img2_rectified)
210
211     lr = np.hstack((img1_rectified, img2_rectified))
212
213     cv2.imshow("left_right", lr)
214
215     cv2.imshow("depth", disp)
216
217     key = cv2.waitKey(1)
218     if key == ord("q"):
219         break
220
221 #    elif key == ord("s"):
222 #        cv2.imwrite("./snapshot/BM_left.jpg", imgL)
223 #        cv2.imwrite("./snapshot/BM_right.jpg", imgR)
224 #        cv2.imwrite("./snapshot/BM_depth.jpg", disp)
225
226 cap.release()
227 cv2.destroyAllWindows()
另外,kitti的左右图像重叠率在90%以上,如果自己用双目相机拍视频,
想要尽量复现出一个较好的结果的话,应该尽量贴近kitti数据集的状态。
等玩熟了再尝试做点改变。
训练过程 不需要 具体的参数 焦距 f 和 基线长b,这就说明了最后训练出来的网络权重只
对这个相机有效,只对这个相机拍出来的图片能做深度估计。
换个相机拍的图片,深度预测效果可能就没那么好了。
2019年3月8日14:15:57
用vscode的对比功能,可以轻松的比较 tf 和 pt 版本的代码的异同
后续可以把其他较新的tensorflow的库改写成pytorch版了。

2019年3月14日16:54:45
在 pytorch 下写了一个 saver,保存了 模型权重 以及 optimizer 状态。
emmm,以后可以把耗时的训练分成好几个晚上来做了。。。都是被渣1050逼的。。。
其实最好做一个 非常小的数据集 以方便调试,做一个 train、valid 之外的很小的数据集。
2019年3月15日08:59:57
用于train的图片3225张,用于valid的图片645张,
跑了81个epoch,平均每个epoch大概 630 s,到第60个epoch的时候valid loss就不怎么往下走了,
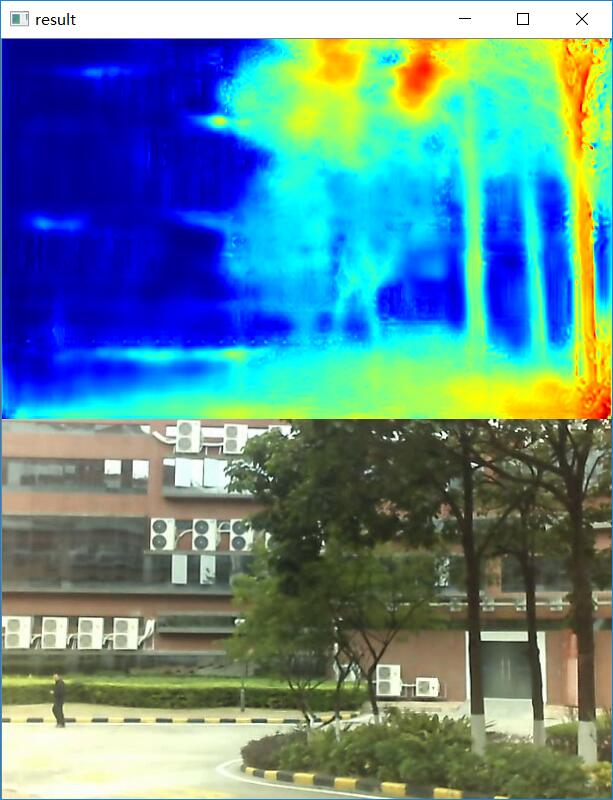
在valid数据集上,部分图片的测试结果已经可以看了。后续还要再调整下 lr 继续训练。
公司的双目相机很劣质,数据集也很小,拍摄的场景也不理想,训练的epoch也不多,
这个结果已经可以接受了。
2019年3月16日09:27:36
又继续训练了一个晚上,epoch跑到了差不多160,train_loss从0.66掉到0.61,valid_loss
还是大概0.68左右,没怎么往下降。但是看valid_dataset的效果,比昨天略好。
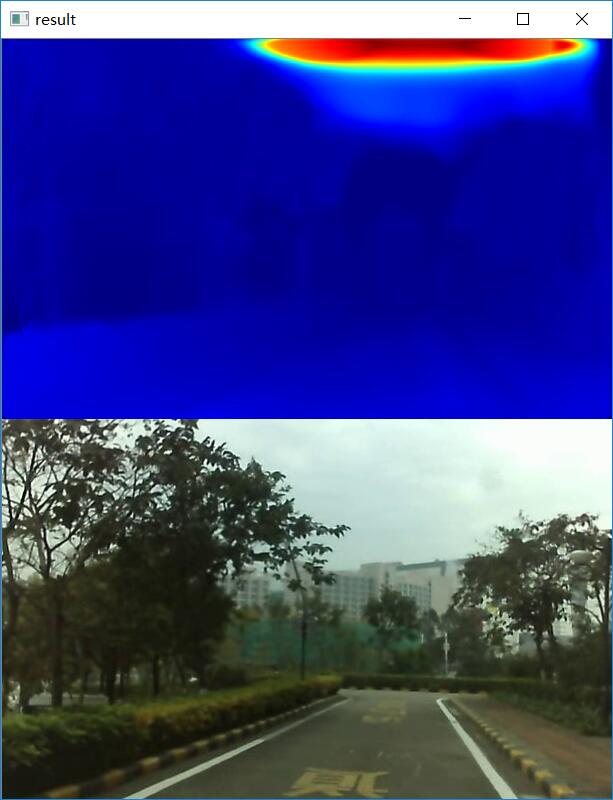
对于玻璃、镜面的效果比昨天的预测结果略好,下面的结果是disparities_pp
1

2
对于大片的天空还是预测错误。
2019年4月22日10:27:31
前两天发现opencv对于我手边这个非常渣的双目相机的标定结果并不是非常精确。。。
校正完了,再拿校正完的棋盘图片算内参,结果两个相机的内参差距有减少,但并
不是一模一样的。。。准备再拿matlab校正一次做对比。
monodepth效果不太好可能是opencv和相机校正的锅。。。