1,前言
本文期望描述如何使用Shiro构建基本的安全登录和权限验证。本文实战场景有如下特殊需求:1,在集群和分布式环境实现session共享;2,前端只使用HTML/CSS/JS。因此无法直接使用Shiro提供的SessionManager,以及Shiro针对web应用提供的Filter拦截方式。当然,除非是一定要通过共享缓存的方式共享session,否则还是使用Shiro默认的session管理,毕竟增加独立缓存就意味着维护成本的提高和可用性的下降。
2, Shiro架构
首先一睹官方给出的Shiro架构图,如图1所示。刨除最右侧的加密工具类,主要围绕SercurityManager来阐述。SercurityManager是Shiro安全框架里的顶层安全管理中心,所有安全控制相关逻辑都是在SercurityManager里面通过delegate的方式,调用到真正的动作执行者。从图1可以清楚看到主要管理的组件:authentication管理,authorization管理,session管理,session缓存管理,cache管理,realms管理。(本文不想重复已有的文字,想要更好的了解Shiro,详见官方推荐的Shiro full intro: https://www.infoq.com/articles/apache-shiro)
1)Shiro提供的CacheManager比较单薄,提供实现是MemoryConstrainedCacheManager,主要是依赖SoftHashMap来做基于内存条件的缓存,也即是当内存吃紧,没有新的内存空间来存放new出来的对象时,会去释放SoftHashMap中存放的对象,在本文中的应用场景是面向集群和分布式应用环境,使用了Redi缓存登录用户的相关信息,所以需要自定义cache处理。
2)Shiro对于session的缓存管理,定义了SessionDAO抽象,并提供了两个存放于本地JVM内存的EnterpriseCacheSessionDAO和MemorySessionDAO,两者主要区别是EnterpriseCacheSessionDAO的session存放在SoftHashMap中,原则上可以自己实现SessionDAO 接口,实际存储使用Redis来做到完整的session共享,但是缺陷是:a,不安全,因为把所有数据都共享出去了;b,当每次需要获取session数据时,都需要通过网络来把整个session反序列化回来,而考虑很多情况下,只是间断的需要几个key的数据,这样在session数据量大一些的时候,就会产生大量消耗。因此在共享session时,不去替换默认SessionDao的实现,而是通过@overwrite AbstractNativeSessionManager getter/setter attribute方法,实现有选择的共享session的基本初始化和指定attribute key的数据。
3)Shiro的authentication和authorization过程主要是依据用户定义的 AuthorizingRealm中提供的AuthenticationInfo和AuthorizationInfo。特别地,authentication 还提供类似验证链的authentication策略,允许用户提供多个Realm。第3部分会具体的示例Shiro集成Spring的使用范例,并详细解释AuthorizingRealm 。

图 1 Shiro官方架构图
3, Shiro使用范例
官方提供了集成Spring Web应用的使用例子,但是就如前文提到的,这里前端只能使用JS的Http和后端通信,因此无法直接使用ShiroFilterFactoryBean来做Request的Filter。本文鉴于简单和初期的原则,可以选择定义一个RequestInterceptor类继承HandlerInterceptorAdapter并overwrite preHandle 方法。Interceptor的applicationContext和源码定义如下:
applicationContext.xml
 1 <mvc:interceptors>
 2     <mvc:interceptor>
 3         <mvc:mapping path="/**"/>
 4         <!--拦截的url -->
 5         <mvc:mapping path="/admin/**"/>
 6         <!-- 不拦截的url start -->
 7         <mvc:exclude-mapping path="/admin/login"/>
 8         <mvc:exclude-mapping path="/admin/code"/>
 9         <mvc:exclude-mapping path="/admin/logout"/>
10         <mvc:exclude-mapping path="/admin/msgErrorInfo"/>
11         <!--不拦截的url end -->
12         <bean class="authorizing.RequestInterceptor">
13             <property name="unauthenticatedUrl" value="/admin/msgErrorInfo" />
14         </bean>
15     </mvc:interceptor>
16 </mvc:interceptors>
RequestInterceptor.java
 1 public class RequestInterceptor extends HandlerInterceptorAdapter {
 2
 3     private String unauthenticatedUrl;
 4
 5     public boolean preHandle(HttpServletRequest request, HttpServletResponse response,
 6             Object handler) throws Exception {
 7         if(PermissionUtils.isLogin(request)){
 8             return true;
 9         }
10         //token已失效,返回提示信息
11         request.getRequestDispatcher(unauthenticatedUrl).forward(request, response);
12         return false;
13     }
14
15     public void setUnauthenticatedUrl(String unauthenticatedUrl) {
16         this.unauthenticatedUrl = unauthenticatedUrl;
17     }
18 }
RequestInterceptor.java定义非常简单,主要是在preHandler方法中验证了一下请求是否是登录用户发出的,否则响应给前端一个重定向。然后看一下PermissionUtils.isLogin(request)是怎样做登录验证的。
PermissionUtils.java
 1 public class PermissionUtils {
 2 private static ThreadLocal<String> sessionToken = new ThreadLocal<String>();
 3
 4 public static boolean isLogin(HttpServletRequest request){
 5     String token = sessionToken(request);
 6     if(StringUtils.isEmpty(token))
 7         return false;
 8     /**
 9     * 使用token检查是否存在登录session
10     */
11     //Session session = SecurityUtils.getSecurityManager().getSession(new WebSessionKey(token, request, response));
12     Session session = SecurityUtils.getSecurityManager().getSession(new DefaultSessionKey(token));
13     if(session != null){
14         session.touch();
15         sessionToken.set(token);
16         return true;
17     }
18     return false;
19 }
20
21 private static String sessionToken(HttpServletRequest request){
22     return request.getHeader("token");
23 }
24 }
从PermissionUtils.java可以判断,保存前后端session的方式是通过token的形式。也即是每次request中的header部分都携带了登录成功后获取的token,以token为标识获取登录用户的session。特别地,对于Shiro而言,session并非特定于Web应用,Shiro有自己的session定义,可以独立于应用环境而存在。因此为了追求简单(既已弃用了Shiro针对web.xml应用提供的Filter),直接使用Shiro创建的默认session(实际是SimpleSession)。此外,需要说明的一个细节是通过Shiro的SecurityManager 返回的session实际都是一个代理(DelegatingSession的实例)。因此,通过 SecurityManager获取的session,然后对session执行的动作实际都是通过 SecurityManager的SessionManager来完成的(因为共享session,每一次session的touch动作都应该反映到共享session中,后文,可以看到overwrite SessionManager#touch(SessionKey key)和start session)。Shiro提供的默认SessionManager都继承了AbstractValidatingSessionManager$sessionValidationSchedulerEnabled属性,该属性控制了是否执行一个后台守护线程(Thread#setDaemon(true))在给定的一个固定时间间隔(默认1个小时)内周期性的检查session是否过期,并且在每一次获取到session之后都会去检查session是否过期(对于共享session的集群,共享缓存基本都已具备超时管理功能,所以可以重新实现后文提到的 AbstractNativeSessionManager#getSession(SessionKey))。PermissionUtils.java中定义了一个ThreadLocal类型的sessionToken变量,该变量是用于暂存当前request authentication成功之后的session标识,避免每次获取token都要从request中拿(后文中使用到的每一个url的authorization都需要首先执行一次checkPermission方法,通过token来验证是否有访问权限)。
接下来描述Authentication和Authorization,具体地说明如何基于Shiro实现login和check permission。下面先给出applicationContext配置。
applicationContext.xml
<bean id="securityManager" class="org.apache.shiro.mgt.DefaultSecurityManager">
  <property name="realm" ref="authorizingRealm" />
  <property name="sessionManager">
      <bean class="service.authorizing.shiro.RedisSessionManager" >
        <property name="globalSessionTimeout" value="${session.timeout}" />
      </bean>
  </property>
</bean>
<bean id="realmCache" class="service.authorizing.shiro.cache.RedisShiroCache" />
<bean id="authorizingRealm" class="service.authorizing.shiro.DefaultAuthorizingRealm">
  <property name="authorizationCachingEnabled" value="true"/>
  <property name="authorizationCache" ref="realmCache" />
</bean>
<bean id="lifecycleBeanPostProcessor" class="org.apache.shiro.spring.LifecycleBeanPostProcessor"/>

<bean class="org.springframework.beans.factory.config.MethodInvokingFactoryBean">
  <property name="staticMethod" value="org.apache.shiro.SecurityUtils.setSecurityManager"/>
  <property name="arguments" ref="securityManager"/>
</bean>
applicationContext.xml中配置的DefaultSecurityManager,RedisSessionManager,DefaultAuthorizingRealm和RedisShiroCache,分别代表Shiro的默认SecurityManager,自定义基于Redis的session manager,继承自Shiro的AuthorizingRealm的默认实现,以及自定义基于Redis的用户权限相关的Cache<Object, AuthorizationInfo>实现。注意到,本文的应用场景虽然是web.xml应用,但是并没有使用Shiro提供的 DefaultWebSecurityManager和DefaultWebSessionManager这两个针对web应用的拓展。使用针对web应用的拓展实现自然也没问题,但是个人认为对于纯粹的前后端分离权限认证的应用场景中,前端和后端应当是完全独立的,它们之间唯一的耦合是通过Http request交互的token。因此就目前简单和初期的原则,不需要DefaultWebSecurityManager和DefaultWebSessionManager。
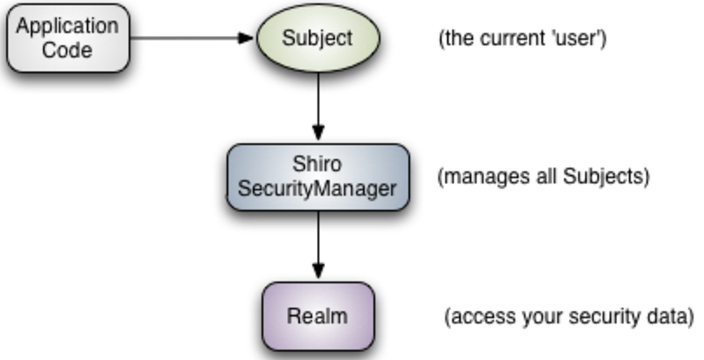
图2 Shiro组件交互过程
在讲解程序具体怎样执行login和check permission之前,先看图2所示的Shiro各组件的交互过程,可以看到Real是安全验证的依据。所以有必要先理解Shiro提供的abstract类AuthorizingRealm,该类定义了两个抽象方法doGetAuthorizationInfo和doGetAuthenticationInfo,分别用于check permission和login验证。具体如下DefaultAuthorizingRealm.java的定义:
DefaultAuthorizingRealm.java
 1 public class DefaultAuthorizingRealm extends AuthorizingRealm {
 2
 3 @Autowired
 4 private AuthorizingService authorizingService;
 5
 6     /**
 7     * 获取登录用户角色和功能权限信息,
 8     * 使用{@link org.apache.shiro.cache.CacheManager}和{@link org.apache.shiro.cache.Cache}获取数据.
 9     * @param principals 登录用户ID
10     * @return
11     */
12     protected AuthorizationInfo doGetAuthorizationInfo(PrincipalCollection principals) {
13         Object username =principals.getPrimaryPrincipal();
14         Cache<Object, AuthorizationInfo> infoCache = getAuthorizationCache();
15         AuthorizationInfo info = infoCache.get(username);
16         return info;
17     }
18
19     /**
20     * 根据登录用户token,获取用户信息。
21     * 对于session timeout时间较短的场景可以考虑使用AuthenticationCache
22     * 若验证失败,会抛出异常 {@link AuthenticationException}
23     * @param token
24     * @return
25     * @throws AuthenticationException
26     */
27     protected AuthenticationInfo doGetAuthenticationInfo(AuthenticationToken token) throws AuthenticationException {
28         Object username = token.getPrincipal();
29         //对于session timeout时间较短的场景,可缓存用户authentication信息
30         //Cache<Object, AuthenticationInfo> infoCache = getAuthenticationCache();
31         //return infoCache.get(username);
32         return authorizingService.authentication(username);
33     }
34 }
DefaultAuthorizingRealm.java的实现,可以看到用户只需要通过 doGetAuthorizationInfo和doGetAuthenticationInfo两个方法给Shiro的SecurityManager提供Authorization和Authentication信息,SecurityManager就会在执行check permission和login操作时自动调用这两个函数来验证操作。下面我们再看执行login和check permission操作时具体做了什么。
- Authentication
下面在LoginController.java定义了login请求操作。
LoginController.java
 1 @Controller
 2 @RequestMapping("/admin")
 3 public class LoginController {
 4   Logger logger = LoggerFactory.getLogger(LoginController.class);
 5
 6   @Autowired
 7   private AuthorizingService authorizingService;
 8
 9   @RequestMapping("/login")
10   @ResponseBody
11   public LoginToken login(User user, HttpServletRequest request){
12       Subject subject = new Subject.Builder().buildSubject();
13       UsernamePasswordToken token = new UsernamePasswordToken(userName, UtilTool.md5Tool(password));
14       token.setRememberMe(true);
15       LoginToken loginToken = new LoginToken();
16       try{
17            subject.login(token);
18            Session session = subject.getSession();
19            user.setToken((String) session.getId());
20            loginToken.setResultCode(WebConstants.RESULT_SUCCESS_CODE);
21       } catch (AuthenticationException e) {
22            loginToken.setResultCode(WebConstants.RESULT_FAIL_CODE);
23            loginToken.setMessage("用户名或密码错误!");
24       }
25       return loginToken;
26   }
27 }
上述login代码只做了非常简单用户名和密码的验证示例。可以看出login如果没有抛出AuthenticationExeception,则说明登录成功。
- Authorization
访问权限控制需要在所有的访问controller的函数中配置,因此使用工具类最合适(在工具类的基础上做成spring annotation也可以很方便),既是PermissionUtils.java。
PermissionUtils.java
 1 private static AuthorizingService authorizingService;
 2
 3 private static ThreadLocal<String> sessionToken = new ThreadLocal<String>();
 4
 5 /**
 6 *
 7 * @param url eg: /admin/review
 8 * @param argv eg: WAIT_BIZ_MANAGER
 9 */
10 public static void checkPermission(String url, @Nullable String argv){
11     Subject subject = getSubject();
12     String permissionCode = authorizingService.uriMappingCode(url, argv);
13     if(StringUtils.isEmpty(permissionCode))
14         throw new IllegalArgumentException("不明操作");
15     subject.checkPermission(permissionCode);
16 }
17
18 public static Subject getSubject(){
19     String token = sessionToken.get();
20     if(StringUtils.isEmpty(token))
21         throw new AuthenticationException("未经认证");
22     return new Subject.Builder()
23             .sessionId(sessionToken.get())
24             .buildSubject();
25 }
26
27 public static void setAuthorizingService(AuthorizingService authorizingService) {
28     PermissionUtils.authorizingService = authorizingService;
29 }
从上述代码来看,每一个request的checkPermission操作,都需要依赖前文RequestInterceptor.java中提到的,从request中获取的token,并依赖该token找到缓存的session 。在权限控制的设计时,不同的业务场景可能需要不同粒度的权限控制,在这里做到了request参数级别的权限控制(在workflow应用中,一个流程涉及多个角色的参与,但很可能只抽象一个接口,如下文的/review操作)。在实现的时,灵活的方式是可以维护一张uri和permission_code之间的关系表(简单可以propertites文件)。对于前端用户而言,为了提升用户体验,拥有不同权限的用户得到的界面会有相应的隐藏和显示,因此会给前端的登录用户提供一张可访问权限表。在这里一个细节的设计,个人觉得有意义的是,在返回给前端的权限表的Key值不应当是permission_code,而是uri。因为permission_code对于前端而言毫无意义,而uri正是前后端沟通的桥梁。因此,check Permission操作可以如下:
ReviewApiController.java
 1 @RestController
 2 @RequestMapping(value = "/review")
 3 public class ReviewApiController {
 4
 5     @Autowired
 6     private ReviewService reviewService;
 7
 8     @ResponseBody
 9     @RequestMapping(value = "/review", method = POST)
10     public WebResult review(@RequestBody NewReviewVo reviewVo){
11         //检查访问权限
12         PermissionUtils.checkPermission("/review/review", reviewVo.getFeatureCode());
13         WebResult result = WebResult.successResult();
14         try {
15             Review review = ReviewAssembler.voToReview(reviewVo);
16             reviewService.review(review);
17         }catch (Exception e){
18             result = WebResult.failureResult(e.getMessage());
19         }
20         return result;
21     }
22 }
- SessionManager
由于要实现有选择的共享session数据,因此session管理成了最棘手的问题,因为你不是粗暴地将整个session序列化到缓存并仍以local session的方式管理,其间需要额外得小心处理共享的session数据和本地的session数据。下面给出RedisSessionManager.java的实现:
RedisSessionManager.java


  1 /**
  2 * 根据 attributeKey,有选择的缓存session信息;
  3 * 设置 {@parm enabledSharedSessionData}来有选择的启用共享session功能。
  4 */
  5 public class RedisSessionManager extends DefaultSessionManager {
  6
  7     private static Logger logger = LoggerFactory.getLogger(RedisSessionManager.class);
  8
  9     private boolean enabledSharedSessionData;
 10
 11     private Set<String> sharedSessionDataKeys;
 12
 13     public RedisSessionManager() {
 14         enabledSharedSessionData = true;
 15         sharedSessionDataKeys = new HashSet<String>();
 16     }
 17
 18     @Override
 19     public Collection<Object> getAttributeKeys(SessionKey key) {
 20
 21         Collection<Object> keys = super.getAttributeKeys(key);
 22         if(enabledSharedSessionData) {
 23             /**
 24             * 从redis获取 {@param key} 对应session的所有attribute key
 25             */
 26             Set sharedKeys = RedisClient.extractAttributeKey((String) key.getSessionId());
 27             keys.addAll(sharedKeys);
 28         }
 29         return keys;
 30     }
 31
 32     @Override
 33     public Object getAttribute(SessionKey sessionKey, Object attributeKey)
 34             throws InvalidSessionException {
 35         if(checkSharedStrategy(attributeKey)){
 36             Object object = RedisClient.getValue((String) attributeKey, (String) sessionKey.getSessionId());
 37             return object;
 38         }
 39         return super.getAttribute(sessionKey, attributeKey);
 40     }
 41
 42     @Override
 43     public void setAttribute(SessionKey sessionKey, Object attributeKey, Object value)
 44             throws InvalidSessionException {
 45         if(checkSharedStrategy(attributeKey)) {
 46             if(value instanceof Serializable)
 47                 RedisClient.setValue((String) attributeKey, (String) sessionKey.getSessionId(),
 48                         (Serializable) value, getGlobalSessionTimeout(), TimeUnit.MILLISECONDS);
 49             else
 50                 throw new IllegalArgumentException("不可共享非序列化value");
 51             return;
 52         }
 53         super.setAttribute(sessionKey, attributeKey, value);
 54     }
 55
 56     private boolean checkSharedStrategy(Object attributeKey){
 57         return enabledSharedSessionData && sharedSessionDataKeys.contains(attributeKey);
 58     }
 59
 60     /**
 61     * 如果是集群, session只在一台机器上创建,因此必须共享 SessionId。
 62     * 当request发过来,获取request中携带的 SessionId,使用 SessionId 在本地获取session,
 63     * 如果为null,则用 SessionId 去redis检查是否存在,如果存在则在本地构建session返回
 64     * (实际就是{@link SimpleSession}的代理{@link DelegatingSession},{@see RedisSessionManager#restoreSession}),
 65     * 否则返回空, 请求重新登录。
 66     * {@link org.apache.shiro.session.mgt.AbstractNativeSessionManager#getSession(SessionKey)}
 67     * @param key
 68     * @return
 69     * @throws SessionException
 70     */
 71     @Override
 72     public Session getSession(SessionKey key) throws SessionException {
 73         Session session = null;
 74         try {
 75             session = getLocalSession(key);
 76         } catch (UnknownSessionException use){
 77             //ignored
 78             session = null;
 79         }
 80         if(!enabledSharedSessionData || session != null)
 81             return session;
 82         /**
 83         * 检查redis,判断session是否已创建,
 84         * 若已创建,则使用SessionFactory在本地构建SimpleSession
 85         */
 86         Serializable sid = RedisClient.getValue((String) key.getSessionId());
 87         if(sid != null){
 88             session = restoreSession(key);
 89         }
 90
 91         return session;
 92     }
 93
 94     /**
 95     * 每一次通过
 96     * {@link org.apache.shiro.session.mgt.AbstractValidatingSessionManager#doGetSession(SessionKey)}}
 97     * 获取session
 98     * 或是通过{@link org.apache.shiro.session.mgt.ExecutorServiceSessionValidationScheduler}
 99     * 定时检查,都会去调用
100     * {@link org.apache.shiro.session.mgt.AbstractValidatingSessionManager#doValidate(Session)}
101     * 验证session是否过期。
102     * 共享session过期的标准是该redis中sessionId过期, 由于redis已经帮助完成了session过期检查,
103     * 所以这里只需要定期清理本地内存中的过期session。
104     * 然而{@link org.apache.shiro.session.mgt.AbstractValidatingSessionManager#doGetSession(SessionKey)}}
105     * 是一个final方法,无法被overwrite,所以只能copy Shiro原来的代码实现来定义getLocalSession(SessionKey key)
106     * @param key
107     * @return
108     */
109     private Session getLocalSession(SessionKey key){
110         Session session = lookupSession(key);
111         return session != null ? createExposedSession(session, key) : null;
112     }
113     private Session lookupSession(SessionKey key) throws SessionException {
114         if (key == null) {
115             throw new NullPointerException("SessionKey argument cannot be null.");
116         }
117         //enableSessionValidationIfNecessary
118         SessionValidationScheduler scheduler = getSessionValidationScheduler();
119         if (enabledSharedSessionData ||
120                 (isSessionValidationSchedulerEnabled() && (scheduler == null || !scheduler.isEnabled()))
121                 ) {
122             enableSessionValidation();
123         }
124         Session s = retrieveSession(key);
125         if (!enabledSharedSessionData && s != null) {
126             validate(s, key);
127         }
128         return s;
129     }
130
131     /**
132     * 根据{@link SessionKey}以及继承自{@link DefaultSessionManager}的默认创建方法,
133     * 重新在本地构建session。
134     * @param key
135     * @return
136     */
137     private Session restoreSession(SessionKey key){
138         SimpleSession restoreSession = (SimpleSession) getSessionFactory().createSession(null);
139         restoreSession.setId(key.getSessionId());
140         restoreSession.setTimeout(getGlobalSessionTimeout());
141         create(restoreSession);
142         return createExposedSession(restoreSession, key);
143     }
144
145     /**
146     * 开启一个新的session, 并且在新的session开启之后做一系列的session共享工作。
147     * {@link org.apache.shiro.session.mgt.AbstractNativeSessionManager#start(SessionContext)}
148     * @param context
149     * @return
150     */
151     @Override
152     public Session start(SessionContext context) {
153         Session session = super.start(context);
154         if(enabledSharedSessionData){
155              shareSessionData(session);
156         }
157         return session;
158     }
159 /**
160 * 完成session基本数据共享
161 */
162     private void shareSessionData(Session session){
163         refreshTTL(session.getId());
164     }
165      /**
166      * 刷新session存活时间
167      */
168     private void refreshTTL(Serializable sessionId){
169         RedisClient.setValue((String) sessionId, new Date(),
170                 getGlobalSessionTimeout(), TimeUnit.MILLISECONDS);
171     }
172
173     /**
174     * {@link org.apache.shiro.session.mgt.AbstractNativeSessionManager#touch(SessionKey)}
175     * @param key
176     * @throws InvalidSessionException
177     */
178     @Override
179     public void touch(SessionKey key) throws InvalidSessionException {
180   if(enabledSharedSessionData){
181        //刷新session存活时间
182        refreshTTL(key.getSessionId());
183         }
184         super.touch(key);
185     }
186
187 /**
188 * 当主动调用{@link Subject#logout()}时,相应会调用该方法来停止session。
189 * 因此,如果共享了session,也需要即时清除共享session。
190 * {@link org.apache.shiro.session.mgt.AbstractNativeSessionManager#stop(SessionKey)}
191 * @param key
192 * @throws InvalidSessionException
193 */
194 @Override
195 public void stop(SessionKey key) throws InvalidSessionException {
196     super.stop(key);
197     if(enabledSharedSessionData)
198         RedisClient.delete((String) key.getSessionId());
199 }
200
201     /**
202     * {@link org.apache.shiro.session.mgt.AbstractNativeSessionManager#getLastAccessTime(SessionKey)}
203     * @param key
204     * @return
205     */
206     @Override
207     public Date getLastAccessTime(SessionKey key) {
208         Serializable lastAccessTime = enabledSharedSessionData ?
209              RedisUtils.getValue((String) key.getSessionId()) :
210              super.getLastAccessTime(key);
211         if(lastAccessTime == null)
212             throw new SessionTimeoutException();
213         return (Date) lastAccessTime;
214     }
215
216     /**
217     * 通知session manager那些attribute key对应的数据需要共享。
218     * @param key
219     */
220     public void registerSharedAttributeKey(String key){
221         if(!enabledSharedSessionData)
222             throw new IllegalArgumentException("不允许共享session数据");
223         if(sharedSessionDataKeys == null)
224             sharedSessionDataKeys = new HashSet<String>();
225         sharedSessionDataKeys.add(key);
226     }
227 }
由于Redis本身就是单线程模型,所以作为客户端基本不需要考虑线程安全问题。下面就各个问题来详细说明 RedisSessionManager。既然需求是想要实现在集群和分布式环境下,有选择的共享session数据,这意味着有一下问题需要处理:1,怎样做到有选择的共享session数据?2,本地session过期了怎样清理,以及怎样避免Shiro每次获取本地session都会进行过期验证和Redis的过期验证之间的重复? 3,怎样管理session存活时间?4,session只在一台机器上创建,既然不是共享了整个session,那么其它机器如何重建session?
对于第1个问题,RedisSessionManager.java定义了enabledSharedSessionData和sharedSessionDataKeys两个变量来控制session数据共享,如果要求共享session数据,则需要通过registerSharedAttributeKey(String key)来告知session manager那些attribute key需要被共享,并定义checkSharedStrategy(Object attributeKey) 方法来检查attribute key是否共享。余下就是overwrite getter/setter attribute方法就可以了。这里再提一下,对于设置enabledSharedSessionData=true,除非是一定要通过共享缓存的方式共享session,否则还是使用Shiro默认的session管理,毕竟增加独立缓存就意味着维护成本的提高和可用性的下降。
对于第2个问题,Shiro提供的session manager已经完成了local session的管理动作,因此我们只需要把local session的管理操作直接交给Shiro提供的默认session manager就可以了,而对于共享的session数据,Redis已经提供了数据过期管理功能(或者其它缓存工具基本都提供了)。因为Shiro提供的session manager清理session的原则是session已经过期或已经stop,那么session manager是怎样自动让session进入过期状态的呢?从AbstractNativeSessionManager#getSession(SessionKey)方法就可以追溯到,每一次通过该方法获取session不为空,都会调用SimpleSesion#validate()方法来验证session是否过期。此外,Shiro也提供了ExecutorServiceSessionValidationScheduler类来开启一个后台的固定周期执行的守护线程来执行session验证。既然Redis已经可以做到session有效性管理,那就没必要在每次获取session的时候都去主动的验证一次session。然而,getSession操作实际,Shiro提供的实现实际是调用了一个final类型AbstractValidatingSessionManager#doGetSession(SessionKey)方法,这意味着无法通过overwrite的方式来避免主动调用SimpleSesion#validate()。因此,在自定义sesssion manager中定义了getLocalSession(SessionKey key)方法,该方法本质实际是参照Shiro提供的实现,并在基础之上加上场景约束。
对于第3个问题,在解释第2问题时已提到,Redis已自带超时管理功能,因此session存活时间只需要由Redis管理即可,而Shiro只需要开启一个固定周期的后台任务来清理本地无效session即可。
对于第4个问题,在前后端完全分离的应用场景下,用户authentication通过之后由Shiro自动创建的session,里面包含的大部分数据都是可选共享的,而Shiro提供的最核心的Session实现,实际就是允许空参构造函数的SimpleSession。所以,实际我们只需共享出全局唯一的sessionId(shareSessionData(Session session) 方法实现),即可使用session manager提供的getSessionFactory()方法获取默认session factory,然后通过该factory即可创建SimpleSession并设置相应的共享数据,即restoreSession(SessionKey key)方法定义的过程。在Shiro提供的默认session manager中可以看到,所有的session创建都是通过AbstractNativeSessionManager#start(SessionContext)完成的,所以只需要overwrite这个方法并共享新创建session的必要数据即可。最后,结合问题2中提到的getLocalSession(SessionKey key)方法,获取session的方法getSession(SessionKey key)的实现分为两步:第一步是通过 getLocalSession(SessionKey key) 获取;如果第一步返回null且Redis中session未过期,则第二步通过restoreSession(SessionKey key)在本地重建session 。特别地,从refreshTTL(Serializable sessionId)方法的定义,可以看到共享sessionId的同时,对应的存放了该session的LastAccessTime。
4,Authentication和Authorization执行时序
在第3部分,已经给出了一个基本的基于Shiro的前后端分离的共享session实战范例,因此在这一部分将基于第3部分,通过时序图来表述Authentication和Authorization的执行流程。
- 简要的合并时序
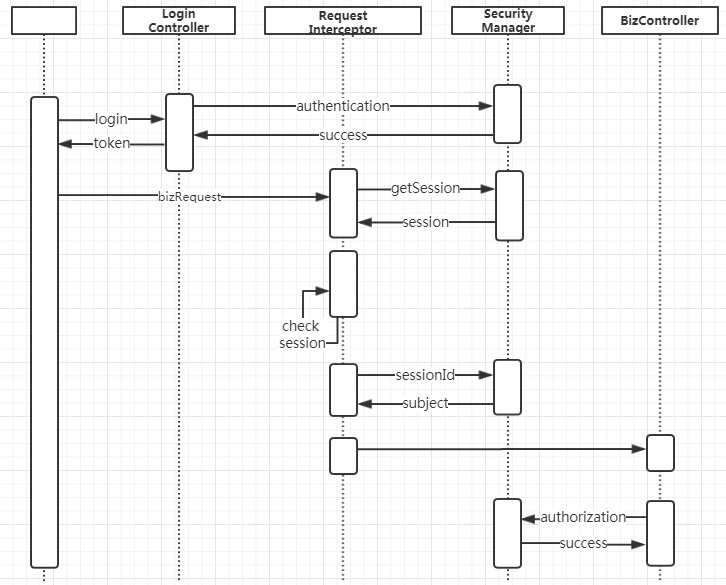
图3 合并时序
- Authentication时序
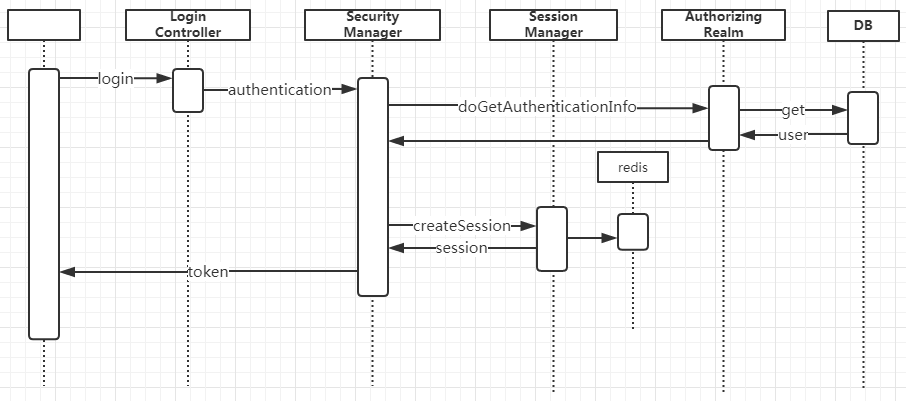
图4 Authentication时序
- Authorization时序
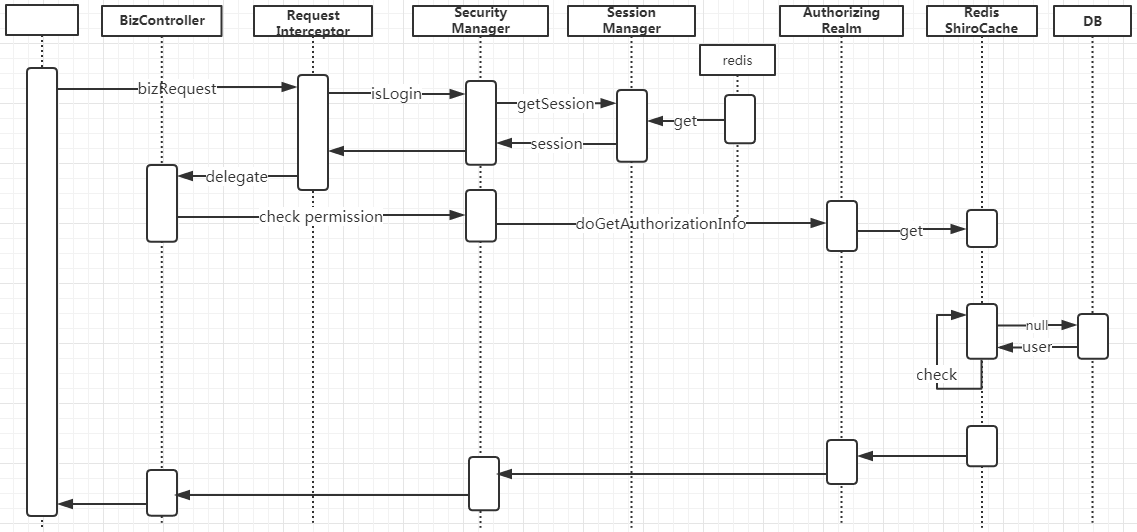
图4 Authorization时序
5,总结
在使用Shiro框架进行Authentication和Authorization实践时,虽然根据不同的业务场景需要做不同的修改或调整,但是基本也是最佳的实践方式是时刻围绕Shiro的设计原则和已有可借鉴的实现方案来操作,尽可能少或者不修改,从而避免一些预想不到的Bug。最后,重提前言部分说到的,除非是一定要通过共享缓存的方式共享session,否则还是使用Shiro默认的session管理。