wget http://ncu.dl.sourceforge.net/project/extundelete/extundelete/0.2.0/extundelete-0.2.0.tar.bz2
所需依赖包
yum -y install e2fsprogs e2fsprogs-libs e2fsprogs-devel
安装的方式就不多说了,无非是源码安装和yum安装,都可以
cat /etc/fstab 查看文件系统类型
centos 6.6
首先在新的机器上安装epel源
1.epel简介: https://fedoraproject.org/wiki/EPEL/zh-cn
rpm -Uvh http://mirrors.ustc.edu.cn/fedora/epel/6/x86_64/epel-release-6-8.noarch.rpm
rpm -Uvh http://rpms.famillecollet.com/enterprise/remi-release-6.rpm
以上URL请按实际情况修改
2.查看是否安装成功
rpm -q epel-release
 3.导入key:
rpm --import /etc/pki/rpm-gpg/RPM-GPG-KEY-EPEL-6
4.修改/etc/yum.repos.d/epel.repo文件
在[epel]最后添加一条属性 priority=11
vi /etc/yum.repos.d/epel.repo
意思是yum先去官方源查,官方没有再去epel的源找
5.重建缓存
yum makecache


然后创建新的分区  指定文件系统为ext4

[root@localhost ~]# fdisk /dev/sdb
Device contains neither a valid DOS partition table, nor Sun, SGI or OSF disklabel
Building a new DOS disklabel with disk identifier 0x3e60339f.
Changes will remain in memory only, until you decide to write them.
After that, of course, the previous content won't be recoverable.

Warning: invalid flag 0x0000 of partition table 4 will be corrected by w(rite)

WARNING: DOS-compatible mode is deprecated. It's strongly recommended to
         switch off the mode (command 'c') and change display units to
         sectors (command 'u').

Command (m for help): m
Command action
   a   toggle a bootable flag
   b   edit bsd disklabel
   c   toggle the dos compatibility flag
   d   delete a partition
   l   list known partition types
   m   print this menu
   n   add a new partition
   o   create a new empty DOS partition table
p   print the partition table
   q   quit without saving changes
   s   create a new empty Sun disklabel
   t   change a partition's system id
   u   change display/entry units
   v   verify the partition table
   w   write table to disk and exit
   x   extra functionality (experts only)

Command (m for help): p

Disk /dev/sdb: 10.7 GB, 10737418240 bytes
255 heads, 63 sectors/track, 1305 cylinders
Units = cylinders of 16065 * 512 = 8225280 bytes
Sector size (logical/physical): 512 bytes / 512 bytes
I/O size (minimum/optimal): 512 bytes / 512 bytes
Disk identifier: 0x3e60339f

   Device Boot      Start         End      Blocks   Id  System

Command (m for help): n
Command action
   e   extended
   p   primary partition (1-4)
p
Partition number (1-4): 1
First cylinder (1-1305, default 1):
Using default value 1
Last cylinder, +cylinders or +size{K,M,G} (1-1305, default 1305): +2G
Command (m for help): p

Disk /dev/sdb: 10.7 GB, 10737418240 bytes
255 heads, 63 sectors/track, 1305 cylinders
Units = cylinders of 16065 * 512 = 8225280 bytes
Sector size (logical/physical): 512 bytes / 512 bytes
I/O size (minimum/optimal): 512 bytes / 512 bytes
Disk identifier: 0x3e60339f

   Device Boot      Start         End      Blocks   Id  System
/dev/sdb1               1         262     2104483+  83  Linux

Command (m for help): w
The partition table has been altered!

Calling ioctl() to re-read partition table.
Syncing disks.
[root@xuegod63 ~]# partx -a /dev/sdb  #获得新分区表
或
[root@xuegod63 ~]#reboot

[root@localhost ~]# mkfs.ext4 /dev/sdb1
mke2fs 1.41.12 (17-May-2010)
文件系统标签=
操作系统:Linux
块大小=4096 (log=2)
分块大小=4096 (log=2)
Stride=0 blocks, Stripe width=0 blocks
131648 inodes, 526120 blocks
26306 blocks (5.00%) reserved for the super user
第一个数据块=0
Maximum filesystem blocks=541065216
17 block groups
32768 blocks per group, 32768 fragments per group
7744 inodes per group
Superblock backups stored on blocks:
32768, 98304, 163840, 229376, 294912

正在写入inode表: 完成
Creating journal (16384 blocks): 完成
Writing superblocks and filesystem accounting information: 完成

This filesystem will be automatically checked every 30 mounts or
180 days, whichever comes first.  Use tune2fs -c or -i to override.
使用新的分区表:
[root@xuegod63 /]# mkdir /home/shenjianyu     #创建挂载点
 [root@xuegod63 ~]# mount /dev/sdb1 /home/shenjianyu/   #挂载
查看挂载情况
[root@xuegod63 ~]# df -h
Filesystem            Size  Used Avail Use% Mounted on
/dev/sda2             9.7G  3.8G  5.5G  41% /
tmpfs                 569M  264K  569M   1% /dev/shm
/dev/sda1             194M   28M  157M  15% /boot
/dev/sr0              3.4G  3.4G     0 100% /mnt
/dev/sdb1            1012M   34M  928M   4% /tmp/sdb1

安装extundelet(恢复软件)
直接yum装就可以 epel源自带

方法1:通过inode结点恢复
方法二:通过文件名恢复
方法三:恢复某个目录,如目录a下的所有文件:
方法四:恢复所有的文件

extundelet命令介绍:
方法1:通过inode结点恢复          --restore-inode
方法二:通过文件名恢复              --restore-file
方法三:恢复某个目录,如目录a下的所有文件:           --restore-directory
方法四:恢复所有的文件       --restore-all
实践:
[root@bogon shenjianyu]# touch testsjy

[root@bogon shenjianyu]# rm -f testsjy

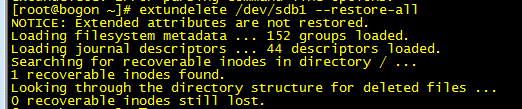
已经删除了 )
stat +文件名  可以查看文件inode结点
这里我使用all恢复
如何避免误删除的文件内容被覆盖???
卸载需要恢复文件的分区或以只读的方式挂载      目的:不在向此分区写入数据避免覆盖之前的数据
注:删除时,只删除了文件名。 另外,我们可以从inode中读出文件名的名字,所以通过inode可以恢复。
[root@bogon ~]# umount /home/shenjianyu/
成功
默认恢复成功的文件存放在  /root/RECOVERED_FILES/
