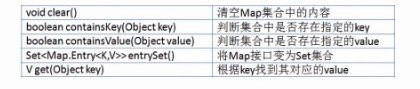
1.Map接口
public interface Map<K,V>
将键映射到值的对象。一个映射不能包含重复的键;每个键最多只能映射到一个值。
2.HashMap、Hashtable、TreeMap
public class HashMap<K,V>extends AbstractMap<K,V>implements Map<K,V>, Cloneable, Serializable

基于哈希表的 Map 接口的实现。此实现提供所有可选的映射操作,并允许使用 null 值和 null 键。(除了非同步和允许使用 null 之外,HashMap 类与 Hashtable 大致相同。)此类不保证映射的顺序,特别是它不保证该顺序恒久不变。
public class MapDemo {

    /**
     * @param args
     */
    public static void main(String[] args) {
        // TODO 自动生成的方法存根
        hashMap();
    }
    /**
     * 是二叉树数据结构的实现(红黑树--平衡二叉树)
     */
    public static void treeMap(){
        TreeMap<String,String> map=new TreeMap<String,String>();
        map.put("1", "hah");


    }
    /**
     * 线程安全,同步的,效率低,与HashMap相似,初始容量为11,每次扩充2倍+1
     */
    public static void hashtable(){
        Hashtable<String, String> table=new Hashtable<String,String>();

    }
    /**
     * 使用哈希表(数组+链表)实现,键不能重复,如果相同就会覆盖原来的对象
     * 默认创建一个长度为16的数组,加载因子为0.75(当数组满75%的容量后,表示需要重新扩充,又叫哈希表重新散列)
     * 哈希表保存对象时,会根据key对象的hashcode值对HashMap的容量求余,决定该对象要存在数组的哪个位置,
     * 如果该位置有对象那么这些对象以链表的结构存储
     * 线程不安全,效率高
     * 每次扩充2倍
     */
    public static void hashMap(){
        Map<String,String> map=new HashMap<String,String>();
        map.put("1","小明");
        System.out.println("1".hashCode()%16);
        map.put("2","小花");
        System.out.println("2".hashCode()%16);
        map.put("3","小刚");
        System.out.println("3".hashCode()%16);
        System.out.println("----------");
        System.out.println(map.size());
        //取值
        System.out.println(map.get("1"));
        System.out.println(map.get("2"));

        System.out.println(map.containsKey(1));

    }

}
3.Map集合的输出
在Collection接口中,可以使用iterator()方法为Iterator接口实例化,并且进行输出操作,但是在Map接口中并没有此方法的定义,所以Map接口本身是不能直接使用iterator进行输出的。
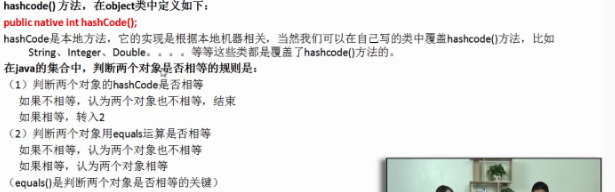
hashcode深入分析:两个hashcode值不同,则两个对象一定不同;两个对象不同,hashcode值可能相同;程序员要做的是任何情况下输出同一个对象的hashcode值都应该相同
public class MapIterator {

    /**
     * @param args
     */
    public static void main(String[] args) {
        // TODO 自动生成的方法存根
        iterator();
        stack();
        queue();
    }
    public static void iterator(){
        HashMap<String,Student> map=new HashMap<String,Student>();
        map.put("jack", new Student("jack",2));
        map.put("tom", new Student("tom",3));
        map.put("honey", new Student("honey",4));

        //遍历
        Set<String> keys=map.keySet();
        Iterator<String> i=keys.iterator();
        while(i.hasNext()){
            String key=i.next();
            Student s=map.get(key);
            System.out.println(key+"-->"+s);
        }
    }
    /**
     * 堆栈
     */
    public static void stack(){
        Stack<String> s=new Stack<String>();
        s.push("xiaoming");//压栈,入栈
        s.push("xiaohua");

        String str=s.pop();//出栈
        System.out.println(str);
    }
    /**
     * 队列
     */
    public static void queue(){
        Queue<String> q=new LinkedList<String>();
        q.add("xiaogang");
        q.add("xiaobin");

        //移除队列的头
        String str=q.poll();
        System.out.println(str);
    }
}
4.对象一对多关系可以使用HashSet实现
public class Person {
    private String name;
    private Set<Book> books=new HashSet<Book>();
    public String getName() {
        return name;
    }
    public void setName(String name) {
        this.name = name;
    }
    public Set<Book> getBooks() {
        return books;
    }
    public void setBooks(Set<Book> books) {
        this.books = books;
    }

}
public class Book {
    private String name;
    private Person person;
    public String getName() {
        return name;
    }
    public void setName(String name) {
        this.name = name;
    }
    public Person getPerson() {
        return person;
    }
    public void setPerson(Person person) {
        this.person = person;
    }
}