1、微信企业号注册与使用
企业号注册:https://qy.weixin.qq.com/
2、企业号使用教程
2.1、通讯录添加企业员工
登录新建的企业号,通过提前把企业成员信息添加到组织或者部门,需要填写手机号、微信号或邮箱,通过这样方式让别人扫码关注企业公众号,为了后面企业号推送消息给企业成员。

#新增账户,填写信息

3、应用中心创建应用

4、给部门设置管理员
设置--->功能设置---->权限管理---->新建管理组
管理员需要事先关注企业号,并且设置好邮箱地址
#需要确定管理员有权限使用应用发送消息,需要管理员的CorpID和Sercrt。(重要)
#准备事项:
微信企业号
企业号已经被部门成员关注
企业号有一个可以发送消息的应用(Abcdocker),一个授权管理员,可以使用应用给成员发送消息
#需要先添加管理员信息,然后使其关注企业号
#需要得到的信息
成员账号
组织部门ID
应用ID
CorpID和Secret
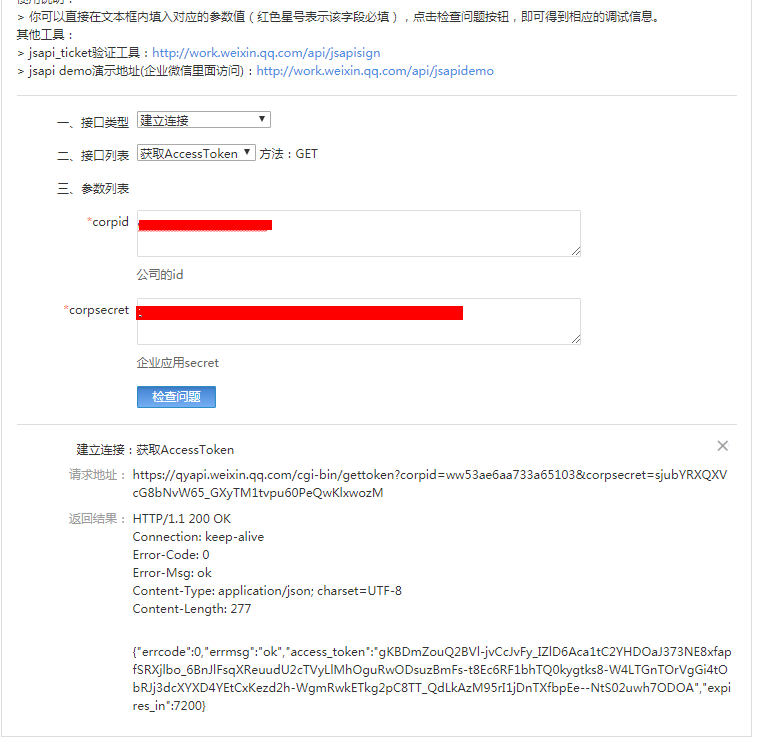
5、微信接口调用
调用微信接口需要一个调用接口的凭证:access_token
通过CorpID和Secret可以获得access_token
微信企业号接口调试地址: http://qydev.weixin.qq.com/debug
6、脚本调用原理
#设置脚本执行路径,编辑zabbix_server.conf文件,添加一行
AlertScriptsPath=/etc/zabbix/bin
6.1、Shell脚本使用
获取 AccessToken
curl -s -G url
传送凭证调用企业号接口
curl --data url
编辑脚本
[root@iot-svndata02 bin]# cat weixin.sh
#!/bin/bash
###SCRIPT_NAME:weixin.sh###
###send message from weixin for zabbix monitor###
###zongx###
###V1-2017-06-12###

#CropID='wx01975981c5d1502c'
#Secret='k6hjyg4UY1Sx4YZIA6teqq5Q_cjjuDKliN3fVCUksN0'
#GURL="https://qyapi.weixin.qq.com/cgi-bin/gettoken?corpid=$CropID&corpsecret=$Secret"
#Gtoken=$(/usr/bin/curl -s -G $GURL | awk -F " '{print $10}')

Gtoken=(`cat  /etc/zabbix/bin/token_new.txt`)
echo "Gtoken="$Gtoken

PURL="https://qyapi.weixin.qq.com/cgi-bin/message/send?access_token=$Gtoken"

function body() {
        local int AppID=1000002                  #企业号中的应用id
#        local UserID=@all                         #部门成员id,zabbix中定义的微信接收者
        local UserID=$1
        local PartyID=@all                        #部门id,定义了范围,组内成员都可接收到消息
        local Msg=$(echo "$@" | cut -d" " -f3-)  #过滤出zabbix中传递的第三个参数
        printf '{
'
        printf '	"touser": "'"$UserID""",
"
#        printf '	"toparty": "'"$PartyID""",
"
        printf '	"msgtype": "text",
'
        printf '	"agentid": "'"$AppID""",
"
        printf '	"text": {
'
        printf '		"content": "'"$Msg"""
"
        printf '	},
'
        printf '	"safe":"0"
'
        printf '}
'
}
/usr/bin/curl --data-ascii "$(body $1 $2 $3)" $PURL

time=`date +"%Y-%m-%d"`
echo "`date`    $1      $2     $3">>/var/log/zabbix/zbx_weixin-$time.log
[root@iot-svndata02 bin]#
#http://qydev.weixin.qq.com/wiki/index.php?title=消息类型及数据格式
#测试:
#./weixin.sh test hello.world!
{"errcode":0,"errmsg":"ok","invaliduser":"all user invalid"}
6.2、python脚本
#安装simplejson
wget https://pypi.python.org/packages/f0/07/26b519e6ebb03c2a74989f7571e6ae6b82e9d7d81b8de6fcdbfc643c7b58/simplejson-3.8.2.tar.gz

tar zxvf simplejson-3.8.2.tar.gz && cd simplejson-3.8.2

python setup.py build

python setup.py install
#下载wechat.py脚本
git clone https://github.com/X-Mars/Zabbix-Alert-WeChat.git

cp Zabbix-Alert-WeChat/wechat.py /opt/zabbix/share/zabbix/alertscripts/

chmod +x wechat.py && chown zabbix:zabbix wechat.py
#脚本修改
#!/usr/bin/python

#_*_coding:utf-8 _*_


import urllib,urllib2

import json

import sys

import simplejson


def gettoken(corpid,corpsecret):

gettoken_url = 'https://qyapi.weixin.qq.com/cgi-bin/gettoken?corpid=' + corpid + '&corpsecret=' + corpsecret

print  gettoken_url

try:

token_file = urllib2.urlopen(gettoken_url)

except urllib2.HTTPError as e:

print e.code

print e.read().decode("utf8")

sys.exit()

token_data = token_file.read().decode('utf-8')

token_json = json.loads(token_data)

token_json.keys()

token = token_json['access_token']

return token


def senddata(access_token,user,subject,content):


send_url = 'https://qyapi.weixin.qq.com/cgi-bin/message/send?access_token=' + access_token

send_values = {

"touser":"touser",      #企业号中的用户帐号,在zabbix用户Media中配置,如果配置不正常,将按部门发送。

"toparty":"8",          #企业号中的部门id。

"msgtype":"text",       #消息类型。

"agentid":"10",         #企业号中的应用id。

"text":{

"content":subject + '
' + content

},

"safe":"0"

}

#    send_data = json.dumps(send_values, ensure_ascii=False)

send_data = simplejson.dumps(send_values, ensure_ascii=False).encode('utf-8')

send_request = urllib2.Request(send_url, send_data)

response = json.loads(urllib2.urlopen(send_request).read())

print str(response)


if __name__ == '__main__':

user = str(sys.argv[1])     #zabbix传过来的第一个参数

subject = str(sys.argv[2])  #zabbix传过来的第二个参数

content = str(sys.argv[3])  #zabbix传过来的第三个参数


corpid =  'xxxxxx'   #CorpID是企业号的标识

corpsecret = 'M3FMhnFh8nTI6SxLAEbbLLZaj-1BpZIyqkJRskeMMUXObGx4mfQsAg7Jw-nUMXe9'  #corpsecretSecret是管理组凭证密钥

accesstoken = gettoken(corpid,corpsecret)

senddata(accesstoken,user,subject,content)

#28,29,31行分别改为用户账号,部门ID,和应用ID

#48,49 改为CropID和Secret

#文中使用的用户为,test-msg,部门iD为8,应用ID为10.

#脚本测试

[root@zabbix alertscripts]# ./wechat.py test-msg test hello

https://qyapi.weixin.qq.com/cgi-bin/gettoken?corpid=wx11ac451376ae0e98&corpsecret=M3FMhnFh8nTI6SxLAEbbLLZaj-1BpZIyqkJRskeMMUXObGx4mfQsAg7Jw-nUMXe9

{u'invaliduser': u'all user invalid', u'errcode': 0, u'errmsg': u'ok'}

#可以显示成功
7、脚本路径设置
#将脚本放到zabbix默认执行的路径下
mv wechat.php weixin.sh /opt/zabbix/share/zabbix/alertscripts/

chown zabbix:zabbix /opt/zabbix/share/zabbix/alertscripts/wechat.php

chmod +x /opt/zabbix/share/zabbix/alertscripts/wechat.php

或

chown zabbix:zabbix /opt/zabbix/share/zabbix/alertscripts/weixin.sh

chmod +x /opt/zabbix/share/zabbix/alertscripts/weixin.sh

#设置脚本的启动用户为zabbix,并给脚本可执行权限

#修改zabbix_server.conf文件,添加脚本执行目录

AlertScriptsPath=/opt/zabbix/share/zabbix/alertscripts

#修改完成重启zabbix_server

/etc/init.d/zabbix_server restart
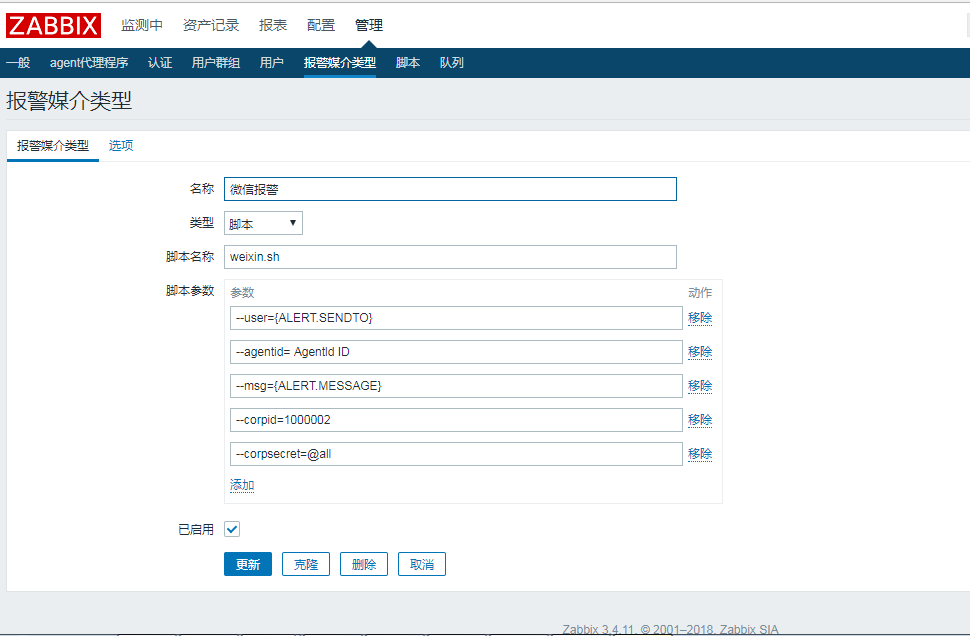
8、Zabbix-web前端设置
8.1、设置通知媒介
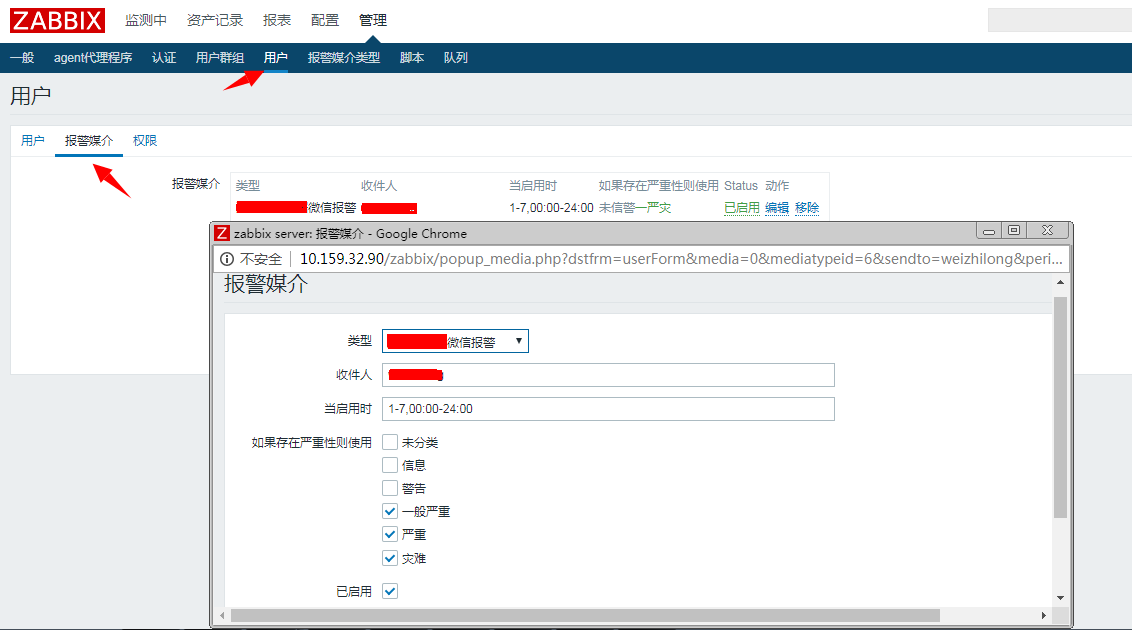
8.2、创建用户
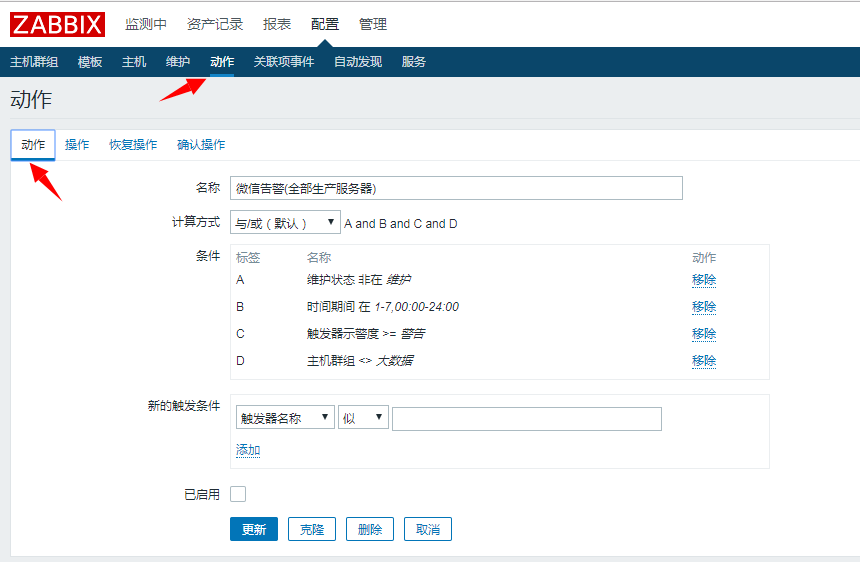
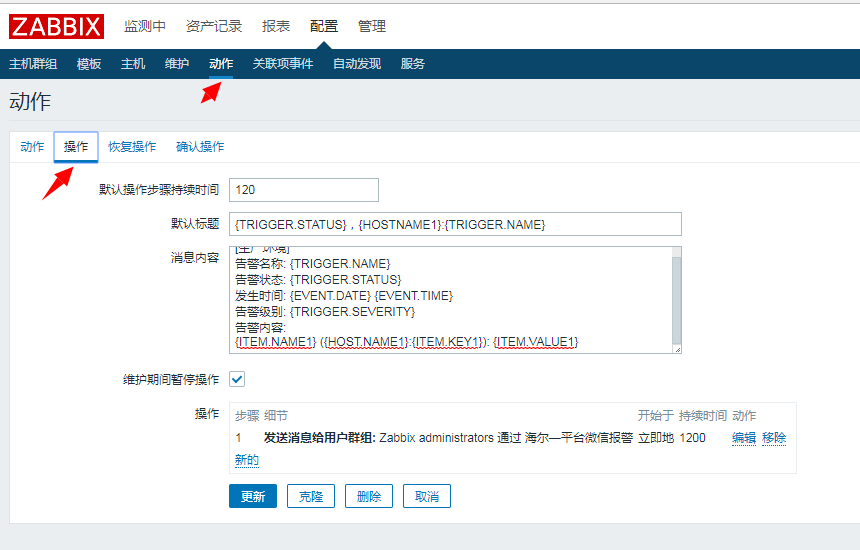
8.3、创建触发动作及发送内容
告警操作:

默认标题:{TRIGGER.STATUS},{HOSTNAME1}:{TRIGGER.NAME}
消息内容:

[生产环境]
告警名称: {TRIGGER.NAME}
告警状态: {TRIGGER.STATUS}
发生时间: {EVENT.DATE} {EVENT.TIME}
告警级别: {TRIGGER.SEVERITY}
告警内容:
{ITEM.NAME1} ({HOST.NAME1}:{ITEM.KEY1}): {ITEM.VALUE1}
恢复主题:

默认标题:{TRIGGER.STATUS}: {TRIGGER.NAME}

消息内容:
[生产环境]
告警名称: {TRIGGER.NAME}
告警状态: {TRIGGER.STATUS}
发生时间: {EVENT.DATE} {EVENT.TIME}
告警级别: {TRIGGER.SEVERITY}
告警内容:
{ITEM.NAME1} ({HOST.NAME1}:{ITEM.KEY1}): {ITEM.VALUE1}
确认操作:
默认标题:Acknowledged: {TRIGGER.NAME}
消息内容:
{USER.FULLNAME} acknowledged problem at {ACK.DATE} {ACK.TIME} with the following message:
{ACK.MESSAGE}
Current problem status is {EVENT.STATUS}
#设置完成记得新增或更新(add&update)


9、测试微信告警发送
#主动触发相关trigger告警,查看微信发送状态
#到此Zabbix结合微信告警完成。
10、注意事项及报错处理
#Zabbix-web页面新增用户权限处理,发送对象选择(应用ID)
#应用当中可见范围选择注意(选这要发送的对象(部门,及部门成员))
#需要配合企业微信加公众号一起使用,微信关注公众号以后才能收到消息。