Spring MVC Flash Attribute 的讲解与使用示例

转自:https://www.oschina.net/translate/spring-mvc-flash-attribute-example

Spring MVC 3.1版本加了一个很有用的特性,Flash属性,它能解决一个长久以来缺少解决的问题,一个POST/Redirect/GET模式问题。

正常的MVC Web应用程序在每次提交都会POST数据到服务器。一个正常的Controller (被注解 @Controller标记)从请求获取数据和处理它 (保存或更新数据库)。一旦操作成功,用户就会被带到(forward)一个操作成功的页面。传统上来说,这样的POST/Forward/GET模式,有时候会导致多次提交问题. 例如用户按F5刷新页面,这时同样的数据会再提交一次。

为了解决这问题, POST/Redirect/GET 模式被用在MVC应用程序上. 一旦用户表单被提交成功, 我们重定向(Redirect)请求到另一个成功页面。这样能够令浏览器创建新的GET请求和加载新页面。这样用户按下F5,是直接GET请求而不是再提交一次表单。

POST/Redirect/GET
Image credit: Wikipedia

  Idiot_s_Sky
Idiot_s_Sky
翻译于 3年前

4人顶

 翻译的不错哦!

虽然这一方法看起来很完美,并且解决了表单多次提交的问题,但是它又引入了一个获取请求参数和属性的难题. 通常当我们生成一次http重定向请求的时候,被存储到请求数据会丢失,使得下一次GET请求不可能访问到这次请求中的一些有用的信息.

Flash attributes 的到来就是为了处理这一情况. Flash attributes 为一个请求存储意图为另外一个请求所使用的属性提供了一条途径. Flash attributes 在对请求的重定向生效之前被临时存储(通常是在session)中,并且在重定向之后被立即移除.

spring-mvc-flash-map-manager

为了这样做, Flash 特性使用了两个集合. FlashMap 被用来管理 flash attributes 而 FlashMapManager 则被用来存储,获取和管理 FlashMap 实体.

对于每一次请求一个 “input” flash map 会被创建,来存储来自任何之前请求的 flash attribute 还有一个 “output” flash map 会被创建,来存储任何我们存储在这个请求中的,之后的请求参数.

leoxu
leoxu
翻译于 3年前

3人顶

 翻译的不错哦!

使用

要想在你的 Spring MVC 应用中使用 Flash attribute,要用 3.1 版本或以上。并且要在 spring-servlet.xml 文件中加入 mvc:annotation-driven。

1
<mvc:annotation-driven />

这些都完成之后,Flash attribute 就会自动设为“开启”,以供使用了。只需在你的 Spring controller 方法中加入RedirectAttributes redirectAttributes。

1
2
3
4
5
6
7
8
9
10
11
12
import org.springframework.web.servlet.mvc.support.RedirectAttributes;
//...
 
    @RequestMapping(value="addcustomer", method=RequestMethod.POST)
    public String addCustomer(@ModelAttribute("customer") Customer customer,
            final RedirectAttributes redirectAttributes) {
    //...
        redirectAttributes.addFlashAttribute("message""Successfully added..");
    //...
 
        return "redirect:some_other_request_name";
    }

addFlashAttribute 方法会自动向 output flash map 中添加给定的参数,并将它传递给后续的请求。

我们来看看一个使用 Flash attribute 来完成 POST/Redirect/GET 并传递一些信息的完整实例吧。

Flash Attribute 实例

下面的应用向用户显示一个表单。当用户填完数据,并提交表单之后,页面会重定向到另一个显示成功信息的页面。在这个重定向的新页面中,会显示用户刚才输入的信息。

戴仓薯
戴仓薯
翻译于 3年前

3人顶

 翻译的不错哦!

第1步: 需要的 JAR 和项目结构

如果你用 Maven 来做依赖管理,用下面的 dependencies 来添加 Spring 3.1 MVC 的支持。

1
2
3
4
5
6
7
8
9
10
11
12
13
14
<dependencies>
    <!-- Spring 3.1 MVC  -->
    <dependency>
        <groupId>org.springframework</groupId>
        <artifactId>spring-webmvc</artifactId>
        <version>3.1.2.RELEASE</version>
    </dependency>
    <!-- JSTL for c: tag -->
    <dependency>
        <groupId>jstl</groupId>
        <artifactId>jstl</artifactId>
        <version>1.2</version>
    </dependency>
</dependencies>

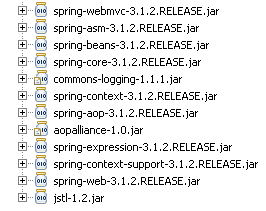
或者,你可以下载以下 JAR 文件,然后把它们放在 /WEB-INF/lib 文件夹下。

spring-mvc-flash-attribute-jar-files

第2步: Spring 配置

要为 web 项目添加 Spring 支持,需要在 web.xml 中添加 DispatcherServlet 。
web.xml

1
2
3
4
5
6
7
8
9
10
11
12
13
14
15
16
17
18
19
20
21
22
23
24
25
26
27
<?xml version="1.0" encoding="UTF-8"?>
    xsi:schemaLocation="http://java.sun.com/xml/ns/javaee 
 
 
    id="WebApp_ID" version="2.5">
     
    <display-name>Spring MVC Flash attribute example</display-name>
    <servlet>
        <servlet-name>spring</servlet-name>
        <servlet-class>
            org.springframework.web.servlet.DispatcherServlet
        </servlet-class>
        <load-on-startup>1</load-on-startup>
    </servlet>
    <servlet-mapping>
        <servlet-name>default</servlet-name>
        <url-pattern>/index.html</url-pattern>
    </servlet-mapping>   
    <servlet-mapping>
        <servlet-name>spring</servlet-name>
        <url-pattern>*.html</url-pattern>
    </servlet-mapping>
</web-app>

然后,spring-servlet 使用 mvc:annotation-driven 来支持 mvc ,并且会扫描项目中的 context:component-scan 标签。

spring-servlet.xml

1
2
3
4
5
6
7
8
9
10
11
12
13
14
15
16
17
18
19
20
<?xml  version="1.0" encoding="UTF-8"?>
         
     
    <bean id="jspViewResolver"
    class="org.springframework.web.servlet.view.InternalResourceViewResolver">
        <property name="viewClass"
            value="org.springframework.web.servlet.view.JstlView" />
        <property name="prefix" value="/WEB-INF/jsp/" />
        <property name="suffix" value=".jsp" />
     </bean>
     
    <context:component-scan base-package="net.viralpatel.controller" />
    <mvc:annotation-driven />
  
</beans>

第3步: Spring Controller – RedirectAttributes

Controller 的代码使用 Customer.java 对象作为 bean 来保存客户信息。

Customer.java

1
2
3
4
5
6
7
8
9
10
package net.viralpatel.spring;
 
public class Customer {
    private String firstname;
    private String lastname;
    private int age;
    private String email;
 
    //getter, setter methods
}

CustomerController 类有3个方法。showForm 方法对应 URL /form ,用来显示 Add New Customer 表单。addCustomer 方法对应 URL /addcustomer ,用来处理 POST 请求。

CustomerController.java

1
2
3
4
5
6
7
8
9
10
11
12
13
14
15
16
17
18
19
20
21
22
23
24
25
26
27
28
29
30
31
32
33
34
35
36
37
package net.viralpatel.controller;
 
import net.viralpatel.spring.Customer;
 
import org.springframework.stereotype.Controller;
import org.springframework.web.bind.annotation.ModelAttribute;
import org.springframework.web.bind.annotation.RequestMapping;
import org.springframework.web.bind.annotation.RequestMethod;
import org.springframework.web.servlet.mvc.support.RedirectAttributes;
 
@Controller
public class CustomerController {


    @RequestMapping(value="showform", method=RequestMethod.GET)
    public String showForm(@ModelAttribute("customer") Customer customer) {
        return "add_customer";
    }
     
    @RequestMapping(value="addcustomer", method=RequestMethod.POST)
    public String addCustomer(@ModelAttribute("customer") Customer customer,
            final RedirectAttributes redirectAttributes) {
 
        redirectAttributes.addFlashAttribute("customer", customer);
        redirectAttributes.addFlashAttribute("message","Added successfully.");
 
        return "redirect:showcustomer.html";  
    }
 
     
    @RequestMapping(value="showcustomer", method=RequestMethod.GET)
    public String showCustomer(@ModelAttribute("customer") Customer customer) {
        System.out.println("cust:" + customer.getFirstname());
        return "show_customer";
    }
}

注意我们在 addCustomer 方法中是如何使用 redirectAttributes 参数来添加 flash attribute 的。并且,我们是用 addFlashAttribute 方法来设置新的参数为 flash attribute。

戴仓薯
戴仓薯
翻译于 3年前

4人顶

 翻译的不错哦!

第4步: View 层

add customer.JSP 文件显示一个 Add New Customer(添加新客户)表单。
add_customer.jsp

1
2
3
4
5
6
7
8
9
10
11
12
13
14
15
16
17
18
19
20
21
22
23
24
25
26
27
28
29
30
<%@taglib uri="http://www.springframework.org/tags/form" prefix="form"%>
<html>
<body>
    <h1>Add New Customer</h1>
    <form:form action="addcustomer.html" method="post" commandName="customer">
    <table>
        <tr>
            <td><form:label path="firstname">Firstname</form:label></td>
            <td><form:input path="firstname" /> </td>
        </tr>
        <tr>
            <td><form:label path="lastname">Lastname</form:label></td>
            <td><form:input path="lastname" /> </td>
        </tr>
        <tr>
            <td><form:label path="age">Age</form:label></td>
            <td><form:input path="age" /> </td>
        </tr>
        <tr>
            <td><form:label path="email">Email</form:label>
            <td><form:input path="email" /> </td>
        </tr>
        <tr>
            <td colspan="2"><input type="submit" value="Add Customer" />
            </td>
        </tr>
    </table>
    </form:form>
</body>
</html>

show_customer.jsp 简单地显示客户的名和姓,以及用 flash attributes 设置的成功信息。

show_customer.jsp

1
2
3
4
5
6
7
<%@taglib uri="http://www.springframework.org/tags/form" prefix="form"%>
<html>
<body>
<h1>${message}</h1>
    ${customer.lastname}, ${customer.firstname} added successfully..
</body>
</html>

Demo:

执行这个 web 项目即可。
URL: http://localhost:8080/SpringMVC_Flash_Attribute_Maven_example/form.html
spring-mvc-flash-attribute-demo-form

spring-mvc-flash-attribute-demo-success

下载源代码

原文地址:https://www.cnblogs.com/sharpest/p/6151239.html