1.下载
yum install redis -y
方式二(通过源码编译)
(1)下载源码包
wget http://download.redis.io/releases/redis-4.0.10.tar.gz
(2)解压
tar -zxvf redis-4.0.10.tar.gz
(3)进入redis原码,编译且安装
cd redis-4.0.10
make && make install
(4)指定配置文件启动redis(可以自定制配置文件)
redis-server redis.conf
(5)更改配置文件为可以后台运行
找到配置文件中的daemonize,将它的配置右no更改为yes
过滤出文件的空白行和注释行
grep -v "^#" redis.conf | grep -v "^$"
2.redis的使用
1.redis的启动
指定文件启动服务端
redis-server redis.conf
启动客户端
redis-cli
注意问题1:当远程访问redis时,如果出现连接不上redis的情况,可能是配置文件bind参数的问题
解决方式:
在配置文件redis.conf中找到bind,若bind的参数为127.0.0.0,则改为0.0.0.0
注意问题2:更改redis默认端口
如果使用默认端口,可能产生安全问题,容易被攻击
在redis.conf配置文件中找到port,将默认参数由6379更改为自定义的参数
以后再登录时,需要指定端口登录:redis-cli -p 6388
注意问题3:更改redis的登录密码
在redis.conf配置文件中找到requirepass,将默认参数由foobared更改为自定义的参数
以后登录后自己需要进行验证才能使用redis:auth 19960926abc
登录时也可以直接指定端口密码:redis-cli -p 6380 -a 密码
2.发布订阅实验
启动两个redis-cli窗口,均订阅heilongjiang频道,启动第三个redis-cli窗口,向heilongjiang频道发送消息
窗口1:
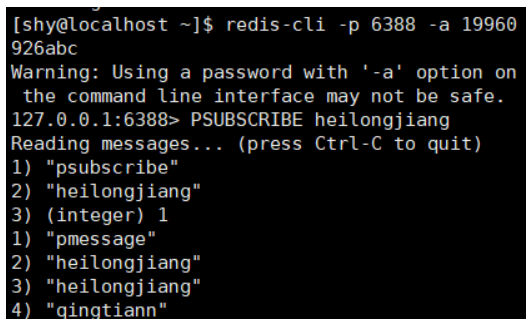
窗口2:
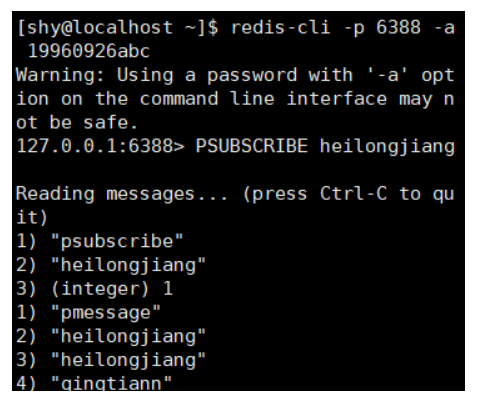
窗口3:

PUBLISH channel msg 将信息 message 发送到指定的频道 channel SUBSCRIBE channel [channel ...] 订阅频道,可以同时订阅多个频道 UNSUBSCRIBE [channel ...] 取消订阅指定的频道, 如果不指定频道,则会取消订阅所有频道 PSUBSCRIBE pattern [pattern ...] 订阅一个或多个符合给定模式的频道,每个模式以 * 作为匹配符,比如 it* 匹配所 有以 it 开头的频道( it.news 、 it.blog 、 it.tweets 等等), news.* 匹配所有 以 news. 开头的频道( news.it 、 news.global.today 等等),诸如此类 PUNSUBSCRIBE [pattern [pattern ...]] 退订指定的规则, 如果没有参数则会退订所有规则 PUBSUB subcommand [argument [argument ...]] 查看订阅与发布系统状态 注意:使用发布订阅模式实现的消息队列,当有客户端订阅channel后只能收到后续发布到该频道的消息,之前发送的不会缓存,必须Provider和Consumer同时在线。 PSUBSCRIBE python* 客户端正则(支持模糊匹配)接收
指明配置文件启动
自定义redis的配置文件myredis.conf
daemonize yes
port 6379
logfile /data/6379/redis.log
dir /data/6379
指明myredis.conf配置文件启动
redis-server myredis.conf
3.数据持久化
注:redis关机后数据就没了,因为没有开启数据持久化
1.RDB持久化(通过sava命令触发)
在自定义的配置文件中添加
dbfilename  dbmp.rdb        #rdb持久化文件
########以下可以不写#################
save 900 1                    #rdb机制 每900秒 有1个修改记录
save 300 10                    #每300秒        10个修改记录
save 60  10000                #每60秒内        10000修改记录
添加数据后要save才能算备份了
2.AOF持久化
怎么工作的:把每一步redis操作实记录到appendonly.aof中
在配置文件 redis.conf中添加最后两行
AOF持久化配置,两条参数 appendonly yes appendfsync always 总是修改类的操作 everysec 每秒做一次持久化***** no 依赖于系统自带的缓存大小机制
注:查看redis的版本
redis-server -v
4.redis不重启RDB数据切换到AOF数据
先准备一个rdb的服务端
CONFIG set appendonly yes #开启AOF功能 CONFIG SET save "" #关闭RDB功能
这一步的操作是临时生效,再启动还是rdb,所以应该将将aof操作写入配置文件
appendonly yes
appendfsync everyse
5.redis的主从同步
配置主从同步
1.启动三个redis数据库实例
创建三个配置文件
touch redis-6379.conf 主库
touch redis-6380.conf 从库
touch redis-6381.conf 从库
分别配置三个文件
在redis-6379.conf中 port 6379 daemonize yes pidfile /data/6379/redis.pid loglevel notice logfile "/data/6379/redis.log" dbfilename dump.rdb dir /data/6379 另外另个文件通过sed命令快速生成 sed "s/6379/6380/g" redis-6379.conf > redis-6380.conf sed "s/6379/6381/g" redis-6379.conf > redis-6381.conf
分别启动三个数据库的客户端和服务端
redis-server redis-6379.conf redis-cli -p 6379 redis-server redis-6380.conf redis-cli -p 6380 redis-server redis-6381.conf redis-cli -p 6381
为从库设置主库
在6380从库中
SLAVEOF 127.0.0.1 6379
在6381从库中
SLAVEOF 127.0.0.1 6379
配置完成,检查数据库信息,看是否生效
info replication
测试
在主库中添加内容
从库中查看数据是否与主库同步
注:批量杀死进程(根据服务名杀死进程)
pkill redis-server #杀死进程名为redis-server的进程
6.手动进行主从复制故障切换
检查从库主从信息,此时master_link_status:down
redis-cli -p 6381
info replication
redis-cli -p 6382
info replication
既然主库挂了,我想要在6380 6381之间选一个新的主库
1.关闭6380的从库身份
redis-cli -p 6381
info replication
slaveof no one
2.将6381设为6380的从库
6382连接到6381:
[root@db03 ~]# redis-cli -p 6382
127.0.0.1:6382> SLAVEOF no one
127.0.0.1:6382> SLAVEOF 127.0.0.1 6381
3.检查6382,6381的主从信息
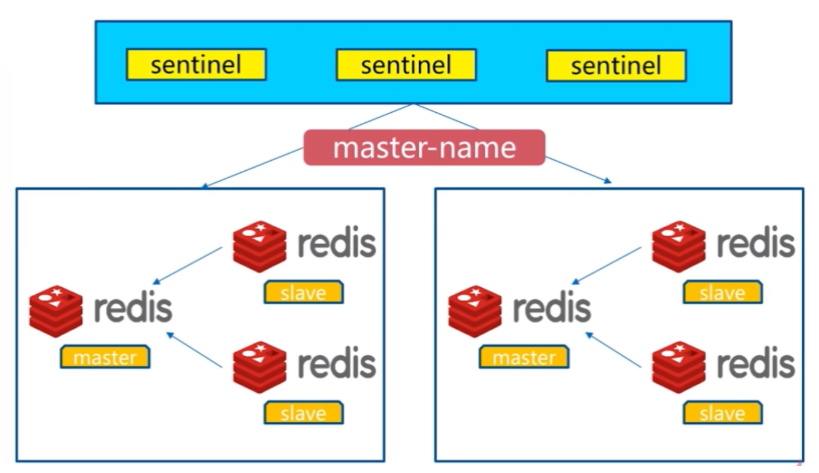
7.主从故障自动切换(redis哨兵)
1.什么是哨兵
保护redis主从集群,正常运转,当主库挂掉之后,自动在从库中挑选新的主库,进行同步
2.主从复制架构

3.Redis Sentinel架构


4.redis哨兵的安装配置
(1).准备三个数据库实例(三个配置文件,通过端口区分)并启动
redis-server redis-6379.conf
redis-server redis-6380.conf
redis-server redis-6381.conf
(2).准备三个啥哨兵的配置文件(写入是去掉注释)(不能直接复制,要更改主机名,地址,端口等信息)
redis-sentinel-26379.conf文件
port 26379 dir /var/redis/data/ logfile "26379.log" // 当前Sentinel节点监控 192.168.119.10:6379 这个主节点 // 2代表判断主节点失败至少需要2个Sentinel节点节点同意 // mymaster是主节点的别名 sentinel monitor s15master 192.168.177.130 6379 2 //每个Sentinel节点都要定期PING命令来判断Redis数据节点和其余Sentinel节点是否可达,如果超过30000毫秒30s且没有回复,则判定不可达 sentinel down-after-milliseconds s15master 30000 //当Sentinel节点集合对主节点故障判定达成一致时,Sentinel领导者节点会做故障转移操作,选出新的主节点, 原来的从节点会向新的主节点发起复制操作,限制每次向新的主节点发起复制操作的从节点个数为1 sentinel parallel-syncs s15master 1 //故障转移超时时间为180000毫秒 sentinel failover-timeout s15master 180000
快速生成另外两个配置文件
sed "s/26379/26380/g" redis-sentinel-26379.conf > redis-sentinel-26380.conf sed "s/26379/26381/g" redis-sentinel-26379.conf > redis-sentinel-26381.conf
(3).添加后台运行参数,使得三个哨兵进程,后台运行
echo "daemonize yes" >> redis-sentinel-26379.conf
echo "daemonize yes" >> redis-sentinel-26380.conf
echo "daemonize yes" >> redis-sentinel-26381.conf
(4).启动三个哨兵
redis-sentinel redis-sentinel-26379.conf
redis-sentinel redis-sentinel-26380.conf
redis-sentinel redis-sentinel-26381.conf
(5).查看哨兵的通信状态(最后一行)
redis-cli -p 6381 info replication
(6)杀死edis的主库
kill -9 5537
(7)查看另外两个库的节点状态
redis-cli -p 6380 info replication
redis-cli -p 6381 info replication
此时的6379库再重新启动会变成从节点
8.redis-cluster配置(集群)
1.作用
对于数据量太大,访问量太大,并发量太大的问题,通过redis-cluster搭建集群来解决该类问题
2.数据分布原理

分布式数据库首要解决把整个数据集按照分区规则映射到多个节点的问题,即把数据集划分到多个节点上,每个节点负责整个数据的一个子集。
常见的分区规则有哈希分区和顺序分区。Redis Cluster采用哈希分区规则,因此接下来会讨论哈希分区规则。
-
节点取余分区
-
一致性哈希分区
-
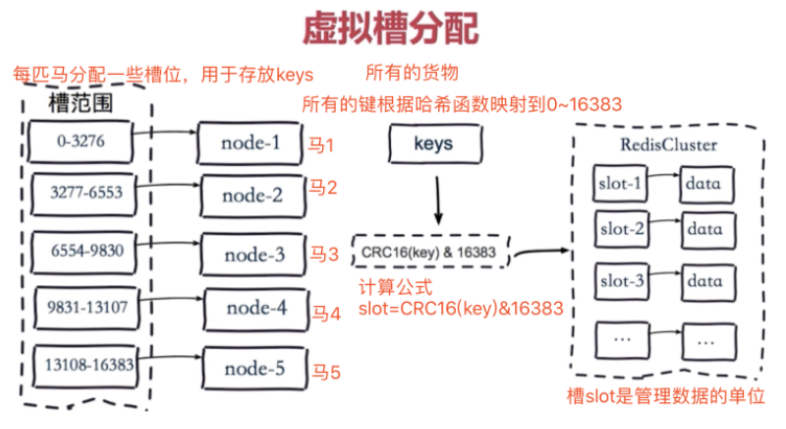
虚拟槽分区(redis-cluster采用的方式)
(1)分区规则一:顺序分区

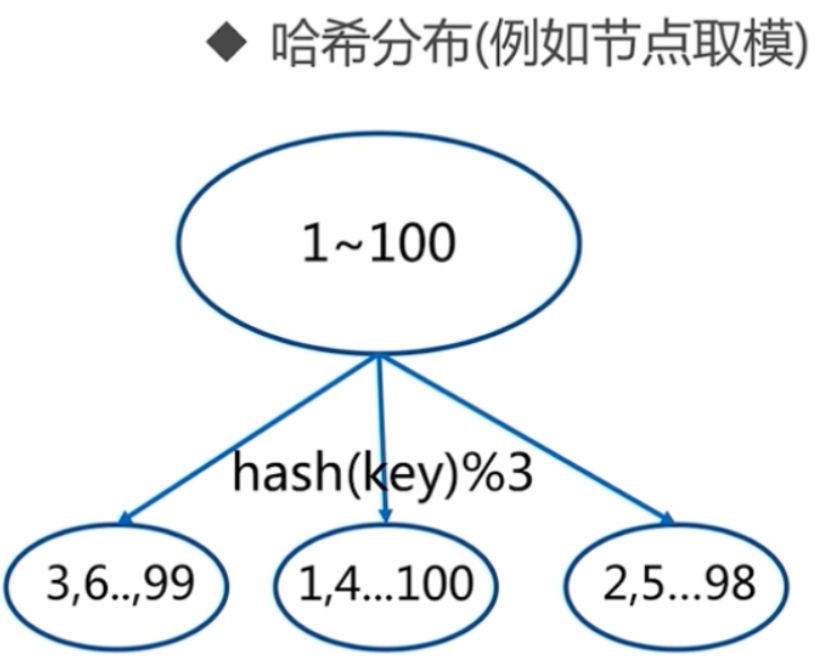
(2)分区规则二:哈希分区
例如按照节点取余的方式,分三个节点 1~100的数据对3取余,可以分为三类 余数为0 余数为1 余数为2 那么同样的分4个节点就是hash(key)%4 节点取余的优点是简单,客户端分片直接是哈希+取余
(3)分区规则三:虚拟槽分区
虚拟槽分区巧妙地使用了哈希空间,使用分散度良好的哈希函数把所有的数据映射到一个固定范围内的整数集合,整数定义为槽(slot)。 Redis Cluster槽的范围是0 ~ 16383。 槽是集群内数据管理和迁移的基本单位。采用大范围的槽的主要目的是为了方便数据的拆分和集群的扩展, 每个节点负责一定数量的槽。
3.创建开启redis-cluster
(1)准备6个数据库实例(端口:7000-7005)
数据库的配置文件编写
port 7000 daemonize yes dir "/opt/redis/data" logfile "7000.log" dbfilename "dump-7000.rdb" cluster-enabled yes #开启集群模式 cluster-config-file nodes-7000.conf #集群内部的配置文件 如果没有/opt/redis/data文件夹,创建文件夹 mkdir -p /opt/redis/data 快速创建另外五个配置文件 sed "s/7000/7003/g" redis-7000.conf >redis-7003.conf sed "s/7000/7004/g" redis-7000.conf >redis-7004.conf sed "s/7000/7005/g" redis-7000.conf >redis-7005.conf ......
(2)启动redis,用这六个配置文件
redis-server redis-7000.conf
redis-server redis-7001.conf
redis-server redis-7002.conf
redis-server redis-7003.conf
redis-server redis-7004.conf
redis-server redis-7005.conf
(3)配置ruby语言环境,脚本一键启动redis-cluster
下载ruby语言的源码包,编译安装 wget https://cache.ruby-lang.org/pub/ruby/2.3/ruby-2.3.1.tar.gz 解压缩 tar -zxf ruby-2.3.1.tar.gz cd ruby-2.3.1 ./configure --prefix=/opt/ruby/ 释放makefile make && make install 编译且安装 下载安装ruby操作redis的模块包 wget http://rubygems.org/downloads/redis-3.3.0.gem gem install -l redis-3.3.0.gem 配置ruby的环境变量 echo $PATH vim /etc/profile 写入最底行 PATH=$PATH:/opt/ruby/bin/ 读取文件 source /etc/profile 5.通过ruby的包管理工具去安装redis包,安装后会生成一个redis-trib.rb这个命令 一键创建redis-cluster 其实就是分配主从关系 以及 槽位分配 slot槽位分配 /root/redis-4.0.10/src/redis-trib.rb create --replicas 1 127.0.0.1:7000 127.0.0.1:7001 127.0.0.1:7002 127.0.0.1:7003 127.0.0.1:7004 127.0.0.1:7005 6.检查节点主从状态 redis-cli -p 7000 info replication redis-cli -p 7001 info replication redis-cli -p 7002 info replication 7.向redis集群写入数据,查看数据流向 redis-cli -p 7000 -c #这里会将key自动的重定向,放到某一个节点的slot槽位中 set name s15 set addr shahe