转载请注明出处:http://www.cnblogs.com/shamoyuu/p/vue_vux_app_1.html
项目github地址:https://github.com/shamoyuu/vue-vux-iconan
继续上一篇文章,这次以实际项目为主题。
我们做一个看漫画的APP,名字就叫爱柯南,但是不会只有柯南一个。
首先在components下新建main文件夹,用来存放4个主导航页。
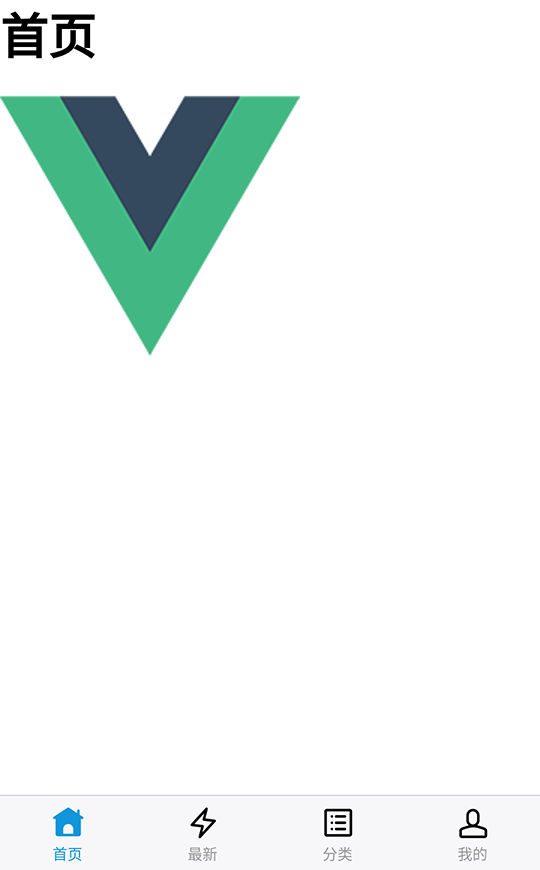
在这个文件夹下新建4个vue文件,分别是Home.vue、News.vue、Classify.vue、Personal.vue,内容都一样
<template>
    <div>
        <h1>{{msg}}</h1>
        <img src="@/static/images/logo.png">
    </div>
</template>

<script>
    export default {
        data () {
            return {
                msg: "首页" //把这里都改一下
            }
        }
    }
</script>

<style scoped>

</style>
@这里可以简单地理解为src根路径。
然后修改tool/router/index.js文件
import Vue from 'vue'
import Router from 'vue-router'
import Home from '@/components/main/Home'
import News from '@/components/main/News'
import Classify from '@/components/main/Classify'
import Personal from '@/components/main/Personal'

Vue.use(Router);

export default new Router({
    routes: [
        {
            path: '/',
            redirect: '/home'
        },
        {
            path: '/home',
            name: 'home',
            component: Home
        },
        {
            path: '/news',
            name: 'news',
            component: News
        },
        {
            path: '/classify',
            name: 'classify',
            component: Classify
        },
        {
            path: '/personal',
            name: 'personal',
            component: Personal
        }
    ]
});
然后在components下新建Footer.vue文件,用来处理底部导航
<template>
    <tabbar @on-index-change="foo">
        <tabbar-item selected>
            <img slot="icon" src="../assets/images/homepage.png">
            <img slot="icon-active" src="../assets/images/homepage_fill.png">
            <span slot="label">首页</span>
        </tabbar-item>
        <tabbar-item>
            <img slot="icon" src="../assets/images/flashlight.png">
            <img slot="icon-active" src="../assets/images/flashlight_fill.png">
            <span slot="label">最新</span>
        </tabbar-item>
        <tabbar-item>
            <img slot="icon" src="../assets/images/createtask.png">
            <img slot="icon-active" src="../assets/images/createtask_fill.png">
            <span slot="label">分类</span>
        </tabbar-item>
        <tabbar-item>
            <img slot="icon" src="../assets/images/people.png">
            <img slot="icon-active" src="../assets/images/people_fill.png">
            <span slot="label">我的</span>
        </tabbar-item>
    </tabbar>
</template>

<script>
    import {Tabbar, TabbarItem} from 'vux'
    import router from '@/tool/router/index.js'

    export default {
        name: 'AppFooter',
        components: {
            Tabbar,
            TabbarItem
        },
        methods: {
            foo: function (newindex, oldindex) {
                switch (newindex){
                    case 0 :
                        router.replace('/home');
                        break;
                    case 1:
                        router.replace('/news');
                        break;
                    case 2:
                        router.replace('/classify');
                        break;
                    case 3:
                        router.replace('/personal');
                        break;
                }
            }
        }
    }
</script>
<style>

</style>
需要注意的是,我们这里并不采用vux官方API里demo的跳转方式(在TabbarItem上加link),而是用on-index-change事件,在这个事件里我们通过router.replace来切换路由,否则你在多次点击底部导航之后再回退的话,会把前面点过的再回退一遍。
我们再添加几个less样式,来初始化和添加全局样式。
在assets下新建less文件夹,在里面新建
app.less
#app {
    .weui-tabbar__item.weui-bar__item_on .weui-tabbar__icon,
    .weui-tabbar__item.weui-bar__item_on .weui-tabbar__icon > i,
    .weui-tabbar__item.weui-bar__item_on .weui-tabbar__label {
        color: #1296DB
    }
}
reset.less
button {
    -webkit-tap-highlight-color: rgba(0, 0, 0, 0);
    -webkit-appearance: none;
    padding: 0;
    margin: 0;
    outline: none;
    border: none;
    border-radius: 0;
    background: transparent;
}
main.less
@import '~vux/src/styles/reset.less';
@import "reset";
@import "app";
然后修改APP.vue文件
<template>
    <div id="app">
        <router-view/>
        <app-footer></app-footer>
    </div>
</template>

<script>
    import AppFooter from './components/Footer.vue'

    export default {
        name: 'app',
        components: {
            AppFooter
        }
    }
</script>

<style lang="less">
    @import "./assets/less/main.less";
</style>
上面用到的几个图片,可以直接到github里下载。