最近在看微信第三方开发,整个流程看下来还是可以理解的
https://blog.csdn.net/abc916545195/article/details/50977079?locationNum=16&fps=1
借鉴了以上的博客
整个流程坑不多,只是初看,有时有些不理解
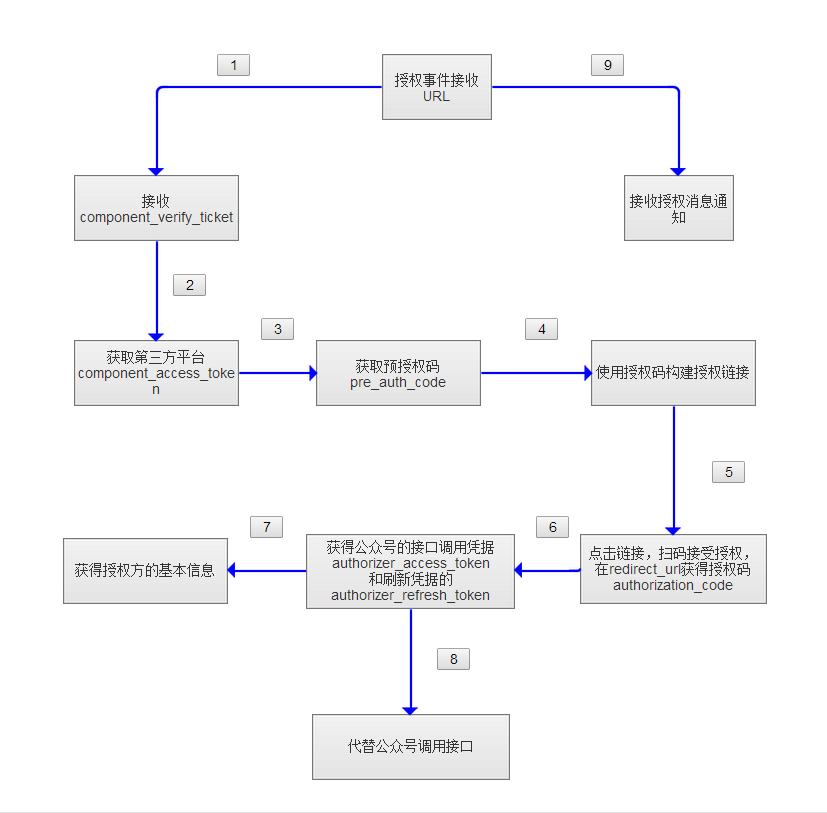
首先,我们要接收
component_verify_ticket
POST数据示例
<xml>
<AppId> </AppId>
<CreateTime>1413192605 </CreateTime>
<InfoType> </InfoType>
<ComponentVerifyTicket> </ComponentVerifyTicket>
</xml>
字段说明
| 字段名称 | 字段描述 |
|---|---|
| AppId | 第三方平台appid |
| CreateTime | 时间戳 |
| InfoType | component_verify_ticket |
| ComponentVerifyTicket | Ticket内容 |
注意:
component_verify_ticket的有效时间较component_access_token更长,建议保存最近可用的component_verify_ticket,在component_access_token过期之前使用该ticket进行更新,避免出现因为ticket接收失败而无法更新component_access_token的情况。
建议使用https协议
public void doAuthorize(String nonce, String timestamp, String signature, String msgSignature, String xml) {
    logger.info("[doAuthorize] nonce=" + nonce +
            "; timestamp = "+ timestamp + " ;signature = " + signature +"; msgSignature= " + msgSignature + "; xml = "+ xml);
    if (StringUtils.isEmpty(msgSignature)) {
        return;
    }
    // 微信消息签名验证
    boolean isValid = WechatOpenLogic.checkSignature(wechatToken, signature, timestamp, nonce);
    if (!isValid){
        logger.error("isValid false ; wechatToken " );
        return;
    }

    Map<String, String> map = null;
    //获得解密后的XML消息体
    try {
        map = WechatOpenLogic.decryptMsgToMap(wechatToken,encodingAesKey, componentAppId, msgSignature, timestamp, nonce, StringUtils.trim(xml));
    }catch (Exception e){
        logger.error("[doAuthorize] error =" + ExceptionUtils.getStackTrace(e));
        return;
    }
    //消息类型
    String infoType = map.get("InfoType");
    switch (infoType) {
        //推送ticket,用于获取component_access_token
//这里可以获取授权码
        case "component_verify_ticket":
            String componentVerifyTicket = map.get("ComponentVerifyTicket");
            storeWechatComponentVerifyTicket(componentVerifyTicket);
            break;
        // 删除本地授权的公众号
        case "unauthorized":
    //移除缓存中的用户信息,这里是指取消的授权的用户
            this.unauthorized(map);
            break;
        ////授权成功或更新授权成功
        case "authorized":
        case "updateauthorized":
    //获取用户信息并保存
//这里可以获取授权码
            this.createOrUpdateAuthorized(map);
            break;
    }

}
第二步,获取第三方平台component_access_token
https请求:
https://api.weixin.qq.com/cgi-bin/component/api_component_token
代码如下
public String getComponentAccessToken() {
    String cacheToke  = stringCacheService.getCacheString(RedisSystemKey.COMPONENT_ACCESS_TOKEN);
    if(!StringUtils.isBlank(cacheToke)){
        return cacheToke;
    }
    String verifyTicket = stringCacheService.getCacheString(RedisSystemKey.COMPONENT_VERIFY_TICKET);
    JSONObject jsonObject = new JSONObject();
    jsonObject.put("component_appid", componentAppId);
    jsonObject.put("component_appsecret", componentAppsecret);
    jsonObject.put("component_verify_ticket", verifyTicket);
    try {
        HttpResponse response = HttpUtils.doPost(apiComponentTokenUrl,new HashMap<>(),new HashMap<>(), jsonObject.toJSONString());
        String data = EntityUtils.toString(response.getEntity());
        String token = JSONObject.parseObject(data).getString("component_access_token");
        //设置过期时间,小于2小时
        stringCacheService.storeCacheTimeOut(RedisSystemKey.COMPONENT_ACCESS_TOKEN, token, 6600, TimeUnit.SECONDS);
        return token;
    }catch (Exception e){
        logger.error("[getComponentAccessToken] get token , error = " + ExceptionUtils.getStackTrace(e));
    }
    return null;
}

3:获取预授权码 pre_auth_code
http请求方式: POST(请使用https协议)
https://api.weixin.qq.com/cgi-bin/component/api_create_preauthcode?component_access_token=xxx