sersync项目介绍
Sersync项目利用inotify与rsync技术实现对服务器数据实时同步的解决方案其中inotify用于监控sersync所在服务器上文件系统的时间变化,rsync是目前广泛使用的本地及异地数据同步工具,其优点是只对变化的目录数据操作,甚至是一个文件不同部门进行同步,所以其优势大大超过使用挂接文件系统或scp等方式进行镜像同步。
目前使用的比较多的同步程序版本是inotify-tools,另外一个是google开源项目Openduckbill(依赖于inotify-tools),这两个都是基于脚本语言编写的,其设计思路同样是采用inotify与rsync命令。
相比以上两个项目,sersync项目的优点是:
①.使用C++编写,对linux系统文件产生的临时文件和重复的文件操作会进行过滤,在结合rsync同步的时候回减少运行时消耗本地及网络资源,因此速度更快。
②.相比较上面两个项目,sersync配置起来很简单:在htto://code.google.com/p/sersync处下载源码(分为32位与64位版本),其中bin目录下是一已经编译好的二进制文件,配合bin目录下的xml文件直接使用即可。
③.使用多线程进行 同步(即可以并发同多个不同文件),尤其在同步较大文件时,能够保证多个服务器实时保持同步状态。
④.sersync自带出错处理机制,通过失败队列对出错的文件重新同步,如果仍旧失败,则每数个小时对同步失败的文件再重新同步。
⑤.Sersync自带crontab功能,只需在xml配置文件中开启,即可按预先的配置,隔一段时间整体同步一次。
⑥.Sersync自带socket与http的协议扩展,可以满足有特殊需求的公司二次开发。
sersync基本架构
①.线程组线程是等待线程队列的守护进程,当队列中有数据的时候,线程组守护进程逐个唤醒,当队列中inotify事件较多的时候就会全部唤醒一起工作。这样设计的目的是能够同时处理多个inotify时间,提升服务器的并发同步能力(核数*2+2)
之所以称止为线程,是因为每个线程在工作的时候,会根据服务上写入文件的数量建立子线程,子线程可以保证所有的文件与各个服务器同时同步,当要同步的文件较大的时候,这样设计可以保证各个远程服务器可以同时获得要同步的文件。
②.服务线程的作用有三个:
a)首先要处理同步失败的文件,将这些文件再次同步,对于再次失败的文件会生成rsync_fail_log.sh脚本,记录失败的事件。
b)同时每隔10个小时执行脚本一次,同时清空脚本
c)第三个作用是crontab功能,可以每隔一定事件,将所有路径整体同步一次
③.过滤队列的建立是为了过滤短时间内产生的重复的inotify信息,例如在删除文件夹的时候,inotify就会同时产生删除文件夹里的文件和删除文件夹的事件,通过过滤队列,当删除文件夹事件产生的时候,会将之前加入队列的删除文件的事件全部过滤掉,这样只产 生一条删除文件夹事件,从而减轻了同步的负担。同时对于修改文件操作的时候,会产生临时文件的重复操作。
sersync同步
sersync依赖rsync进行数据同步。如下图:在同步主服务器(test3)上开启sersync,sersync负责监控配置路径中的文件系统事件变化,然后调用rsync命令把更新的文件同步到目标服务器(test1-test2),因此,需要在主服务器配置sersync,在同步目标服务器配置rsync server(注意是rsync服务)。
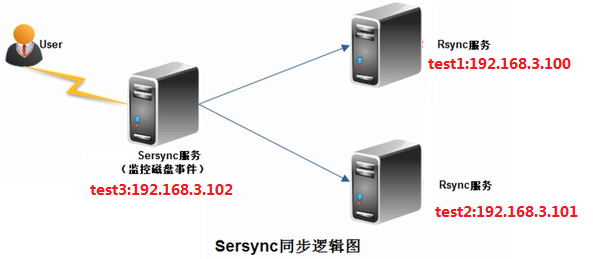
如图,用户会实时的往左边的同步主服务器(test3)上写入或更新文件数据,此时需要在左边的同步服务器(test3)上配置sersync服务,在左边的同步目标服务器test1和test3服务器上配置rsync守护进程,这样在主服务器test3上产生的写入或更新的文件,就会被sersync服务实时同步到多个目标服务器(test1、test2等)。在主服务器(test3)上有rsync命令即可,在目标服务器(test1、test2)上只需进行简单的配置,并开启rsync守护进程即可。
提示:学习rsync的守护进程服务后就会发现,实际上sersync就是监控本地的数据写入或更新事件,然后,调用rsync客户端的命令,将写入或更新事件对应的文件通过rsync推送到目标服务(例如test1、test2),就这么简单
部署环境
|
角色 |
服务器配置 |
操作系统版本 |
IP |
机器名 |
|
sersync服务 |
VM |
CentOS6.4|2.6.32-358.el6.i686 |
192.168.3.102/24 |
test3 |
|
rsync服务 |
VM |
CentOS6.4|2.6.32-358.el6.i686 |
192.168.3.100/24 |
test1 |
|
rsync服务 |
VM |
CentOS6.4|2.6.32-358.el6.i686 |
192.168.3.101/24 |
test2 |
♧部署rsync服务(在多台目标服务器test1,test2..上相同配置)
安装
[root@test1 ~]# yum install -y rsync	#安装rsync             [rsync version 3.0.6]
[root@test1 ~]# cat >/etc/rsyncd.conf<<EOF
transfer logging = yes
log file = /var/log/rsyncd.log
pid file = /var/run/rsyncd.pid
lock file = /var/run/rsyncd.lock
port = 873
address = 192.168.3.100			#监听的网卡IP,test2上改为192.168.3.101
uid = root        #rsync是通过这个设定的用户来访问下面配置的path路径
gid = root		    #所以这个用户要对下面配置的path路径要有相应的权限
use chroot = no
read only = false		#设置为false,客户端可以上传文件,设置为true就不能推送只能拉取
max connections = 2000
Timeout = 600
ignore errors
auth users = rsyncd_bk
secrets file = /etc/rsyncd.passwd
hosts allow = 192.168.3.0/255.255.255.0
hosts deny = *
list = false
########################################				#设置了三个模块
[www]
comment = www by heboan
path = /data0/www/
########################################
[bbs]
comment = bbs by heboan
path = /data1/bbs/
########################################
[blog]
comment = blog by heboan
path = /data2/blog/
EOF
提示:test1,test2的机器192.168.3.100,192.168.3.101同时部署上诉服务,上面的rsync服务的配置文件,表明允许sersync主服务器(192.168.3.102)访问,rsync同步模块名为[www][bbs][blog],将同步过来的文件分别放入对应path指定的目录/data0/www/,/data1/bbs/,/data2/blog/下。如果有多台目标服务器,则每一台都需要进行类似的rsync服务配置,上面的uid,gid要换成你服务器的相应的同步用户,注意,rsync服务账户(本文用了root)要有对同步目录的写入更新权限。
创建相关待同步目录
# mkdir -p /data0/www /data1/bbs /data2/blog
配置相关权限认证
# echo "rsyncd_bk:pass123" >/etc/rsyncd.passwd
# chmod 600 /etc/rsyncd.passwd
# ll /etc/rsyncd.passwd
-rw-------. 1 root root 18 Apr 20 21:31 /etc/rsyncd.passwd
开启rsync守护进程
# rsync --daemon
# ps -ef |grep rsync|grep -v grep
root      1710     1  0 21:32 ?        00:00:00 rsync --daemon
# netstat -lnt |grep 873
tcp        0      0 192.168.3.100:873           0.0.0.0:*                   LISTEN
设置开机启动
# which rsync
/usr/bin/rsync
# echo "#rsync service daemon by heboan 20150420" >>/etc/rc.local
# echo "/usr/bin/rsync --daemon" >>/etc/rc.local
重启命令
# pkill rsync
# ps -ef |grep rsync|grep -v grep
# rsync --daemon
# ps -ef |grep rsync|grep -v grep
root      1746     1  0 21:43 ?        00:00:00 rsync --daemon
到此test1已经配置完成,test2的配置和test1一样,这里就不再写出步骤,和上面一样即可
♧在test3上配置rsync客户端
[root@test3 ~]# yum install -y rsync

在test3上配置rsync客户端相关权限认证
[root@test3 ~]# echo "pass123" >/etc/rsyncd.passwd
[root@test3 ~]# chmod 600 /etc/rsyncd.passwd
[root@test3 ~]# ll /etc/rsyncd.passwd
-rw-------. 1 root root 8 Apr 20 22:21 /etc/rsyncd.passwd
test3上手工测试rsync同步情况
特别强调:此步非常关键,如果这里测试不成功,后面的sersync配好了也不会同步数据
①分别创建待同步的数据
[root@test3 ~]# mkdir -p /data0/www /data1/bbs /data2/blog
[root@test3 ~]# touch /data0/www/www.log /data1/bbs/bbs.log /data2/blog/blog.log
[root@test3 ~]# ls /data0/www/ /data1/bbs/ /data2/blog/
/data0/www/:
www.log

/data1/bbs/:
bbs.log

/data2/blog/:
blog.log
②执行同步命令
rsync -avzP /data0/www/ rsyncd_bk@192.168.3.100::www/ --password-file=/etc/rsyncd.passwd
rsync -avzP /data0/www/ rsyncd_bk@192.168.3.101::www/ --password-file=/etc/rsyncd.passwd

rsync -avzP /data1/bbs/ rsyncd_bk@192.168.3.100::bbs/ --password-file=/etc/rsyncd.passwd
rsync -avzP /data1/bbs/ rsyncd_bk@192.168.3.101::bbs/ --password-file=/etc/rsyncd.passwd

rsync -avzP /data2/blog/ rsyncd_bk@192.168.3.100::blog/ --password-file=/etc/rsyncd.passwd
rsync -avzP /data2/blog/ rsyncd_bk@192.168.3.101::blog/ --password-file=/etc/rsyncd.passwd
③同步完成之后,test1,test2上的对应目录应该有*.log的文件
[root@test1 ~]# ls /data0/www/ /data1/bbs/ /data2/blog/
/data0/www/:			/data1/bbs/:			/data2/blog/:
www.log			       bbs.log			        blog.log

[root@test2 ~]# ls /data0/www/ /data1/bbs/ /data2/blog/
/data0/www/:			/data1/bbs/:			/data2/blog/:
www.log				bbs.log				blog.log
♧在test3上开始部署sersync服务
下载sersync
在google code下载sersync的可执行文件版本,里面有配置文件与可执行文件,这里用sersync2.5进行说明,新版配置形式类似。
下载地址:http://sersync.googlecode.com,根据自己的系统版本选择32位或64位的下载
安装sersync
[root@test3 ~]# tar zxf sersync2.5_32bit_binary_stable_final.tar.gz -C /usr/local/
[root@test3 ~]# cd /usr/local/;ls
bin  etc  games  GNU-Linux-x86  include  lib  libexec  sbin  share  src
[root@test3 local]# mv GNU-Linux-x86 sersync
[root@test3 local]# ls sersync/
confxml.xml  sersync2
规范sersync目录结构
[root@test3 local]# cd sersync/
[root@test3 sersync]# mkdir conf bin logs
[root@test3 sersync]# mv confxml.xml conf
[root@test3 sersync]# mv sersync2 bin/sersync
[root@test3 sersync]# tree
.
├── bin
│   └── sersync
├── conf
│   └── confxml.xml
└── logs
配置sersync
因为需要同步三个模块[www]、[bbs]、[blog],这里我们需要创建三个与之对应的配置文件,如果只是同步一个模块,我们只需要一个配置文件confxm.xml就可以了(注意:修改配置文件前记得备份)
[root@test3 sersync]# cd conf/
[root@test3 conf]# cp confxml.xml www_confxml.xml
[root@test3 conf]# cp confxml.xml bbs_confxml.xml
[root@test3 conf]# cp confxml.xml blog_confxml.xml
[root@test3 conf]# mkdir bk		#创建一个目录,用来放置备份配置文件的
[root@test3 conf]# mv confxml.xml  bk/		#把备份的配置文件放入备份目录
[root@test3 conf]# ls
bbs_confxml.xml  bk  blog_confxml.xml  www_confxml.xml
修改配置文件www_confxml.xml(bbs_confxml.xml、blog_confxml.xml同理修改)
①修改24-28行的部分,原内容为:

 24		<localpath watch="/opt/tongbu">
 25		    <remote ip="127.0.0.1" name="tongbu1"/>
 26		    <!--<remote ip="192.168.8.39" name="tongbu"/>-->
 27		    <!--<remote ip="192.168.8.40" name="tongbu"/>-->
 28		</localpath>

修改后的内容为:
        <localpath watch="/data0/www">
             <remote ip="192.168.3.100" name="www"/>
             <remote ip="192.168.3.101" name="www"/>
        </localpath>
提示:此步watch="/data0/www"就是定义服务端待同步的目录,和目标服务器的模块name="www"
-----------------------------------------------------------------------------------
bbs_confxml.xml修改为:
       <localpath watch="/data1/bbs">
             <remote ip="192.168.3.100" name="bbs"/>
             <remote ip="192.168.3.101" name="bbs"/>
        </localpath>

blog_confxml.xml修改为:
       <localpath watch="/data2/blog">
             <remote ip="192.168.3.100" name="blog"/>
             <remote ip="192.168.3.101" name="blog"/>
        </localpath>
②修改29-35(修改前的行号),认证部分,原内容为:
 29		<rsync>
 30		    <commonParams params="-artuz"/>	#同步的参数
 31		    <auth start="false" users="root" passwordfile="/etc/rsync.pas"/>
 32		    <userDefinedPort start="false" port="874"/><!-- port=874 -->
 33		    <timeout start="false" time="100"/><!-- timeout=100 -->
 34		    <ssh start="false"/>
 35		</rsync>

修改后的内容为:(其他两个配置文件修改为一样即可)
       <rsync>
            <commonParams params="-artuz"/>
            <auth start="true" users="rsyncd_bk" passwordfile="/etc/rsyncd.passwd"/>
            <userDefinedPort start="false" port="874"/><!-- port=874 -->
            <timeout start="true" time="100"/><!-- timeout=100 -->
            <ssh start="false"/>
        </rsync>
细心一点我们就能明白,其实上面的几个配置就是在拼接rsync -artuz --timeout=100 /data0/www/ rsyncd_bk@192.168.3.100:www/ --password-file=/etc/rsyncd.passwd这个同步的命令而已
③修改36行(修改前的行号),原内容为
36	     <failLog path="/tmp/rsync_fail_log.sh" timeToExecute="60"/><!--default every 60mins execute once-->

修改后的内容为:
     <failLog path="/usr/local/sersync/logs/www_rsync_fail_log.sh" timeToExecute="60"/><!--default every 60mins execute once-->

提示:当同步失败后,日志记录到/usr/local/sersync/logs/www_rsync_fail_log.sh,并且每60分钟对失败的log进行重新同步
-----------------------------------------------------------------------------------
bbs_confxml.xml修改为:
     <failLog path="/usr/local/sersync/logs/bbs_rsync_fail_log.sh" timeToExecute="60"/><!--default every 60mins execute once-->

blog_confxml.xml修改为:
     <failLog path="/usr/local/sersync/logs/blog_rsync_fail_log.sh" timeToExecute="60"/><!--default every 60mins execute once-->
配置sersync环境变量
[root@test3 ~]# echo 'export PATH=$PATH:/usr/local/sersync/bin'>>/etc/profile
[root@test3 ~]# tail -1 /etc/profile
export PATH=$PATH:/usr/local/sersync/bin
[root@test3 ~]# source /etc/profile
[root@test3 ~]# which sersync
/usr/local/sersync/bin/sersync
启动命令
sersync -r -d -o /usr/local/sersync/conf/www_confxml.xml
sersync -r -d -o /usr/local/sersync/conf/bbs_confxml.xml
sersync -r -d -o /usr/local/sersync/conf/blog_confxml.xml

参数说明:
-r  :用来第一次同步初始化目录,是服务器两边的内容保持一致
-d  :在后台运行
-o  :用来指定配置文件
♧sersync同步测试(省略)
附:
Sersync配置文件说明(XML配置文件:confxml.xml)
提示:xml配置文件注释不是“#”,而是<!--中间是注释内容-->
1	<?xml version="1.0" encoding="ISO-8859-1"?>
2	<head version="2.5">
3	    <host hostip="localhost" port="8008"></host>
hostip与port是针对插件的保留字段,对于同步功能没有任何作用,保留默认即可
4	    <debug start="false"/>
设置为true,开启debug模式,会在sersync正在运行的控制台打印inotify事件与rsync同步命令
5	    <fileSystem xfs="false"/>
对于xfs文件系统的用户,需要将这个选项开启,才能使sersync正常工作
对于sersync监控的文件,会默认过滤系统的临时文件(以“.”开头,以“~”结尾),除了这些文件外,可以自定义需要过滤的文件
6	    <filter start="false">
7		<exclude expression="(.*)\.svn"></exclude>
8		<exclude expression="(.*)\.gz"></exclude>
9		<exclude expression="^info/*"></exclude>
10		<exclude expression="^static/*"></exclude>
11	    </filter>
将start设置为true后开启过滤功能,在exclude标签中,填写正则表达式,默认给出两个例子分别是过滤以“.gz”结尾的文件与过滤监控目录下的info路径(监控路径/info/*),可以根据需要添加,但开启的时候,自己测试一下,正则表达式如果出现错误,控制台会有提示。相比较使用rsync的exclude功能,被过滤的路径,不会加入监控,大大减少了rsync同步的通讯量
对于inotify监控参数可以进行设置,根据项目的特点优化rsync
12	    <inotify>
13		<delete start="true"/>
14		<createFolder start="true"/>
15		<createFile start="false"/>
16		<closeWrite start="true"/>
17		<moveFrom start="true"/>
18		<moveTo start="true"/>
19		<attrib start="false"/>
20		<modify start="false"/>
21	    </inotify>
对于大多数应用,可以尝试把createFile(监控文件事件选项)设置为false来提高性能,减少rsync通讯。因为拷贝文件到监控目录会产生create事件与close_write事件,所以如果关闭create事件,只监控文件拷贝结束时的事件close_write,同样可以实现文件完整同步。
注意:需要将createFolder保持为true,如果将createFolder设为false,则不会对产生的目录进行监控,该目录下的子文件与子目录也不会被监控。所以除非特殊需要,请开启。默认情况下对创建文件(目录)事件与删除文件(目录)事件都进行监控,如果项目中不需要删除远程目标服务器的文件(目录),则可以将delete参数设置为false,则不对删除事件进行监控。
22
23	    <sersync>
文件监控与远程同步设置
24		<localpath watch="/opt/tongbu">
25		    <remote ip="127.0.0.1" name="tongbu1"/>
26		    <!--<remote ip="192.168.8.39" name="tongbu"/>-->
27		    <!--<remote ip="192.168.8.40" name="tongbu"/>-->
28		</localpath>
/opt/tongbu目录为sersync主服务器本地待同步的目录,ip=”192.168.8.39”为从服务器的IP地址,如果有多个从服务器,依次列出来即可。name=”tongbu”,这里的tongbu为rsyncd.conf中的模块名字,即中括号中的名称
Rsync设置
29		<rsync>
30		    <commonParams params="-artuz"/>
31		    <auth start="false" users="root" passwordfile="/etc/rsync.pas"/>
32		    <userDefinedPort start="false" port="874"/><!-- port=874 -->
33		    <timeout start="false" time="100"/><!-- timeout=100 -->
34		    <ssh start="false"/>
35		</rsync>
在commonParams项,我们可以自定义rsync的同步参数,默认是-artuz,auth start=”false”设置为true的时候,使用rsync的认证模式传送,需要配置user与passwordfile(--password-file=)来使用。userDenfinedPort当远程同步目标服务器的rsync端口不是默认端口的时候使.timeout这是rsync的timout事件。<ssh start=”false”/>如果开启,ssh使用rsync -e ssh的方式传输。
失败日志脚本配置
36		<failLog path="/tmp/rsync_fail_log.sh" timeToExecute="60"/><!--default every 60mins execute once-->
如果文件同步传输失败,会重新传送,再次失败就会写入rsync_fail_log.sh,然后每个一段时间(timeToExecute进行设置)执行该脚本再次重新传送,然后清空该脚本。可以通过path来设置日子路径。
Crontab定期整体同步功能
37		<crontab start="false" schedule="600"><!--600mins-->
38		    <crontabfilter start="false">
39			<exclude expression="*.php"></exclude>
40			<exclude expression="info/*"></exclude>
41		    </crontabfilter>
42		</crontab>
Crontab可以对监控路径与远程目标主机每隔一段时间进行一次整体同步,可能由于一些原因再次重传失败,这个时候如果开启了crontab功能,还可以进一步保证各个服务器文件一致,如果文件量比较大,crontab的时间间隔要设大一些,否则可能增加通讯开销。Schedule这个参数设置crontab的时间间隔,默认是600分钟。如果开启了filter文件过滤功能,那么crontab整体同步也需要设置过滤,否则虽然实时同步的文件被过滤了,但是crontab整体同步的时候,如果不单独设置crontabfilter,还会将需过滤的文件同步到远程从服务器,,crontab的过滤正则与filter过滤的不同,也给出了两个实例分别对应与过滤文件与目录。总之如果同时开启了filter与crontab,则要开启crontab的crontabfilter,并按示例设置使其与filter的过滤一一对应。
插件设置
43		<plugin start="false" name="command"/>
当start=”false”处设置为true的时候,将文件同步到远程服务器后会调用插件。通过name参数指定需要执行的插件。目前支持的有command refreshCDN socket http四种插件。其中,http插件目前由于兼容性原因已经去除,以后会重新加入
44	    </sersync>
45
Command插件
46	    <plugin name="command">
47		<param prefix="/bin/sh" suffix="" ignoreError="true"/>	<!--prefix /opt/tongbu/mmm.sh suffix-->
48		<filter start="false">
49		    <include expression="(.*)\.php"/>
50		    <include expression="(.*)\.sh"/>
51		</filter>
52	    </plugin>
当文件同步完成后,会调用command插件,如同步文件时test.php,则test.php文件再改动之后,调用rsync同步到远程服务器后,调用command插件,执行 :/bin/sh test.php  suffix>dev/null 2>&1
如果suffix设置了,则会放在inotify事件test.php之后,如果ignoreError为true,则会添加>/dev/null 2>&1,当然还可以设置command的filter,当filter为true时,include可以只对正则匹配到的文件调用command.
53
Socke插件,开启该模块,则向指定的ip与端口发送inotify所产生的文件路径信息
54	    <plugin name="socket">
55		<localpath watch="/opt/tongbu">
56		    <deshost ip="192.168.138.20" port="8009"/>
57		</localpath>
58	    </plugin>
59	    <plugin name="refreshCDN">
60		<localpath watch="/data0/htdocs/cms.xoyo.com/site/">
61		    <cdninfo domainname="ccms.chinacache.com" port="80" username="xxxx" passwd="xxxx"/>
62		    <sendurl base="http://pic.xoyo.com/cms"/>
63		    <regexurl regex="false" match="cms.xoyo.com/site([/a-zA-Z0-9]*).xoyo.com/images"/>
64		</localpath>
“refreshCDN”,就在同步过程中将文件发送到目的服务器后刷新cdn接口。如果不想使用,则将start属性设为false即可。
如果需要使用其他插件,则查看其他plugin标签,将插件名称改为xml中其他插件名称即可。该模块根据chinaCDN的协议进行设计,当有文件产生的时候,就向cdn接口发送需要刷新的路径位置。
其中localpath watch=”/data0/hotdocs/cms.xoyo.com/site”是需要监控的目录。cdninfo标签制定了cdn接口的域名,端口号,以及用户名与密码。
sendurl标签是需要刷新的url的前缀。regexurl标签中的,regex属性为true的时候,使用match属性的正则语句匹配inotify返回的路径信息,并将正则匹配到的部分作为url一部分。
举例:
如果产生的文件事件为:/data0/htdoc/cms.xoyo.com/site/jx3.xoyo.com/image/a/123.txt
经过上面的match正则匹配后,最后的刷新路径是:http://pic.xoyo.com/cms/jx3/a/123.txt
如果regex属性为false,最后刷新的路径是http://pic.xoyo.com/cms/jx3.xoyo.com/images/a/123.txt
65	    </plugin>
66	</head>

###############################################################################################
只调用command插件
./sersync -d -m command
只调用refreshCDN插件
./sersync -d -m refreshCDN
只调用socket插件
./sersync -d -m socket