准备前提
配置ansible主机详情:https://www.cnblogs.com/security-guard/
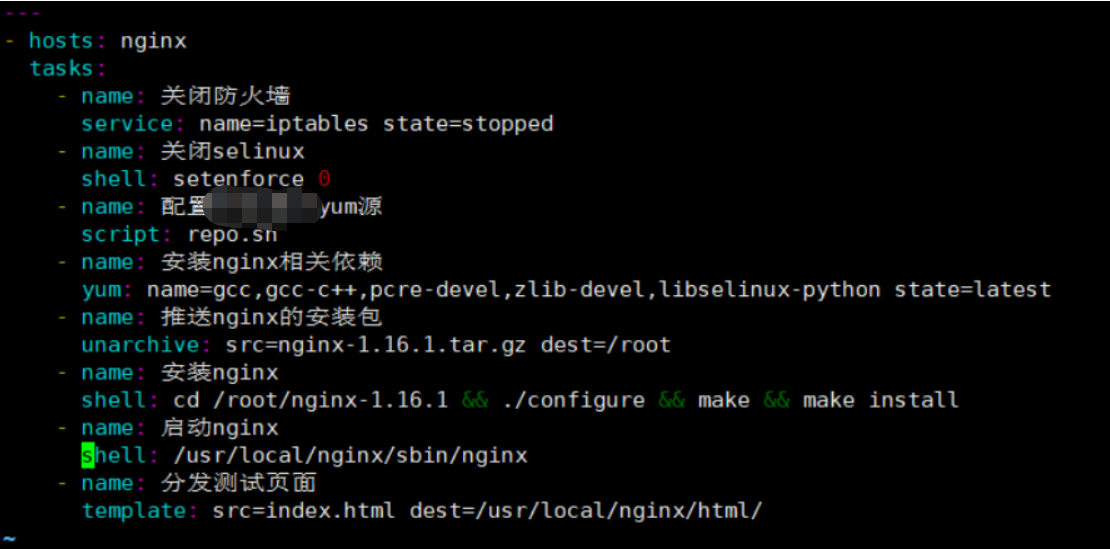
nginx的安装
编写nginx的自动部署文件nginx.yml hosts主机更改为自己定义的
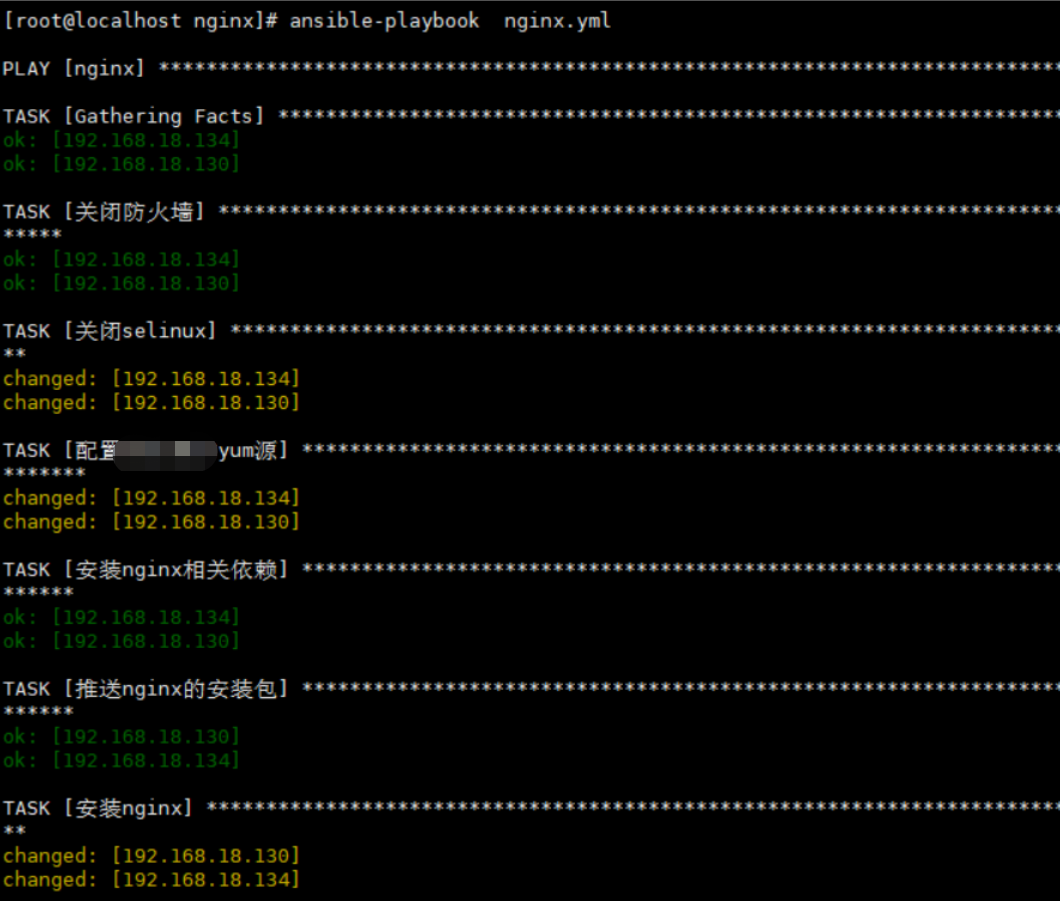
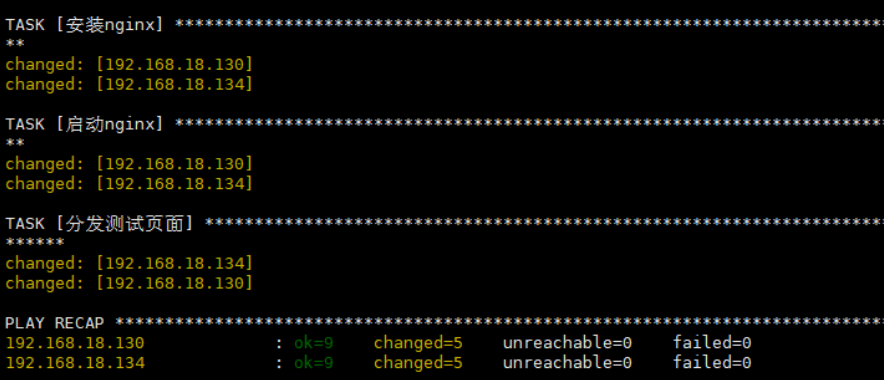
访问目标主机组的IP地址,查看测试页面
测试页面:显示的是本机ip
<h1>{{ansible_all_ipv4_addresses}}</h1>
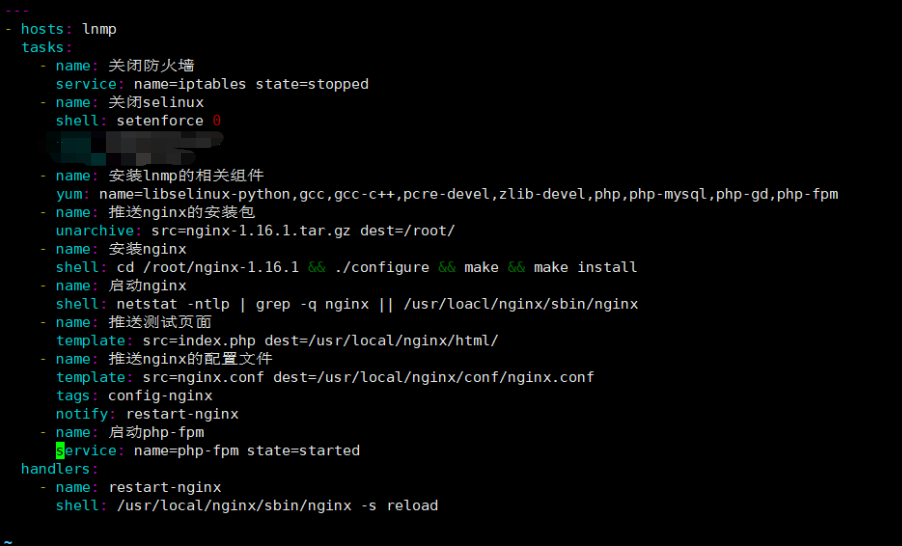
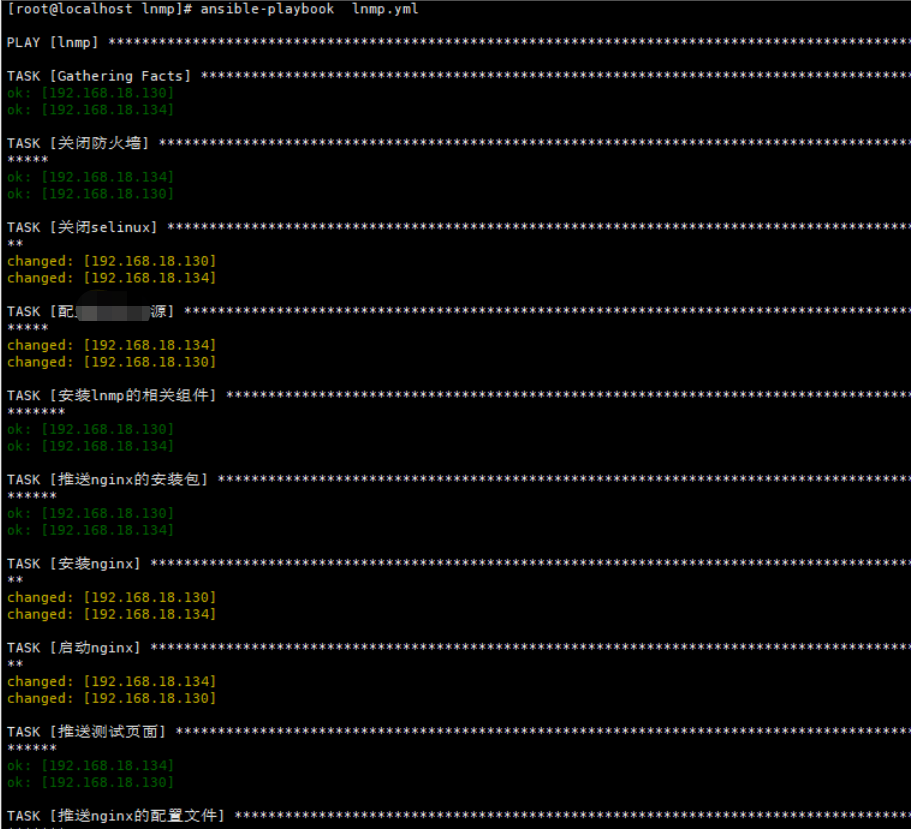
lnmp架构自动部署
首先免密登录配置
编写lnmp的脚本 lnmp.yml
结果:

ansible自动部署tomcat
---
- hosts: tomcat
  tasks:
    - name: 关闭防火墙
      service: name=iptables state=stopped
    - name: 关闭selinux
      shell: setenforce 0
    - name: 安装所需的软件
      yum: name=tar,libselinux-python state=latest
    - name: 推送jdk java环境
      copy: src=jdk-8u131-linux-x64_.rpm dest=/root
    - name: 创建文件夹
      file: path=/opt/tomcat state=directory
    - name: 推送tomcat的压缩包
      unarchive: src=apache-tomcat-8.5.35.tar.gz dest=/opt/tomcat
    - name: 安装jdk
      yum: name=jdk-8u131-linux-x64_.rpm state=installed
    - name: 启动tomcat
      shell: nohup /opt/tomcat/apache-tomcat-8.5.35/bin/startup.sh &
---
- hosts: lnmp
  tasks:
    - name: 关闭防火墙
      service: name=iptables state=stopped
    - name: 关闭selinux
      shell: setenforce 0
    - name: 配置相关组件以及MySQL
      yum: name=zlib-devel,pcre-devel,gcc,gcc-c++,php,php-mysql,php-gd,php-fpm,libselinux-python,tar,vim,unzip state=latest
    - name: 推送nginx安装包
      unarchive: src=nginx-1.16.1.tar.gz dest=/root
    - name: 安装nginx
      shell: cd /root/nginx-1.16.1 && ./configure && make && make install
    - name: 启动nginx
      shell: netstat -ntlp | grep -q nginx || /usr/local/nginx/sbin/nginx
    - name: 推送ningx的配置文件
      template: src=nginx.conf dest=/usr/local/nginx/conf/nginx.conf
      tags: config-nginx
      notify: restart-nginx
    - name: 启动php-fpm
      service: name=php-fpm state=started
    - name: 安装mysql
      yum: name=mysql,mysql-server state=latest
    - name: 启动mysql
      service: name=mysqld state=started
    - name: 删除数据库如果存在
      shell: mysql -e "drop database if exists ds;"
    - name: 创建数据库
      shell: mysql -e "create database ds charset=utf8;"
    - name: 给用户授权
      shell: mysql -e "grant all on *.* to 'tom'@'%' identified by '123';"
    - name: 刷新权限
      shell: mysql -e "flush privileges;"
    - name: 推送电商的安装包并给予权限
      unarchive: src=tinyshopV2.5_data.zip dest=/usr/local/nginx/html/ mode=777

  handlers:
    - name: restart-nginx
      shell: /usr/local/nginx/sbin/nginx -s reload
要求操作系统:centos7
[root@localhost zabbix]# rpm -ivh http://repo.zabbix.com/zabbix/4.4/rhel/7/x86_64/zabbix-release-4.4-1.el7.noarch.rpm
获取http://repo.zabbix.com/zabbix/4.4/rhel/7/x86_64/zabbix-release-4.4-1.el7.noarch.rpm
警告:/var/tmp/rpm-tmp.MEfeuA: 头V4 RSA/SHA512 Signature, 密钥 ID a14fe591: NOKEY
准备中...                          ################################# [100%]
正在升级/安装...
   1:zabbix-release-4.4-1.el7         ################################# [100%]
[root@localhost ~]# yum -y install zabbix-server-mysql zabbix-web-mysql zabbix-apache-conf zabbix-agent
[root@localhost ~]# yum -y install mariadb mariadb-server
[root@localhost ~]# systemctl start mariadb
[root@localhost ~]# systemctl enable mariadb
[root@localhost ~]# mysql
Welcome to the MariaDB monitor.  Commands end with ; or g.
Your MariaDB connection id is 2
Server version: 5.5.64-MariaDB MariaDB Server
Copyright (c) 2000, 2018, Oracle, MariaDB Corporation Ab and others.
Type 'help;' or 'h' for help. Type 'c' to clear the current input statement.

MariaDB [(none)]> create database zabbix charset=utf8;
Query OK, 1 row affected (0.00 sec)

MariaDB [(none)]> grant all on *.* to 'zabbix'@'localhost' identified by '123';
Query OK, 0 rows affected (0.00 sec)

MariaDB [(none)]> flush privileges;
Query OK, 0 rows affected (0.00 sec)

MariaDB [(none)]> exit
Bye

[root@localhost ~]# cd /usr/share/doc/zabbix-server-mysql-4.4.1/
[root@localhost zabbix-server-mysql-4.4.1]# ls
AUTHORS  ChangeLog  COPYING  create.sql.gz  NEWS  README
[root@localhost zabbix-server-mysql-4.4.1]# zcat create.sql.gz | mysql -uzabbix -p123 zabbix
[root@localhost ~]# vim /etc/zabbix/zabbix_server.conf
  DBName=zabbix  //创建的数据库的名字
  DBUser=zabbix  //用户
  DBPassword=123 //用户的密码
[root@localhost ~]# vim /etc/httpd/conf.d/zabbix.conf
  php_value date.timezone Asia/Shanghai
[root@localhost ~]# systemctl restart httpd zabbix-server zabbix-agent