SpringSecurity +JWT 实现前后端分离的登录
要实现前后端分离,需要考虑以下2个问题:
-
项目不再基于session了,如何知道访问者是谁?
-
如何确认访问者的权限?
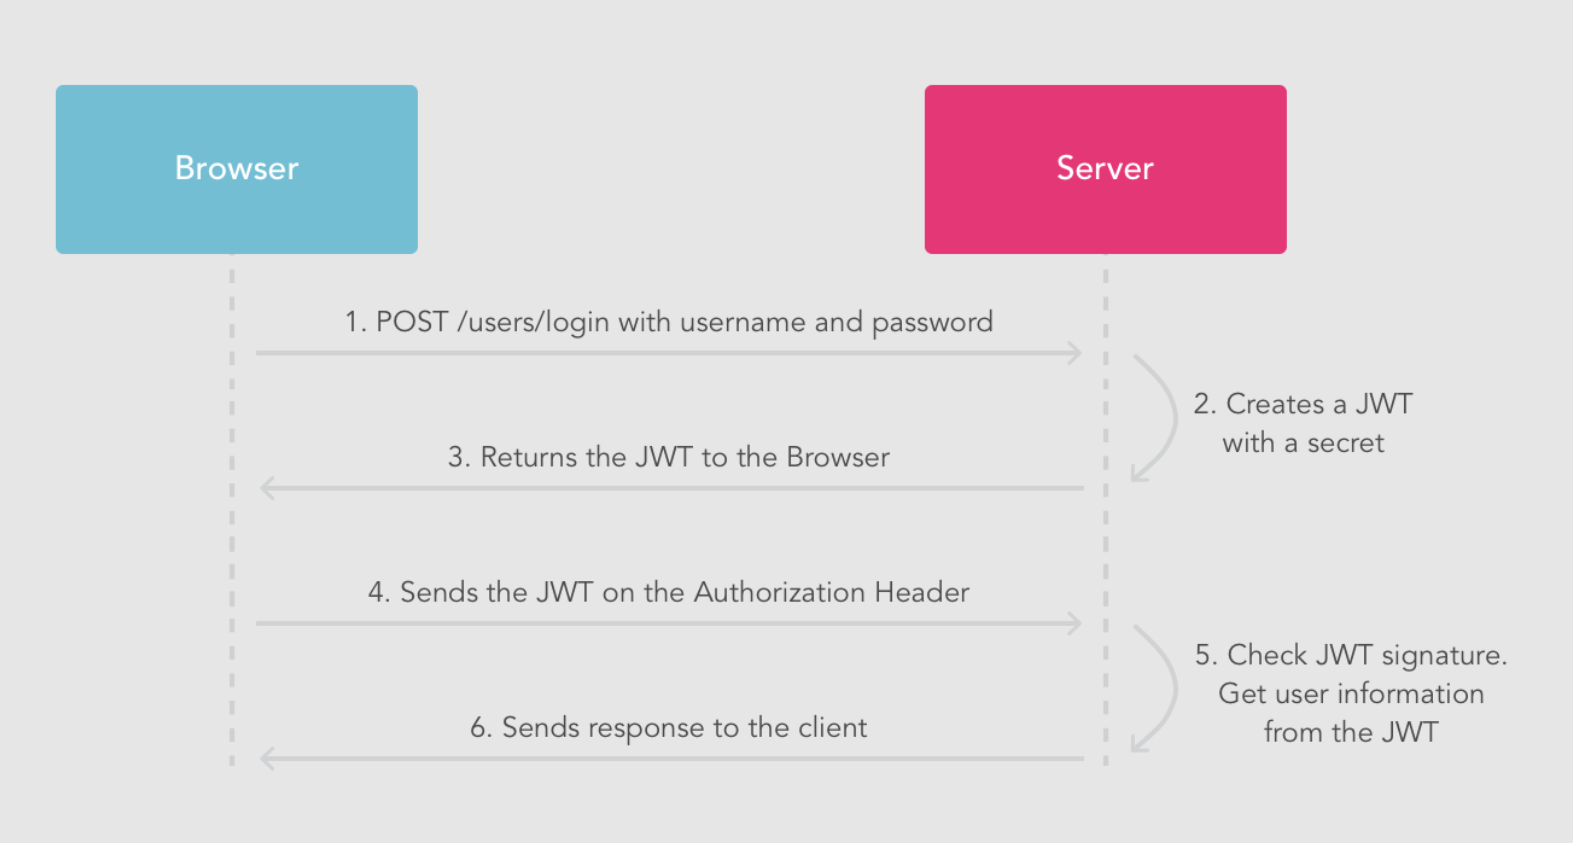
前后端分离,一般都是通过token实现,本项目也是一样;用户登录时,生成token及token过期时间,token与用户是一一对应关系,调用接口的时候,把token放到header或请求参数中,服务端就知道是谁在调用接口,登录如下所示:
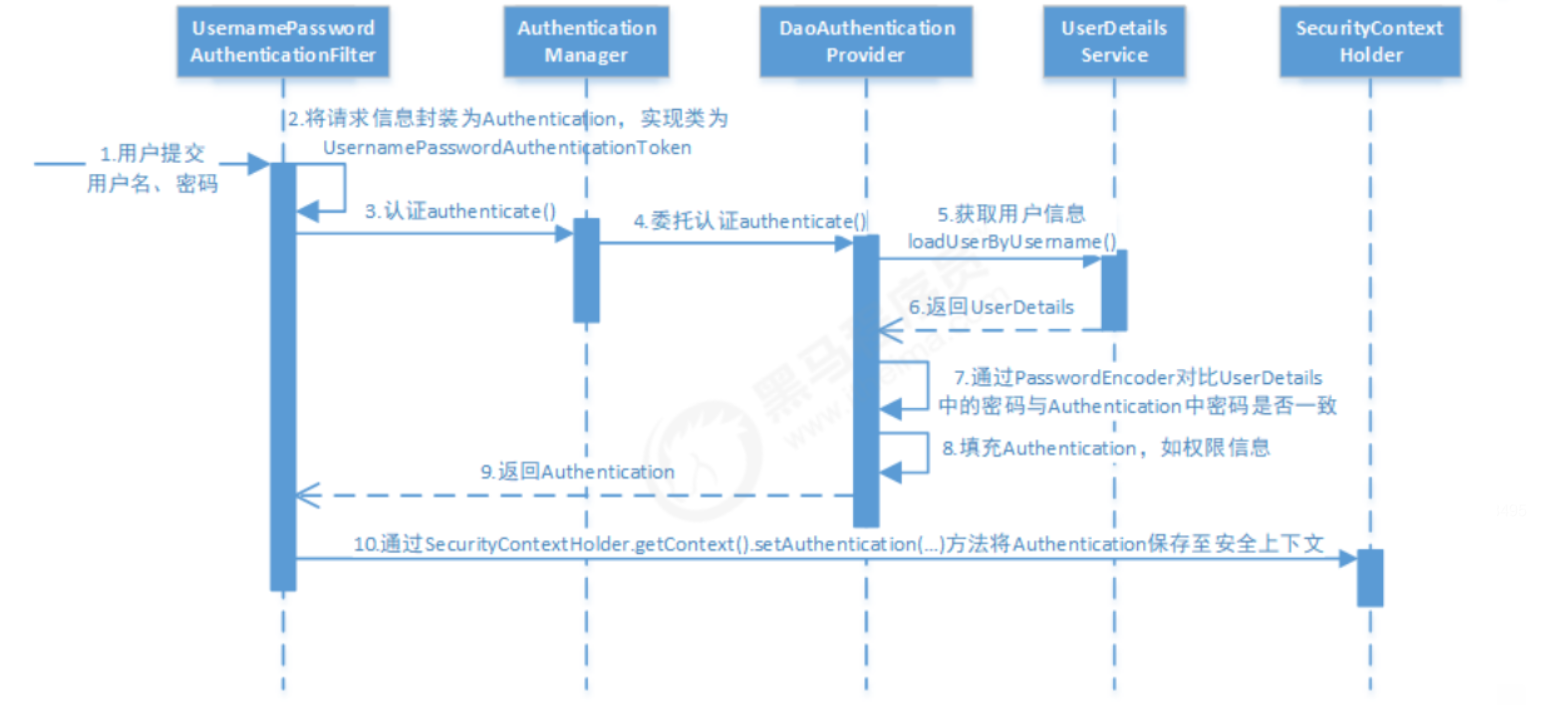
SpringSecurity登录认证流程:https://blog.csdn.net/weixin_44588495/article/details/105907312
1.搭建步骤
1. 引入依赖
<!-- springboot security -->
<dependency>
    <groupId>org.springframework.boot</groupId>
    <artifactId>spring-boot-starter-security</artifactId>
</dependency>
<!-- jwt -->
<dependency>
    <groupId>io.jsonwebtoken</groupId>
    <artifactId>jjwt</artifactId>
    <version>0.9.1</version>
</dependency>
<dependency>
    <groupId>com.github.axet</groupId>
    <artifactId>kaptcha</artifactId>
    <version>0.0.9</version>
</dependency>
<!--hutools工具类-->
<dependency>
    <groupId>cn.hutool</groupId>
    <artifactId>hutool-all</artifactId>
    <version>5.7.3</version>
</dependency>
2.application.properties配置文件
#spring security
spring.security.user.password=123456
spring.security.user.name=admin
#jwt
jwt.header=Authorization
#过期时间设置为7天
jwt.expire=7
#32位的字符
jwt.secret=ji8n3439n439n43ld9ne9343fdfer49h
这里使用配置文件的方式配置用户名和密码,比较简单便于测试,实际项目中是从数据库取用户数据
3.创建JWT工具类
该工具类主要包括3个方法,jwt的token的生成和解析以及token的过期与否
@Component
@Data
@ConfigurationProperties(prefix = "jwt")
public class JwtUtil {

    private int expire;
    private String secret;
    private String header;
    /**
     * 生成jwt
     * @param userName
     * @return
     */
    public String generateToken(String userName)
    {
        Date nowDate = new Date();
        Date expireDate = DateUtil.offsetDay(nowDate,expire);//设置过期时间

        return Jwts.builder()
                .setHeaderParam("","")
                .setSubject(userName)
                .setIssuedAt(nowDate)
                .setExpiration(expireDate)
                .signWith(SignatureAlgorithm.HS256,secret)
                .compact();
    }

    /**
     * 解析JWT
     * @param jwt
     * @return
     */
    public Claims parseClaim(String jwt)
    {
        Claims claims = null;
        try {
            claims = Jwts.parser().setSigningKey(secret).parseClaimsJws(jwt).getBody();
        } catch (Exception e) {
            e.printStackTrace();
        }
        return claims;
    }
    /**
     *jwt是否过期
     *
     */
    public boolean isTokenExpired(Claims claims) {
        return claims.getExpiration().before(new Date());
    }
}
便于后续的配置,这里成员变量的值都写到配置文件中
4.创建SecurityConfig配置文件
@Configuration
@EnableWebSecurity
@EnableGlobalMethodSecurity(prePostEnabled = true)
public class SecurityConfig extends WebSecurityConfigurerAdapter {

    @Resource
    private LoginFailureHandler loginFailureHandler;
    @Resource
    private LoginSuccessHandler loginSuccessHandler;
    @Resource
    private CaptchaFilter captchaFilter;

 /*   @Bean
    public BCryptPasswordEncoder bCryptPasswordEncoder()
    {
        return new BCryptPasswordEncoder();
    }*/

    @Override
    protected void configure(HttpSecurity http) throws Exception {
        http.cors().and().csrf().disable()

                .formLogin()
                .successHandler(loginSuccessHandler)//登录成功后的处理,会生成jwt的token并返回
                .failureHandler(loginFailureHandler)//登录失败后的处理

                .and()//关闭session
                .sessionManagement()
                .sessionCreationPolicy(SessionCreationPolicy.STATELESS)

                .and()//配置安全访问规则
                .authorizeRequests()
                .antMatchers("/login","/captcha","/logout","/favicon.ico").permitAll()
                .anyRequest().authenticated()

                //添加自定义验证码过滤器,在UsernamePasswordAuthenticationFilter之前
                .and()
                .addFilterBefore(captchaFilter, UsernamePasswordAuthenticationFilter.class);
    }
}
5.登录成功和失败处理类
-
LoginSuccessHandler
LoginSuccessHandler类实现接口AuthenticationSuccessHandler,并且重写onAuthenticationSuccess方法,在方法中实现对登录成功的逻辑处理,生成lwt并且将jwt放在请求头中返回给前端
@Component public class LoginSuccessHandler implements AuthenticationSuccessHandler { @Autowired private JwtUtil jwtUtil; @Override public void onAuthenticationSuccess(HttpServletRequest httpServletRequest, HttpServletResponse httpServletResponse, Authentication authentication) throws IOException, ServletException { httpServletResponse.setContentType("application/json;charset=UTF-8"); ResponseResult responseResult = ResponseResult.createBySuccessMessage("登录成功"); //生成jwt String jwt = jwtUtil.generateToken(authentication.getName()); //把生成的jwt放在请求头中返回,前端以后访问后端接口请求头都需要带上它 httpServletResponse.setHeader(jwtUtil.getHeader(),jwt); ServletOutputStream outputStream = httpServletResponse.getOutputStream(); outputStream.write(JSONUtil.toJsonStr(responseResult).getBytes("UTF-8")); outputStream.flush(); outputStream.close(); } } -
LoginFailureHandler
LoginFailureHandler实现接口AuthenticationFailureHandler并且实现onAuthenticationFailure方法,在方法中实现对登录失败的逻辑处理。
@Slf4j
@Component
public class LoginFailureHandler implements AuthenticationFailureHandler {
    @Override
    public void onAuthenticationFailure(HttpServletRequest httpServletRequest, HttpServletResponse httpServletResponse, AuthenticationException e) throws IOException, ServletException {

        httpServletResponse.setContentType("application/json;charset=UTF-8");

        ResponseResult responseResult =ResponseResult.createByErrorMessage(e.getMessage());

        ServletOutputStream outputStream = httpServletResponse.getOutputStream();
        outputStream.write(JSONUtil.toJsonStr(responseResult).getBytes("UTF-8"));

        outputStream.flush();
        outputStream.close();
    }
}
2.认证失败异常处理
由于我们的securityConfig的配置文件中只是对部分的url放行不做认证,其他的访问请求都需要做认证。比如我们现在访问localhost:8081/sys/menu/nav这个请求,认证失败后返回的结果是给我们跳转到内置的一个登录页面,因为这是一个前后端分离的,这不是我们希望的结果,我们希望的结果是返回一个统一格式的返回结果给前端。

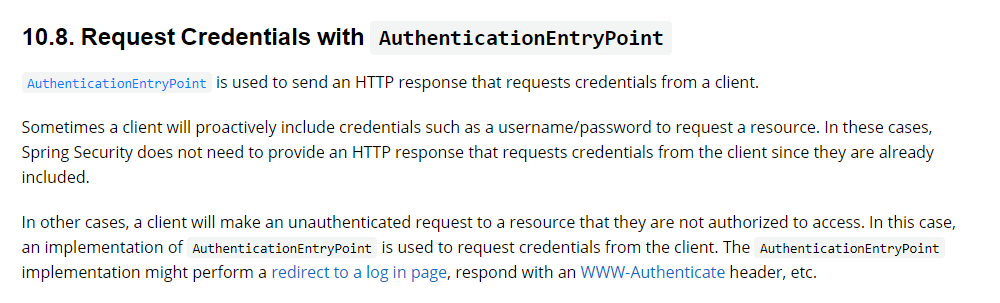
这里需要配置我们的AuthenticationEntryPoint,从官方文档解释如下
因此我们需要创建一个类JwtAuthenticationEntryPoint类实现AuthenticationEntryPoint接口,并实现该方法commence
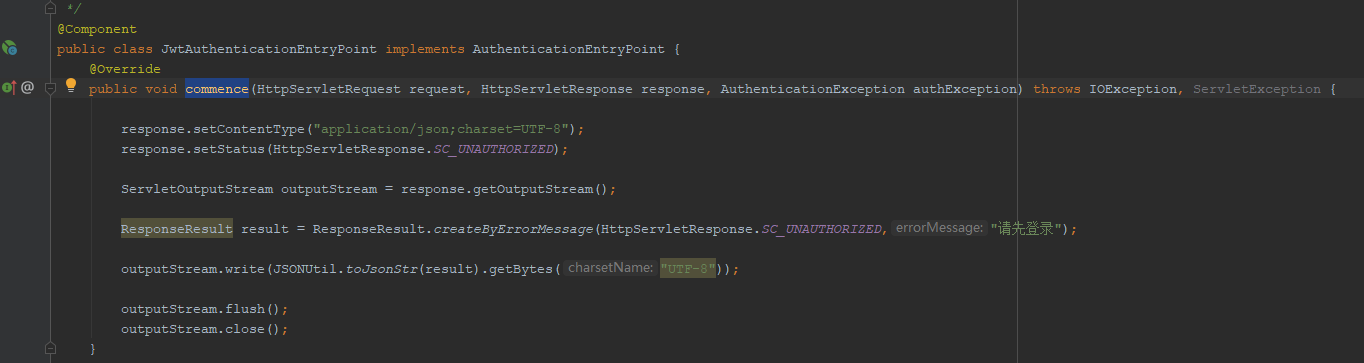
然后在配置文件securityConfig中,注入该配置
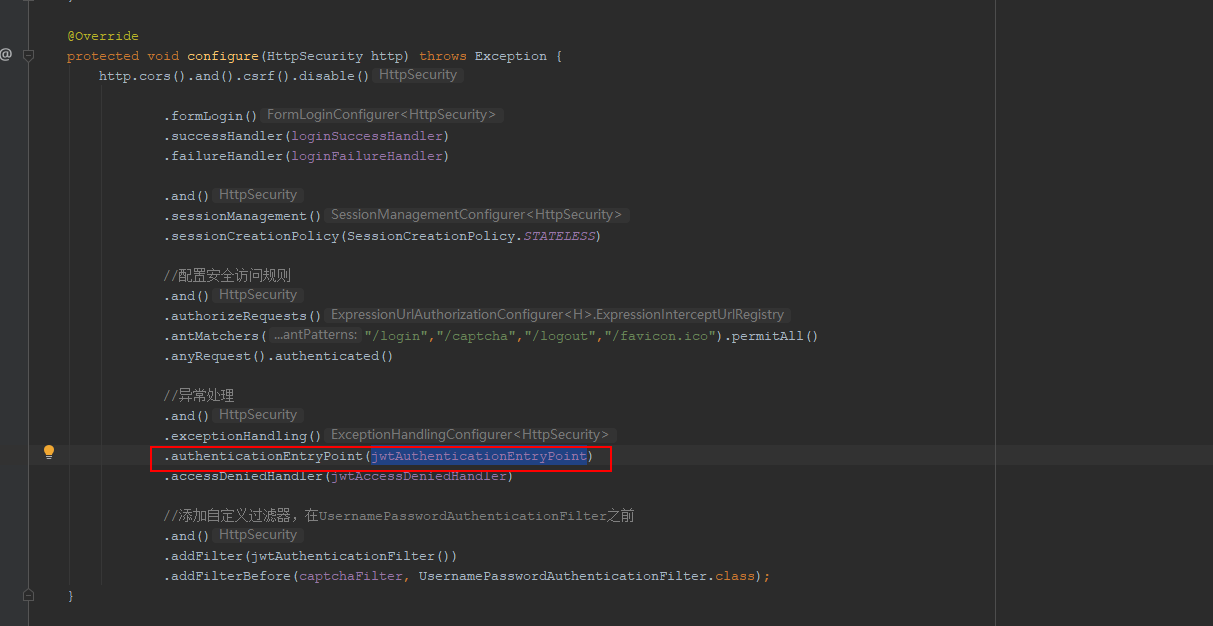
如此设置后访问没有认证的接口也就不会再跳转到登陆页面,而是给前端返回一个统一的json数据格式。
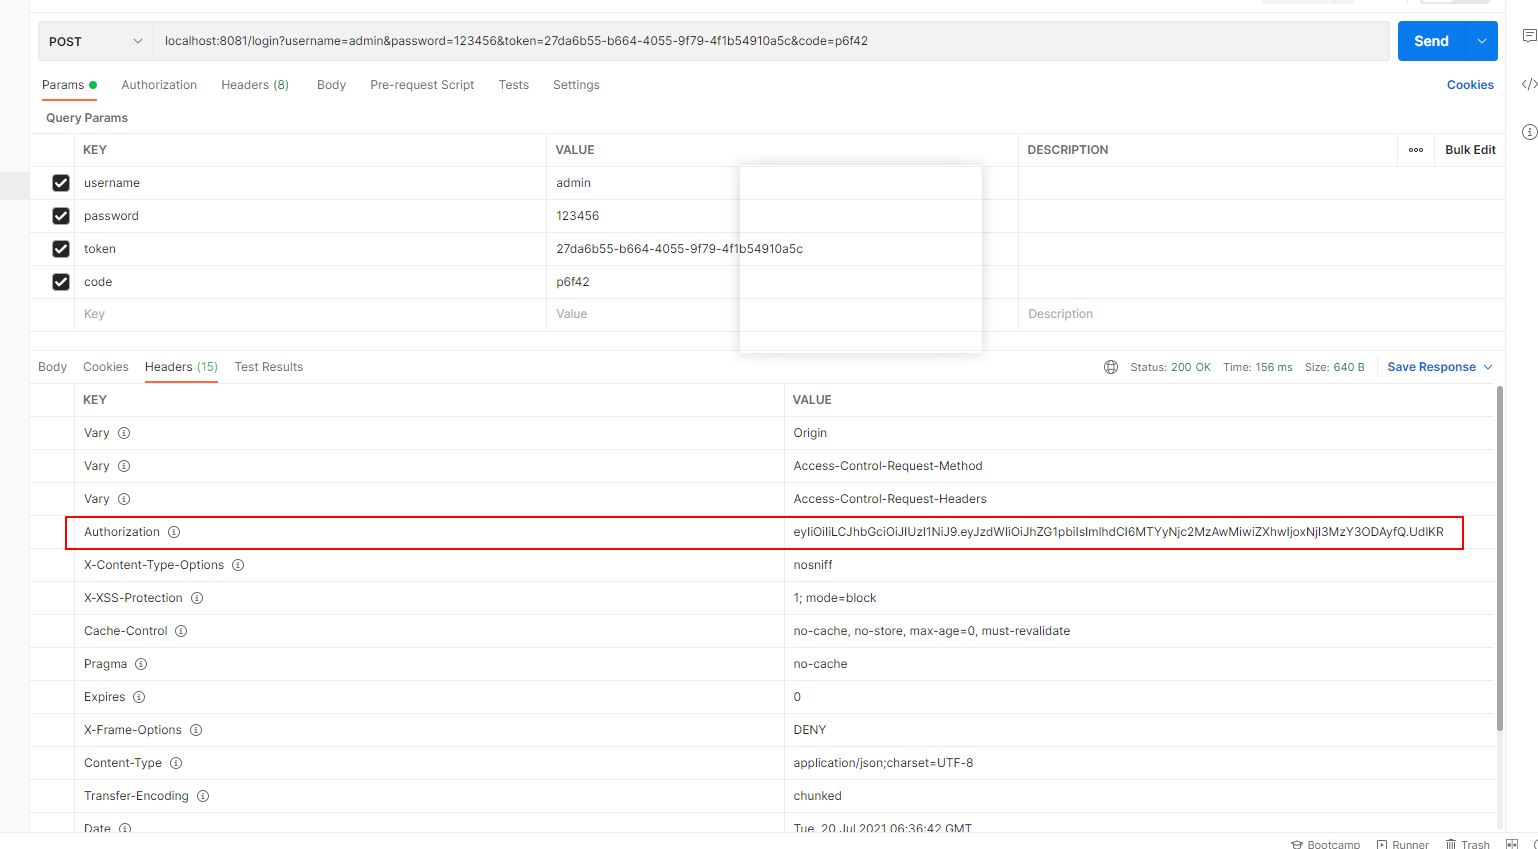
3.登陆测试
使用postman进行登陆测试,首先发送请求获取验证码,后台生成验证码的同时,将该验证码存储到redis中,并将redis存储的验证码的key给返回,即token=key,此token非JWT生成的token, JWT生成的token是在登陆成功后才生成的。

获取到验证码后,进行登陆接口测试。