一、bond模式
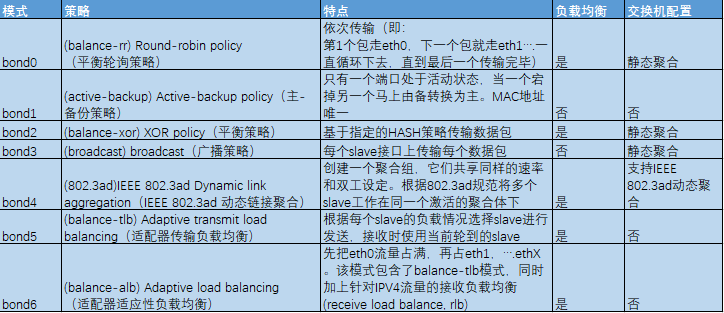
Mode=0(balance-rr) 表示负载分担round-robin,和交换机的聚合强制不协商的方式配合
Mode=1(active-backup) 表示主备模式,只有一块网卡是active,另外一块是备的standby,这时如果交换机配的是捆绑,将不能正常工作,因为交换机往两块网卡发包,有一半包是丢弃的
Mode=2(balance-xor) 表示XOR Hash负载分担,和交换机的聚合强制不协商方式配合。(需要xmit_hash_policy)
Mode=3(broadcast) 表示所有包从所有interface发出,这个不均衡,只有冗余机制...和交换机的聚合强制不协商方式配合
Mode=4(802.3ad) 表示支持802.3ad协议,和交换机的聚合LACP方式配合(需要xmit_hash_policy)
Mode=5(balance-tlb) 是根据每个slave的负载情况选择slave进行发送,接收时使用当前轮到的slave
Mode=6(balance-alb) 在5的tlb基础上增加了rlb
二、交换机设置
mode 1、5、6不需要交换机设置
mode 0、2、3需要交换机设置静态聚合,mode 4需要交换机支持802.3ad
三、网卡配置文件
2个物理网口分别是:eth0,eth1
绑定后的虚拟口是:bond0
服务器IP是:192.168.0.100
vim /etc/sysconfig/network-scripts/ifcfg-eth0
  DEVICE=eth0
  BOOTPROTO=none
  MASTER=bond0
  SLAVE=yes
  ONBOOT=yes
vim /etc/sysconfig/network-scripts/ifcfg-eth1
  DEVICE=eth1
  BOOTPROTO=none
  MASTER=bond0
  SLAVE=yes
  ONBOOT=yes
3)修改bond0配置文件
vim /etc/sysconfig/network-scripts/ifcfg-bond0
  DEVICE=bond0
  BOOTPROTO=static
  IPADDR=192.168.0.100
  NETMASK=255.255.255.0
  ONBOOT=yes
alias bond0 bonding
options bond0 miimon=100 mode=6
modprobe bonding
确认模块是否加载成功
lsmod |grep bonding
6)重启网络
service network restart
查看bond
cat /proc/net/bonding/bond0
四、设置多个bond
1)多个bond口的模式设成相同
alias bond0 bonding
alias bond1 bonding
options bonding max_bonds=2 miimon=100 mode=6
alias bond0 bonding
options bond0 miimon=100 mode=1
install bond1 /sbin/modprobe bonding -o bond1 miimon=100 mode=0
miimon:监视网络链接的频度,单位是毫秒,我们设置的是100毫秒
max_bonds:配置的bond口个数
mode:bond模式,在一般的实际应用中,0和1用的比较多