个人笔记 长期更新
Opencv和PIL格式之间互转
from PIL to Opencv
import cv2
import numpy as np
from PIL import Image

pil_image=Image.open("demo2.jpg") # open image using PIL

# use numpy to convert the pil_image into a numpy array
numpy_image=numpy.array(pil_img)

# convert to a openCV2 image, notice the COLOR_RGB2BGR which means that
# the color is converted from RGB to BGR format
opencv_image=cv2.cvtColor(numpy_image, cv2.COLOR_RGB2BGR)
from Opencv to PIL
import cv2
import numpy as np
from PIL import Image

opencv_image=cv2.imread("demo2.jpg") # open image using openCV2

# convert from openCV2 to PIL. Notice the COLOR_BGR2RGB which means that
# the color is converted from BGR to RGB
pil_image=Image.fromarray(
                          cv2.cvtColor(opencv_image, cv2.COLOR_BGR2RGB)
                         )
#### 创建一个图片
import cv2  # Not actually necessary if you just want to create an image.
import matplotlib.pyplot as plt #jupyter notebook 用cv2 show img有问题
import numpy as np
height=300
width=300
blank_image = np.zeros((height,width,3), np.uint8)
print(blank_image.shape)
#blank_image[:,0:width//2] = (128,128,128)      # (B, G, R)
#blank_image[:,width//2:width] = (128,128,128)
white_image = blank_image.copy()
white_image[...]=(255,255,255)
plt.imshow(white_image)
plt.show()

gray_image = blank_image.copy()
gray_image[...]=(128,128,128)
plt.imshow(gray_image)
plt.show()
#

white_in_center_img = blank_image.copy()
white_in_center_img[100:200,100:200,:]=(128,128,128)
plt.imshow(white_in_center_img)
plt.show()
读取一个图片
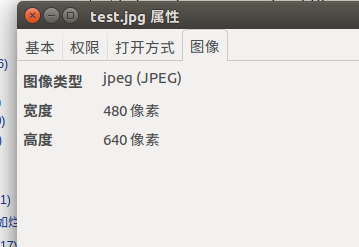
import cv2
img = cv2.imread("/nfsserver/test.jpg")
print(img.shape)
输出(640, 480, 3). 顺序为HWC,BGR
opencv里内存里的存储顺序
https://stackoverflow.com/questions/37040787/opencv-in-memory-mat-representation
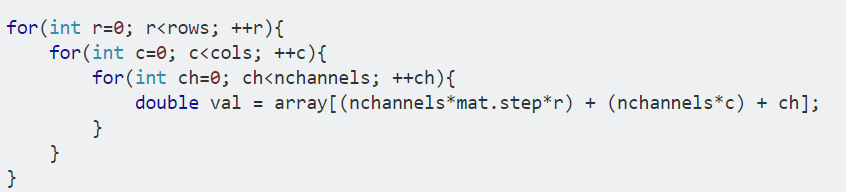
举个具体的例子,比如8 x 8的彩色图片。像素坐标从(0,0)到(7,7),每个像素有r,g,b三个值。
存储顺序为(0,0,b),(0,0,g),(0,0,r),(0,1,b),(0,1,g),(0,1,r)......(7,7,b),(7,7,g),(7,7,r)
所以第i行,第j列,第c个channel对应的index即为 i x j x 3 + j x 3 + c.
resize
import cv2
import matplotlib.pyplot as plt
import numpy as np
height=3
width=5
blank_image = np.zeros((height,width,3), np.uint8)
blank_image[1:2,3:4,]=(255,0,0)
plt.imshow(blank_image)
plt.show()

cv2.imwrite('/home/su/Desktop/test.jpg',blank_image)

blank_image = cv2.resize(blank_image, (416, 416), interpolation=cv2.INTER_CUBIC)
cv2.imwrite('/home/su/Desktop/test2.jpg',blank_image)
opencv mat type
在用printf("mat.type")打印的时候打出来的只是一个数字,不好观察具体的类型,可以参见下表
+--------+----+----+----+----+------+------+------+------+
| | C1 | C2 | C3 | C4 | C(5) | C(6) | C(7) | C(8) |
+--------+----+----+----+----+------+------+------+------+
| CV_8U | 0 | 8 | 16 | 24 | 32 | 40 | 48 | 56 |
| CV_8S | 1 | 9 | 17 | 25 | 33 | 41 | 49 | 57 |
| CV_16U | 2 | 10 | 18 | 26 | 34 | 42 | 50 | 58 |
| CV_16S | 3 | 11 | 19 | 27 | 35 | 43 | 51 | 59 |
| CV_32S | 4 | 12 | 20 | 28 | 36 | 44 | 52 | 60 |
| CV_32F | 5 | 13 | 21 | 29 | 37 | 45 | 53 | 61 |
| CV_64F | 6 | 14 | 22 | 30 | 38 | 46 | 54 | 62 |
+--------+----+----+----+----+------+------+------+------+
打印类型的参考代码:
string type2str(int type) {
  string r;

  uchar depth = type & CV_MAT_DEPTH_MASK;
  uchar chans = 1 + (type >> CV_CN_SHIFT);

  switch ( depth ) {
    case CV_8U:  r = "8U"; break;
    case CV_8S:  r = "8S"; break;
    case CV_16U: r = "16U"; break;
    case CV_16S: r = "16S"; break;
    case CV_32S: r = "32S"; break;
    case CV_32F: r = "32F"; break;
    case CV_64F: r = "64F"; break;
    default:     r = "User"; break;
  }

  r += "C";
  r += (chans+'0');

  return r;
}
cv:Mat to vector
Mat to array
uchar * arr = image.isContinuous()? image.data: image.clone().data;
uint length = image.total()*image.channels();
Mat to vector
cv::Mat flat = image.reshape(1, image.total()*image.channels());
std::vector<uchar> vec = image.isContinuous()? flat : flat.clone();