前言
由于项目需求,最近需要使用ambari配置hdp,因此在公司找了台搭建一套测试环境,测试环境运行在kvm虚拟机上,ambari版本和hdp版本没有采用最新版进行配置,为了快速进行配置,使用了ansible进行批量操作,详细配置如下。
1.环境准备
1.1 安装包准备
hdp:wget http://public-repo-1.hortonworks.com/HDP/centos7/2.x/updates/2.5.0.0/HDP-2.5.0.0-centos7-rpm.tar.gz
ambari:wget http://public-repo-1.hortonworks.com/ambari/centos7/2.x/updates/2.4.0.1/AMBARI-2.4.0.1-centos7.tar.gz
hdp-utils:wget http://public-repo-1.hortonworks.com/HDP-UTILS-1.1.0.21/repos/centos7/HDP-UTILS-1.1.0.21-centos7.tar.gz
jdk:已下载完毕
1.2 服务器准备
|
序号 |
主机名 |
ip地址 |
用途 |
备注 |
|
01 |
node01 |
192.168.1.101 |
ambari-server |
mysql |
|
02 |
node02 |
192.168.1.102 |
ambari-agent |
nn+snn+zk |
|
03 |
node03 |
192.168.1.103 |
ambari-agent |
rm+zk+dn+hive |
|
04 |
node04 |
192.168.1.104 |
ambari-agent |
zk+dn+hive |
|
05 |
node05 |
192.168.1.105 |
ambari-agent |
1.3 配置管理工具
ansible 定义组:ambari
1.4 yum源配置文件准备
[root@node-30 ~]# cat HDP.repo
[HDP-2.5]
name=HDP-2.5
baseurl=http://192.168.2.252/HDP/centos7
enabled=1
gpgcheck=0

[root@node-30 ~]# cat ambari.repo
[ambari]
name=ambari
baseurl=http://192.168.2.252/ambari/AMBARI-2.4.0.1/centos7/2.4.0.1-1
enabled=1
gpgcheck=0
gpgkey=http://192.168.2.252/ambari/AMBARI-2.4.0.1/centos7/2.4.0.1-1/RPM-GPG-KEY/RPM-GPG-KEY-Jenkins

[root@node-30 ~]# cat HDP-UTILS.repo
[HDP-UTILS-1.1.0.21]
name=HDP-UTILS-1.1.0.21
baseurl=http://192.168.2.252/HDP-UTILS-1.1.0.21/
enabled=1
gpgcheck=0

[root@node05 ~]# cat /etc/yum.repos.d/mysql.repo
[mysql5.7]
name=mysql5.7
baseurl=https://mirrors.tuna.tsinghua.edu.cn/mysql/yum/mysql57-community-el7/
enabled=1
gpgcheck=0
2 操作系统初始化
2.1 关闭selinux
2.2 关闭防火墙
2.3 修改hosts
2.4 配置时钟同步
2.5 配置系统centos7.4 yum源
2.6 关闭THD
2.7 增加sudo用户
centos7.4.sh如下:
#!/bin/bash
# Filename:    centos7.4.sh
# Revision:    1.0
# Date:        20180621
# Author:      Yang
# Description: 用于centos7.4配置ambari的安装

#1.定义配置yum源函数
function yum(){
mkdir -p /etc/yum.repos.d/bak
/usr/bin/mv /etc/yum.repos.d/*.repo /etc/yum.repos.d/bak
touch /etc/yum.repos.d/centos7.4.repo
cat > /etc/yum.repos.d/centos7.4.repo << EOF
[centos7.4]
name=centos7.4
baseurl=http://192.168.2.252/centos7.4
enabled=1
gpgcheck=0
EOF
}

#2.定义关闭防火墙函数
function close_firewalld(){
    /usr/bin/systemctl stop firewalld.service &> /dev/null
    /usr/bin/systemctl disable firewalld.service &> /dev/null
}
#3.定义关闭selinux函数
function close_selinux(){
    setenforce 0
    sed -i 's#SELINUX=enforcing#SELINUX=disabled#g' /etc/selinux/config
}

#4.优化内核并打开文件数限制
function optimization(){
[ -f /etc/sysctl.conf.bak ] && error_show "sysctl.conf.back is exist."
/usr/bin/cp /etc/sysctl.conf /etc/sysctl.conf.bak
cat>>/etc/sysctl.conf<<EOF
#对于一个新建连接,内核要发送多少个 SYN 连接请求才决定放弃。
net.ipv4.tcp_syn_retries = 1
#显示或设定 Linux 核心在回应 SYN 要求时会尝试多少次重新发送初始 SYN,ACK 封包后才决定放弃。
net.ipv4.tcp_synack_retries = 1
#表示当keepalive起用的时候,TCP发送keepalive消息的频度。默认是俩小时。
net.ipv4.tcp_keepalive_time = 600
#TCP发送keepalive探测以确定该连接已经断开的次数。
net.ipv4.tcp_keepalive_probes = 3
#探测消息发送的频率
net.ipv4.tcp_keepalive_intvl =15
#在丢弃激活(已建立通讯状况)的TCP连接之前﹐需要进行多少次重试。默认15。
net.ipv4.tcp_retries2 = 5
#表示如果套接字由本端要求关闭,这个参数决定了它保持在FIN-WAIT-2状态的时间。
net.ipv4.tcp_fin_timeout = 2
#表示系统同时保持TIME_WAIT套接字的最大数量。
net.ipv4.tcp_max_tw_buckets = 36000
#表示开启TCP连接中TIME-WAIT sockets的快速回收,默认为0,表示关闭。
net.ipv4.tcp_tw_recycle = 1
#表示开启重用。允许将TIME-WAIT sockets重新用于新的TCP连接,默认为0,表示关闭;
net.ipv4.tcp_tw_reuse = 1
#系统所能处理不属于任何进程的TCP sockets最大数量。
net.ipv4.tcp_max_orphans = 32768
#表示开启SYN Cookies。
net.ipv4.tcp_syncookies = 1
#表示SYN队列的长度
net.ipv4.tcp_max_syn_backlog = 16384
#为每个TCP连接分配的读、写缓冲区内存大小,单位是Byte
net.ipv4.tcp_wmem = 8192 131072 16777216
net.ipv4.tcp_rmem = 32768 131072 16777216
#内核分配给TCP连接的内存 单位是Page,1 Page = 4096 Bytes
net.ipv4.tcp_mem = 786432 1048576 1572864
#允许使用的端口
net.ipv4.ip_local_port_range = 1024 65000
#在内核内存中netfilter可以同时处理的“任务”
net.ipv4.ip_conntrack_max = 65536
net.ipv4.netfilter.ip_conntrack_max=65536
#跟踪的连接超时结束时间
net.ipv4.netfilter.ip_conntrack_tcp_timeout_established=180
#定义了系统中每一个端口最大的监听队列的长度
net.core.somaxconn = 16384
#该参数决定了, 每个网络接口接收数据包的速率比内核处理这些包的速率快时,允许送到队列的数据包的最大数目
net.core.netdev_max_backlog = 16384
EOF
/sbin/sysctl -p
echo "* soft nofile 65536" >> /etc/security/limits.conf
echo "* hard nofile 65536" >> /etc/security/limits.conf
echo "* soft nproc 65536" >> /etc/security/limits.conf
echo "* hard nproc 65536" >> /etc/security/limits.conf
}
#05.添加sudo-mvtech用户
function add_user(){
useradd weihu
echo "1qaz2wsx"|passwd --stdin weihu
history -c
sed -i '91a weihu  ALL=(ALL)      NOPASSWD:ALL' /etc/sudoers
}
#06.ntp
function ntp(){
/usr/bin/yum -y install ntp
#修改配置文件
echo '' >/etc/ntp.conf
cat >>/etc/ntp.conf << EOF
driftfile /var/lib/ntp/drift
restrict default nomodify notrap nopeer noquery
restrict 127.0.0.1
restrict ::1
server 192.168.2.251
includefile /etc/ntp/crypto/pw
keys /etc/ntp/keys
disable monitor
EOF
#同步hwclock
cat >>/etc/sysconfig/ntpd<<EOF
#Command line options for ntpd
SYNC_HWCLOCK=yes
OPTIONS="-g"
EOF
#使用ntpdate命令校验时间
/usr/sbin/ntpdate 192.168.2.251 && /usr/sbin/hwclock -w
/usr/bin/systemctl stop chronyd &> /dev/null
/usr/bin/systemctl disable chronyd &> /dev/null
/usr/bin/systemctl start ntpd &> /dev/null
/usr/bin/systemctl enable ntpd &> /dev/null
}

#7.关闭THP
function closeTHP(){
cat >> /etc/rc.d/rc.local << EOF
if test -f /sys/kernel/mm/transparent_hugepage/defrag; then
  echo never > /sys/kernel/mm/transparent_hugepage/defrag
fi
if test -f /sys/kernel/mm/transparent_hugepage/enabled; then
  echo never > /sys/kernel/mm/transparent_hugepage/enabled
fi
exit 0
EOF
chmod +x /etc/rc.d/rc.local
}
#8.配置hosts文件
function hosts(){
cat >> /etc/hosts << EOF
192.168.1.101 node01
192.168.1.102 node02
192.168.1.103 node03
192.168.1.104 node04
192.168.1.105 node05
EOF
}

#初始化方法
function init(){
    yum;
    close_firewalld;
    close_selinux;
    optimization;
    add_user;
    ntp;
    closeTHP;
    hosts;
}
init
使用ansible批量执行
ansible ambari -m script -a /root/centos7.4.sh -f 5
2.8 配置主机名
sshpass -p 'Mvtech@123!' ssh -o StrictHostKeyChecking=no root@192.168.1.101 hostnamectl set-hostname node01
sshpass -p 'Mvtech@123!' ssh -o StrictHostKeyChecking=no root@192.168.1.102 hostnamectl set-hostname node02
sshpass -p 'Mvtech@123!' ssh -o StrictHostKeyChecking=no root@192.168.1.103 hostnamectl set-hostname node03
sshpass -p 'Mvtech@123!' ssh -o StrictHostKeyChecking=no root@192.168.1.104 hostnamectl set-hostname node04
sshpass -p 'Mvtech@123!' ssh -o StrictHostKeyChecking=no root@192.168.1.105 hostnamectl set-hostname node05
2.9 配置主机互信
使用ansible批量配置主机名互信
ansible ambari -m shell -a "ssh-keygen -t rsa -P '' -f ~/.ssh/id_rsa" -f 5
ansible ambari -m shell -a "cat /root/.ssh/id_rsa.pub" -f 5 > /tmp/authorized_keys
sed -i '/SUCCESS/d' /tmp/authorized_keys
ansible ambari -m copy -a "src=/tmp/authorized_keys dest=/root/.ssh/ owner=root group=root mode=0644" -f 5
2.10 安装jdk1.7
install.sh
#!/bin/bash
mkdir -p /usr/local/java
tar -xvf jdk-7u80-linux-x64.gz -C /usr/local/java
sed -i '$a export JAVA_HOME=/usr/local/java/jdk1.7.0_80' /etc/profile
sed -i '$a export CLASSPATH=.:$JAVA_HOME/lib/dt.jar:$JAVA_HOME/lib/tools.jar' /etc/profile
sed -i '$a export PATH=$JAVA_HOME/bin:$PATH' /etc/profile
批量执行
ansible ambari -m copy -a "src=/root/jdk dest=/root/jdk" -f 5
ansible ambari -m shell -a "cd /root/jdk && bash +x install.sh" -f 5
2.11 拷贝ambari源、HDP源、HDP-UTILS源
ansible ambari -m copy -a "src=/root/ambari.repo dest=/etc/yum.repos.d/ambari.repo " -f 5
ansible ambari -m copy -a "src=/root/HDP.repo dest=/etc/yum.repos.d/HDP.repo " -f 5
ansible ambari -m copy -a "src=/root/HDP-UTILS.repo dest=/etc/yum.repos.d/HDP-UTILS.repo " -f 5
ansible ambari -m shell -a "yum clean all && yum makecache" -f 5
2.12 拷贝mysql源至node01服务器中
安装mysql-server用于ambari-server,hive
yum install mysql-community-server-5.7.22
修改/etc/my.cnf
添加:区分大小写,和把连接数设为1000
max_connections = 1024
max_connect_errors = 1000
启动:systemctl start mysqld
开机自启动:systemctl enable mysqld
首次登陆需要查看root密码:cat /var/log/mysqld.log | grep 'A temporary password'
登陆后需要更新密码:ALTER user 'root'@'localhost' identified by 'Mvtech@123#';
创建远程root用户:grant all privileges on *.* to root@"%" identified by "Mvtech@123#";
select Grant_priv from user where user='root' and Host='%';
update user set Grant_priv='Y' where user='root' and Host='%';
创建ambari库:CREATE DATABASE `ambari` DEFAULT CHARACTER SET utf8 COLLATE utf8_general_ci;
刷新数据库:FLUSH PRIVILEGES;
注:配置ambari-server时需要输入mysql密码,若密码中含有特殊字符则会报错,可通过修改以下配置进行修改mysql密码为简单的:123456
注:mysql5.7密码策略修改
set global validate_password_policy=0;
set global validate_password_length=0;
3 配置ambari
3.1 ambari-server
node01服务器上执行
3.1.1 安装
yum install ambari-server -y
3.1.2 导入ambari库
mysql> use ambari
Database changed
mysql>  source /var/lib/ambari-server/resources/Ambari-DDL-MySQL-CREATE.sql;
3.1.3 安装mysql jdbc包
yum install mysql-connector-java-5.1.37-1.noarch
若报错则可这样执行:
rpm -ivh http://192.168.2.252/HDP-UTILS-1.1.0.21/mysql-connector-java/mysql-connector-java-5.1.37-1.noarch.rpm
3.1.4 配置ambari-server setup

3.1.5 启动ambari-server
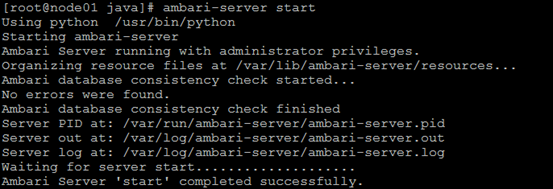
3.1.6 开机自启动
chkconfig ambari-server on
3.1.7 ambari-web登陆
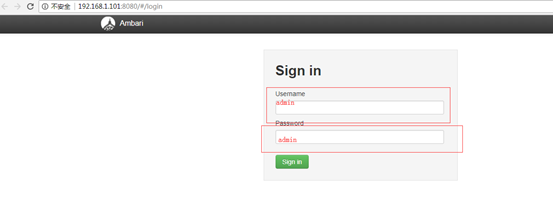
登陆成功:

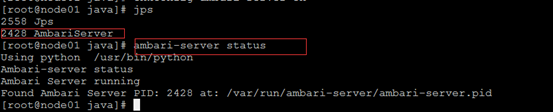
3.1.8 状态检查
3.2 ambari-agent
node02 node03 node04 node05上执行
3.2.1 安装
yum install ambari-agent -y
3.2.2 开机启动
chkconfig ambari-agent on
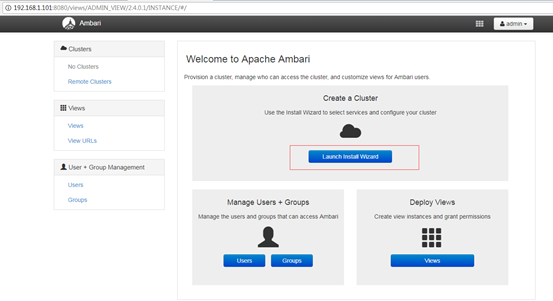
3.3 配置集群
3.3.1 ambari界面如下:点击 launch install wizard
3.3.2 弹出下图输入集群名称:hdpCluster

3.3.3 弹出下图:根据下图进行填写
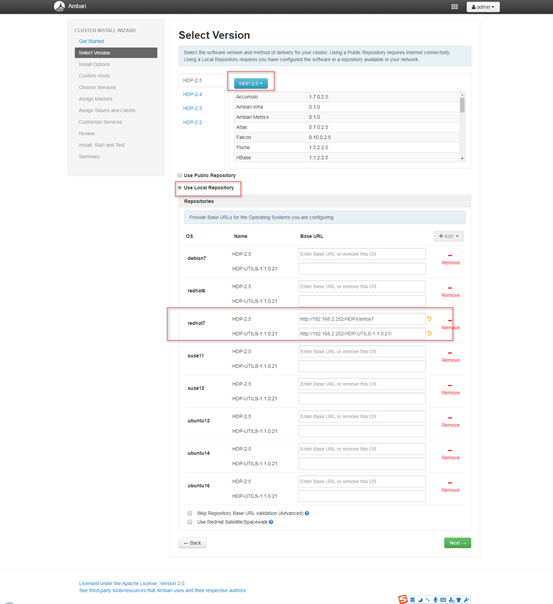
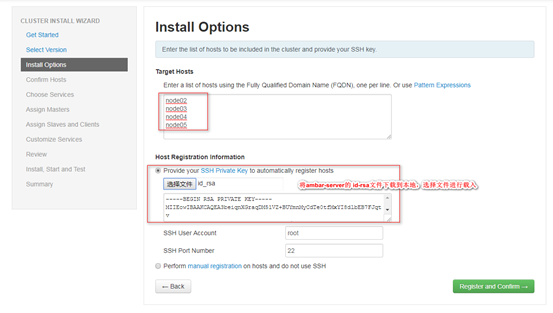
3.3.5 弹出下图
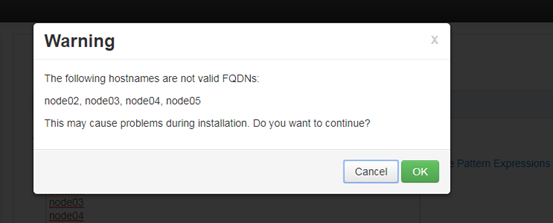
3.3.6 弹出下图:点击ok
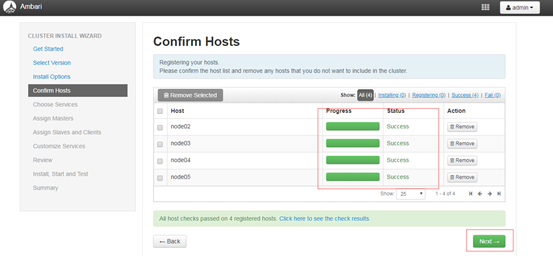
3.3.7 弹出下图:confirm hosts
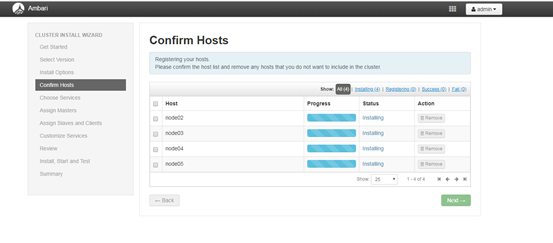
报错:centos7.4会报失败的错误:

错误信息:ERROR 2018-06-21 15:56:02,451 NetUtil.py:89 - SSLError: Failed to connect. Please check openssl library versions.

可在ambari-agent 修改:/etc/python/cert-verification.cfg

[https]

#verify=platform_default

verify=disable


修改后重启agent: 点击retry
3.3.8 通过界面:点击next
3.3.9 弹出下图:选择角色

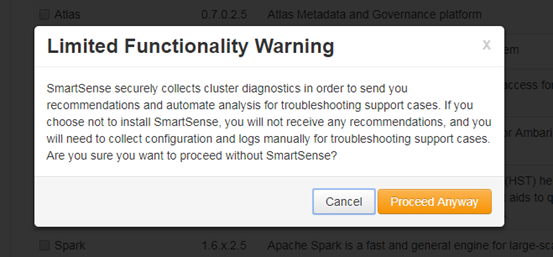
3.3.10 弹出下图:proceed anyway
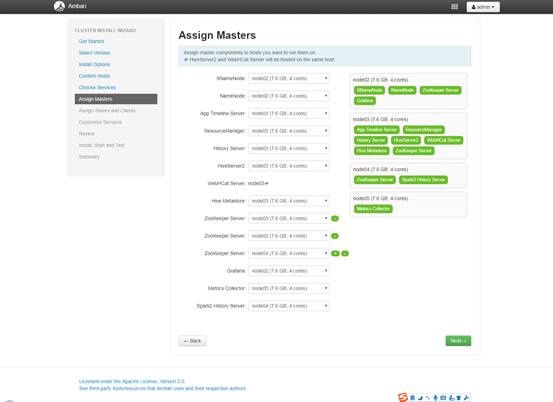
3.3.11 弹出下图:选择角色所在的服务器
注:Metrics与其它组件不要装在一台机器上,因为Metrics内置了HBase和Zookeeper,容易产生问题。
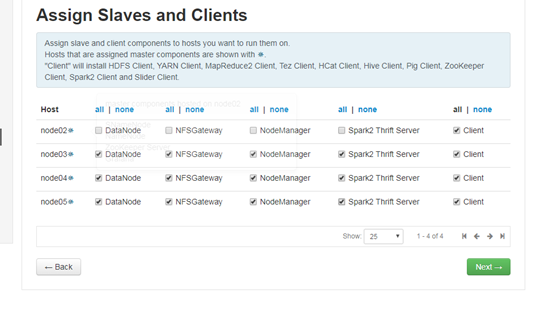
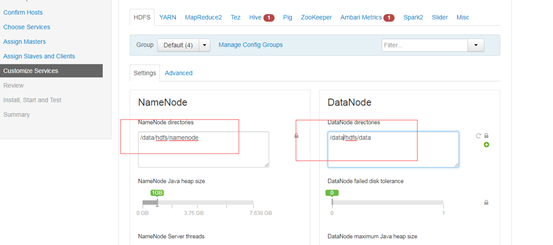
3.3.12 弹出下图,选择相应的角色
3.3.13 根据提示执行
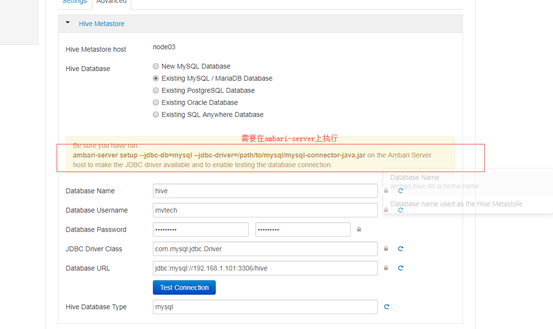
切到hive页面时配置,注:需要在ambari-server上执行:ambari-server setup --jdbc-db=mysql --jdbc-driver=/usr/share/java/mysql-connector-java.jar 配置完毕后点击最下面的next
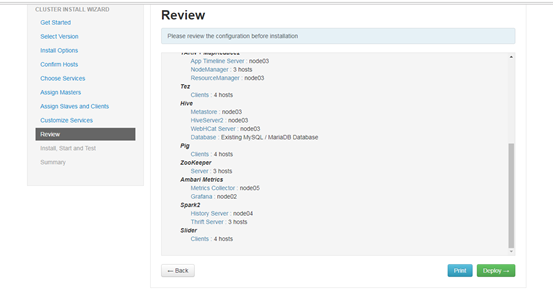
3.3.14 弹出下图:点击deploy
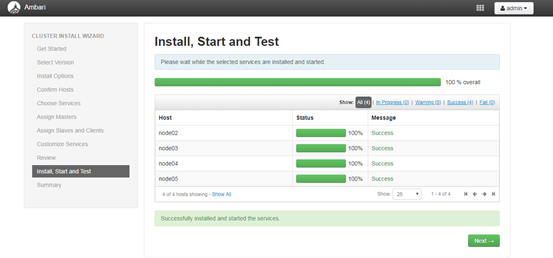
3.3.15 弹出下图
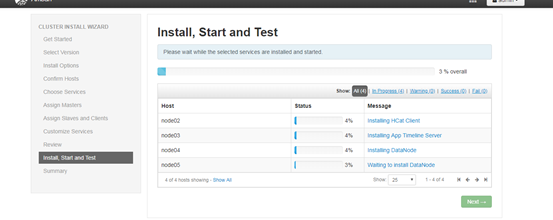
3.3.16 待安装完毕:如下图
3.3.17 弹出下图:点击完毕
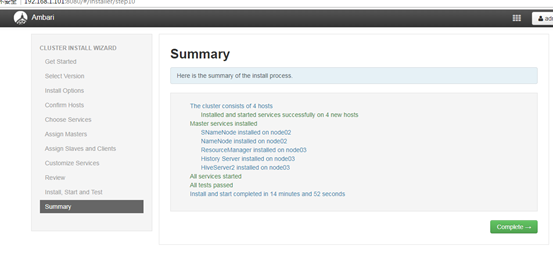
3.3.18 弹出下图:至此ambari-server安装完毕
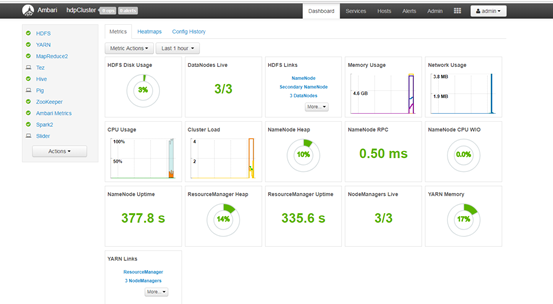
3.3.19 验证集群
验证hdfs:hadoop fs -ls /
验证hive:输入hive
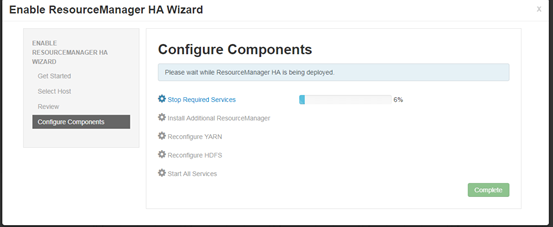
3.3.20 配置resource ha

弹出下图选择:
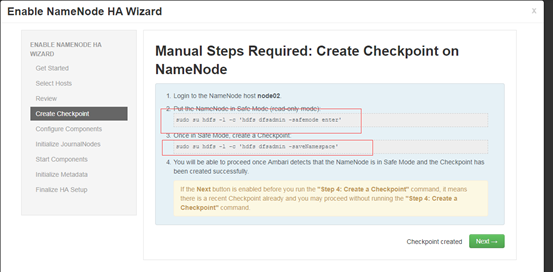
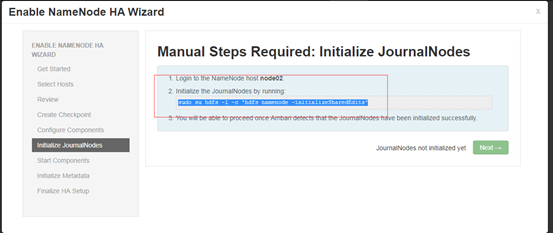
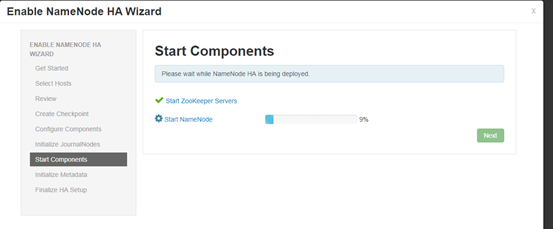
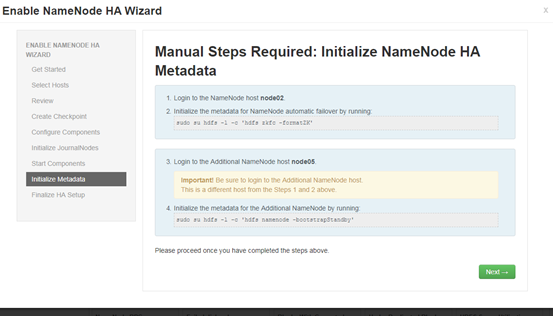
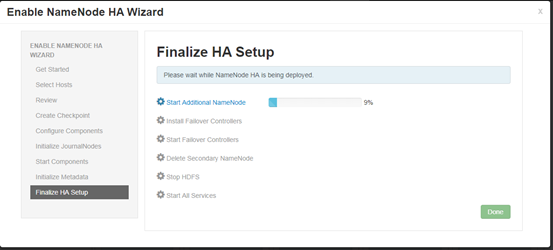
3.3.21 配置hdfs ha

至此ambari配置hdp完毕。
如有发现问题,欢迎留言指导,一起学习,一起进步。